To avoid these ads, REGISTER NOW!

Woodworking 101--Tools and Tips

ez-duzit

Well-known member
Joined
Jun 24, 2013
Messages
5,096
Location
Marina del Rey
When I say refurbished, I mean more along the lines of restored.

Better off buying even just a used plane than one some "refurbisher" thinks he has "improved". My set of Record planes (the 3 blue ones on the left) was bought, used, like new. Also the ship's plane.

planes-1_zpsea84c6e8.jpg
 
To avoid these ads, REGISTER NOW!
OP
J

jimreed2160

Well-known member
Joined
Aug 7, 2016
Messages
3,589
Location
Tallahassee FL
Old smoother front knob

Today's project is to work on the old smoother. It is one of my granddaughter's favorites because it fits her hand. I think it is about 150 years old and was probably user made. I understand that these planes were often sold as kits and the woodworker could customize with his own wooden parts.

It really works well. It has a tapered Matheson blade that is 3/16" thick and it pulls really nice shavings.

DSCN1319.jpg

Well, this ww had small hands because my big paw hardly fits in the tote. Hers, of course, fits just fine. The wood looks like beech and I have already repaired the horn.

DSCN1315.jpg


DSCN1316.jpg


But the front handle is in bad shape. This plane needs a nose job.

DSCN1317.jpg


Well that should be pretty easy. Just get out the turnscrew and get these two screws out.

DSCN1318.jpg


Yeah. Those screws last turned over 100 years ago and they are not moving.

DSCN1321.jpg


So it's off to the milling machine we go.

DSCN1327.jpg


Ready for business.

DSCN1328.jpg


Of course, all I need to do is drill the head down to the wood.

DSCN1329.jpg


DSCN1330.jpg


There is one on each side. I drilled them out and then started whacking the knob with a wooden mallet.


The screwheads popped right off.

DSCN1332.jpg


DSCN1331.jpg


Most of these early planes I have encountered had their wooden parts bedded in plaster of paris.

The old knob broke into three pieces. I glued it together so I could use it as a pattern.

DSCN1334.jpg


There is another plane in the boneyard with a nice knob. I will copy that design.

DSCN1336.jpg


Just imagine this one, only smaller.

DSCN1337.jpg


I found some beech stock.

DSCN1339.jpg


Just might have to glue it up to get the size I need.

DSCN1340.jpg


I need it to match this.

DSCN1341.jpg


With this.

DSCN1342.jpg


It will be nice to get this one out of the shop. Maybe I can make a case for it and give it to granddaughter. Will have to see if she is still interested or if her brain has been taken over by Minecraft. :dunno:
 

Rickss96

Well-known member
Joined
Sep 23, 2010
Messages
455
Location
SoCal
The wood looks like beech and I have already repaired the horn.

Can you give some more detail on how you repaired the horn, what was broken, did you use just glue, or pins, or screws, or what?

Your photo sequences on these repairs is very informative, especially for guys like me that have not done this before, keep up the good work!:thumbup:

Sure wish I had a milling machine, but it looks like my drill press will work as long as I'm careful with the setup.

-rick
 

ez-duzit

Well-known member
Joined
Jun 24, 2013
Messages
5,096
Location
Marina del Rey
Some of my chisels, to give you an idea of what a professional woodworker might have in his kit.

And a basic set of Japanese saws, which I highly recommend to anyone, even those just starting out. Extremely handy and capable of doing very fine work. Not too expensive. The bottom-most is the one that does most of the work.

The teak plywood part underneath them all is a replacement I made for a floorboard in a sailboat for which no replacement material is currently available, due to the odd width and spacing of the "holly" (in this case, birch was used) strips.

chisels-plus-1_zpsmn4sop4u.jpg

Japanese-saws-1_zpst4stehuu.jpg
 
Last edited:
OP
J

jimreed2160

Well-known member
Joined
Aug 7, 2016
Messages
3,589
Location
Tallahassee FL
EZ--Nice toolkit. Thanks for the pictures.

Rick--Glad you found it interesting. There is a never ending stream of projects in my workshop. Now that I am retired I have some time to get them done. This plane project began back in 2012 when I acquired the plane. My first chore was to remove the rust and sharpen the blade. The cleanup was pretty straight forward but the blade sharpening took awhile because the back was pitted. It just took a little extra polishing to get down to sound metal.

My Wayback machine provided some pictures of the tote repair.

Here is what I started with.

014.jpg


It was a pretty ugly break. I like to stare it down and develop a plan. My goal is to remove as little wood as possible while preparing a flat surface for a glue up. I started with the chisel and finished with a shoulder plane.

015.jpg


Here is a picture of the new wood. Notice the rays in the grain.

016.jpg


This is like the problem you have when hanging figured wallpaper. All of the patterns need to line up at seams. Just slapping it on the side would make the rays look funny. Ray grain pattern in the patch needs to match the ray grain pattern on the tote horn.

So I cut the patch to match and glued it to the horn.

017.jpg


Patches need to be strong so they will withstand shaping. I started cutting off the waste with my bandsaw.

009.jpg


010.jpg


I followed up with the chisel and finally with several different grits of sandpaper.

014_1.jpg


015_1.jpg


016_1.jpg


Once I get all of the repairs done, I will sand all the wood and stain the new to match the old.

Hope this helps you understand how I fixed the horn. It is common to find damaged horns on plane totes and saw handles. I like the damage because it destroys the value of the tool and I can pick it up for pennies on the dollar. Then I can add a little work and have myself a nice user tool. The repairs are not hard. In fact, the hardest thing is finding wood to match. Old saw handles, especially Disstons, are made of apple wood and that is hard to find.
 
Last edited:
OP
J

jimreed2160

Well-known member
Joined
Aug 7, 2016
Messages
3,589
Location
Tallahassee FL
Cleaning up a Stanley Bedrock #604C plane

I found this sequence when I was in the Wayback machine tonight. It is a Bedrock I cleaned up a few years back. It looked pretty nasty when I started.

5CAA5DFD-39FC-49F8-BE31-35E01AD1D493.jpg


Lots of rust and butter yellow paint.

209CC26A-00F0-480D-B4B2-2F89A5EBBE04.jpg


A2950284-9D29-4FB8-942C-A27935D74E9F.jpg


84239269-42AB-4A1A-AF0C-B18039FF20F3.jpg


F4C31069-F32F-46D9-A6EA-F7AE6D61734B.jpg


It even had some original Board of Education sawdust inside.

CB85EDCC-6498-4295-8FE7-6244496705B2.jpg


09435B65-867D-4B63-A873-DC4874AE87DF.jpg


Ugh. The adjuster screw was frozen in place. I thawed it using Liquid Wrench.

FE5BEE3B-8785-4BD9-BBE7-12DDDB67C6F3.jpg


295BA726-E879-467A-BBD9-8A1996EB1B2C.jpg


I cleaned up the screws with a wire wheel brush on my drill press.

3F7667FF-C1DE-44B3-B39F-8B64A52A320D.jpg


The plane cast parts got dipped in a hot citric acid bath for 5-10 minutes. Then they were washed with Dawn and hot water, dried with paper towels, and placed on a cookie sheet in a 200 degree oven. After a 5 minute bake, they were slathered with 3 in 1 oil and left overnight to soak. Here is everybody the next day after their wipe down.

31A2FDFA-58BA-4B32-8423-E2C3C6FAA415.jpg


A30AD6D4-570C-4708-AD33-889760682F3E_1.jpg
 
OP
J

jimreed2160

Well-known member
Joined
Aug 7, 2016
Messages
3,589
Location
Tallahassee FL
Bedrock #604C

The wood on this plane was in decent shape except for the paint. Fortunately, rosewood does not absorb paint well. I like to use a dull pocketknife to scrape the paint off. It flicks it off and causes little damage. After a polish with a Scotchbrite pad, everything looks good. I also used the pad on the tote and followed up with Johnsons paste wax on all.

9B2A6782-169C-458F-857B-896F0487DE21.jpg


Surprisingly, about 75% of the japan finish remained on this plane after treatment. The remaining bare metal darkened up with the 3 in 1 treatment so everything matched well. After the Liquid Wrench treatment, the adjuster worked just fine. The blade sharpened up well and this plane was able to pull a nice shaving.

21D97D09-34AD-4FF5-9C61-C06684AEC253_2.jpg


Sometimes even nasty looking planes clean up well. It is a tribute to Stanley quality of the day.
 
Last edited:
OP
J

jimreed2160

Well-known member
Joined
Aug 7, 2016
Messages
3,589
Location
Tallahassee FL
Wire jig project

This thing arrived yesterday and is a rush project. It's time to shake off Christmas and get back into the shop.

DSCN1343.jpg


I inherited the top wire bender from my FIL about 40 years ago. He never used it but I sure have. These things are handy in the workshop. I even use it to make pegboard hooks. Anyway, I found an inexpensive one for my daughter to use while crafting jewelry. It was inexpensive because, like most of my acquisitions, it is in need of repair. In fact, it was only $5 shipped. The bending pegs are missing. And this rehab is rush because I am going to see her on Friday.

The first thing I need is some rod stock. Here is the stash.

DSCN1344.jpg


Measuring the existing pegs reveals a diameter of 15/64. As luck would have it, I have a long rod that is 14/64 and it fits with just a little wobble. It is close enough. She can wrap with tape if the looseness is a problem. So we are again saved by that famous "Reed luck", and can proceed.

I start by measuring a cut line with a Sharpie marker.

DSCN1345.jpg


Next step is to finish the end of the rod. I dress it on the grinder by rotating both the end and the side bevel.

DSCN1347.jpg


Then I secure the rod in a vise and attack with an angle grinder.

DSCN1346.jpg


Once I have three pieces cut to length, I move over to the grinder to finish the cut ends.

DSCN1349.jpg


I started with the pliers but finished just using my fingers. All it took was a light touch and I did not grind enough to get it hot.

Done with pegs.

DSCN1350.jpg


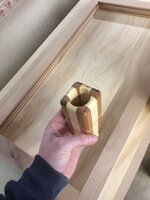
Next step is to mount it on a board. The previous owner did not use this item and the screw holes were not open. I used the drill press to open the screw holes in the casting.

DSCN1351.jpg


And here is the finished project.

DSCN1352.jpg


But wait. Those pegs look a little short.

I compared them to my jig and they ARE short. The previous owner lost ALL of the pegs and replaced one of them with a SHORT peg. Back to the grinding room. Time to make four LONGER pegs.

DSCN1353.jpg


Well, sometimes that is how things go in the shop. I sure make my share of mistakes. In woodworking (and metalworking), mistakes can be costly. I attribute this one to the engineering department. Shop floor made exactly what was specified. :bubbrubb:

I mounted my jig on a block of 2x4 so I can clamp it between the bench dogs. She will have to clamp hers to her workbench. These things really need to be mounted to be used. Bending wire requires a lot of force.

I encourage my ww buddies to get one of these benders and use it.
 

ez-duzit

Well-known member
Joined
Jun 24, 2013
Messages
5,096
Location
Marina del Rey
Since you have to remake them, anyway, try to find some wire that more fully fills the holes in the bending jig. Otherwise they will tip.
 

drivesitfar

Well-known member
Joined
Oct 23, 2013
Messages
36,007
Location
Pacific Northwest
JIM: i for one am really enjoying your posts so keep them coming as you have time. when i started the Vise Repair 101 thread it felt like i was talking to myself for maybe the first 6 months at times with a few member's posts and now i get compliments for starting it fairly often and it runs itself.

i've never used a wire bender so care to share what kind of wire you might use it for and for what project? i usually bend wire with my hands or if heavy stick in the copper jaws of one of my vises to get it started. i'm sure you have better reasons for doing yours.

EZ: nice collection of saws and chisels and planes. :bowdown:
 

Autonomous

Well-known member
Joined
Dec 26, 2015
Messages
66
drives: This is the first thread I check every morning and has inspired me thoroughly.

Jim: I learn something every time you get behind the keyboard. I feel like you should copy your posts to a file and put it in an eBook on Amazon so folks who wouldn't think of Garage Journal as a wood working resource have a chance to learn.
 

Sgt Nox

Member
Joined
Dec 4, 2016
Messages
16
Location
Rochester, NY
I'm still here soaking up the knowledge every single day.

Jim: Thank you so much for the tutorial on cleaning up that plane. You've given me the confidence to dabble in some similar rehab projects and get myself some planes at "better" prices.
 
OP
J

jimreed2160

Well-known member
Joined
Aug 7, 2016
Messages
3,589
Location
Tallahassee FL
Dollhouse stuff

Back in August of 1980 I ordered two dollhouse kits for my young daughters. It was the Christmas gift that nearly killed me. The pressed plywood kits were not very friendly and I worked like a dervish every evening to make the deadline. I added to their houses every year but was wise enough to buy a built but unfinished one for the last daughter.

Fast forward to a few weeks ago. I moved a Craftsman tool chest from storage over to where I could use it. Remember that it has tools of yore inside. I found some of the original dollhouse supplies. This project has probably been waiting since about 1985. I guess it is time to restart.

DSCN1360.jpg


Including an unfinished project--a pretty little Federal sofa.

DSCN1361.jpg


It looks like I built the frame and then had to put it away. The time bandits came and took some of the tiny pieces.

Here is all that remains of the leg frame.

DSCN1363.jpg


Lucky for me that I have a stash of basswood for repairs.

DSCN1362.jpg


The square stock is a tad too large and needs to be planed down.

DSCN1364.jpg


Well, that went well.

DSCN1366.jpg


Here is the front leg cut to size.

DSCN1368.jpg


And it needs a dang 1/8" dado. Looks like I need to use the 1/8" Japanese style paring chisel that I made.

DSCN1369.jpg


It just fits.

DSCN1370.jpg


I marked the dado and used the Japanese **** chisel to cut the sides. Then I will use it to trim out waste to each side.

DSCN1371.jpg


The final trimming was with the Japanese paring chisel. The tiny dado looks pretty good.

DSCN1372.jpg


DSCN1373.jpg


OK. I am not too proud to admit that I eat frozen dinners. But I only do it for the plates. They make great parts holders.

DSCN1374.jpg


Next piece up is the back leg. It is curved and I need a wider piece of stock.

DSCN1376.jpg


Of course, the wide basswood is a little too thick.

DSCN1377.jpg


One swipe on the top and one swipe on the bottom yields perfect stock. Here it is behind the leg.

DSCN1378.jpg


I traced out the pattern with a knife.

DSCN1379.jpg


I chiseled out the front and used a bandsaw to remove stock from the rear.

DSCN1380.jpg


It turns out that my curved Japanese chisel was best for carving the curved surface.

DSCN1382.jpg


Here is the new leg beside the old one.

DSCN1383.jpg


DSCN1385.jpg


And here is the glue up of the old pieces.

DSCN1386.jpg


Next step is to glue up the two new legs with their new stretcher.
 
Last edited:
OP
J

jimreed2160

Well-known member
Joined
Aug 7, 2016
Messages
3,589
Location
Tallahassee FL
Drives--The wire benders are great stuff. Here is a project from earlier. I have a pot rack over the cooktop. BUT the mfg only provided five hooks. I made more.

IMG_2557%201.jpg


I use the longer one for spoons. The second from the left is the "store bought" one.

Here is a quick project. I start with an old stainless rotisserie rack and use the angle grinder to snag a piece of wire.

DSCN1389.jpg


DSCN1390.jpg


Here is the pegboard hook I will use as a go by.

DSCN1391.jpg


Starting the bend.

DSCN1392.jpg


Our first little curl.

DSCN1393.jpg


Bending continues. Now we are making an arc.

DSCN1394.jpg


DSCN1395.jpg


Done bending. Now I need to cut off the excess and grind the end smooth.

DSCN1396.jpg


Finished hook.

DSCN1397.jpg


It is stout enough to hold a brace.

DSCN1398.jpg


Bending is simple. Sometimes I use a vise to assist. This jig also works for flat stock. You office workers can bend some flat stock into a coat hook that will fit over your cubicle wall. Make it like an "S" and square off the top to fit the low wall. Impress your co-workers. :pimpflash
 
OP
J

jimreed2160

Well-known member
Joined
Aug 7, 2016
Messages
3,589
Location
Tallahassee FL
Sofa frame--continued

I did the final glue up on the dollhouse sofa. Once the glue dries I will stain it to match.

DSCN1387.jpg


When I told my daughter about finding the sofa, she was delighted. I showed her the kit and she immediately replied, "Cool beans. I can totally do that!"

So it is with great pride that I will deliver the kit and frame to her tomorrow. It is such a wonderful treat to pass the torch as I watch her become more confident with her crafting skills.

All of us geezer woodworkers need to spend time and light some fires with the younger set. Our society has already transitioned from a "make it or make do" mindset to an Amazon, "order it and have it tomorrow" world. But there is something special about making things from scratch. They do not know it right now, but the younger set NEEDS these skills.
 
OP
J

jimreed2160

Well-known member
Joined
Aug 7, 2016
Messages
3,589
Location
Tallahassee FL
Auto & Sgt--Thanks for your kind words. I found a vintage spokeshave today while I was working on the sofa frame so there is more material to come.

Cheechi--Some people really get into the small stuff. I am not one of those. It drives me crazy. :eyecrazy:
 
OP
J

jimreed2160

Well-known member
Joined
Aug 7, 2016
Messages
3,589
Location
Tallahassee FL
There was some interest in lignum vitae mallets, so here are some photos. The first is my favorite. It was turned from a tree in a single piece. A crack developed in the handle and I wrapped it in duck tape so it would feel better in my hand.

DSCN1312.jpg


Here is the bottom view.

DSCN1313.jpg


And here it is with another lignum mallet. This mallet has a handle that was turned and then attached.

DSCN1314.jpg


Here is the bottom. As you can see, there is a crack developing in the side. The handle goes all the way through. Notice the "HAITI" stamped at the top.

DSCN1322.jpg


Most of these lignum mallets develop cracks over time. I am lucky that both of these are sound enough to use and the cracks are not enlarging.

I prefer to use smaller and lighter mallets for most of my work but will trot out the "big dogs" whenever they are needed.
 
OP
J

jimreed2160

Well-known member
Joined
Aug 7, 2016
Messages
3,589
Location
Tallahassee FL
Well, I am off on a road trip today. Here is a picture from the wayback machine. I built this cradle in 2004 for my granddaughter. Used plans from the New Yankee Workshop.

561jr1.jpg


I used T&G for the floorboards and sliding dovetails on the rockers. It has held together well and is usually full of baby dolls.
 

drivesitfar

Well-known member
Joined
Oct 23, 2013
Messages
36,007
Location
Pacific Northwest
JIM: keep those great pictures and information coming and your thread has 55,000 views so far and should be about a million views by this time next year. thanks again for starting it.

ALL: i'm going to throw this out there in case any of you have built or seen something similar. my daughter who was born with SPINA BIFIDA 26 years ago and that has been in a wheelchair since she was 1 is getting married. i've been assigned to build her a sort of chair on casters that her wedding dress won't get caught up in so she can dance, eat and enjoy her BIG DAY.

i'm thinking 6 casters on a base and not sure how i'll build a stand on top of it. if any of you might have a plan or idea please let me know and i might start a thread about it to help other dad's maybe get a smile and a big kiss from their handicapped daughters and wives. this is about all i'm allowed to do for the wedding, but of course i need it done yesterday cause the wedding dress needs to be altered to fit her and the stand i make.

thoughts, pictures or any ideas??
 
To avoid these ads, REGISTER NOW!

drivesitfar

Well-known member
Joined
Oct 23, 2013
Messages
36,007
Location
Pacific Northwest
ALL: any of you WOOD WORKERS and even you WOOD BUTCHERERS i need a little help. i've started a thread and need to build a chair on casters that my handicapped daughter can get married in. her wedding dress will cover the entire chair and maybe even to to the floor (it will be altered to fit the chair) so the chair doesn't need to be pretty.

here's a thread i started in case any of you might have an idea or thought to post there. or maybe watch and see what I (we) come up with.

sort of looking to put something like this chair or 4,6 or 8 casters.

http://www.garagejournal.com/forum/showthread.php?t=348709

thanks all and have a happy new year
 

ztorres

Well-known member
Joined
Sep 22, 2016
Messages
195
Location
Iowa
Well I think I may be done making Christmas gifts for the year; granted the year ends tomorrow. One luxury of living 800 miles from home is I have a little longer to make gifts than most.
I made a pen holder out of pine and oak with a cross piece of hickory. If there were a woodworking store close by I want to try flocking the inside. c0c7d2dc6a900de7f104314c5ed4bcc3.jpg
Then I made two more cutting boards. The first is for my grandparents and the second is for the wife.
f961349bf44ff1e742b92dc1b82d02af.jpg969f943aa251a722805422ae7a1f4bd2.jpg
I made a set of coasters as well 37ba827e7d95798022f0343cc63d7429.jpg
I found a set of capital letters so I can electrically brand my work now as seen:cb839e78a65e190b8d72c15e9c3ae55d.jpg


Zach
 

Attachments

  • cb839e78a65e190b8d72c15e9c3ae55d.jpg
    cb839e78a65e190b8d72c15e9c3ae55d.jpg
    468.1 KB · Views: 0
  • 37ba827e7d95798022f0343cc63d7429.jpg
    37ba827e7d95798022f0343cc63d7429.jpg
    630.2 KB · Views: 0
  • 969f943aa251a722805422ae7a1f4bd2.jpg
    969f943aa251a722805422ae7a1f4bd2.jpg
    518 KB · Views: 0
  • f961349bf44ff1e742b92dc1b82d02af.jpg
    f961349bf44ff1e742b92dc1b82d02af.jpg
    484.1 KB · Views: 0
  • c0c7d2dc6a900de7f104314c5ed4bcc3.jpg
    c0c7d2dc6a900de7f104314c5ed4bcc3.jpg
    372.4 KB · Views: 0

drivesitfar

Well-known member
Joined
Oct 23, 2013
Messages
36,007
Location
Pacific Northwest
Z: i love the new projects and really like the new branding especially the little one you could put on your cows when you own a ranch some day.

WELL DONE and if you want to share more how you made the pen holder i for one would love to see how you glued, clamped, drilled the hole and then sanded it all smooth or at least tell us how. thanks

Jim: if you happen to have any ideas i'd love to hear them on that other thread since you make very small and large furniture i'm sure you'd make a much nicer one than i could.

cheers
 

turbowoodworker

Well-known member
Joined
Mar 18, 2012
Messages
3,526
Location
Apex NC
Jim that is one beautiful cradle. It has held up well. What is the primary wood? I sure hope no one ever paints over your nicely executed dovetails. That will last forever.
 

ztorres

Well-known member
Joined
Sep 22, 2016
Messages
195
Location
Iowa
I have an actual branding iron for cattle back home; it's way too big for wood projects. Thanks for the compliments. Hopefully everyone likes his or her gift.


Zach
 

ztorres

Well-known member
Joined
Sep 22, 2016
Messages
195
Location
Iowa
Pencil Holder Primer:
I'll give a run down of how I did it.
1st: Cut pieces down to 3/4"x3/4"x8" pieces. I just used scrap wood for this project because I had enough around.
2nd: I glued the pieces to make a 3x3 square; I alternated the oak and pine to give the distinct checkered look. First layer went Oak, Pine, Oak; second layer went Pine, Oak, Pine; repeat first layer. Then clamp the pieces together; it may be easier to make each layer individually then glue the layers together but I did it all at once - I wasn't patient and this wasn't a planned gift more so a trial run.
3rd: I cut the piece in two at a 30° angle, this angle is rather easy to determine the size of middle piece.
4th: Cut the middle piece, I used hickory for this one. I think 1/8" thickness is ideal. I make sure to leave extra wood on all sides so there's good coverage.
5th: Glue the spacer in. This can be tricky because the pieces like to slide when glue is applied thanks to gravity, lack of friction and clamping force.
6th: Plane down the sides and sand until smooth. My pieces weren't exactly flush after glueing.
7th: Time to drill the pen holder hole. I used 1-1/2" drill bit - a Fostner bit - and drilled down about 5" on center.
8th: Round the corners. For this I used a 1/8" rounding router bit and the router table. I rounded all the edges except the bottom, including the rim of the hole.
9th: Burn my mark into the bottom of the piece, like I do with all pieces.
10th: I didn't want to stain this project, although I think I may see what a stain looks like next time. For this I just used Minwax Wipe On Poly for the clear coat; I did about 3-4 coats with 3 hours in between coats.
Please let me know if you have questions, I'd be more than happy to help.


Zach
 

Autonomous

Well-known member
Joined
Dec 26, 2015
Messages
66
JIM: keep those great pictures and information coming and your thread has 55,000 views so far and should be about a million views by this time next year. thanks again for starting it.

ALL: i'm going to throw this out there in case any of you have built or seen something similar. my daughter who was born with SPINA BIFIDA 26 years ago and that has been in a wheelchair since she was 1 is getting married. i've been assigned to build her a sort of chair on casters that her wedding dress won't get caught up in so she can dance, eat and enjoy her BIG DAY.

i'm thinking 6 casters on a base and not sure how i'll build a stand on top of it. if any of you might have a plan or idea please let me know and i might start a thread about it to help other dad's maybe get a smile and a big kiss from their handicapped daughters and wives. this is about all i'm allowed to do for the wedding, but of course i need it done yesterday cause the wedding dress needs to be altered to fit her and the stand i make.

thoughts, pictures or any ideas??

This is a long shot, but if it's a hurry why not build some wide shrouds (fenders) out of hard board to cover her current chair wheels? She would have the comfort of her normal chair that way.

Just a thought.
 

drivesitfar

Well-known member
Joined
Oct 23, 2013
Messages
36,007
Location
Pacific Northwest
Auto: the idea is to sort of have her sitting up a bit cause she can't stand to make her a bit taller. if you want to post over on the thread i started please do if you have any more thoughts. thanks for thinking of me (her).

Z: thanks for the rundown.

AK: AWESOME!! also if you maybe want to tell some of us less talented WOODWORKERS how you made them please do.
 
OP
J

jimreed2160

Well-known member
Joined
Aug 7, 2016
Messages
3,589
Location
Tallahassee FL
Jim that is one beautiful cradle. It has held up well. What is the primary wood? I sure hope no one ever paints over your nicely executed dovetails. That will last forever.

Thanks for your kind comments. The primary wood is North Carolina walnut. It is finished naturally without stain. Sorry that I do not have any more pictures with details. I will try to get some. There is a finger hole at the foot that in in the shape of a heart. The top boards are pegged into place and have withstood the test of time. I thought Norm's plan was good except for the rockers. I was afraid they would wobble and break, so I designed and installed an arched brace between them to add strength. It is pegged to the cradle floor and the rockers are pegged to it. My mod seems to be working well.
 
OP
J

jimreed2160

Well-known member
Joined
Aug 7, 2016
Messages
3,589
Location
Tallahassee FL
Infill Plane front knob, continued

We last left this front knob at the glue up stage. Now is it dry and I think there is time for one last project this year. I drew a rough sketch on the wood block.

DSCN1406.jpg


Now all I have to do is get rid of the waste. I will start with my favorite power tool, the bandsaw. My grandfather, the woodworker, passed away when I was 11 and I inherited his Homecraft bandsaw. It was the only power tool I was allowed to use in my dad's extensive woodshop. So I learned how to do everything on the bandsaw.

First we have to make things safe. The bandsaw likes to eat small pieces of wood so I make the block larger with the handscrew.

DSCN1409.jpg


And then I start to nibble away. I keep a wide blade on the saw for general work and the wide blade is not very good for curves.

DSCN1407.jpg


I guess you can call this strategy "death by a thousand cuts."

DSCN1408.jpg


Looking better.

DSCN1411.jpg


Well, it looks pretty nasty right now. Time for another tool.

DSCN1413.jpg


How about an oscillating spindle sander?

DSCN1415.jpg


This tool has sanding drums of varying diameters and is great for plane totes and saw totes. It also needs dust collection. Luckily the redneck dust collection system is nearby. Just don't forget your vacuum couplers.

DSCN1414.jpg


Since I have a lazy streak, I am delighted to find that the drum that is loaded is just the right size.

DSCN1416.jpg


Once again, I rely on the woodscrew to keep everything level and safe.

DSCN1417.jpg


Here is a close up of the first sanded area. Notice the white line saw kerf.

DSCN1418.jpg


It's gone now.

DSCN1419.jpg


It starts off pretty rough.

DSCN1420.jpg


But quickly takes shape.

DSCN1421.jpg


My luck ran out on the last side and the drum quit cutting. I replaced it with a smaller diameter and kept going. This whole phase of the project took about an hour.

DSCN1422.jpg


Here is a test fit.

DSCN1423.jpg


So I am finished with the rough sanding and it is time for a break. I need to knock the corners down but I can do that by hand. Then I need to fit the knob to the plane. Stay tuned.
 
Last edited:

ktmracer

Well-known member
Joined
Mar 6, 2012
Messages
47
Location
Fresno area
There are so many interesting threads on GJ, like this thread.

b3ba637bf081c77bf7e5e957067ac605.jpgdcf96f7d0df166f702ce12ab7163bd91.jpg

I recently bought this petite 8" table saw at an estate sale, $25. I wasn't really looking to add a small saw, but it's works good and they don't build them like this anymore. It was a hoot talking to the man who bought it new. There was a dado on it, and he said they worked up the wooden forms for his ceramic business on this saw. His son even helped me find the nearly lost fence before I left.


Sent from my iPhone using Tapatalk
 

Attachments

  • dcf96f7d0df166f702ce12ab7163bd91.jpg
    dcf96f7d0df166f702ce12ab7163bd91.jpg
    282.2 KB · Views: 0
  • b3ba637bf081c77bf7e5e957067ac605.jpg
    b3ba637bf081c77bf7e5e957067ac605.jpg
    184.7 KB · Views: 0

drmarkr

ALLIANCE MEMBER
Joined
Feb 5, 2006
Messages
4,209
Location
Tucson
They sell replacement drum rolls for your oscillating sander at Harbor Freight, BTW. Couple of different grits as well.
 
OP
J

jimreed2160

Well-known member
Joined
Aug 7, 2016
Messages
3,589
Location
Tallahassee FL
Infill knob continued

With the basic size roughed out, I followed up with a fine 150 grit and knocked off the rough edges. I do this by hand. It requires constant movement and frequent examinations.

DSCN1425.jpg


It is time to shape the front. The plane has a gentle curve so I marked it on the new knob. I want it to look like the old knob. I plan to get it close but oversized so I can sand it to fit when it is installed.

DSCN1426.jpg


This beech is hard and sanding takes time. I used the bandsaw to knock off some waste.

DSCN1427.jpg


DSCN1428.jpg


Front rounding finished. Here is a picture of it along with the plane and the old knob.

DSCN1429.jpg


Now for a tricky part. I made the block oversized so it would be easier to work. It is time to cut off the bottom. I will use the tablesaw. Normally the guard is in place, but it just gets in the way on a tricky cut like this. I do not encourage anyone to follow my practice. Cutting wood on a tablesaw without the blade guard and kickback prawls is dangerous.

DSCN1431.jpg


Well that cut got my motor going. Whew! I am glad it went uneventfully. Here is a picture of the knob, the one I copied, and the original.

DSCN1432.jpg


I am pleased with today's progress. Every time I see the old knob, I chuckle because it is so ugly. Good news for me because flawed tools sell for pennies on the dollar. I think I picked this thing up for about $20-30 because of its condition. It will never be a collector plane but it will be a dynamite user plane. And it is my granddaughter's favorite.

Next up is fitting it to the body. I want it to be overstuffed with the wood flush on the sides. That means I need to chisel and gnaw the bottom to fit. But it also means that the overhanging wood will hide any loose fits and errors.

Thanks to all of you GJers who like this window into my workshop. I love my shop but it has been tough getting back into the swing of things after some family setbacks. Posting all of these projects has been fun and your views have encouraged me to resume my activities.

Happy new year to all!!
 

turbowoodworker

Well-known member
Joined
Mar 18, 2012
Messages
3,526
Location
Apex NC
It wouldn't be so crazy or ominous looking if you were to hook the wooden clamp on a miter gauge to keep it parallel/perpendicular to the blade.
 
To avoid these ads, REGISTER NOW!
Top Bottom