To avoid these ads, REGISTER NOW!

Woodworking 101--Tools and Tips

drivesitfar

Well-known member
Joined
Oct 23, 2013
Messages
36,005
Location
Pacific Northwest
CRS: noted and thanks for your thoughts.

Shift: are you making those bridges for your own property or did you maybe build those during the summers while you were on vacation from teaching? nice looking bridges either way and probably could use a few more pictures and maybe share the process if you remember or have more pictures.
 
To avoid these ads, REGISTER NOW!

schor

Well-known member
Joined
Apr 16, 2013
Messages
531
Location
Ajax, Ontario
Drives: I'd only do the absolute minimum on those hatches. Maybe just a light brushing scraping to remove loose flakes then something to seal it all. If you are really concerned about cracks and splits look into putting in some Dutchmen. Those are the bow tie shaped inserts that Shor used on his three legged table. That's exactly what they were meant for.

Shor: Your buddy and you did a great job. Very elegant looking. BTW I thought Ajax sounded familiar so I looked it up. It turns out that we stopped there for a picnic lunch by the water on our way to Quebec. Nice looking city.

If your ever in the area, drop in for a beer, meal, whatever. Doors are always open for forum members.
 

CRSINMICH

Well-known member
Joined
Aug 15, 2015
Messages
2,397
Location
Southeastern Michigan
If your ever in the area, drop in for a beer, meal, whatever. Doors are always open for forum members.

schor: We did enjoy that trip - once we finally made it past Toronto. Whew! We don't get Way Out East too often but keep a Carling cold just in case. Or a Molson. Brador's good too. Blue? Damn, now I'm thirsty.
 

Shiftless

Well-known member
Joined
Mar 9, 2014
Messages
14,507
Location
East Bay SFO
Drives:
I built a few bridges on a 3 acre property owned by friends up in Sonoma county. They let me use an out of the way corner with a corrugated fiberglass cover for a work shop. I have been retired from teaching since June 2009.
 
Last edited:

bj383ss

Well-known member
Joined
Sep 29, 2011
Messages
3,166
Location
TX
Steve- that table you made looks awesome. Would you share your finishing technique with the Danish oil? Did you build up coats with it and then polish it out?

Shift- that last bridge is inspiring. You have pictures of more you have built.

Drive- I hate to let you down but the inside of my tool cabinet is empty. :(. I have never got around to putting anything in there because it is a blank slate and will require custom tool holders. Maybe you just motivated me to start that project...

Bret
 

schor

Well-known member
Joined
Apr 16, 2013
Messages
531
Location
Ajax, Ontario
Steve- that table you made looks awesome. Would you share your finishing technique with the Danish oil? Did you build up coats with it and then polish it out?

Bret

There were a few light cracks in the wood so I put on some danish oil and sanded with 800 grit until the cracks were filled. Wipe and let it dry, repeat until you get it looking the way you want.
 

Denwood

Well-known member
Joined
Sep 22, 2014
Messages
4,184
Location
Thunder Bay, Ontario, Canada
Drives, here is a cut/paste of the dust management summary. I'd highly recommend to anyone with similar needs.

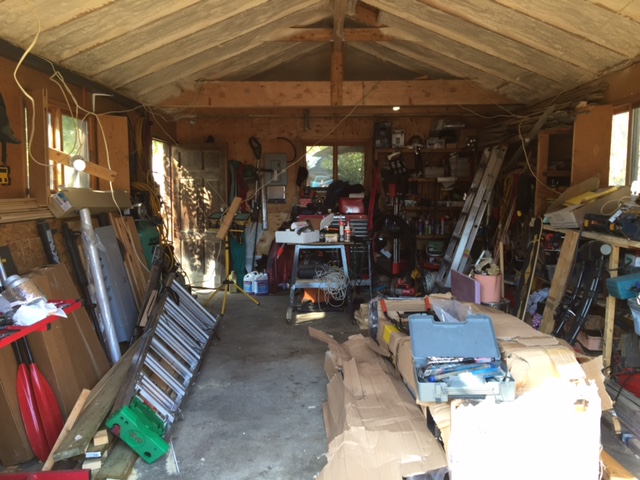
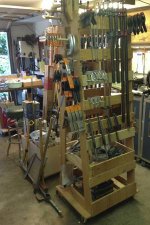
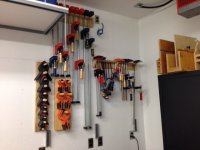
I figure every one of these satellite threads needs a before after of my shop from chaos to order :)

mess.jpg


rd5.jpg


The cleaned up shop has been in need of a basic dust management system for some time. The space is small, and needs to be multi-functional, so this system reflects those needs. I started with a 2 1/2 kit from Lee Valley tools. As you might guess, I only used part of the kit..the rest will go to my business shop.

03j6080s2.jpg


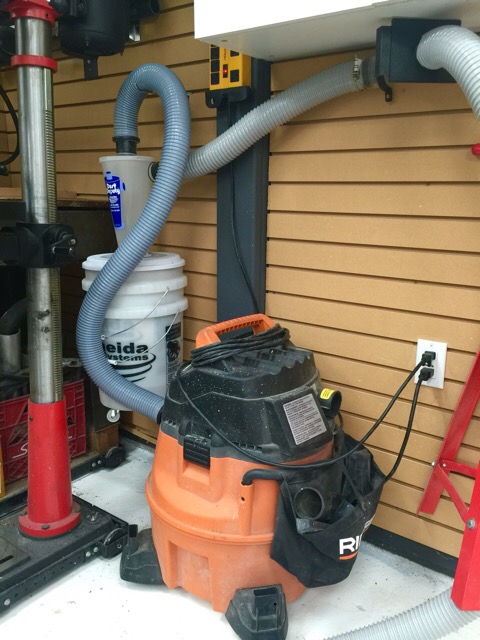
After doing a 4" system at the office shop, I realized velocity would be much better with a 2 1/2" system powered by my Rigid vac at 179 CFM. To that kit, we add the Dust deputy. Trying things out on my table saw, I figure I should have sorted dust management out a long time ago. The dust deputy seems to end up taking 99% of the sawdust, meaning the vacuum suction stays much higher with a clean filter.

149951.jpg


We have two of these Rigid 14 gallon vacs in two locations over the last 2-3 yrs, easily my favourite shop vac ever. They are relatively quiet, and move a ton of air. Looking over a few web reviews, they also seem to end up on top most of the time.

56544-ridgid-wd14503.jpg


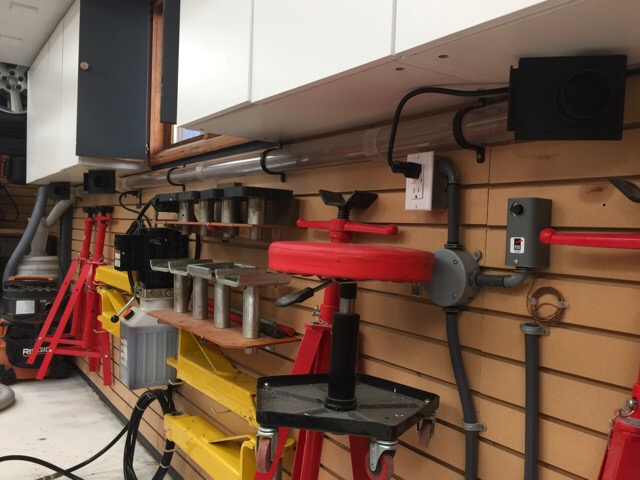
I wanted to keep things as simple, clean and compact as possible. The shop vac can be pulled out in seconds for use off-site, and the hose/attachments can be attached to any of the blast gates.

The Dust Deputy is tucked in behind the drill press. Hose is all 2 1/2". I bought a 50 ft roll, for both the home and business shop.

dustcon1.jpg


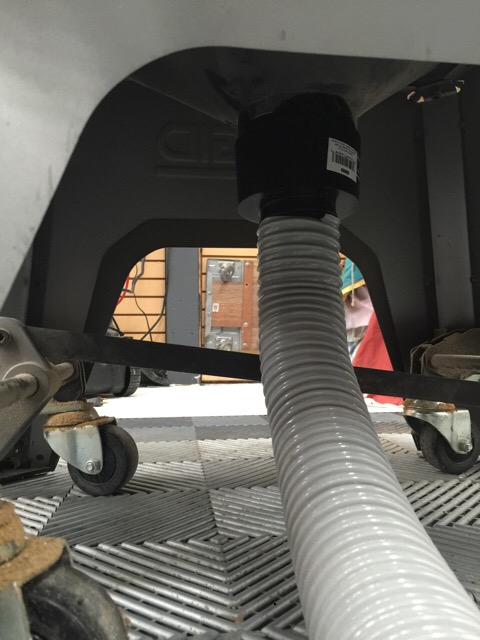
Attachment for the Rigid table saw via 2 1/2 to 4" adapter:

dustcon2.jpg


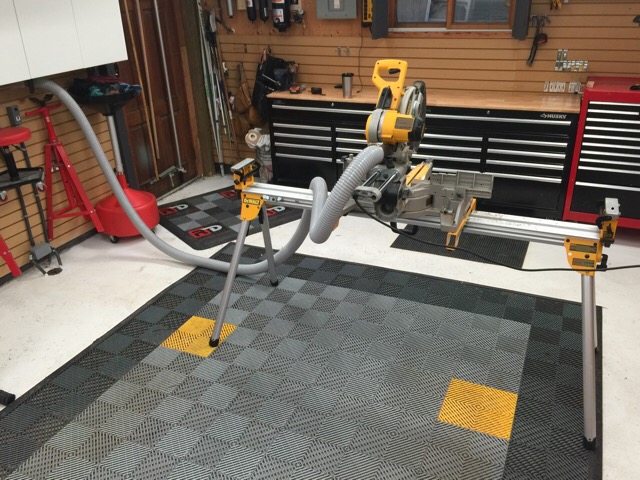
Chop saw setup, pretty much the same as radial arm saw connection:

dustcon3.jpg


2 1/2" clear pipe and 3 blast gates tucked under cabinets:

dustcon4.jpg


dustcon5.jpg


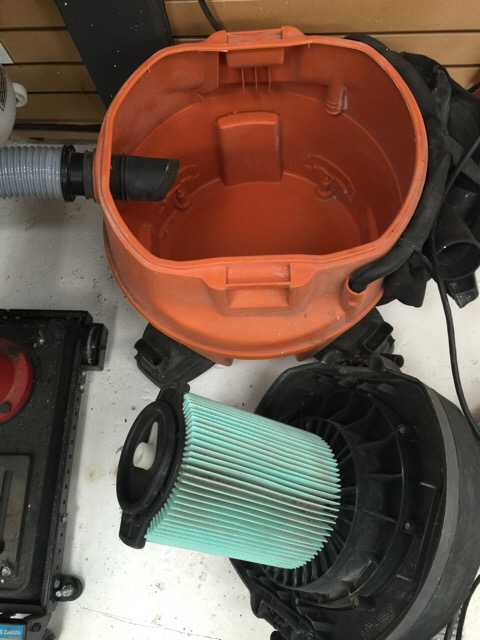
The vacuum ends up sucking up almost nothing:

dustcon7.jpg


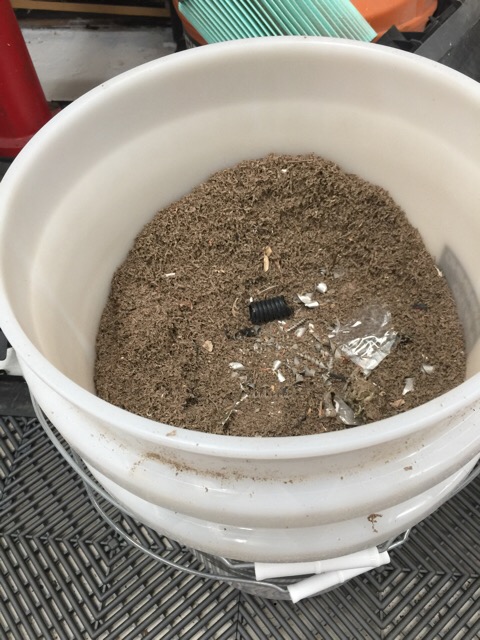
The cyclone bucket though is pretty full:

dustcon8.jpg


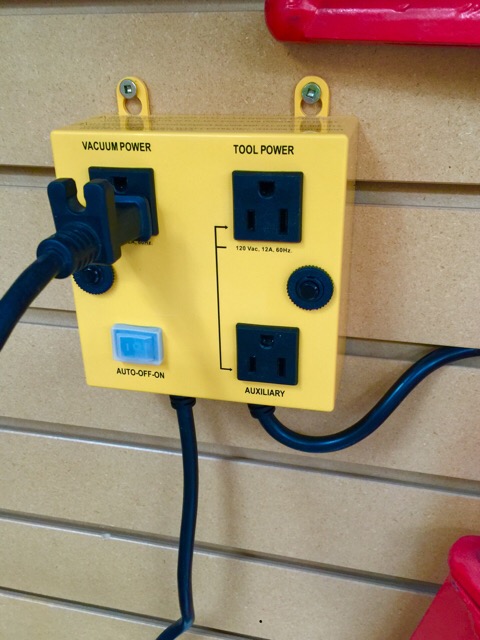
Analog Vaccum Controller

If you want an effective vacuum control using two circuits, this works well: http://ivacswitch.com/ivac-switch/ You plug the tool into this box, and when powered, it fires up the vacuum. It delays the vacuum power off by about 5 seconds to clear the lines. It can draw power from one or two 110V circuits...two being the preferred set up if you're drawing more than 15 amps for the vacuum and tools.

dustcon11.jpg


Fancy pants Automation Control of Vacuum

I decided to try my hand at writing a Smart App, and using automation to run the vacuum. If you're interested in setting this up for yourself, I posted the code, and instructions over at the SmartThings forum. You'd need a Smarthings Hub (about $100), the app I wrote, and a few smart plugs to make this work. Being that I already have the garage automated, the incremental cost was low.

Using this type of control, you don't need to run extension cords from a device like the iVac switch for each tool. You can also have more than just one device controlled using the Smart app..and you can set the turn off delay to whatever you like.

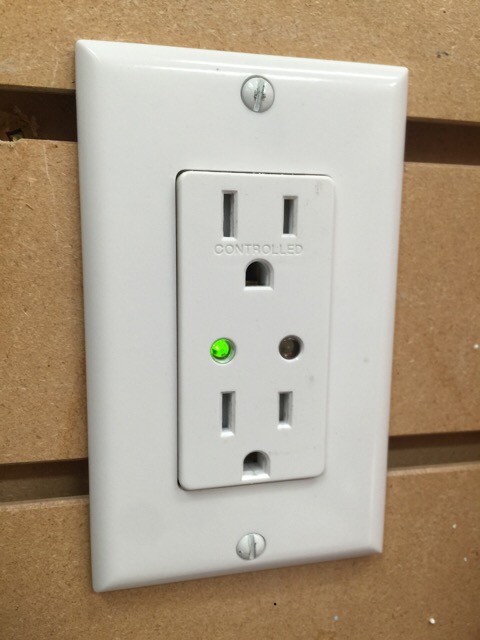
This Zwave receptacle can be controlled via Zwave wireless. The automation hub communicates with the controlled half of the receptacle, and switches it on and off based on what the Smart App I wrote tells it to do. The Rigid vacuum is connected to the controlled receptacle.
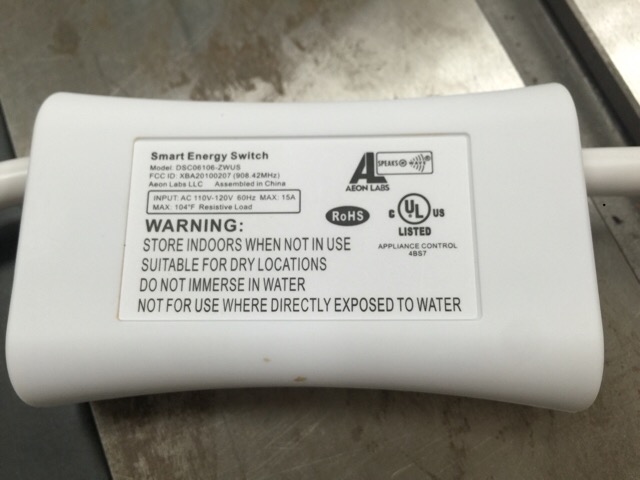
dustcon6.jpg


This Aeon-Labs-
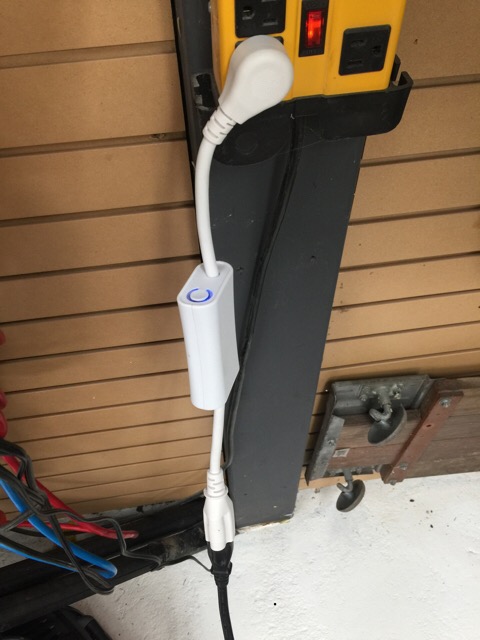
DSC06106 Smart Energy Switch reports energy use to the automation hub. So if a tool is connected to it, and powered up, the switch communicates the power increase to the hub (via zWave wireless) which in turn powers on/off the vacuum. This means you can plug any tool into any circuit, and the vacuum will turn on/off automatically. The downside to using this app is that there is a bit more delay than when using the iVac switch.

Table saw plugged in to Aeon Smart Energy Switch.

dustcon9.jpg


A close look.

dustcon10.jpg


My assistant showed up late to test things out :)

dustcon12.jpg
 

CRSINMICH

Well-known member
Joined
Aug 15, 2015
Messages
2,397
Location
Southeastern Michigan
Denwood: A picture perfect shop! Very, very nice. I hope you realize just how lucky you are. I'm talking about your assistants. Grab on tight. They grow up fast! As for your shop - you're lucky there too. Here are some pictures of my shop that I just took an hour ago. I was, and still am, happy just to be able to see the bench top again. My back was against the opposite wall when I snapped.
 

Attachments

  • Clean workbench (1) 11-13-2016.jpg
    Clean workbench (1) 11-13-2016.jpg
    125.5 KB · Views: 145
  • Clean workbench (2) 11-13-2016.jpg
    Clean workbench (2) 11-13-2016.jpg
    130.4 KB · Views: 137

ztorres

Well-known member
Joined
Sep 22, 2016
Messages
195
Location
Iowa
It's amazing to see everyone's shop. I started working on my garage to be used for automotive work. It has since evolved into a woodworking shop.
a25b1620aab101a3a0a4c17f55abc395.jpg
Ignore the clutter


Sent from my iPhone using Tapatalk
 

Attachments

  • a25b1620aab101a3a0a4c17f55abc395.jpg
    a25b1620aab101a3a0a4c17f55abc395.jpg
    113.4 KB · Views: 6

CRSINMICH

Well-known member
Joined
Aug 15, 2015
Messages
2,397
Location
Southeastern Michigan
It's amazing to see everyone's shop. I started working on my garage to be used for automotive work. It has since evolved into a woodworking shop.

Ignore the clutter

ztorres: You can still see the floor. You can still see the tops of all horizontal surfaces. You can still see all the wall surfaces. What clutter are you talking about? We must be using different definitions. Nice shop by the way.
 

ztorres

Well-known member
Joined
Sep 22, 2016
Messages
195
Location
Iowa
ztorres: You can still see the floor. You can still see the tops of all horizontal surfaces. You can still see all the wall surfaces. What clutter are you talking about? We must be using different definitions. Nice shop by the way.


Clutter to me is having stuff out that I'm not using. I like to have things clean and organized so I don't have to look around for tools. OCD and working in a clean manufacturing facility for awhile makes it hard to leave things around


Sent from my iPhone using Tapatalk
 

drivesitfar

Well-known member
Joined
Oct 23, 2013
Messages
36,005
Location
Pacific Northwest
ZT: in your defense you are in the middle of a decent size cabinet build project. don't be too hard on yourself and get us a few more pictures once you get you cabinet done which by the way looks pretty good so far. also thanks for the tutorials.

Shift: so are bridges your favorite things to build or do you have other projects you built that you might have a few pictures of.

Woody: that beginning shop picture is even after you raised the roof on your smallish garage, but OMG the progress you made. love the improvements and all the tech data, but you lost me some with the SMART stuff that i'll have to read maybe 20 times over to get the SMARTS. love the assistant picture and kid's are never LATE when they show up to vacuum the shop. good to see them working and better yet with a smile. WELL DONE and thanks for posting up your dust and debris set up. i really appreciate it.

CRS: if i do end up putting a woodshop in my shed i'll probably need to be outside the door to get my picture since it's about 6 foot deep with an extra 2 foot inset i mentioned where i might but a bench with the ship hatch top and 13 foot wide. WELL DONE getting the bench top clean for the picture. any chance you might mount one of those VERSA VISES on it?

BJ: when you said you planed all that wood before doing the dato cuts any chance you might have a picture or video of how you set up your planer and which direction you put in the wood? i figured you had secret stash in that cabinet behind the hammers so when you figure out what you want to put in there is maybe the time to finish it. i recall a cabinet one guy spent a good part of his lifetime building and i'll try to find a picture of it to post if you don't have an idea which one that is. lots of cool old stuff and stored amazingly well sort of like what yours will be when you get more chisels, planes and do dads like Jim has shown and a few other members own. good luck with the drawers.

ALL: it's still raining but i am going to get a few pictures soon of my garage sale finds yesterday so I can have some of you mention how they are used or how to spiff them up. BTW i picked this up last weekend and the son of the seller thought it was a leather punch and he only wanted a few bucks for it so it's mine now. Outlaw mentioned its used for adjusting the Kerf in saw sharpening so i'll add it to my wood working tools. any of you sharpen your own hand saws and do tell how if you don't mind since i own a few and I also own a vise that was meant to hold the saw.


here's a youtube video i found of a guy using the tool i found adjusting the kerf on his saw.


another video on saw sharpening:

i have some of the COOL TOOLS and i would love to have some of the SKILLS and KNOWLEDGE on how to use them. i'm not saying i want to obtain the skills Mr. Studley had when he made this cabinet, but WHY NOT TRY. it's a keeper and maybe more than a Woodworking 101 thread project, but i bet a few of you might like it if you haven't already seen it a few times.
 

Attachments

  • WP_20161106_028.jpg
    WP_20161106_028.jpg
    158 KB · Views: 142
  • WP_20161106_027.jpg
    WP_20161106_027.jpg
    158.5 KB · Views: 137
  • WP_20161106_026.jpg
    WP_20161106_026.jpg
    154.7 KB · Views: 153
  • 120508_tool_1.jpg
    120508_tool_1.jpg
    82 KB · Views: 241
  • 120508_tool_2.jpg
    120508_tool_2.jpg
    66.3 KB · Views: 206
  • 120508_tool_3.jpg
    120508_tool_3.jpg
    72.7 KB · Views: 185

drivesitfar

Well-known member
Joined
Oct 23, 2013
Messages
36,005
Location
Pacific Northwest
CRS: i think MR. STUDLEY is a tad above Woodworking 101 level, but OMG that guy made some cool stuff. we've all got skills to improve no matter what level we are at.

ALL: for those of you members and non members that need to join to post if you have a woodworking question just ask cause I bet others want to know the answer too. make a quick search to see if it's already been discussed and if you can't find it i'm guessing it needs to be addressed again.

thanks all of you woodworkers that have the basic skills for teaching us that don't. :bowdown:
 
OP
J

jimreed2160

Well-known member
Joined
Aug 7, 2016
Messages
3,589
Location
Tallahassee FL
Wow! There is a lot of ww lore and interest here. It is nice to find a dedicated group of hard working termites.

Denwood--Thanks for posting details of your dust collection system. Every modern ww shop should have DC. Sadly, my shop is not very modern, even with a new broom.

CRS--Love the clean benchtop. It is begging for new projects.

Ztorres--I have to agree with CRS. I am still looking for clutter in your shop. At least your shop has a floor. Mine just has a few wandering paths.

Drives--Thanks for inviting Mr Studley to the party. I used the picture of his over the top chest as wallpaper at work until the IT security office outlawed the practice.

I started a corner cupboard project in 2004, did major work on it in 2007, and finished it just last month. Like all other extended projects, the world changed a lot. In my case, the top was taken out of the scope and the cupboard turned into a TV stand. Finishing it was very satisfying on many levels, but mostly because it sat on the end of my workbench for over 10 years. So here is the cupboard bottom made from hand planed 5/4 NC walnut with birdseye maple panels.

DSCN0754.jpg
 

Shiftless

Well-known member
Joined
Mar 9, 2014
Messages
14,507
Location
East Bay SFO
As requested, here is an earlier pic of the curved railing bridge showing construction details. Wnen I started work, the bridge was near collapse. I removed both railings and replicated missing or rotted pieces and redid several of the tenons by shortening the railing system by a few inches and recutting the big tenons. Epoxy putty helped hold everything together. I used 10 foot long pipe clamps and worked on them flat on a 4 by 12 foot workbench.
The entire walking surface and underpinning is new PT.
 

Attachments

  • image.jpg
    image.jpg
    158.9 KB · Views: 161
Last edited:

Shiftless

Well-known member
Joined
Mar 9, 2014
Messages
14,507
Location
East Bay SFO
Here is another garden carpentry project I completed in 2012. The existing glass panelled greenhouse endwall was near collapse. Overhead panes of glass were in danger of falling out of the rotted framing.
So I put up some temporary roof bracing and demolished the whole end wall. I designed and built a new end wall using some recycled old growth redwood and some new redwood. The redwood door has tempered glass. The diamond design feature continues from other garden structures. My local glass company did a great job cutting the special shapes used near the top as well as the rectangular pieces.
 

Attachments

  • image.jpg
    image.jpg
    144 KB · Views: 169
Last edited:

drivesitfar

Well-known member
Joined
Oct 23, 2013
Messages
36,005
Location
Pacific Northwest
JIM: nice work on the cabinet first of all. what is the joint called at the top in the corners above the cabinet doors?

Shift: looks like a fun project. ok how did you make that curve piece? was there water (boarding) and maybe heat or did you cut it out of maybe a 2x12? also it looks like you still needed to add a couple deck boards to complete the bridge. yes? did you also put on copper green on the end cuts of the treated wood or what did you use to finish it?

just saw you posted a cool greenhouse as i posted so don't be shy and post up more than one picture of these cool projects. WELL DONE BTW on all of these. you have some serious skills and looks like plumbing, cement and other skills are involved too.

ALL: just an FYI. i ask a lot of questions and sometimes i sort of know the answer or i could Google it, but hope you all don't mind answering for me and especially for those that just want to read and learn. OK?

just a warning i drink a lot of ice tea so some days if i didn't eat enough i apologize in advance for my comments. all of you need to know i'm always smiling when i post and about 99% of my posts are meant in a very positive manner no matter how they appear in writing.

cheers
 

Shiftless

Well-known member
Joined
Mar 9, 2014
Messages
14,507
Location
East Bay SFO
Drives:
Thanks!
I was fortunate in that those curved pieces had a fantastic weathered patina but were not rotted except at the tenon ends. After shortening them they were reused.
No missing boards. The framing was designed to accept gravel to adjust the level of the bridge to the level of the gravel paths on each side. The garden requires an enormous amount of maintenance and is also open to group garden tours on occasion which means that guests, workers, and wheelbarrows need to pass smoothly.

Yes, copper green went onto all end grain, factory or freshly cut, that was at ground level.
No finish went on the deck boards. I used the brown colored PT and after a while in the weather it looks pretty good.
 
Last edited:

CRSINMICH

Well-known member
Joined
Aug 15, 2015
Messages
2,397
Location
Southeastern Michigan
Jim: That clean bench was one step in the current project. The white panel on the wall behind the bench is meant to provide reflected light and to be a place to hang my most frequently used tools. The bench had to be clear in order to hang the panel. My tools are all crammed into the 4 drawers and one cupboard below the benchtop. Yes, I confess! I'm in the middle of the dreaded, time-eating Shop Re-organization.

All of this is in preparation for an actual project I have stalled on. I'm going to make a kerfing plane. (See Tom Fidgen). I've already made a working prototype for a frame saw. The saw and the plane are themselves preparation for the actual long term project that brought me back to woodworking. Stay tuned.
 
To avoid these ads, REGISTER NOW!
OP
J

jimreed2160

Well-known member
Joined
Aug 7, 2016
Messages
3,589
Location
Tallahassee FL
Drives--You have a sharp eye. The door frame top piece was specially selected because of its grain pattern. I cut it so the swirl would be in the center. Then it looked like the swirl needed to be balanced, so I cut a half dovetail to dress up the ends. The top is solid and the back of this rail is rabbeted into the top. The full length rabbet and the half dovetail ends both make the frame pretty strong.
 

Shiftless

Well-known member
Joined
Mar 9, 2014
Messages
14,507
Location
East Bay SFO
Toddler workbench
Good project for those of us with toddlers in our families.
Great for those getting started in woodworking. No need for expensive lumber, fancy tools or precise measuring. Table top sits 20 inches high.
I built this using 2x3 framing lumber and a scrap of half inch maple plywood.
The shelf underneath is sized to accept a good sized plastic tool box for the little guy or girl.
No, I didn't try to exactly match Snap On Red. :)
The holes were drilled to accept pegs I cut from 3/4 inch dowels. The smaller holes are backed up with 5/16 threaded inserts so kids can screw in eye bolts or anything else with those threads.
 

Attachments

  • image.jpg
    image.jpg
    139.2 KB · Views: 146
Last edited:

ztorres

Well-known member
Joined
Sep 22, 2016
Messages
195
Location
Iowa
Well here is the cabinet I started building this weekend all assembled. It's made out of 3/4" BCX plywood and will be used in the shop so the quality isn't as high. It has a 1-1/4" top of glued spruce. The sides each have two racks for "hyper-organized" bins. Right now I just have a fixture made for "f" clamps but the possibilities are endless. It sits on 4" casters, two swivels with brakes and 2 straights. I still need to sand everything smooth but I'm pleased with how it turned out.
6285fd9b1bf4c34ec02f0a119172af4f.jpg
c763a2f7523af92d64afd88a8af8228c.jpg
896cd9a2a5e994a71f79ab931b4321f6.jpg


Sent from my iPhone using Tapatalk
 

Attachments

  • 6285fd9b1bf4c34ec02f0a119172af4f.jpg
    6285fd9b1bf4c34ec02f0a119172af4f.jpg
    164.6 KB · Views: 4
  • c763a2f7523af92d64afd88a8af8228c.jpg
    c763a2f7523af92d64afd88a8af8228c.jpg
    144.5 KB · Views: 2
  • 896cd9a2a5e994a71f79ab931b4321f6.jpg
    896cd9a2a5e994a71f79ab931b4321f6.jpg
    173.1 KB · Views: 4

drivesitfar

Well-known member
Joined
Oct 23, 2013
Messages
36,005
Location
Pacific Northwest
Jim: you are so right that top piece does so go there. WELL DONE!!

ok teach you'll have to teach us how to do rabbets, dovetails, and many many other joints that require more skill and glue and screws to make. of course when you have some time.

Shift: thanks for the 411 and is the Greenhouse yours or did you build that for a client or friend? we would love to grow all or at least more of our own food and a greenhouse would really help. how big was/is that one? nice looking too and looks like it has plumbing or is that gas for heat?

CRS: good luck and hope you will take lots of pictures and post when you have some time. I bet that Versa Vise would look great on that bench some place or with that piece that can disappear you can put the little vise in a drawer and haul it out and have it ready to use just by popping that vise mount up from the bench top.

ALL: i know it will quit raining so i can get some pictures of my new rusty and dull woodworking tools, but not yet so i might just have to get wet. so i've been wanting to start this fence project and hopefully will have bought all the cedar this winter to be able to start in the spring. my wife and i drive around looking at properties for good ideas and we saw this fence several years ago and liked it. i think it's the one so any thoughts from my woodworking members?

cheers
 

Attachments

  • DSCN1268.jpg
    DSCN1268.jpg
    146.6 KB · Views: 121
  • DSCN1271.jpg
    DSCN1271.jpg
    151.7 KB · Views: 128
  • DSCN1264.jpg
    DSCN1264.jpg
    142.7 KB · Views: 111
  • DSCN1263.jpg
    DSCN1263.jpg
    144.1 KB · Views: 115
  • DSCN1266.jpg
    DSCN1266.jpg
    144.6 KB · Views: 119
  • DSCN1260.jpg
    DSCN1260.jpg
    149.8 KB · Views: 115
  • DSCN1261.jpg
    DSCN1261.jpg
    153 KB · Views: 112
Last edited:

Shiftless

Well-known member
Joined
Mar 9, 2014
Messages
14,507
Location
East Bay SFO
Z:
Nice work for a utilitarian piece.
It will serve you well and give you great value for the small time and money invested.
Good call on the bigger wheels too. I found out the hard way that unless your floors are really smooth, the bigger wheels roll MUCH better than smaller ones. Some of my projects cost more for casters than all the wood combined. Love the locking ones.

Drives:
The greenhouse is on the same 3 acre famous garden owned by friends of ours.
I'd say its about 10x20
The white pipe you see is for irrigation. I later built a wooden box over it and the owner uses it to hold a big potted plant.
 
Last edited:

ztorres

Well-known member
Joined
Sep 22, 2016
Messages
195
Location
Iowa
Another on going project I have:
e1d50c4b4f70c2aa881933db5c330c2b.jpg
I have been building a 6'x8' shed I got most of the shingles up last week, need another 12 shingles. Amazing how that always works out. I still need to put some siding on. This shed was built just for quick storage, I wasn't too worried about it looking fancy. I may put steel siding on it and call that good. It does need a door though.


Sent from my iPhone using Tapatalk
 

Attachments

  • e1d50c4b4f70c2aa881933db5c330c2b.jpg
    e1d50c4b4f70c2aa881933db5c330c2b.jpg
    197.2 KB · Views: 9

drivesitfar

Well-known member
Joined
Oct 23, 2013
Messages
36,005
Location
Pacific Northwest
ZT: i might have built that shed with a flat roof to get more height and tilted it off to the side so you don't have water going down your siding. i bet it will do you just fine and good for you to build something that gets some of the stuff out of your garage to make more room for your tools and machines and of course gives you some space.

nice looking cabinet too.

Shift: thanks for all the information and i've thought about building a greenhouse here if we don't move or at the next house so we can have winter veggies. i can't tell you how many cherry tomatoes i ate this year off our plants in a new brick planter i made along side our house. i'd grab 2 or 3 maybe daily and they we'd pick a bunch and put them in salads. we also had maybe 150 figs. the really cool thing is a greenhouse would give us year round fresh spices for the ones we don't already get that we can go out and pick almost anytime of year.

did the place you made all that cool stuff for give you a nice place to hang your hat at for months or were you able to drive back and forth daily? i can't even imagine what a 3 acre parcel with ponds and cool buildings would cost to own near San Francisco.

ALL: so i've got a bunch of old cast iron clamps along with a ton of newer and plastic ones and i've seen some great storage ideas. ZT just made one for his small clamps and i've seen several carts or walls with clamp storage. anybody want to share where or how they store theirs? also how often do you use them?
 

Attachments

  • clamp stand on casters1.jpg
    clamp stand on casters1.jpg
    26.8 KB · Views: 239
  • clamp stand on casters.jpg
    clamp stand on casters.jpg
    25.9 KB · Views: 229
  • clamp stand on casters2.jpg
    clamp stand on casters2.jpg
    29.6 KB · Views: 217
  • sN64YYil.jpg
    sN64YYil.jpg
    41.3 KB · Views: 211

swimrr

Well-known member
Joined
Aug 6, 2015
Messages
102
Location
Vancouver, BC
Just subscribed to the thread. I have less than nothing to contribute as I'm only just getting interested in WW and have trouble even understanding what many of you are talking about. But I love reading about all your amazing projects and look forward to some of your knowledge hopefully rubbing off on me.

Thanks for another great thread on GJ!
 

ztorres

Well-known member
Joined
Sep 22, 2016
Messages
195
Location
Iowa
Drives:
I offset the back so there is a 12" gap between the shed and garage. I was really just looking for storage and it's about 5' in the rear and 7-1/2' at the front.


Sent from my iPhone using Tapatalk
 

drivesitfar

Well-known member
Joined
Oct 23, 2013
Messages
36,005
Location
Pacific Northwest
SWIMRR: you are in the right place to learn cause these guys on the thread already and more to come really know how to use their tools. keep looking in and feel free to ask questions if you see something you don't understand no matter how silly it might be. WE ALL HAD TO LEARN SOMETIME!!

Welcome

ZT: sorry if it sounded like i was criticizing you and actually just the opposite. i commend you for building a shed outside your garage. only thing is with all my STUFF i like to maximize space so i see a few extra cubic feet that could have been made. hope it works well for you and i know you'll like having some of that stuff out of the garage. when i make suggestions i'm usually only trying to help if not you maybe the next guy thinking of making something similar. you should see what i have packed in my 7x7 rubbermaid. yes i do need to move or add on to my little garage.
 

schor

Well-known member
Joined
Apr 16, 2013
Messages
531
Location
Ajax, Ontario
My shop cabinets, made the cabinets to fit the doors I got from a neighbour. Notice all the door above them? I could make another 30 cabinets with all the doors I have.

csCwI6UrC1jAYFX35C7g_Hu0FqeVL0aBtzmfi8gvGM0qiE7U6VHnsETYbDx8F-Z-YuKhlSoRzhgbsYT4KhaNkggQ3EdZTICC3g3p2zAIIDfWZlWigXK5nKe62cGwRckuRhYtleGaeLAojyfffHV7umXetfakVqajSVobVON0qV5YR5MLmYUhogY4moNJaqCYdrjW_5hGRmyhq8bwqkv0w6hZtUbo8e0vtE-ZPuERXzogWJvy2hwQIPfzCbIJymUZbGnEoeY6yoFzSyDb1_zHH81Y_dkpUGAh4zz2pa712dikTHoht-wjQb02r7JNNWIrD52wPFArthIkDJqprA8eOVt_mnL9w7dPmisE_5TPN1isW9Nlt6ZHCGSDDu78AwgZ6qsHiLDgxaKyXnoCSnBof2knqCy5cHz9z9ku_VLQ1PAvo2XhHcAXBYZFsPhlfUQz12Ls_vrP8CH20meuwYLHoIITvnvjSXx9QgXV15KjKrCFX1bSoScekVcyOh7kk0q3VV8QtyJMZDobn9Hg0xqpSh4weTL4aBTPDCY6L8-YGRJFHvsRex6j93N2Cb6jrKcKhDrkJZxpDGhfK-kHgumEVfCrPtTeiucX1tNNCIDJ2B62s7Eb=w1289-h726-no
 

bj383ss

Well-known member
Joined
Sep 29, 2011
Messages
3,166
Location
TX
Wow this might be the most active thread I have been involved with it. I love it.

Dennis-thanks for sharing your DC. All of your Automated stuff intrigues me and I would love to have it in my shop but like Drive it is over my head.


CR I like seeing a clean bench. It means you either just finished a project or about to start another one.

Ztorres your shop is no were near cluttered I can show you clutter. And you are going to love that shed. I just finished mine this past spring and I was able to get all my storage in there and also build an additional 12x10 workshop in there for dirty work. (bodywork, painting, and finishing)

Swimrr- welcome to the thread. Please ask questions or share any projects or your workshop with us. We all started somewhere. I can show what my first garage looked like and some of my projects. My in-laws bought me a Skilsaw Xmas 05' and it snowballed after that.

Jim- that is a cool corner bench. Love that Dovetail. That is a sign of craftsmanship.

Shift- that is a cool toddler bench. If might boys were too big I would make them one of those.

Bret
 

bj383ss

Well-known member
Joined
Sep 29, 2011
Messages
3,166
Location
TX
My shop cabinets, made the cabinets to fit the doors I got from a neighbour. Notice all the door above them? I could make another 30 cabinets with all the doors I have.

csCwI6UrC1jAYFX35C7g_Hu0FqeVL0aBtzmfi8gvGM0qiE7U6VHnsETYbDx8F-Z-YuKhlSoRzhgbsYT4KhaNkggQ3EdZTICC3g3p2zAIIDfWZlWigXK5nKe62cGwRckuRhYtleGaeLAojyfffHV7umXetfakVqajSVobVON0qV5YR5MLmYUhogY4moNJaqCYdrjW_5hGRmyhq8bwqkv0w6hZtUbo8e0vtE-ZPuERXzogWJvy2hwQIPfzCbIJymUZbGnEoeY6yoFzSyDb1_zHH81Y_dkpUGAh4zz2pa712dikTHoht-wjQb02r7JNNWIrD52wPFArthIkDJqprA8eOVt_mnL9w7dPmisE_5TPN1isW9Nlt6ZHCGSDDu78AwgZ6qsHiLDgxaKyXnoCSnBof2knqCy5cHz9z9ku_VLQ1PAvo2XhHcAXBYZFsPhlfUQz12Ls_vrP8CH20meuwYLHoIITvnvjSXx9QgXV15KjKrCFX1bSoScekVcyOh7kk0q3VV8QtyJMZDobn9Hg0xqpSh4weTL4aBTPDCY6L8-YGRJFHvsRex6j93N2Cb6jrKcKhDrkJZxpDGhfK-kHgumEVfCrPtTeiucX1tNNCIDJ2B62s7Eb=w1289-h726-no

Very Nice Steve. I would have done the same thing. Doors take longer to build than cabinets. Digging that lathe sitting underneath and those Machinist toolboxes.

Bret
 

bj383ss

Well-known member
Joined
Sep 29, 2011
Messages
3,166
Location
TX
Drive here is a quick shot of my clamp storage. I don't have that many but I have enough for most jobs. I honestly use the 12" and 18" F clamps and 4" spring clamps the most. They are located all the way across the shop from the woodshop side. But it was the best wall to put them on.

20160313_192545 by bjohnson388, on Flickr


Your question about using the planer. What I do is feed the wood in with the grain running downhill. You have less tear out this way. And sometimes it still tears out on really hardwoods. If you have tearout I flip it around and try the other way. I also flip the piece end for end when I plane the other side.

JP_3_5_300 by bjohnson388, on Flickr

Bret
 
Last edited:

bj383ss

Well-known member
Joined
Sep 29, 2011
Messages
3,166
Location
TX
Very Nice Steve. I see you have some of the Bessey Cabinet Clamps. My dad found about 20 of those on clearance at Home Depot and cleaned them out. They work great.

Bret
 

ztorres

Well-known member
Joined
Sep 22, 2016
Messages
195
Location
Iowa
Bret,
What makes those Bessey Cabinet Clamps better?


Sent from my iPhone using Tapatalk
 

bj383ss

Well-known member
Joined
Sep 29, 2011
Messages
3,166
Location
TX
Bret,
What makes those Bessey Cabinet Clamps better?


Sent from my iPhone using Tapatalk

They have a much more surface area that they clamp with it and keep the workpiece flatter. The more you tighten pipe clamps they can bow your piece.

Plus the Bessey clamps slide real easy. Just my opinion. Now I do have some of the Rockler pipe clamps and they are much better than the old Jorgensen pipe clamps.


Bret
 

schor

Well-known member
Joined
Apr 16, 2013
Messages
531
Location
Ajax, Ontario
The besseys work better, easier to adjust do not jamb/stick, but the jorgensens (honestly I am not even sure that is the name of them now) I can really crank on them hard. Just a feel thing, they just seem to have more clamp pressure.
 

bj383ss

Well-known member
Joined
Sep 29, 2011
Messages
3,166
Location
TX
So I want to post my first workbench which has most of my first tools on it. My dad actually made the bench for me out of 3 sheets of plywood. It served me well for about 3 years and then I built my second one.

Picture 11 by bjohnson388, on Flickr

Much bigger and more for woodworking. I am still using the top from this one on my current bench but rebuilt the entire bottom added cabinets the bench dog holes, and the woodworking vise.

Picture 29 by bjohnson388, on Flickr

20161113_202125 by bjohnson388, on Flickr

I have been digging through all the folders of my projects and phases of my woodshop trying to find photos of stuff I have that might be useful to others. I could spend all day posting pics of projects and my shop but not sure everyone wants to see that.

I ran across this. I store all my dowel pieces in here. Set it up when I started building scale models as I use a ton of dowels for all different sorts of things. As you can see I am very OCD and hate looking for stuff.

DSCN3163 by bjohnson388, on Flickr

I also have this Hardware Cabinet I built that holds a ton of Hardware.

Picture 275 by bjohnson388, on Flickr

Picture 276 by bjohnson388, on Flickr

Picture 277 by bjohnson388, on Flickr

Picture 279 by bjohnson388, on Flickr

Picture 280 by bjohnson388, on Flickr

Picture 281 by bjohnson388, on Flickr

Bret
 
Last edited:
To avoid these ads, REGISTER NOW!
Top Bottom