To avoid these ads, REGISTER NOW!

Woodworking 101--Tools and Tips

superautobacs

Well-known member
Joined
Oct 31, 2008
Messages
3,997
Location
Vancouver, BC
What do you guys think of Veritas hand planes? I read a lot about how good century-old planes can be, but for a novice woodworker, I feel like spending the extra money to have the assurance that I get something good right out of the box.
 
To avoid these ads, REGISTER NOW!

CRSINMICH

Well-known member
Joined
Aug 15, 2015
Messages
2,397
Location
Southeastern Michigan
Phase 2C continued​

Whew, that was horrible. I've done this to a few planes and haven't found anything this bad. That bed boss looks like it was attacked by a cold chisel.

Let's recap

PROS:
1) The plane looks good and appears to be sound.
2) National planes are scarce.
3) No. 5 1/2 size planes are scarce.
4) The cutting iron is a Stanley.

CONS:
1)The cap iron screw was user made but didn't quite fit.
2) The frog was not seating properly.
3) One of the bed bosses whas chewed up badly.
4) The cap iron (sometimes called a chip breaker) isn't the same width as the cutting iron.


What (if anything) can be done to correct the problems?

The cap iron screw is easily replaced unless the thread pitch is one of Stanley's proprietary oddball pitches or the owner who made the replacement used his screw to cut new threads in the iron. The cap iron could also be replaced if necessary.

I REALLY DO WANT YOUR SUGGESTIONS FOR REPAIRING THE CHEWED UP BED BOSS. I have some ideas but each has some drawbacks. What do you think I should do? Can this plane be saved as a user or will it be a shop decoration?

Also, I'd like your thoughts and guesses about what happened to this plane. Was the ill-fitting cap iron screw responsible for what followed? Was the frog or the bed badly cast or machined in the first place? Should a cold chisel be used to "adjust" a plane?


Errata:
I mentioned that this plane has quirks but here a some things I didn't mention: The depth adjustment screw and nut are not left-hand thread even though on most planes they are. The upshot of that is when you want to advance the blade you have to turn the nut counter-clockwise (anti-clockwise to Canadians and Brits) as if you were unscrewing it and vise-versa. It will take a little getting used to. It's also a sign that this is a fairly old plane. Also, the adjustment nut is brass, 1inch in diameter, and has lateral, not diagonal, knurling. What does that mean? Believe it or not, those are the kind of tiny things that are used to help date a plane.

The sharp eyed among you may have already noticed another quirk. There is no frog adjustment screw (See plane anatomy drawing in post #1615). On most planes there is a screw located directly under the depth adjustment nut. If the frog screws are adjusted to the correct tension then moving the frog forward or backward only takes a slight turn of the screw. Lack of a frog adjuster is also a sign of age. I attached a copy of a page from a 1914 Stanley catalog that illustrates and explains this feature.

GJ member mefast spotted another quirk of this plane. The lateral adjustment lever is different. It looks like a long thin strip of metal was held by two pliers, one at each end, and then the pliers were twisted in opposite directions. On most planes there are words stamped into the lever but not on this one. That's another little detail that helps identify and date a plane.

One last observation: Go back to post #1582 and look at the photos of the plane. Notice the fine rust and dust over everything? Now, look closely at the sole. See how shiny it is? I didn't do that. That's what it looked like when I bought it. With all the problems we discovered, this plane has been used recently which is a hopeful sign.

What we were doing in Phase 2 was a thorough assessment. Phase 3 (if there was one) would be Tuning the Plane. We actually started that process when the Sharpie made an appearance. When I started tearing the National apart I was intending to give it quick fettle and spiff-up and maybe post the finished product. When I got down to the chowdered bed boss, I realized that the National coud be used to teach some things about planes and plane assessment (teachers gotta teach). That's what led to this series.


COMMENTS ON ANY PART OF THIS SERIES ARE WELCOMED AND ENCOURAGED
 

Attachments

  • 1914 Bailey Adjustable plane illustration from Stanley catalog.jpg
    1914 Bailey Adjustable plane illustration from Stanley catalog.jpg
    146.5 KB · Views: 33
Last edited:

CRSINMICH

Well-known member
Joined
Aug 15, 2015
Messages
2,397
Location
Southeastern Michigan
What do you guys think of Veritas hand planes? I read a lot about how good century-old planes can be, but for a novice woodworker, I feel like spending the extra money to have the assurance that I get something good right out of the box.

superautobacs: I haven't tried a Veritas plane but I've heard good things about them. I was given a Lie Nielsen 5 1/2 for my birth and it's a real honey! There are some very good modern planes - but you'll pay for them. Your grandchildren will thank you.

EZ: I bought it at an estate sale a few blocks away from my house. I was telling mefast the other day that I live very close to the Canadian border but we still don't see very many Canadian tools.

Oh, thanks again for the tip about using a dark background for photos.
 
Last edited:

rrich1

Well-known member
Joined
Oct 7, 2015
Messages
793
rrich: I just noticed that your Record has Marples cast into the toe. Those are probably the two biggest names in British cutting edge tools. I'm going to have to investigate this further. Is there a name stamped into the cutting iron? That's where I'd expect to find Marples. They make wonderful chisels. (Well, they made wonderful chisels. Chinese made now.) If you have a chance and the time, could you post a picture of the toe so that all of the words around the knob can be read? Oh boy! More tool investigations.

trainer: You posted a Record too. Does it say Marples on the toe?

Craptain: I'm intrigued by your third picture. The one that shows the inside of the bed. The area where the frog sits is unusual, at least to me. It's Y-shaped. The machined bosses are just to the rear of the screw holes. The single stem of the Y that goes toward the mouth, is that also a pad for the frog? It looks like it could be seated rock solid if everything went together well. I can't wait until the next installment.

I think it's from the mid 80's.
6c16ab8008dc891284f29fdf15bba7dc.jpgeb20b943b7411620f1768684222ec0bf.jpg

Sent from my Pixel XL using Tapatalk
 

Attachments

  • eb20b943b7411620f1768684222ec0bf.jpg
    eb20b943b7411620f1768684222ec0bf.jpg
    76.3 KB · Views: 1
  • 6c16ab8008dc891284f29fdf15bba7dc.jpg
    6c16ab8008dc891284f29fdf15bba7dc.jpg
    62.5 KB · Views: 0
Last edited:
OP
J

jimreed2160

Well-known member
Joined
Aug 7, 2016
Messages
3,589
Location
Tallahassee FL
Superauto--Veritas planes are some of the best on the market today. They are high quality and they are known for their innovation. The owner, Robin Lee, is a tool nut and has one of the biggest collections of vintage ww tools around. I have several Veritas tools and all of them are top notch.

CRS--That plane is toast. You can find a much better user 5 1/2 bench plane. At least you have a few good parts.
 

CRSINMICH

Well-known member
Joined
Aug 15, 2015
Messages
2,397
Location
Southeastern Michigan
rrich: Thanks for the pictures. I've only done a little research on Marples-Record planes so far but it seems that it was a thing. I'll continue looking but I suspect that the answers to most of my questions will be found in a Marples' Planes site I found just before I went to bed last night. Here's a link in case you're interested: http://www.marplesplanes.com/


CAN (SHOULD) THIS PLANE BE SAVED?​

RESULTS SO FAR:
Save it - 0
It's toast - 2
WTH? - 2


I'd like to have some suggestions about how to deal with the damaged boss.
 
Last edited:

Craptain

Well-known member
Joined
Apr 18, 2013
Messages
4,028
Location
Tampa Bay FL
CRS. The heretic in me says put a paper gasket between the boss and the frog then tighten it down. If you are so intent on saving it.

Sent from my SM-G900T using Tapatalk
 

CRSINMICH

Well-known member
Joined
Aug 15, 2015
Messages
2,397
Location
Southeastern Michigan
CRS. The heretic in me says put a paper gasket between the boss and the frog then tighten it down. If you are so intent on saving it.

Sent from my SM-G900T using Tapatalk

Craptain: Thanks! That's the kind of suggestion that I'm looking for. I don't know if I am so intent on saving it but I am interested in how other people would go about dealing with that particular problem. You never know, it might come up on a rusty old plane that turns out to have been autographed by Stanley AND Bailey. I have you down for "It's Toast".
 
Last edited:

cheechi

Well-known member
Joined
Feb 29, 2012
Messages
4,384
Location
Triad, NC
I am more curious than really 'voting' would making it functional through (for example) custom fab machine parts, 3d printing, etc etc type methods where it's not the same vintage tool it was, be an option for guys interested in saving and working with planes?

For example, my dad felt it was really important to give me my grandfather's (whom I never met, died long before) #131 Yankee driver. It's on my pegboard with no intention to use it every day, but I bought a hex adapter for it since it only had the wide slotted bit it was sold with. Now with my example, it didn't involve modifying or changing the vintage of the tool itself, so I understand if new custom parts aren't considered for your planes here. Just a thought as I was reading through.
 

CRSINMICH

Well-known member
Joined
Aug 15, 2015
Messages
2,397
Location
Southeastern Michigan
I am more curious than really 'voting' would making it functional through (for example) custom fab machine parts, 3d printing, etc etc type methods where it's not the same vintage tool it was, be an option for guys interested in saving and working with planes?

For example, my dad felt it was really important to give me my grandfather's (whom I never met, died long before) #131 Yankee driver. It's on my pegboard with no intention to use it every day, but I bought a hex adapter for it since it only had the wide slotted bit it was sold with. Now with my example, it didn't involve modifying or changing the vintage of the tool itself, so I understand if new custom parts aren't considered for your planes here. Just a thought as I was reading through.

chhechi: Thanks!! This is another good example of why I asked for suggestions. I have considered doing some machining on it but the idea of 3D printing a part never occurred to me. It might not be something I'd use in this situation but who knows what use I might have for it in the future.

As for how much alteration a purist would consider appropriate, that would depend on the object and the purist. A general rule of thumb might be, "It's only original once". I have, and will continue to, alter old tools but it always makes me feel just a little odd. However, the guys in the old days altered their tools at will so why shouldn't I?

I also have my grandfather's Yankee screwdriver. It's a great tool but I can still feel how much it hurt to have my fingers pinched in the mechanism when using it as a kid.
 

ez-duzit

Well-known member
Joined
Jun 24, 2013
Messages
5,096
Location
Marina del Rey
With the latest info, change my vote from "looks restorable" to "you should be able to use it for something." :) At least a good lesson on where not to buy a plane.
 

CRSINMICH

Well-known member
Joined
Aug 15, 2015
Messages
2,397
Location
Southeastern Michigan
With the latest info, change my vote from "looks restorable" to "you should be able to use it for something." :) At least a good lesson on where not to buy a plane.

ez: Thanks for commenting. I changed your vote to WTH? because you at least thought something could be done with it. Don't be too sure that estate sales are not good places to buy planes. The sale where I bought this one had more than one plane. I've only talked about the National. Stay tuned (he said enticingly).

CAN (SHOULD) THIS PLANE BE SAVED?​

RESULTS SO FAR:
Save it - 0
It's toast - 2
Repurpose it (formerly WTH?) - 3
 
Last edited:

mefast

Well-known member
Joined
Sep 1, 2015
Messages
99
Location
Southwestern, Ontario
I wouldn't go restoring it now that you know what flaws it has. However, I don't like throwing tools away, so my suggestion would be to tune it so it can still make shavings (they won't be good ones) and use it to find nails or knots if you ever work on barn boards or reclaimed lumber. More or less a sacrifical tool to protect your better planes.
 

Craptain

Well-known member
Joined
Apr 18, 2013
Messages
4,028
Location
Tampa Bay FL
I wouldn't go restoring it now that you know what flaws it has. However, I don't like throwing tools away, so my suggestion would be to tune it so it can still make shavings (they won't be good ones) and use it to find nails or knots if you ever work on barn boards or reclaimed lumber. More or less a sacrifical tool to protect your better planes.
That is the answer.

Sent from my SM-G900T using Tapatalk
 
OP
J

jimreed2160

Well-known member
Joined
Aug 7, 2016
Messages
3,589
Location
Tallahassee FL
I wouldn't go restoring it now that you know what flaws it has. However, I don't like throwing tools away, so my suggestion would be to tune it so it can still make shavings (they won't be good ones) and use it to find nails or knots if you ever work on barn boards or reclaimed lumber. More or less a sacrifical tool to protect your better planes.

Good point. Toasted planes are where I got my education in rehab. Basket cases are excellent tools to learn on. And many of them can get turned around. I acquired a Stanley Handyman plane once. It was very poor quality with lots of backlash but I got some great practice tuning it up. Then one day, one of my co-workers was lamenting about his fishing dock. It seems that the edge of one of the decking boards cupped at the corner and seemed to find his foot every time he passed it. He wondered how I would fix it. Of course, the proper fix would be to replace the offending board, but this was just a corner. I presented him with the plane. The only stipulation was that he could not give it back to me.

He invested a few minutes of plane time and solved his problem.
 
OP
J

jimreed2160

Well-known member
Joined
Aug 7, 2016
Messages
3,589
Location
Tallahassee FL
Chisel rehab project

"Abandon all hope, ye who enter here." I really need a sign for the plane boneyard.

DSCN2305.jpg


Probably not what Dante had in mind, but it does provide a dramatic opening to this tutorial. It did not take long to find a candidate.

DSCN2306.jpg


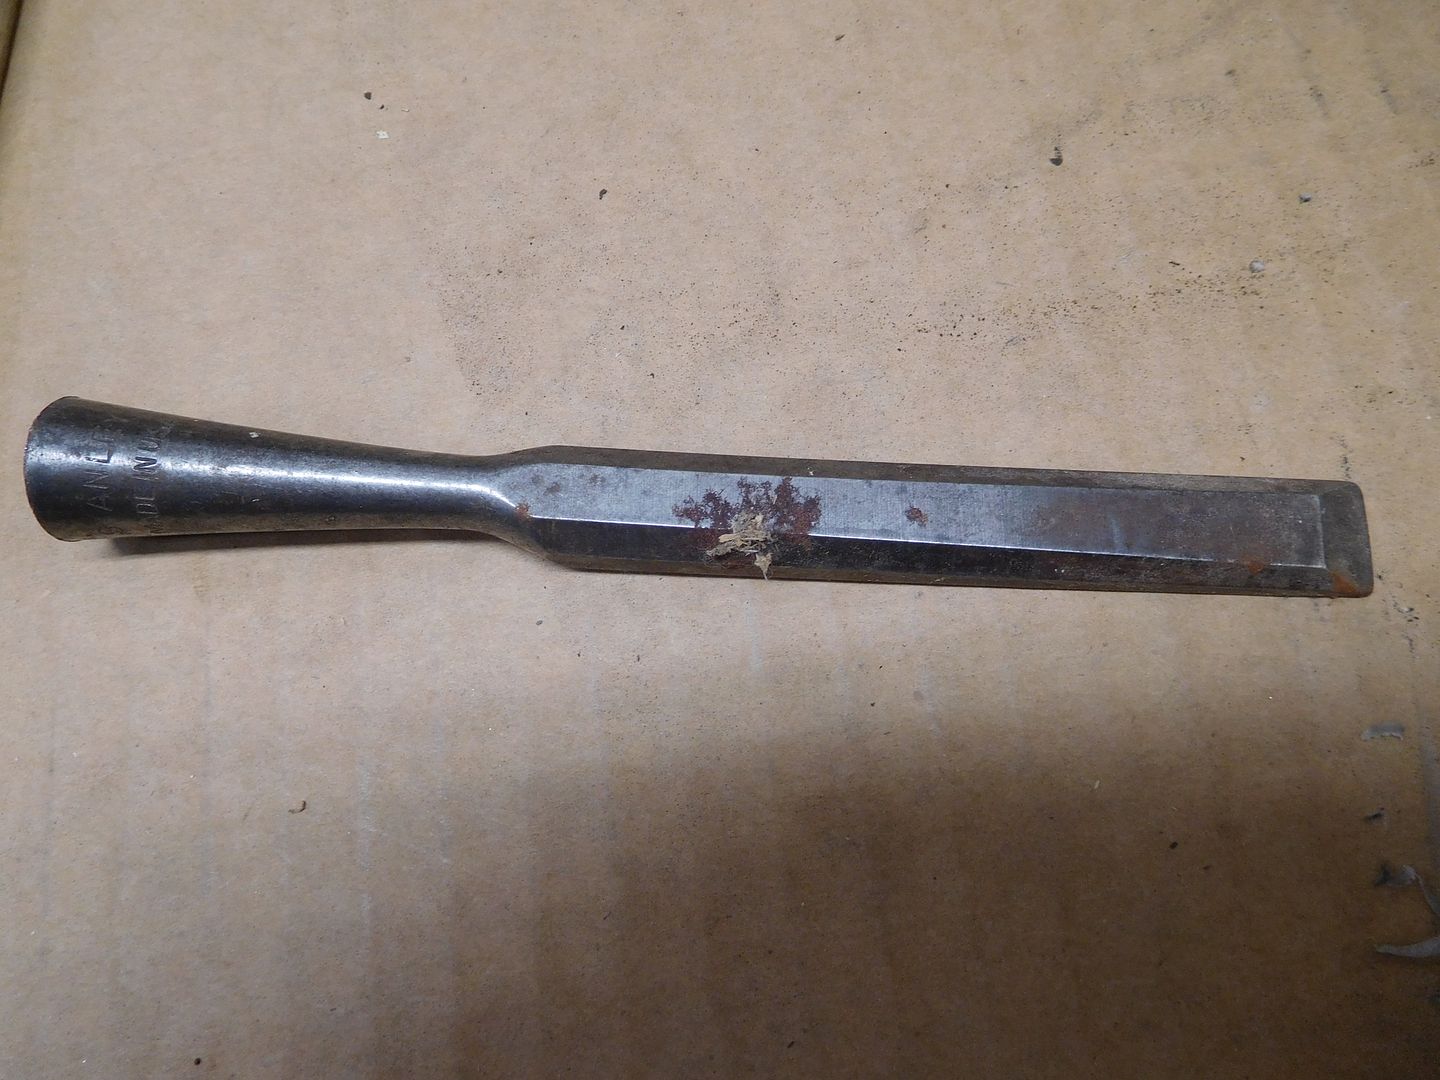
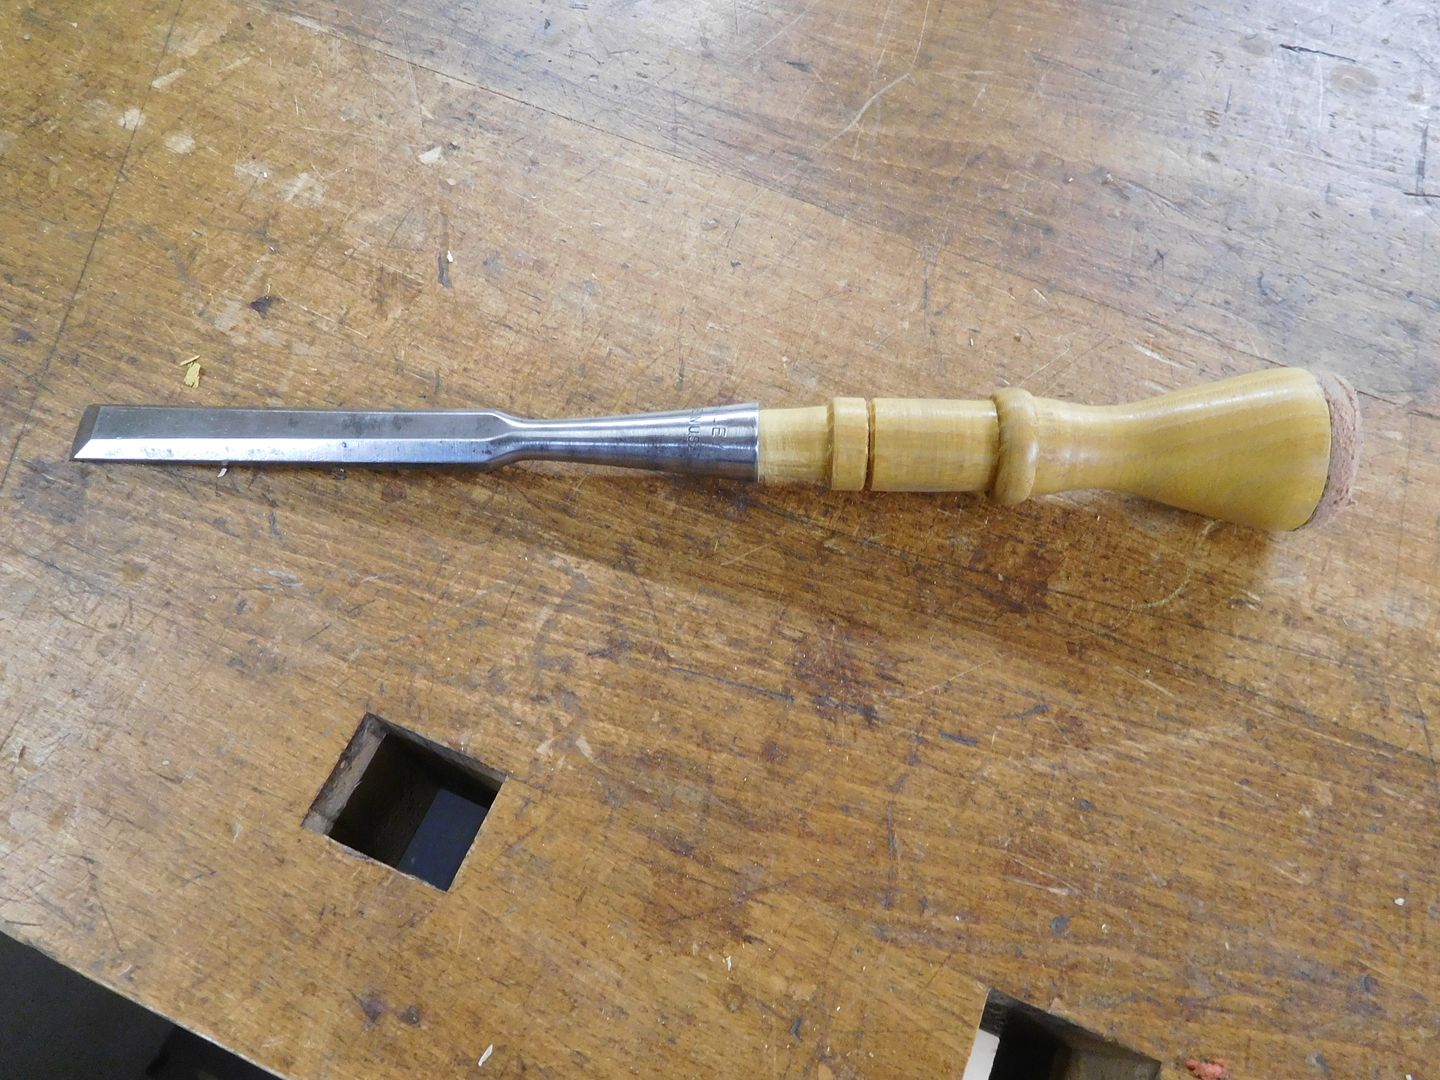
This is a vintage Stanley 1/2" socket chisel. It looks just like a collectible #750, but is only marked "Stanley, Made in USA".

DSCN2307.jpg


The chisel has no handle but is in nice shape otherwise. Except for a big sweat stain, it has almost no rust. The end is out of square and someone put a back bevel on the edge. Lazy? In a hurry? Who knows, but that is an easy fix. At least the socket was not abused with a hammer.

DSCN2308.jpg


DSCN2309.jpg


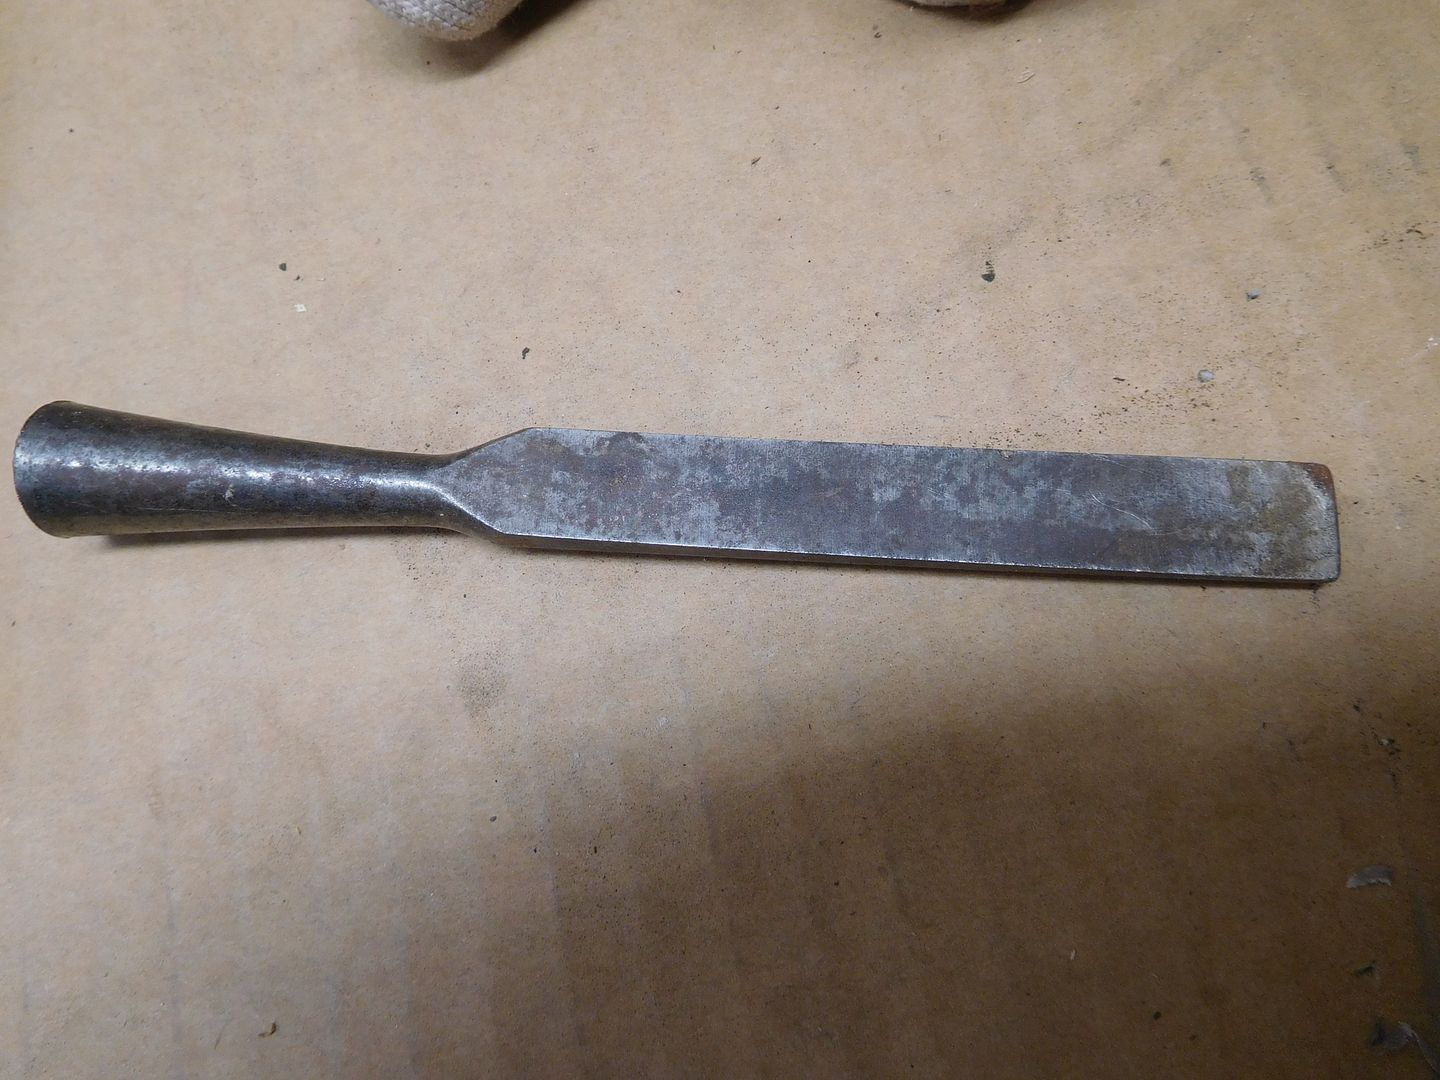
Looks like I have the makings of a three piece set. Here they are together, along with a vintage chisel that I use for a handle pattern.

DSCN2310.jpg


Looks like I need some 5/4 stock. Sawyers cut wood using 1/4 measurements for width. 4/4 stock is milled and planed to 13/16" thickness and 5/4 stock can be finished to 1".

DSCN2311.jpg


I used Osage Orange for the other handles and need to see if I have any left. Osage Orange is a hardy shrub with stickers that grows in the Mississippi basin. It was prized by Native Americans, who used it for bows. In fact, the French settlers called it Bois d'Arc. This stuff is a heavy 48 lbs per cubic foot and makes great tool handles.

WooHoo! Wood stash burped up a nice stick of OO for me to use.

DSCN2312.jpg


The sawdust is bright yellow although the color did not photograph well.

DSCN2313.jpg


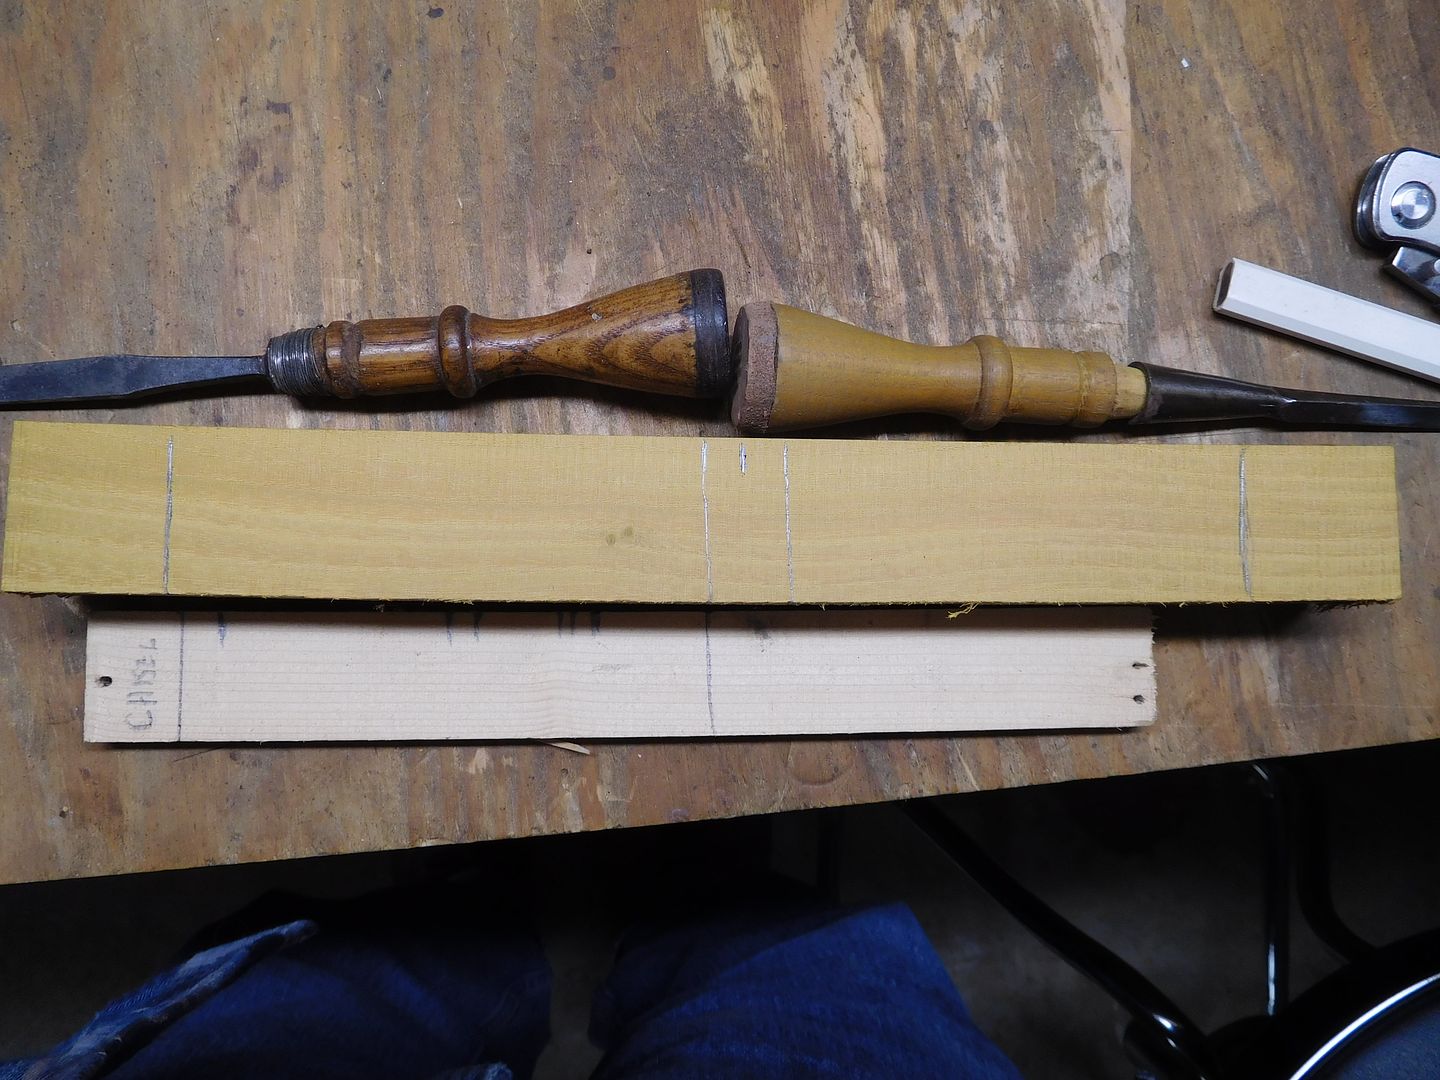
This stick is exactly 12 inches long and I hate to waste the wood. It will be more economical to make two handles instead of just one.

DSCN2314.jpg


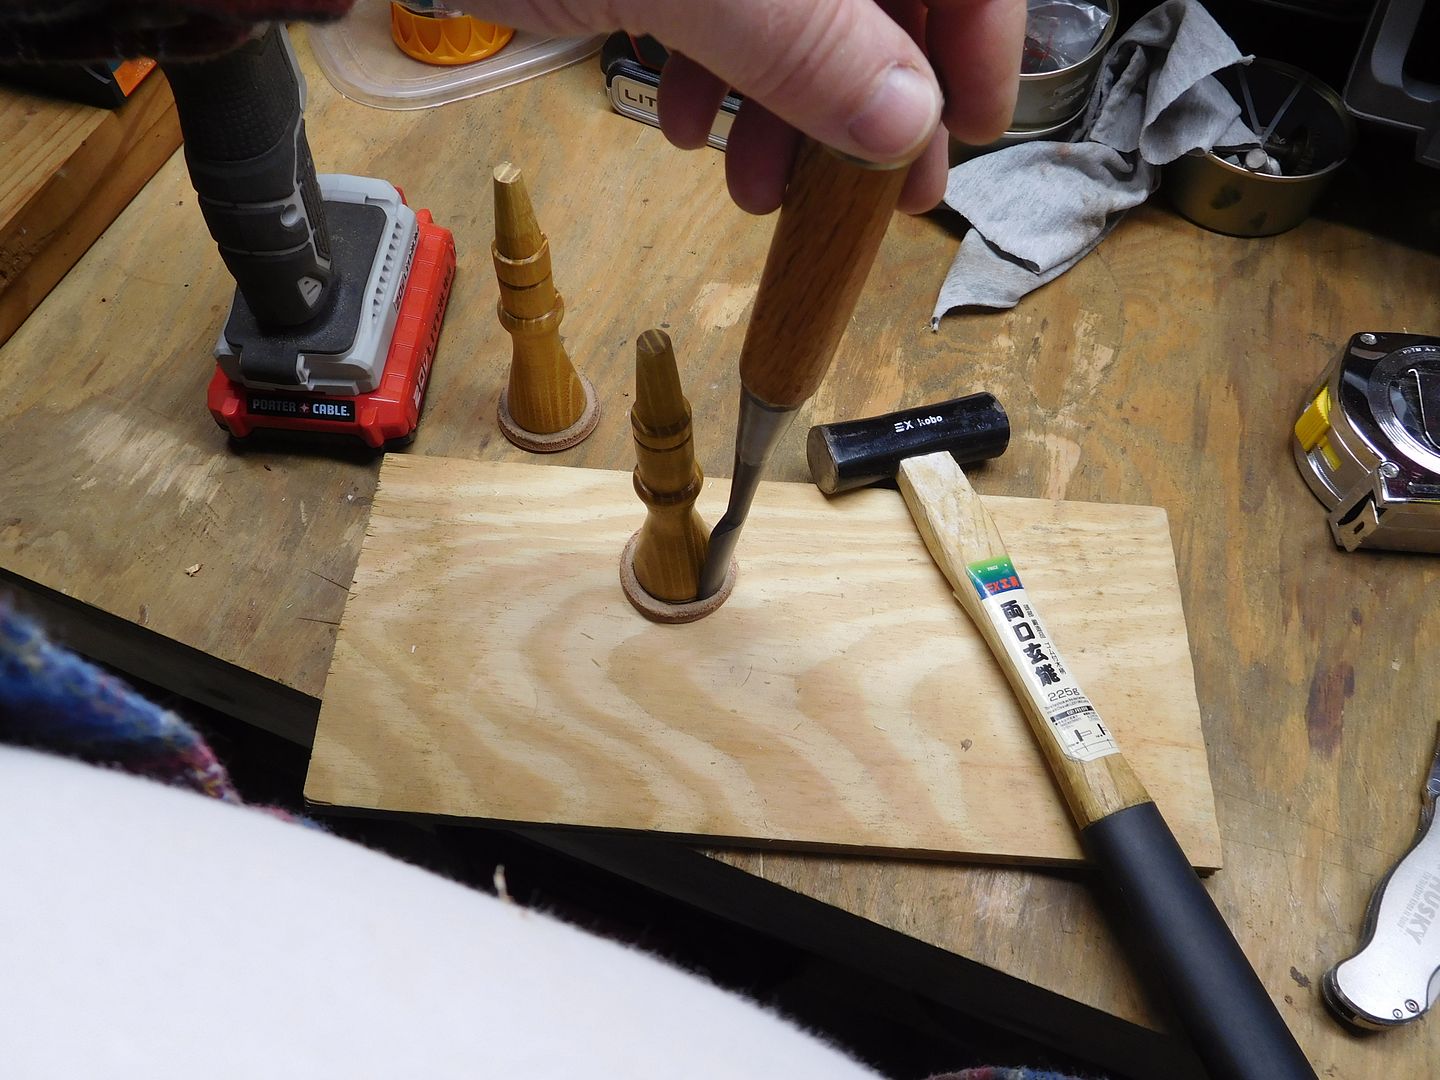
I start with a story stick. This is where I mark the transitions in the turning. The original was made for a tang chisel so I had to modify the pattern and add the pointy end for the socket.

DSCN2315.jpg


Just as I thought--this stick is perfect for a pair. Here they are laid out.

DSCN2316.jpg


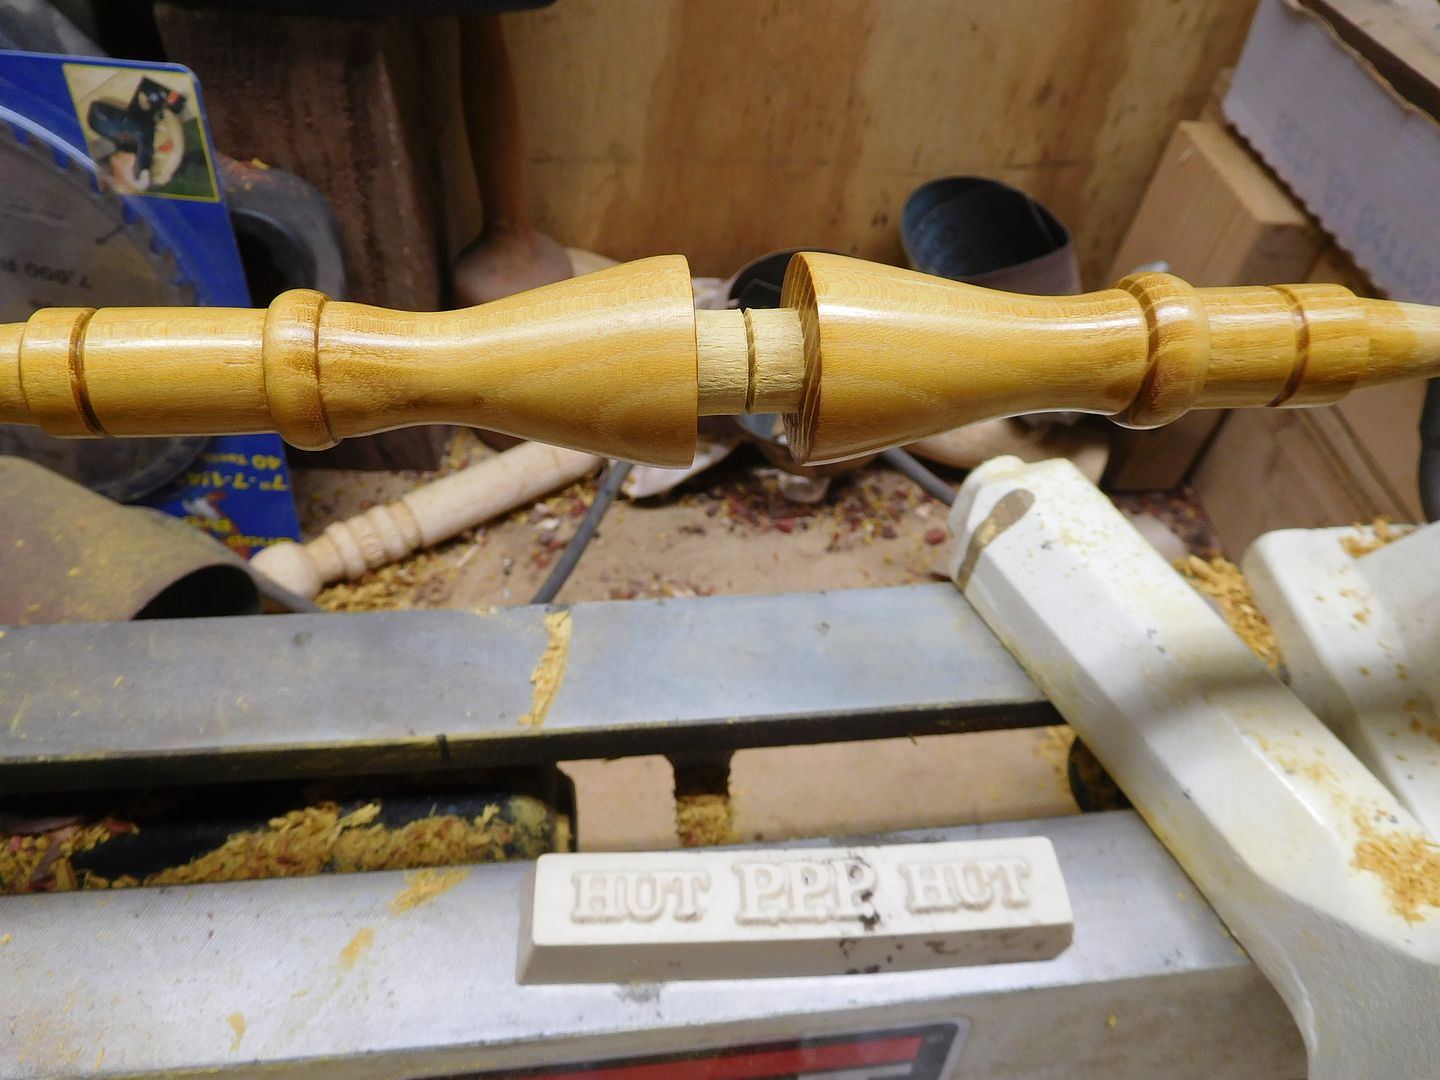
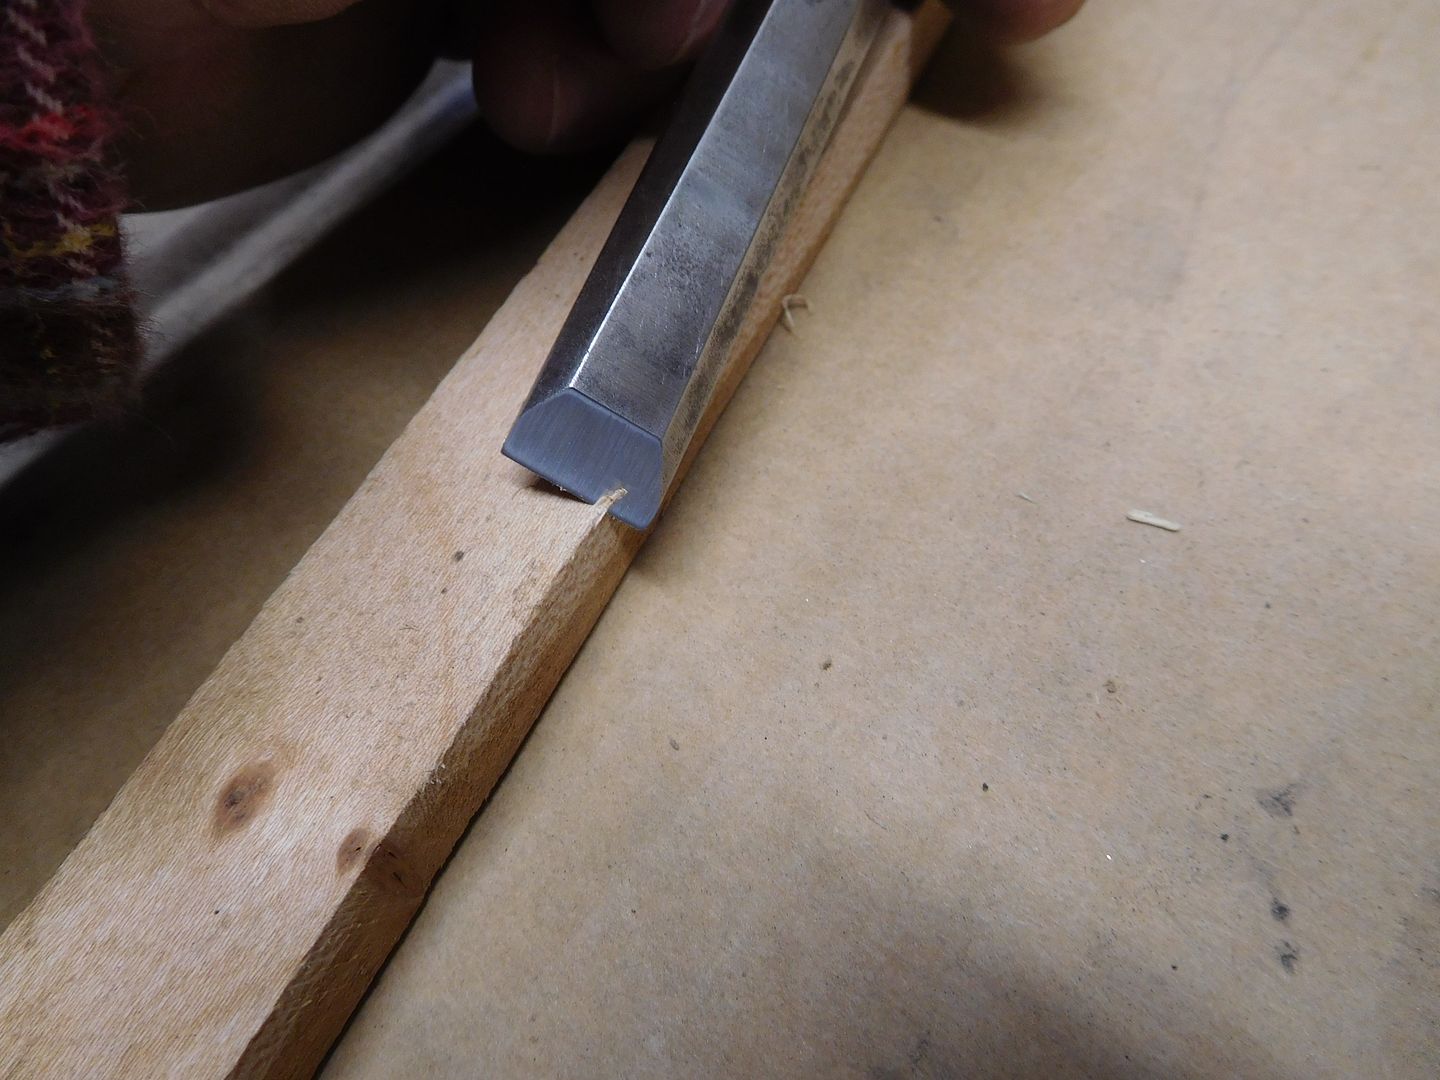
This wood is very tough, so I made saw kerfs for the headstock.

DSCN2317.jpg


Mount up!

DSCN2318.jpg


The first order of business is to make a cylinder. Notice how beautifully this OO turns.

DSCN2319.jpg


I removed one of the socket chisels just to check my story stick. Ugh. Mistakes were made. No problem. I just extended the transition point on the story stick. This is a good reason to keep your patterns and story sticks. Once you get it right, you can fire for effect.

DSCN2320.jpg


Here is the first cylinder after marking. Just hold the stick up to the cylinder while the lathe is spinning and use a pencil to make the transition marks.

DSCN2321.jpg


Now it is time to get serious on the lathe. More to follow.
 
OP
J

jimreed2160

Well-known member
Joined
Aug 7, 2016
Messages
3,589
Location
Tallahassee FL
Chisel rehab, continued

I use an outside caliper to size the turnings. Just set it to size and use it as a go-nogo gauge on the spinning wood. Here I am sizing the largest diameter.

DSCN2322.jpg


I stopped the lathe for a picture but you can see how sizing is done. Just turn until the cylinder matches the caliper.

DSCN2323.jpg


You may have noticed that these chisel handles have a leather top. It allows them to be struck lightly with a mallet and also allows them to be pushed with the heel of a hand. They are glued to a dowel on top of the handle. I found the exact (over) sized leather washer to use. These are pet bird toys but they make great chisel washers.

DSCN2324.jpg


Chisel #1 is taking shape.

DSCN2325.jpg


And yada-yada before you know it, the chisel handles are done.

DSCN2326.jpg


I finished with two grits of sandpaper (medium and fine). Then I cleaned up the mess and took a lunch break.

Since I have a bottle of pen finish, I think I will add finish to these handles while they are still on the lathe. Then I will remove them, cut them apart, and add the leather washers. Stay tuned as we continue this adventure.
 

Craptain

Well-known member
Joined
Apr 18, 2013
Messages
4,028
Location
Tampa Bay FL
I like the leather washers. I have wondered what to use. Any recommended suppliers?

Sent from my SM-G900T using Tapatalk
 
OP
J

jimreed2160

Well-known member
Joined
Aug 7, 2016
Messages
3,589
Location
Tallahassee FL
To avoid these ads, REGISTER NOW!
OP
J

jimreed2160

Well-known member
Joined
Aug 7, 2016
Messages
3,589
Location
Tallahassee FL
Chisel rehab continued

Fortified by lunch, I am ready for more shoptime. The next task is finish for the chisel handles. I use Hut on pens and like it. It is shellac based and dries quickly when applied to projects on the lathe.

DSCN2327.jpg


It is easy to use. Just turn on the lathe, hold a rag under the turning, and squirt on some product. Dry it and move on. It dries as you polish with the rag. Here is one already finished.

DSCN2328.jpg


Finish on both. The OO looks a lot like boxwood. When the Hut is dry, I apply wax and polish the piece.

DSCN2329.jpg


Now I can separate the pieces. I stopped using the bandsaw after a few accidents. Cutting unsupported pieces on the bandsaw can lead to a wardrobe mishap. It is pretty easy for the blade to snag a piece and slam it into the throat. That usually results in a flip which is almost always followed by something whizzing by your ear. The coping saw is much less dramatic. Anyway, if you did your turning right, there is very little to cut.

DSCN2330.jpg


Workbench vise comes in handy.

DSCN2331.jpg


I like a tight fit on the washer so the top stretches a bit. I bevel the bottom so it will go on better.

DSCN2332.jpg


I use Titebond III and let it soak for a minute or two. That makes the leather softer. Then I put it on and send it home with a mallet whack.

DSCN2333.jpg


Topside view.

DSCN2334.jpg


I put a sock on it and use a woodscrew to keep the edges down.

DSCN2335.jpg


Sometimes there is squeeze out. Wipe that off.

DSCN2337.jpg


I will let the glue dry overnight. The next step is to trim the leather to the sides of the chisel handle.
 

My Old Tools

Well-known member
Joined
Jun 4, 2014
Messages
5,435
Location
Hamrick Lake, TX
For the buggered up bed boss, you can bed the frog with rifle bedding compound. Look at Brownell's Acuglas. You could also build it up with braze and file it back to shape. I wouldn't bother and move on to another project.
 

mbatarga

Well-known member
Joined
Sep 14, 2005
Messages
883
Location
GA
I'm a member of the WoodWorker's Guild of Georgia (since 1995) and one of our members passed away several months back and the shop contents were being sold today. She was a doctor retired several years back and got into woodworking including turning - and had some nice large stationary machines.

They limited shoppers to 20 at a time - and I was 22 so didn't get to go in at the start. Got in about 15 minutes or so later, found a few hand tools of interest, then saw a bonanza deal. An older model Tormek sharpener on a custom wooden cabinet with 4 drawers filled with all of the accessories for the sharpener. Then I saw another sharpener - a WorkSharp brand - and the price was right for it too. The accessories for it were in the bottom drawer of the cabinet for the Tormek. A Tormek has been on my want list for some time and now I've got one.

The mystery is one item that was in the third drawer - pictures below. It is a cast part with a flat plate predrilled with 4 holes. I've looked and can't find any connection to the Tormek or the Worksharp sharpener. Any of you woodworkers have an idea of what mystery item might be?
 

Attachments

  • IMG_2100.jpg
    IMG_2100.jpg
    141.9 KB · Views: 77
  • IMG_2104.jpg
    IMG_2104.jpg
    125.9 KB · Views: 65
  • IMG_2103.jpg
    IMG_2103.jpg
    139.4 KB · Views: 67
  • IMG_2102.jpg
    IMG_2102.jpg
    137.2 KB · Views: 69
  • IMG_2101.jpg
    IMG_2101.jpg
    138.3 KB · Views: 63

jar944

Well-known member
Joined
Jul 26, 2010
Messages
5,907
Location
Northern VA
I finished the turning for the table base. I decided to build a jig to cut the sliding dovetails.


With the spindle done I moved to making new legs.


I have a bit of cleanup left to do.
 

superautobacs

Well-known member
Joined
Oct 31, 2008
Messages
3,997
Location
Vancouver, BC
A question for the woodworking community here:

I'm going to build my first woodworking bench which is going to be a portable/foldable bench with a work surface of 20" x 48".

I just got a peice of birch plywood in 3/4", cut to 20" x 48". Laminating them together would give me a 1.5" thick work surface.

I want to be able to use 3/4" holdfasts and accessories. Would using these accessories wreck the top veneer of the plywood? Is it critical to have a softwood or hardwood layer on top?

If I should be adding another layer, what would be an economical material and method to use?

My preliminary thoughts are:

-1/2" material would suffice?

-softwood to keep the cost down or should it be a hardwood species?


PS. The work bench on the attached photo is a communal work bench that the strata built.
 

Attachments

  • IMG_20170304_173014584.jpg
    IMG_20170304_173014584.jpg
    140.6 KB · Views: 56
Last edited:
OP
J

jimreed2160

Well-known member
Joined
Aug 7, 2016
Messages
3,589
Location
Tallahassee FL
Mbat--Hello and welcome. I was a member of the WW Guild of GA from about 1995 until I moved to FL in 2004. It was a great group and I remember meeting at the community college near my home. Sorry to hear about the passing of a member. Glad to hear that her tools were appreciated. You made a good score on your sharpening items. The odd piece of metal belongs to an import patternmakers vise. It is a jaw accessory that helps clamp irregularly shaped objects. I have one just like it.

Jar--You are making great progress on your table reconstruction. I am enjoying your progress shots.

Superauto--Since you are in BC, I recommend maple, oak, or ash. Any of these woods should give you the strength you are looking for. Good luck with your bench.
 

CRSINMICH

Well-known member
Joined
Aug 15, 2015
Messages
2,397
Location
Southeastern Michigan
Old Tools: Thanks for that suggestion. Again, it's exactly why I asked for them. I was thinking of trying something like that but I have never heard of bedding compound. I'll look into it. Thanks again.

p.s. My next project is already in the works.

jim: Chisel Rehab was a timely tutorial. I'm about to launch Sharpfest 2017. Every so often I borrow my brother's Tormek and sharpen everything in the shop that has an edge. Since I go to a lot of estate sales and I can't resist a good old chisel I usually have plenty to do. By the way, my brother has a different source of leather rings - he makes them. His brother goes to a lot of estate sales and once found a set of leather punches that vary in size from 1/4 inch to 1 1/2 inches. He stacks a few pieces of leather and using a small Dake press (that his brother found at a garage sale) punches out leather rings. Thanks again for the tutorial.

jar: That table is coming out nicely. You guys who do turning just amaze me. I've dabbled at it a little but the results were not encouraging. My brother (see above) is a whiz at it. You'll never guess how he got his lathe (see above). Keep posting about the table. I'd like to see what it looks like when you finish.
 
Last edited:

Craptain

Well-known member
Joined
Apr 18, 2013
Messages
4,028
Location
Tampa Bay FL
Jar, I am inspired by your table project. In particular the jig assembled over the lathe. Smart thinking or common sense. I don't know. But I usually only have one of them at a time.

Sent from my SM-G900T using Tapatalk
 
OP
J

jimreed2160

Well-known member
Joined
Aug 7, 2016
Messages
3,589
Location
Tallahassee FL
Chisel rehab continued

Well this thing cannot go on forever. When we left, the handles were in clamps and the glue was drying. I went in today and found them both in great shape.

DSCN2338.jpg


Now it is time to remove that extra leather. There are probably dozens of ways, with the neatest being a sharp leatherworkers knife. But I am a woodworker and most of my sharp things are chisels. And I have a set of gouges. The middle one fits the radius perfectly.

DSCN2339.jpg


The leather is thick and it takes five or six trips around to punch through. The finished product looks good to me. After all, it is meant to get punched around a lot.

DSCN2340.jpg


Now we can move on to the chisel. Remember this guy?

DSCN2308.jpg


DSCN2309.jpg


Well, he looks much better after a spa treatment on the deburring wheel.

DSCN2341.jpg


DSCN2342.jpg


The body of the chisel is now bright and shiny but that beauty is only skin deep. The business end is in sorry shape.

DSCN2345.jpg


DSCN2346.jpg


There is pitting on the back, the corners are rounded, and the edge has a back bevel. Ouch. Let's start with the back.

First we need some help from Mr Sharpie.

DSCN2349.jpg


And then it is time for AO sandpaper. I used the 220 and followed with 400.

DSCN2350.jpg


That removed most of the pitting and put a shine on the back. You can see the reflection of the overhead light in the photo.

DSCN2351.jpg


Now it is easier to see the back bevel. Ouch again!

DSCN2355.jpg


Time to start grinding. Stay tuned.
 
OP
J

jimreed2160

Well-known member
Joined
Aug 7, 2016
Messages
3,589
Location
Tallahassee FL
Chisel rehab continued

Let's get everything in place before we start grinding. This procedure creates heat and that is death to the temper of tool steel. It concentrates in small areas like the cutting tip. I keep my tools cool with water.

DSCN2347.jpg


The first task is to square up the edge and then remove the back bevel. This is accomplished by grinding the edge at 90 degrees to the body. I will use the coarse white wheel.

DSCN2348.jpg


I had to remove quite a bit of steel to get back to a good profile. This chisel lost about 3/32 altogether.

DSCN2357.jpg


DSCN2358.jpg


I started grinding the bevel freehand on a Veritas rest. After a bit I noticed the wheel was not cutting so I dressed it with a diamond Tee dresser. As you can see, the wheel looks pretty clean. But looks are deceptive. Wheels need to be dressed often in order to work properly.

DSCN2359.jpg


Grind, dunk, grind, dunk. It took about three or four minutes to grind out the bevel.

DSCN2360.jpg


And then we move on to the honing plate. I used 800 paper to shine up the back.

DSCN2361.jpg


And I used 400 and 800 paper on the bevel.

DSCN2362.jpg


Cuts good.

DSCN2363.jpg


Now for the handle. The handle socket looked OK but when grinding I noticed a burr. Someone hit the socket a few times. I spun it against the grinding wheel and took off the burr. Then I used needle files to remove the inside burr.

DSCN2364.jpg


DSCN2365.jpg


I spun the handle in the socket and then took a look. Nice. The best thing to see is socket grime evenly distributed along the cone.

DSCN2366.jpg


Chisel in left hand, mallet in right hand, handle in socket. Wham! Home it goes.

DSCN2367.jpg


Family photo.

DSCN2368.jpg


And the money shot.

DSCN2369.jpg


If you have not rehabbed a chisel, you have missed a lot of fun. Odd and abused chisels can be had for low money if you look. Fixing them up is both fun and rewarding. Thanks for looking.
 

ztorres

Well-known member
Joined
Sep 22, 2016
Messages
195
Location
Iowa
Made some more boxes this past week with some of the wood I got at Rockler last week.

First box

05b9d89fb6761a1f301acf1214cff8a9.jpg

This has red oak corner pieces dowel jointed to pieces of poplar (bottom) then a piece of mahogany (middle) with hard maple as the top. I need to come up with a better method to make the corner pieces identical.

Second box:

d4cd63a20d12ec5a7c772f1a1e00c84f.jpg

This box has Padauk and Cherry sides lap jointed together.

Third box:

2c3af7b42157ba04c365e51ed41f12d4.jpg

This is Mahogany and Black Walnut lab jointed together as well.

All box are finished with three coats of Minwax Wipe-On Poly Satin


Sent from my iPhone using Tapatalk
 

Attachments

  • 2c3af7b42157ba04c365e51ed41f12d4.jpg
    2c3af7b42157ba04c365e51ed41f12d4.jpg
    440 KB · Views: 1
  • d4cd63a20d12ec5a7c772f1a1e00c84f.jpg
    d4cd63a20d12ec5a7c772f1a1e00c84f.jpg
    409.7 KB · Views: 1
  • 05b9d89fb6761a1f301acf1214cff8a9.jpg
    05b9d89fb6761a1f301acf1214cff8a9.jpg
    420.2 KB · Views: 2

CRSINMICH

Well-known member
Joined
Aug 15, 2015
Messages
2,397
Location
Southeastern Michigan
I must have built up some good karma by rehabbing that National plane. Look what I just bought at the local flea market for $10. Stanley No.3. Not exactly near mint condition but minty fresh enough. This is how it functioned "out of the box". I haven't done anything to it - yet.

LATE EDIT: It's a Type 15 1931-1932
 

Attachments

  • 3 Stanley No3 closeup.jpg
    3 Stanley No3 closeup.jpg
    139.3 KB · Views: 81
  • 2 Stanley No3 right test.jpg
    2 Stanley No3 right test.jpg
    142.6 KB · Views: 73
Last edited:
OP
J

jimreed2160

Well-known member
Joined
Aug 7, 2016
Messages
3,589
Location
Tallahassee FL
CRS--Kudos to karma. That is a nice plane. The older I get the more I like the #3 size. It is large enough to do some work but light enough to push for a long time.
 

Craptain

Well-known member
Joined
Apr 18, 2013
Messages
4,028
Location
Tampa Bay FL
I continued with the rehab. I had given the appropriate surfaces a quick paint job. So today I was able to start on the blade. While I know it is not a great blade, it is what I have. So a few, or rather quite a few strokes on 220 grit paper finally got a cleaner looking bevel. Followed by diamond stones and then just had to test it. With no knob or tote it was not easy but I had to try. After a little adjustment this is what I got.

0e5c1a33d94ef1ddc1c031c538589fb2.jpg

Far from perfect but good enough for the future of this plane. Now on to make a new tote.

Sent from my SM-G900T using Tapatalk
 

Attachments

  • 0e5c1a33d94ef1ddc1c031c538589fb2.jpg
    0e5c1a33d94ef1ddc1c031c538589fb2.jpg
    120.5 KB · Views: 2

jar944

Well-known member
Joined
Jul 26, 2010
Messages
5,907
Location
Northern VA
Unrelated to the table, but this showed up on friday. Other than a few test cuts I haven't had a chance to use it yet.

 
To avoid these ads, REGISTER NOW!
Top Bottom