You are using an out of date browser. It may not display this or other websites correctly.
You should upgrade or use an alternative browser.
You should upgrade or use an alternative browser.
Woodworking 101--Tools and Tips
- Thread starter jimreed2160
- Start date

Bob Heine
ALLIANCE MEMBER
@CRSINMICH, growing up in the 1950s that was casual dress. My grandfather doing a little fly fishing (he took off his vest because it was hot):I can't make out any saws in the picture but something tells me they would be using gents' saws.
OLDE SCHOOL

HenryAZ
MEMBER EMERITUS
The saws are probably underneath that mess of wood shavings and other miscellaneous tools laying around. I guess "keeping your work area clean" was the next course.I can't make out any saws in the picture but something tells me they would be using gents' saws.
OLDE SCHOOL
CRSINMICH
Well-known member
Bob: I used to do a lot of fly fishing, but I was never that natty. Knotty yes, but not natty. It would almost be required to dress up when using a split cane rod like your grandfather did.
Bob Heine
ALLIANCE MEMBER
@CRSINMICH, my grandfather taught me to tie my own flies and cast with that pole. Also taught me to spin the male brass joints in the side of my nose for lubrication (the sections always came apart easily). I spent a lot of my allowance and wages on fishing gear. When I turned 8 Dad bumped me up from 25¢ to 33¢ an hour to spread 4 truckloads of topsoil and pick out all the rocks. I thought I was smart when I bought a cheap fiberglass fly rod but it was terrible. The casting, spinning and salt water fiberglass rods were OK. Fishing for spawning Salmon in Alaska ended that sport for me.Bob: I used to do a lot of fly fishing, but I was never that natty. Knotty yes, but not natty. It would almost be required to dress up when using a split cane rod like your grandfather did.
CRSINMICH
Well-known member
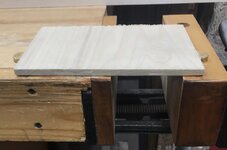
Walnut Serving Tray
Another hand-tool-only project
Attachments
-
 Walnut serving with finish.JPG491.3 KB · Views: 99
 -
 Walnut serving tray dry fit.JPG468.3 KB · Views: 60
 -
 Plowing grooves.JPG648.4 KB · Views: 58
 -
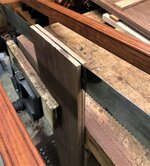 Resawing close up.JPG765.2 KB · Views: 54
 -
 Resawing with frame saw.JPG1.1 MB · Views: 54
 -
 Kerfing plane for resawing close up.JPG940.7 KB · Views: 54
 -
 Kerfing plane for resawing.JPG888.3 KB · Views: 69
turbowoodworker
Well-known member
Interesting method, and good to see. I get so stuck thinking power tools, that I forget I own tools like a bow saw, etc. nice project.
Notgrownup
Well-known member
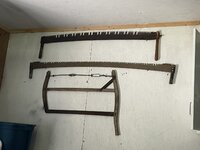
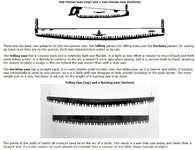
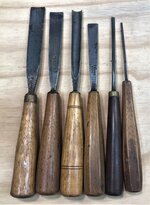
I used to watch my grandfather work wood with so many hand tools. Now I always look for something that has a battery or a cord…don‘t get me wrong, I know how to use them, I’m just lazy I guess. My SIL gave me the 4 mounding planes, I used the double handle saw pictured on top and I recently acquired the miter trimmer which I use a lot making picture frames. I haven’t used the planes yet.
Attachments


CRSINMICH
Well-known member
turbo: Thanks. I started with power tools but gradually switched to hand work. I like the feeling of actually working the wood (and the quietness).
Notgrownup: Don't worry about laziness - scratch any hand woodworker and you're liable to find power tools. Those planes look like they're in good condition. The second from the left looks like it's a boxed beading plane. The double handed saw on the top has a Disston tooth pattern (I think). My grandfather's saw has the same pattern.
Notgrownup: Don't worry about laziness - scratch any hand woodworker and you're liable to find power tools. Those planes look like they're in good condition. The second from the left looks like it's a boxed beading plane. The double handed saw on the top has a Disston tooth pattern (I think). My grandfather's saw has the same pattern.
Last edited:
Notgrownup
Well-known member
I cut a lot of cedars with my Dad with that saw to build a log cabin as a youngster in New Brunswick Canada. Great Memories.turbo: Thanks. I started with power tools but gradually switched to hand work. I like the feeling of actually working the wood (and the quietness).
Notgrownup: Don't worry about laziness - scratch any hand woodworker and you're libel to find power tools. Those planes look like they're in good condition. The second from the left looks like it's a boxed beading plane. The double handed saw on the top has a Disston tooth pattern (I think). My grandfather's saw has the same pattern.
CRSINMICH
Well-known member

Notgrownup
Well-known member
I think mine is perforated lance style
Notgrownup
Well-known member
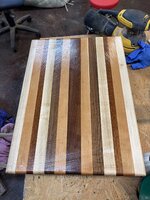
Working on my 2nd cutting board… Meh! It’s not thick enough but it will work. It’s for my SIL to chop BBQ, still needs some sanding and ran through the router and router some hand holds, then oiled up. Got it all oiled up today.
Attachments


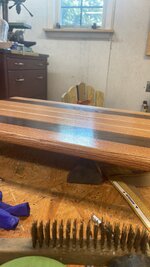
Last edited:
I got a set of the [in]famous Aldi chisels a few years ago and have found them pretty handy. The backs certainly flatten faster than any of my antiques. Today, I saw and spent $20 for a set at Lidle. They have the same DIN handles, but six to the set rather than four. I have no idea why they call them mortising chisels, 'cause they aren't that. Complete with a small case of questionable usefulness. https://www.lidl.com/products/413777_2110_0001
PugetDude
ALLIANCE MEMBER
I got a set of the [in]famous Aldi chisels a few years ago and have found them pretty handy. The backs certainly flatten faster than any of my antiques. Today, I saw and spent $20 for a set at Lidle. They have the same DIN handles, but six to the set rather than four. I have no idea why they call them mortising chisels, 'cause they aren't that. Complete with a small case of questionable usefulness. https://www.lidl.com/products/413777_2110_0001
Never heard of Lidl before… the chisels look interesting. No shipping options, though.
I got a set of the [in]famous Aldi chisels a few years ago and have found them pretty handy. The backs certainly flatten faster than any of my antiques. Today, I saw and spent $20 for a set at Lidle. They have the same DIN handles, but six to the set rather than four. I have no idea why they call them mortising chisels, 'cause they aren't that. Complete with a small case of questionable usefulness. https://www.lidl.com/products/413777_2110_0001
Lidl is another German supermarket chain very much like Aldi with a section of temporary oddball stuff. Right now it is "Dad" stuff for father's day, so tools and imitation ronco fishing rods. The stores tend to be a little nicer than Aldi. There seem to be new stores all the time, but the "locate a store" function says still East Coast.Never heard of Lidl before… the chisels look interesting. No shipping options, though.
Last edited:
CRSINMICH
Well-known member
CRSINMICH
Well-known member
Yeah, sorry. I shouldn't have mentioned the price. That was crass, but I couldn't believe my luck. I'm used to finding the odd dinged up vintage chisel but this was at another level. To make up for my boorishness, I won't even mention the other three chisels I got at the same sale.
Mr. Wonderful
Well-known member

I wanted to see what you guys thought on this. I have an old cabinet with a butcher block maple top. It's starting to come apart in a couple places. I dont think I can spread some of the cracks any further. What type of glue do you think would be best?? Regular titebond? CA? This would not be a food surface and will likely be treated with tung oil when finished.
Thanks!
I've used regular titebond for this before without much success... I just don't think it penetrates deep enough, plus it gets most of its strength when the gap between pieces is really small (ie they are firmly compressed), and it's hard to eliminate the gaps completely even with strong clamps. I've had some success with epoxy. It's a bit tough to use though. You have to contain the holes, either with green painter tape or silicone caulk. I like 5 min epoxy for this because it's easier to control the inevitable seep through, even though it's not as strong as a longer setting version. Then just have to sand the top. I also usually use tung oil, one note with maple, I've had epoxy stain the edges of the crack just a shade darker than what the tung oil does and had to sand a fair amount down to get rid of it. Might not be much of a problem for a workbench, but it can be annoying for furniture. The other alternative is to rip the cracks and reglue them, though for each crack you lose a blade kerf of top width.
I wanted to see what you guys thought on this. I have an old cabinet with a butcher block maple top. It's starting to come apart in a couple places. I dont think I can spread some of the cracks any further. What type of glue do you think would be best?? Regular titebond? CA? This would not be a food surface and will likely be treated with tung oil when finished.
Thanks!
PS nice Dawn, I've been unsuccessfully looking for one of those for a while
Do the cracks go all the way thru the top?
I wanted to see what you guys thought on this. I have an old cabinet with a butcher block maple top. It's starting to come apart in a couple places. I dont think I can spread some of the cracks any further. What type of glue do you think would be best?? Regular titebond? CA? This would not be a food surface and will likely be treated with tung oil when finished.
Thanks!
If yes, I would use Titebond 2. If the glue is hard to get down into the crack and cover the full thickness of the top, use a shop vac.
Apply Vaccum on the bottom side of the crack to pull the glue through. Sometimes I’ve found that a new bottle of glue will run down into the cracks easier.
If the crack isn’t all the way through I’ve used air pressure to force the glue down into the crack.
Either way i would do a dry clamp and see how the cracks close up.
Mr. Wonderful
Well-known member
Ok thanks! Im not sure if this block has any metal in it or not. I'll have to wand it when i get it off the cabinet. Cutting and regluing will be my last try I think.I've used regular titebond for this before without much success... I just don't think it penetrates deep enough, plus it gets most of its strength when the gap between pieces is really small (ie they are firmly compressed), and it's hard to eliminate the gaps completely even with strong clamps. I've had some success with epoxy. It's a bit tough to use though. You have to contain the holes, either with green painter tape or silicone caulk. I like 5 min epoxy for this because it's easier to control the inevitable seep through, even though it's not as strong as a longer setting version. Then just have to sand the top. I also usually use tung oil, one note with maple, I've had epoxy stain the edges of the crack just a shade darker than what the tung oil does and had to sand a fair amount down to get rid of it. Might not be much of a problem for a workbench, but it can be annoying for furniture. The other alternative is to rip the cracks and reglue them, though for each crack you lose a blade kerf of top width.
PS nice Dawn, I've been unsuccessfully looking for one of those for a while
Thanks on the Dawn. I just got it at another sale. it's my second one.


Mr. Wonderful
Well-known member
At least one goes all the way through. Good idea with the air and vaccum. I'll definitely try that!Do the cracks go all the way thru the top?
If yes, I would use Titebond 2. If the glue is hard to get down into the crack and cover the full thickness of the top, use a shop vac.
Apply Vaccum on the bottom side of the crack to pull the glue through. Sometimes I’ve found that a new bottle of glue will run down into the cracks easier.
If the crack isn’t all the way through I’ve used air pressure to force the glue down into the crack.
Either way i would do a dry clamp and see how the cracks close up.
HenryAZ
MEMBER EMERITUS
You really need to get the surfaces-to-be-glued cleaned for a good bond. If they have been open for any length of time, there has got to be surface contamination on the glue face. I would rip the top at the open joints so you can really get to them, then scrape or lightly joint those edges to make a clean surface for the glue. The different width boards in your new top will add some character to it.")
Notgrownup
Well-known member


CRSINMICH
Well-known member
BLUNT CHISELS
Do any of you have any experience using blunt chisels?
Attachments


Last edited:
Never seen that before, but it sounds brilliant. I'm going to have to try that out on an old chisel or two.After seeing blunt chisels recommended in Bill Carter and Tom Fidgen videos, I thought I'd give them a try. They're regular chisels that are ground to 90 degrees. They're used to pare end grain on hardwoods. I'm going to have to refine mine a bit but they seem to be worth it. Carter and Fidgen emphasize that they are blunt - not dull. They work like scrapers with handles. My samples is end grain maple that had some wood stain on it.
BLUNT CHISELS
Do any of you have any experience using blunt chisels?
CRSINMICH
Well-known member
pachypod: You should watch Bill Carter's videos about it before you sacrifice any chisels. It's simple to do and, once you have a working edge, re-sharpening is even easier. You'll be back using the chisel before your grinder stops spinning. IMPORTANT: The first step in making a blunt chisel is the same as with a regular one - Flatten the back!
Bill also has a set of blunt gouges.
Bill also has a set of blunt gouges.
Notgrownup
Well-known member
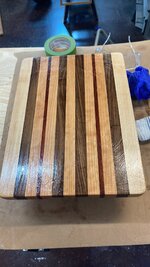
Couple more boards and charcuterie board intone books. I am enjoying making these. It’s good therapy. Also made a walnut frame polished with linseed oil for my sister to hold a painting my wife made of apicturewe took 4 months ago ona wharf in Cana
Attachments


CRSINMICH
Well-known member
ROUBO BOOKSTAND
Andre Roubo (1739-1791) wrote L'Art du Menuisier which is THE book on joinery. One of the items in it was a bookstand. It's deceptivelysimple. It's a folding stand made from only one piece of wood with no hinges. Even after making a small practice stand and this full
size stand it still seems like it should just fall apart. There's an episode of The Woodwrights Shop in which Roy Underhill makes one.
Attachments


CRSINMICH
Well-known member
MODIFIED PAD SAW
(it has to be an odd number) a small starter hole is drilled at each end of the slot. Then a thin, narrow saw blade is inserted into one hole and is the starting point for sawing down the line to the hole at the other end. That's easier said than done. It's repetitious and slow going. To help make it easier I modified a hacksaw blade to fit into a pad saw handle. Hacksaw blades are thin and leave a very narrow kerf. The leading edge of the blade is tapered and its teeth are pointing backward so that it cuts on the pull stroke. The pad saw handle is hollow and the blade is entirely inside of it. When beginning the slot only a short length of blade is sticking out which makes it stiffer. Once the slot is long enough that the blade sticks out the other side of the joint, more of the blade can be extended until you are sawing regularly.
Attachments


Last edited:
rlitman
Well-known member
I like what you did there, but you might want to look into hobby knife saw blades. X-Acto used to make them, but there's still good stuff out there. Something like this has an even thinner kerf:One of the hardest parts of making a Roubo stand is making the slots between the knuckles joints. After laying out the knuckles
MODIFIED PAD SAW
(it has to be an odd number) a small starter hole is drilled at each end of the slot. Then a thin, narrow saw blade is inserted into one hole and is the starting point for sawing down the line to the hole at the other end. That's easier said than done. It's repetitious and slow going. To help make it easier I modified a hacksaw blade to fit into a pad saw handle. Hacksaw blades are thin and leave a very narrow kerf. The leading edge of the blade is tapered and its teeth are pointing backward so that it cuts on the pull stroke. The pad saw handle is hollow and the blade is entirely inside of it. When beginning the slot only a short length of blade is sticking out which makes it stiffer. Once the slot is long enough that the blade sticks out the other side of the joint, more of the blade can be extended until you are sawing regularly.

CRSINMICH
Well-known member
A present for a nephew and newly acquired niece-in-law. White oak. Hand tools only. Vertical reeding done with a Stanley #66. It's a fun tool to use. The brass plaque with their names and wedding date is still at the engravers.
Attachments


CRSINMICH
Well-known member
QUICK UNPLANNED REFURB
Not exactly woodworking but close enough
Start to finish it took about 3 hours. I think it might have originally been a smoking stand or humidor since the bottom of the large compartment is galvanized tin.
Attachments


Last edited:
ez-duzit
Well-known member
C--that grain came out fantastic.
CRSINMICH
Well-known member
ez: Thanks. It's quarter sawn oak veneer - a very thick veneer. If you look closely at the back corner you can see where the veneer has lifted off. I decided to leave it 'as is' for character. Yeah, that's what it is.
seber
Well-known member
I believe that would be a bread safe from the 30s.My neighbor had a yard sale last weekend. This cabinet didn't sell so she gave it to me. The discoloration on the top turned out to be paper (probably magazines) that had sat on the cabinet for so long that they fused with the old finish. After carefully scuffing the area with medium sandpaper, I sprayed small sections with warm soapy water. After letting it set for a few minutes I used a plastic putty knife as a scraper to minimize gouging. It took about an hour to get it all off. When that was done I gave the whole cabinet a gentle cleaning. The knobs had been replaced with 1950's kitchen cabinet pulls sometime in the past. I replaced those with garage sale solid brass knobs I had that were just laying around.
QUICK UNPLANNED REFURB
Not exactly woodworking but close enough
Start to finish it took about 3 hours. I think it might have originally been a smoking stand or humidor since the bottom of the large compartment is galvanized tin.
CRSINMICH
Well-known member
NOT QUITE WOODWORKING
AGAIN