To avoid these ads, REGISTER NOW!

Woodworking 101--Tools and Tips

Alchymist

Well-known member
Joined
Mar 1, 2009
Messages
4,423
Location
Central PA
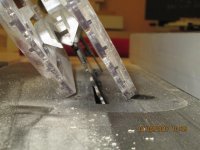
Gorgeous work, akalian. Just a couple comments on the post. First, cutting boards do not have to be fancy to look good, nor is end grain a must. In fact, a great many cutting boards, including commercial ones, are face grain. End grain are perhaps a smidge better, but face grain works ok too. One caution with end grain - do not attempt to run a end grain glueup through a planer.

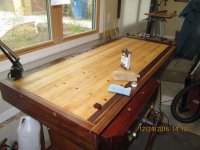
Second comment - resin glue is fine, but others work just as well. I like Titebond II. Titebond II and III are the only glues besides an occasional epoxy that I use in woodworking. Have tried a bunch of others over the years and have settled on these. The two cutting boards in the pics are face grain glued up with Titebond and are several years old. They get washed in soapy water after use, and hand dried. They are given an occasional rubdown with mineral oil.
 

Attachments

  • IMG_3614.jpg
    IMG_3614.jpg
    146.4 KB · Views: 93
  • IMG_3633.jpg
    IMG_3633.jpg
    138.8 KB · Views: 91
To avoid these ads, REGISTER NOW!
OP
J

jimreed2160

Well-known member
Joined
Aug 7, 2016
Messages
3,589
Location
Tallahassee FL
Infill front knob, continued

This project is beginning to be a real time sucker. But it looks much better after each session. Now I need to make it fit.

DSCN1443.jpg


I traced the bottom of the old one and set the gauge for depth.

DSCN1442.jpg


Then I scratched all around.

DSCN1444.jpg


The new knob will sit inside the casting with wood around the edge. That means that I need to chop off the outside. I will begin by putting it in the vise and marking the line with a chisel.

DSCN1445.jpg


I acquired this versa vise copy a few months back. It got a set of hickory jaws and a stand. Now is goes to work along with some Japanese chisels.

DSCN1446.jpg


Once I lightly marked the line, it became apparent that I needed to secure the knob in the vise better. I used the cut off on the vise slide and then pulled everything tight.

DSCN1447.jpg


Here is the line after one pass. I like to just enlarge the scratch mark by striking all around. There are some stray pencil marks on the side that I made for reference. At this point, I really cannot see the scratch mark but the chisel can find it.

DSCN1448.jpg


After I mark the line, I go back and make the mark deeper. Then I come up from the bottom and remove a splinter. Remember, the bottom is waste but the top needs to be flat and without scars.

DSCN1449.jpg


Two or three splinters are gone and it is starting to take shape. Of course, this is the side grain. That is the easiest spot.

DSCN1450.jpg


Just a reminder--the flat of the chisel goes toward the top and the good edge. The bevel of the chisel goes toward the waste.

DSCN1451.jpg


I need some help with the sides. Calling on Mr Bandsaw.

DSCN1452.jpg


I made two cuts but stopped shy of the top. I don't want to mess up the transition area where the wood meets the plane casting.

DSCN1453.jpg


Now I can focus on the difficult part--the front nose. AKA--end grain city. Time to break out the tiny chisel for little bites.

DSCN1454.jpg


The tiny chisel does a good job and it does it quickly. Notice there is cutting and not crushing on the end grain. Kudos to the sharpener. Hey, that is me. :thumbup:

DSCN1455.jpg


More progress on the front. I made deep marks from the front and now I am meeting at the intersection.

DSCN1456.jpg


Almost there.

DSCN1457.jpg


The sides are a snap compared to the front. And the BS helped remove a big splinter. I knocked them out quickly. Time for a test fit.

DSCN1458.jpg


Fits like a glove--EXCEPT. Remember that I used the large knob as a pattern. And the pattern is larger than necessary. It is a case of too much junk in the trunk. Notice the pencil marks. It is time for some more BS help.

DSCN1459.jpg


Ahhh. Fits nicely. This is a great place to stop for the day.

Our next session requires the oscillating spindle sander to reshape the knob. Then things will get tedious as I fit the sides around the irregular casting. At least we are closing in on the finish.
 

drivesitfar

Well-known member
Joined
Oct 23, 2013
Messages
36,006
Location
Pacific Northwest
Jim: great stuff and thanks for sharing AGAIN.

ALL: so I'm buying this old Craftsman table saw cause it's small enough for my space to store and then be able to pull outside to work on. anybody have some thoughts about this? it's a 1HP and i think it is wired for 220 or i can rewire it.

building a sled for it might be my first project cause i like how you can keep your fingers attached maybe a bit easier with that method of cutting. yes?

cheers
 

Attachments

  • 00c0c_kPNNJTIGbIv_1200x900.jpg
    00c0c_kPNNJTIGbIv_1200x900.jpg
    101.2 KB · Views: 128
  • 00L0L_eKYVppycfQX_1200x900.jpg
    00L0L_eKYVppycfQX_1200x900.jpg
    90.8 KB · Views: 99
  • 00h0h_67asFgOTizk_1200x900.jpg
    00h0h_67asFgOTizk_1200x900.jpg
    104.5 KB · Views: 109
  • 00404_hiPH3XvOzRv_1200x900.jpg
    00404_hiPH3XvOzRv_1200x900.jpg
    83.2 KB · Views: 105

Zeke

Well-known member
Joined
Aug 13, 2009
Messages
17,176
Location
Long Beach CA, the sewer by the sea.
Those stands are wobbly at best. I'd not use the extensions as they are, both to one side. If you like that much cutting capacity consider using a aluminum one and put the other CI one one the left side for better balance. If you put a piece of 3/4 ply or MDF on that the way it is, it will tip over. I took my old CM saw off that stupid stand and placed it on a wider stand with splayed legs. I put a little sander on the skinny table which is fine.
 
OP
J

jimreed2160

Well-known member
Joined
Aug 7, 2016
Messages
3,589
Location
Tallahassee FL
Drives--Nice score on the TS. I agree that it looks a bit tippy in its current state. If you are space challenged, take off one of the wings. Right off, I would use it to build a storage cabinet underneath the wing and use it for support/storage. Figure out a way to use some of those screw foot levelers so you can adjust the height to level the cutting table. Also, look around for (or make) a pair of outfeed roller stands. It adds an extra margin of safety. I use mine all the time.
 

ktmracer

Well-known member
Joined
Mar 6, 2012
Messages
47
Location
Fresno area
Jim: great stuff and thanks for sharing AGAIN.


ALL: so I'm buying this old Craftsman table saw cause it's small enough for my space to store and then be able to pull outside to work on. anybody have some thoughts about this? it's a 1HP and i think it is wired for 220 or i can rewire it.


building a sled for it might be my first project cause i like how you can keep your fingers attached maybe a bit easier with that method of cutting. yes?


cheers


That is a cool vintage Craftsman!


Sent from my iPhone using Tapatalk
 

ktmracer

Well-known member
Joined
Mar 6, 2012
Messages
47
Location
Fresno area
Infill front knob, continued


This project is beginning to be a real time sucker. But it looks much better after each session. Now I need to make it fit.


DSCN1443.jpg


I traced the bottom of the old one and set the gauge for depth.


DSCN1442.jpg


Then I scratched all around.


DSCN1444.jpg


The new knob will sit inside the casting with wood around the edge. That means that I need to chop off the outside. I will begin by putting it in the vise and marking the line with a chisel.


DSCN1445.jpg


I acquired this versa vise copy a few months back. It got a set of hickory jaws and a stand. Now is goes to work along with some Japanese chisels.


DSCN1446.jpg


Once I lightly marked the line, it became apparent that I needed to secure the knob in the vise better. I used the cut off on the vise slide and then pulled everything tight.


DSCN1447.jpg


Here is the line after one pass. I like to just enlarge the scratch mark by striking all around. There are some stray pencil marks on the side that I made for reference. At this point, I really cannot see the scratch mark but the chisel can find it.


DSCN1448.jpg


After I mark the line, I go back and make the mark deeper. Then I come up from the bottom and remove a splinter. Remember, the bottom is waste but the top needs to be flat and without scars.


DSCN1449.jpg


Two or three splinters are gone and it is starting to take shape. Of course, this is the side grain. That is the easiest spot.


DSCN1450.jpg


Just a reminder--the flat of the chisel goes toward the top and the good edge. The bevel of the chisel goes toward the waste.


DSCN1451.jpg


I need some help with the sides. Calling on Mr Bandsaw.


DSCN1452.jpg


I made two cuts but stopped shy of the top. I don't want to mess up the transition area where the wood meets the plane casting.


DSCN1453.jpg


Now I can focus on the difficult part--the front nose. AKA--end grain city. Time to break out the tiny chisel for little bites.


DSCN1454.jpg


The tiny chisel does a good job and it does it quickly. Notice there is cutting and not crushing on the end grain. Kudos to the sharpener. Hey, that is me. :thumbup:


DSCN1455.jpg


More progress on the front. I made deep marks from the front and now I am meeting at the intersection.


DSCN1456.jpg


Almost there.


DSCN1457.jpg


The sides are a snap compared to the front. And the BS helped remove a big splinter. I knocked them out quickly. Time for a test fit.


DSCN1458.jpg


Fits like a glove--EXCEPT. Remember that I used the large knob as a pattern. And the pattern is larger than necessary. It is a case of too much junk in the trunk. Notice the pencil marks. It is time for some more BS help.


DSCN1459.jpg


Ahhh. Fits nicely. This is a great place to stop for the day.


Our next session requires the oscillating spindle sander to reshape the knob. Then things will get tedious as I fit the sides around the irregular casting. At least we are closing in on the finish.


Curious is your bandsaw a delta Homecraft like you mentioned inheriting? I was wondering if that would be a good one to pickup, as I don't have one yet.


Sent from my iPhone using Tapatalk
 
OP
J

jimreed2160

Well-known member
Joined
Aug 7, 2016
Messages
3,589
Location
Tallahassee FL
Also recognize that the fence is on the wrong side of the blade...cutoff can get trapped. Probably obvious.

Please elaborate. Are you referencing the picture with both miter gauge AND fence? It is true that using both at the same time is a no-no. And logically the fence provides more usefulness on the larger side of the table. It looks to me like the previous owner was left handed.
 
OP
J

jimreed2160

Well-known member
Joined
Aug 7, 2016
Messages
3,589
Location
Tallahassee FL
KTM--The bandsaw I am using now is a 14" Jet with a riser block. My Homecraft is in the back of the shop and needs a little TLC. Both of them are good saws, but the Jet is superior in every way.

I think every woodworker should start with the best bandsaw that is affordable. It is a very safe power tool and can perform many shop tasks with ease.

I will take some pictures of the saw and point out the features that I like.
 

Zeke

Well-known member
Joined
Aug 13, 2009
Messages
17,176
Location
Long Beach CA, the sewer by the sea.
Also recognize that the fence is on the wrong side of the blade...cutoff can get trapped. Probably obvious.

Please elaborate. Are you referencing the picture with both miter gauge AND fence? It is true that using both at the same time is a no-no. And logically the fence provides more usefulness on the larger side of the table. It looks to me like the previous owner was left handed.


There is no right or wrong side for the fence. Some cuts due to the blade tilt have to be done on the side that works for the cut.

And I've had some very weird cuts to do. Some, I have to think about for quite awhile.
 

drivesitfar

Well-known member
Joined
Oct 23, 2013
Messages
36,006
Location
Pacific Northwest
ALL: thanks for the tips on the fence and my new tablesaw. anybody actually own this one and are using it now?

also i think i have this little Craftsman bandsaw still in the back of my storage unit and wondering if it's decent or just a toy? it has new rubber around the wheels and it was working when i stuck it in storage.

so Jim has a Jet bandsaw that he likes. anybody else have a favorite? post up some pictures with the pros and cons if you do. thanks in advance
 

Attachments

  • photo 1.jpg
    photo 1.jpg
    126.3 KB · Views: 70
  • photo 2.jpg
    photo 2.jpg
    118.9 KB · Views: 61
  • photo 33.jpg
    photo 33.jpg
    141.9 KB · Views: 64

Blue Frog

Well-known member
Joined
Jun 22, 2014
Messages
363
Location
Lynn Haven, FL
If you try to clean up a glueup with plastic resin glue using a plane, you spend more time resharpening your blade than you do planing.

Absolutely true and has been for decades - just don't see many folks using plastic resin glue.

My father taught this to me in the early 1950's. He used plastic resin glue in the construction of wooden boats.

Blue Frog
 

turbowoodworker

Well-known member
Joined
Mar 18, 2012
Messages
3,522
Location
Apex NC
Note that most TS are "right tilt" vs "left tilt" blade.

I think that saw is left tilt, meaning that for a bevel cut, the blade tilts to the left. Correct me if I am wrong, Drives.

Now the following only matters for bevel rip cuts, not 90* cuts. If you tilt to 30* or 45*, and the tilt is to the left, the cutoff or the workpiece is trapped against the fence and beneath the blade. Now picture the piece binding and you can anticipate the danger there.

Placing the fence opposite the tilt, the piece closest to the fence rides up, while the piece opposite the blade is no longer trapped.

I hope that description makes sense. Again only important for bevel cuts (ripping a bevel).

If needed, maybe I can take pictures and illustrate better tomorrow. This may be one of those urban myth things but when preaching safety around the TS, I usually trust "passed on wisdom" rather than trying to find out the hard way. Mythbusting on the TS can be a bad practice!

Rick
 

drivesitfar

Well-known member
Joined
Oct 23, 2013
Messages
36,006
Location
Pacific Northwest
Turbo: thanks for the post and i get it, but maybe for others it might help to do something with a little more color.

i've always sort of been afraid to even use a RAS (RADIAL ARM SAW) cause of all the issues i've heard about. doesn't that type of saw have a lot of potential dangers?
 

crguy

Well-known member
Joined
Jan 24, 2016
Messages
2,652
Location
SW Washington
also i think i have this little Craftsman bandsaw still in the back of my storage unit and wondering if it's decent or just a toy? it has new rubber around the wheels and it was working when i stuck it in storage.

Those 3 wheel bandsaws are not highly regarded. They put more strain on the blade weld due to running over a smaller diameter which causes early blade failure.
 

turbowoodworker

Well-known member
Joined
Mar 18, 2012
Messages
3,522
Location
Apex NC
Drives, my fingers get tired thinking of all the typing I've done to discuss pros and cons of RAS. They have their place. They have their quirks. Just respect them and use them correctly, just like TS and any spinning tools.
Mine is now my dedicated dado crosscut station. That is about all I use it for now. Setup, square and perfect for what it is.
 
To avoid these ads, REGISTER NOW!
OP
J

jimreed2160

Well-known member
Joined
Aug 7, 2016
Messages
3,589
Location
Tallahassee FL
Turbo--Thanks for the extra insight. Makes sense. I certainly agree that thinking is necessary for safe table saw use. Things can go bad in a hurry.

Drives--You may as well slap a blade in that bandsaw and use it. CR has a good point on the blade but you will find quickly if that is an issue for you.

As for a RAS, I had one and loved it. It is a real dado making machine. You need to exercise care when using it and make sure you have the correct blade. Normal blades have a tendency to climb in a RAS and it will come out to greet you quickly. It is also easy to get careless and run over a finger.

But they take up lots of room. I sold mine before a big move and replaced it with the small contractor's table saw. Still miss it when making dados. Not much need for one now that you have the new TS.
 

mtnwkr

Well-known member
Joined
Aug 4, 2013
Messages
237
Location
bremerton, wa
so Jim has a Jet bandsaw that he likes. anybody else have a favorite? post up some pictures with the pros and cons if you do. thanks in advance


I restored this 1970 14" Delta, it's become one of the most used tool in my shop. I might get a riser for it someday. Only con would be that it's not bigger!

31894502892_3777fdbcb8_b.jpg
 

turbowoodworker

Well-known member
Joined
Mar 18, 2012
Messages
3,522
Location
Apex NC
Cheechi,

I like the RAS for dados because I can leave it set up and use stops on long workpieces, never having to push the piece through the blade, rather the blade through the piece.

The most uncomfortable thing to do on the TS is cutting a dado on the end of an eight foot shelf standard and fighting to support the other end. The router is the other alternative but repetitive cuts on multiple pieces can introduce inaccuracies.

I am fortunate to have the space for a dedicated station like the RAS. I recognize that other GJ members don't have this luxury.
 
OP
J

jimreed2160

Well-known member
Joined
Aug 7, 2016
Messages
3,589
Location
Tallahassee FL
Cheechi--Yes. If I had the space I would have a RAS and dedicate it to dados. I did them with a regular blade and multiple cuts. It was quick and accurate. I liked it because it was fast with the bonus of watching it happen. The trouble with a router table is that everything is invisible. Router on top needs guides on both sides.

Mtn--Nice saw. You did a good restore. Time to pimp it out with a fence. :pimpflash

EZ--This dang knob was supposed to be easy and quick. :dunno:
Now I wonder if I will ever finish. :willy_nil
 

SteveL

Well-known member
Joined
Jan 14, 2005
Messages
760
Location
St. Louis, MO
Jim: great stuff and thanks for sharing AGAIN.

ALL: so I'm buying this old Craftsman table saw cause it's small enough for my space to store and then be able to pull outside to work on. anybody have some thoughts about this? it's a 1HP and i think it is wired for 220 or i can rewire it.

building a sled for it might be my first project cause i like how you can keep your fingers attached maybe a bit easier with that method of cutting. yes?

cheers

Nice little saw you got there. A couple of suggestions that will make life a little safer and easier.

-Make a simple cut off sled to use instead of the miter gauge. Once you get it set up square, you will be amazed at how much quicker and more accurate your cuts will be. I rarely use a miter gauge any more.
- Replace the drive belt with a link type belt. It will run so much smoother and quieter than the old stiff belts.
- Make sure the fence is set up parallel with the blade and miter slots. If it is closer to the blade on the back side, cut offs can get trapped and kicked back at you.
- Make zero tolerance blade insert out of mdf with a splitter built in. Makes much cleaner cuts, keeps most of the dust from being thrown back at you and the splitter makes it much, much safer.
- Never, ever use the miter gauge with the fence. The cut off piece can easily get trapped and kicked back. And believe me when I say that you will never see it coming.:eyecrazy: You will hear it but not see it.
- I also see that the base has casters on it. They are good for moving the saw around but really bad for using it. Worse that you can do is to have a big piece of plywood on the saw and have it roll away as you're cutting.
- Take your time thinking things through before cutting and use push sticks or blocks. I have a bunch of shop made push blocks that keep my fingers as far away from the blade possible.

Enjoy the new toy and be safe!
 

manwithtools

ALLIANCE MEMBER
Joined
Aug 24, 2015
Messages
13,730
Location
Lebanon, TN
with no space constraint would you prefer making dadoes with the saw table, RAS or a router table?

I'll be the odd man out on this discussion. I prefer the router, not in a table but used with an edge guide or a track saw track with router adapter.

My reasoning for this is consistency of depth in the dado. The router is only contacting the work piece along the router base which allows the router to follow any bow or twist the stock might have. With table saw (unless you have a power feeder) it's very difficult to press the work piece firmly enough to over come any warp or twist or just overcome the weight of the stock out feed creating a bow. With a RAS, the same applies, although not to the same degree. I just don't like a RAS for a variety of operator related reasons.

When I had my cabinet shop, I had a number of routers setup with custom bases incorporating edge guides permanently fastened to them. This allowed me to make very repetitive dadoes without setting up a saw every time.
 

turbowoodworker

Well-known member
Joined
Mar 18, 2012
Messages
3,522
Location
Apex NC
No argument here. The router is a terrific tool and paired with an accurate and square edge guide, may be the best tool for the job.

I bought a used RAS and once I had it, I had to find a reason to keep it. Space not an issue (yet).

I love routers, possibly the most versatile tool in the wood shop, and ofetn my most favorite to use.
 

turbowoodworker

Well-known member
Joined
Mar 18, 2012
Messages
3,522
Location
Apex NC
So when Drives ask, I will salute and deliver!

Here are some pictures to help illustrate the point about trapping a workpiece between tilted blade and fence during bevel rip cuts.

1. left tilt blade on new Delta cabinet saw
2. right tilt blade on older Delta contractor saw (guard removed as was being used with crosscut sled and only for illustration)
3. example of desired result: bevel rip
4. cut with left tilt
5. cut with right tilt

As you can see, on the rt tilt saw there is a risk of the piece being trapped or held beneath blade and fixed fence. I hope this helps to clarify the issue. Again, it may be urban myth but my sense is that the risk is real.
 

Attachments

  • IMG_8357.jpg
    IMG_8357.jpg
    138.5 KB · Views: 54
  • IMG_8358.jpg
    IMG_8358.jpg
    134.1 KB · Views: 49
  • IMG_8361.jpg
    IMG_8361.jpg
    138.2 KB · Views: 47
  • IMG_8359.jpg
    IMG_8359.jpg
    129.3 KB · Views: 43
  • IMG_8360.jpg
    IMG_8360.jpg
    140.6 KB · Views: 50

drivesitfar

Well-known member
Joined
Oct 23, 2013
Messages
36,006
Location
Pacific Northwest
ALL: I've NEVER used a RAS and i owned one (I did have seller turn it on before i bought it a few years ago), but i couldn't find a spot for it (Delta/Milwaukee) so i had a friend want to buy it and he uses it. i've only used routers for interior cuts or edges and i think i own maybe 4 of them. it will be nice to get all my woodworking stuff in one area some day so i don't have to have one tool in each area.

Jim: that NOB has many many cuts and edges and nice work figuring out how to make a copy of it. WELL DONE!!

TURBO: you are AWESOME!! WELL DONE AND WELL SAID!!

ALL: on angle cuts do the FEATHER BOARDS need to be used or just on the straight ones?
 

turbowoodworker

Well-known member
Joined
Mar 18, 2012
Messages
3,522
Location
Apex NC
We spent some time flattening and freshening my primary work bench.

Well the boy had fun but his attention span is a bit short. But the results are good.
 

Attachments

  • IMG_6491.jpg
    IMG_6491.jpg
    137.7 KB · Views: 128
  • IMG_8300.jpg
    IMG_8300.jpg
    139.4 KB · Views: 118

turbowoodworker

Well-known member
Joined
Mar 18, 2012
Messages
3,522
Location
Apex NC
Drives,

Feather boards are extremely helpful and an often unused safety item. I don't use them as much as I should. They are helpful in almost all rip functions along a fence and also on the router table.

Not only safety but they help maintain a uniform cut depth for grooves and for the router table.
 

drivesitfar

Well-known member
Joined
Oct 23, 2013
Messages
36,006
Location
Pacific Northwest
Turbo: thanks for the head up.

also did you only plane the top or end up hitting it with a big # sandpaper to finish? also what's in the can?

great picture of your son at least in the picture and maybe learning something from Dad. my boys would run to a game or girl if i had projects to do unless i OVERpaid them. they aren't very handy, but they ended up so far being good kids and adults.

cheers and your TABLE IS A SHOWPIECE and i'd love to own one like it.!!
 

PelicanPines

ALLIANCE MEMBER
Joined
Apr 30, 2014
Messages
38,107
Location
New Jersey, USA, Earth, My own reality
Drives,

Feather boards are extremely helpful and an often unused safety item. I don't use them as much as I should. They are helpful in almost all rip functions along a fence and also on the router table.

Not only safety but they help maintain a uniform cut depth for grooves and for the router table.

Been lurking here... this post is making me chime in...

OMG YES... I have a riving knife on my saw (that is not installed at the moment) and I have mag feather boards... also not used recently...

WHEN... I was ripping the edge of a 2x4 to square off the edge and the damn thing kicked ... thankfully I was not behind it as always... I pick my spot before I start the cut. If I had either safety feature in use... that kick would not have happened.

USE the force... (of safety)
 

turbowoodworker

Well-known member
Joined
Mar 18, 2012
Messages
3,522
Location
Apex NC
Pelican,

Just my two cents but featherboards, while helpful, may not completely eliminate risk of kickback.

I suspect that a lot of that experience emanates from the type of wood you were cutting. Dimensional lumber, 2x4 etc., is rarely truly dimensional. They always have some twist, bend or warp. They also store a lot of energy. So that a partially completed rip can allow the kerf to close on the back of the blade which is the definition of kickback!

On the contrary, planed and jointed flat hardwood, is much less likely to do what you had happen. BUT it does happen because of that stored tension in the wood. I see this alot when ripping planed and jointed 6-7" boards to finished width for faceframes.

Bottom line, featherboards are great. Still gots to be careful.
 

turbowoodworker

Well-known member
Joined
Mar 18, 2012
Messages
3,522
Location
Apex NC
Drives, the can is Watco Danish oil in natural color.

I will use any oil I have laying around to finish a top like this. The top really soaks it up. I do not use polyurethane (I know I'll start some discussion here) but when planing on a bench used exclusively for handtools, I want grip, and more grip. Poly is beautiful but also very slick by design. Just my opinion.
 
OP
J

jimreed2160

Well-known member
Joined
Aug 7, 2016
Messages
3,589
Location
Tallahassee FL
Man--Good point about the router. I would hate to use a RAS for production dados. Router with guide seems much quicker and production shop would have good DC to keep the chips out of my beard.

Turbo--Nice bench. Good work on teaching your helper. Patience and young grasshopper will unite one day. Nice pictures of TS issues.

Pelican--Thanks for chiming in. We all need to keep safety in mind. Blade guards, safe practices, and good work habits will allow us to keep our digits. Another rule I like to follow is:

Turn out the lights and close up the shop when you get tired.
 

Zeke

Well-known member
Joined
Aug 13, 2009
Messages
17,176
Location
Long Beach CA, the sewer by the sea.
Another router and track system user here for dados. In cabinet work there are a lot of 24 inch panel sides and a RAS will not go the full 24". Not the typical ones you see in a home shop anyway. And blade climb is always a factor. The worst feature of a RAS is being able to rotate the head and rip stock. That's a disaster waiting to happen every time.

They are dinosaurs.
 
To avoid these ads, REGISTER NOW!
Top Bottom