To avoid these ads, REGISTER NOW!

Woodworking 101--Tools and Tips

jar944

Well-known member
Joined
Jul 26, 2010
Messages
5,907
Location
Northern VA
Madison: You should try making your own saw vise. All it takes is a couple of scraps of plywood, some 1 by, and a piano hinge. Look for a You Tube video. I have an actual saw vise but I only use my home made vise. It took less than an hour to build. I should tell you that I have to clamp mine in my woodworker's vise but there are simple plans for stand-alone saw vises.

That's what I use.


To avoid these ads, REGISTER NOW!
OP
J

jimreed2160

Well-known member
Joined
Aug 7, 2016
Messages
3,589
Location
Tallahassee FL
Nice saw storage, I can't pass up Disston saws so I got a lot of them sitting in the corner on a peg hook. Been thinking of how to better store them and also I need to go through them and restore the saws. So I been trying to decide how i want to go about acquiring a saw vise. I haven't found one in the wilds at estate sales or garage sales but I just keep looking for one.

My large collection of ww tools may seem random but I have always collected with a purpose. And that purpose is education. Most vintage American ww tools from 1870--1939 are both plentiful and inexpensive. To me, that was the golden age of hand craftsmanship and it slowed with WWI before stopping altogether with WWII. I like to acquire specific tools, use them, and evaluate their effectiveness and usefulness in modern ww. One of those items was saw vises. I acquired about a dozen to determine how they worked and what features were important.

What I learned about saw vises is that I preferred the ball joint adjuster. This model was patented by Disston but later made by others (I think). Mine is a no marked name version.

DSCN2291.jpg


Based on the wing nut design, I think this one was made sometime late in the 19th century. It is surely in need of a cleaning but it works great in its current state. I am an amateur saw sharpener and I really like the ball adjuster feature. It helps me get the saw in just the right location for filing. If that position is uncomfortable, it can be changed quickly.

DSCN2292.jpg


It also holds the saw high and just the right height for filing while standing up.

DSCN2293.jpg


I know you can clamp the saw between two boards in an end vise and file away. BUT my end vise is low and I would have to crouch. I also like the way the metal jaws clamp tightly on the saw plate. It prevents harmonic vibration. I guess the wooden sandwich would do the same thing but maybe not as effectively.

Anyway, vintage saw vises are relatively inexpensive for what you get. I say find a nice vintage vise and enjoy your sharpening experience. The real issue with filing vintage saws is finding suitable files.
 
OP
J

jimreed2160

Well-known member
Joined
Aug 7, 2016
Messages
3,589
Location
Tallahassee FL
Vintage saw manufacturers

I tend to acquire Disston saws but do have a few from Simmonds, Atkins and others. The Warranted Superior brand was used in the US and the UK. Here is was used for lesser expensive non-brand products. And it was used by many different manufacturers so quality is all over the board. About 50% of the WS product was made by Disston. I was very selective and the WS saws I have are very high quality. I would put them in a contest with anything of the era. The real bonus of WS saws is that the prices are usually pretty low. Low price means low risk. Buy three WS saws in reasonable shape and the odds are that two of them will be really good tools. If you acquired them for $5-10 each, then you have two good saws for about the price of burger night with spouse.
 
OP
J

jimreed2160

Well-known member
Joined
Aug 7, 2016
Messages
3,589
Location
Tallahassee FL
Jar--Nice setup. Do you find vibration an issue? Hardwood or softwood jaws? And have you acquired any files lately? Do you have any good leads on file sources?
 

drivesitfar

Well-known member
Joined
Oct 23, 2013
Messages
36,007
Location
Pacific Northwest
JIM: thanks again for all your tutorials and i'll catch up on my reading of all the cool stuff on this thread one day soon and happy to have it available when i have some time.

since you set up the saw in that saw vise do you have a Kurf setting tool or do you only use that on certain types of saws? i actually picked up a Kurf setting tool a few months ago not knowing what it was and the owner thought it was some sort of leather punch cause it was his dad's and his dad did a lot of leather work.

i couldn't find the pictures i saved of my kerf setting tool, but i did find an interesting page on saw sharpening that might help someone here.

http://workshopcompanion.com/KnowHo...arpening_Hand_Saws/8_Sharpening_Hand_Saws.htm

BF: WOW that is some CRIB. WELL DONE!!
 

Attachments

  • P176-2.jpg
    P176-2.jpg
    117.9 KB · Views: 36
  • P175-3_402.jpg
    P175-3_402.jpg
    19.4 KB · Views: 34

CRSINMICH

Well-known member
Joined
Aug 15, 2015
Messages
2,397
Location
Southeastern Michigan
Vintage saw manufacturers

I tend to acquire Disston saws but do have a few from Simmonds, Atkins and others. The Warranted Superior brand was used in the US and the UK. Here is was used for lesser expensive non-brand products. And it was used by many different manufacturers so quality is all over the board. About 50% of the WS product was made by Disston. I was very selective and the WS saws I have are very high quality. I would put them in a contest with anything of the era. The real bonus of WS saws is that the prices are usually pretty low. Low price means low risk. Buy three WS saws in reasonable shape and the odds are that two of them will be really good tools. If you acquired them for $5-10 each, then you have two good saws for about the price of burger night with spouse.

jim: I was hoping you'd pick up on the Warran and Ted joke and explain what it meant. Curiously, English saw manufacturers took the expression to heart and put it on their top of the line saws. Hadn't they heard of hyperbole?

I have a lot of Disstons too along with saws from companies that Disston ate. I like them all but my current fave is a 12 pt. Oak Leaf. I don't know anything about the company but they made a good saw with a nice etch. LATE EDIT: My Oak Leaf saw was made by Wm. Enders Co. Enders had a close association with Simmons.

jar: I like your minimalist saw vise. It really doesn't take much more than being able to hold the blade still and steady. Nice touches with the file guide and angle marks on the top of the jaws. If you have any trouble with vibration, try putting leather on the jaw faces.
 
Last edited:

jar944

Well-known member
Joined
Jul 26, 2010
Messages
5,907
Location
Northern VA
Jar--Nice setup. Do you find vibration an issue? Hardwood or softwood jaws? And have you acquired any files lately? Do you have any good leads on file sources?

There was a bit of vibration when I first tried it at the extreme ends, but either repositioning or adding clamps on the ends fixed it. It's just a 2x4 ripped in half

Tools for working wood out on NYC had the best selection of saw sharpening files I found.
 

madison069

Well-known member
Joined
Nov 5, 2010
Messages
4,150
Location
Monroeville, PA
Nice saw vice everyone! I've been looking for one at estate sales with no luck, so until I find one I'll try the wood in a vice trick.

What's the proper file for saws? I actually had a saw kerf setting tool in my hands at a estate sale and didn't know what it was, I regret not getting it.
 

Craptain

Well-known member
Joined
Apr 18, 2013
Messages
4,028
Location
Tampa Bay FL
Nice saw vice everyone! I've been looking for one at estate sales with no luck, so until I find one I'll try the wood in a vice trick.

What's the proper file for saws? I actually had a saw kerf setting tool in my hands at a estate sale and didn't know what it was, I regret not getting it.

The files I use are just fine triangular files. Maybe not perfect but I find it works well. More important is the angle and consistency of the filing. I have only ever touched up my saws and never (yet) had to fully re-cut the teeth. Likewise my saw set is perhaps not totally correct for different saws,being non adjustable, but again it works for me.

Sent from my SM-G900T using Tapatalk
 

CRSINMICH

Well-known member
Joined
Aug 15, 2015
Messages
2,397
Location
Southeastern Michigan
Nice saw vice everyone! I've been looking for one at estate sales with no luck, so until I find one I'll try the wood in a vice trick.

What's the proper file for saws? I actually had a saw kerf setting tool in my hands at a estate sale and didn't know what it was, I regret not getting it.

madison: Paul Sellers is an English woodworker who has a large number of videos on You Tube. Quite a few are about sharpening and setting handsaws. Just do a You Tube search for his name. Look for the one about saw chocks. That's what he calls his shop-made saw sharpening vise. Any 3 sided (Paul says they're really 6-sided) files can be used provided they're the right size for the saw teeth you're sharpening. He has an easy way of judging the size. Enjoy.
 
Last edited:

shortykorte

Well-known member
Joined
Sep 1, 2014
Messages
8,038
Location
Tallahassee, Fl
Another GJ aha moment. I was at Florida Flywheelers this pass weekend and came across numerous saw vises. I didn't know what they were for but thought they'd make a simple metal brake. I'll know nest time. :thumbup:

Jim nice tutorial on making the moulding. Plainly put, awesome.
 

Craptain

Well-known member
Joined
Apr 18, 2013
Messages
4,028
Location
Tampa Bay FL
Another GJ aha moment. I was at Florida Flywheelers this pass weekend and came across numerous saw vises. I didn't know what they were for but thought they'd make a simple metal brake. I'll know nest time. [emoji106]

Jim nice tutorial on making the moulding. Plainly put, awesome.
Geez Shorty. You only had to ask.

Sent from my SM-G900T using Tapatalk
 

CRSINMICH

Well-known member
Joined
Aug 15, 2015
Messages
2,397
Location
Southeastern Michigan
CAN THIS PLANE BE SAVED​
I was thinking of adding a feature to Woodworking 101. I have a plane I just bought that I started to tear apart today to get it cleaned and see if it needed repair. Once I started I realized that the steps could be posted in phases and everyone could add their questions, comments, and suggestions as I was working on it. I'll post PHASE 1 today. If there is enough interest I'll post PHASE 2 in a few days and so on. Otherwise, I'll continue rehabbing the plane then post some AFTER shots when I finish. Teaser: There are some interesting quirks in this plane.

PHASE 1 - Giving it the once over​
Imagine that you've just found this plane on a bench or table at an estate sale. Look it over. What do you like? What shape is it in generally? See anything interesting or unusual? Just give your general impressions before we move on to PHASE 2 - Tear Down and Assessment.

If you hadn't guessed yet - yes, I was a teacher.
 

Attachments

  • 6 CTPBS overview sole.jpg
    6 CTPBS overview sole.jpg
    162.7 KB · Views: 53
  • 5 CTPBS Overview tote.jpg
    5 CTPBS Overview tote.jpg
    119 KB · Views: 53
  • 4 CTPBS overview top left rear.jpg
    4 CTPBS overview top left rear.jpg
    131.2 KB · Views: 54
  • 3 CTPBS Overview top front left.jpg
    3 CTPBS Overview top front left.jpg
    129.5 KB · Views: 55
  • 2 CTPBS top front.jpg
    2 CTPBS top front.jpg
    154.6 KB · Views: 54
  • 1 CTPBS Overview top front right.jpg
    1 CTPBS Overview top front right.jpg
    133 KB · Views: 59
Last edited:

ez-duzit

Well-known member
Joined
Jun 24, 2013
Messages
5,096
Location
Marina del Rey
CR--it looks restorable.

If you photograph a dark object against a very light background, the automatic exposure setting makes the object too dark to show much detail. Try it against a dark background with plenty of light or a flash.

I'm not a photography teacher. It's just a tip, :)
 
OP
J

jimreed2160

Well-known member
Joined
Aug 7, 2016
Messages
3,589
Location
Tallahassee FL
Saw sets and saw geometry

My grandfather had a master's degree in math and taught HS math, trig, etc before becoming a superintendent of schools. He loved woodworking and I think it was because ww is total immersion in solid geometry. Math, angles, and shapes abound in ww and in ww tools. That is especially true with handsaws. This is an area where I am a novice and it seems to me sometimes that I know a little and don't know a lot. So here is a brief tutorial on saw tooth terminology. Collectively, these characteristics work together to determine how a saw performs.

PITCH--Saw pitch, measured in points per inch (PPI), is really an indication of the depth of the gullet. Large gullets carry away lots of sawdust and small gullets carry away small amounts of sawdust. Aggressive saws have low pitch and fine work saws have high pitch.

RAKE--Rake is the angle of the cutting edge relative to the saw plate. Zero rake is 90 degrees to the plate, or straight up and down. Leaning forward is positive rake and leaning backward is negative rake. Positive rake is for aggressive cutting and makes the saw hard to use. More negative rake retards cutting but makes the saw easier to move.

FLEAM--Fleam is the angle of the cutting face. No fleam means the tooth cutting edge is perpendicular to the saw plate. It is like a little chisel which addresses the wood head on. More fleam turns the chisel edge into a knife edge that slices more instead of gouges.

SET--Set is the angle that the tooth projects sideways from the plate. Rip saws typically have no fleam and no set. They are like little chisels stacked in a row and each one gouges a tiny shaving. Crosscut saws can have more fleam and set. These knife like teeth sever wood fibers and make a wide path for the sawplate to follow.

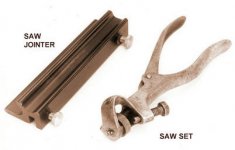
As for sets, here are mine.

DSCN2294.jpg


They are Stanley model 42-X. They are said to be the Cadillac of vintage saw sets.

DSCN2299.jpg


Here is a picture of the adjustable anvil piece. When you squeeze the handle, a rod projects toward the anvil. The rod is fixed and the anvil moves. Move the anvil up for less set and move it down for more set.

DSCN2295.jpg


Here is a good shot of the rod and the tapered anvil.

DSCN2297.jpg


And here is an action shot.

DSCN2298.jpg


So now you have a short course in saw geometry. A specific tooth pattern should be designed for each type of wood. Woodworkers of yore used the "six tooth" rule. Simply, have six teeth in the cut for optimal cutting. The ww must take into account, the type of cutting--ripping typically is at 45 degrees, so the saw kerf is wider than the board, thickness and type of wood, and other variables.

My hat is off to ww who understand handsaws and the interplay of tooth geometry. It is a whole area of specialized knowledge. I do not even begin to know how to optimize a handsaw. I just sharpen the existing pattern and use the saw that cuts best. Most poor cutting jobs can be finished up with handplanes.
 
OP
J

jimreed2160

Well-known member
Joined
Aug 7, 2016
Messages
3,589
Location
Tallahassee FL
CRS--I will play the game. This plane looks good to me. Wood is intact, there seems to be some blade left, casting is in good shape. Looks like it just needs a clean. Is it one of those Bailey planes by National?
 

CRSINMICH

Well-known member
Joined
Aug 15, 2015
Messages
2,397
Location
Southeastern Michigan
EZ: One of the things that I enjoyed about teaching was that I learned a lot myself. Thanks for the photography suggestion. I'll give it a try. As for restorable...we'll have to see.

jim: I don't want to reveal too much about the plane before getting to Phase 2 but the iron does have a Stanley stamping. The wood is in excellent shape but...oops not quite yet. Good job describing saw tooth geometry. It can seem baffling and like learning a second language with the specialized vocabulary. Keep up the good work.

TO ALL: Keep the comments, suggestions, and questions coming. Is there anything you'd like to have a closer look at?

ORIGINAL POST #1582
 
Last edited:

MoonRise

Well-known member
Joined
Nov 5, 2010
Messages
4,028
Location
NJ
PITCH--Saw pitch, measured in points per inch (PPI), is really an indication of the depth of the gullet. Large gullets carry away lots of sawdust and small gullets carry away small amounts of sawdust. Aggressive saws have low pitch and fine work saws have high pitch.

re: relationship between pitch (TPI or PPI) and gullet depth

For teeth filed with a standard 60 deg triangular file, absolutely.

But that relationship between pitch (TPI or PPI) and gullet depth is a 'result' of filing the teeth with that 60 deg triangular file. If you are 'making' the teeth and/or gullets any other way, then there is no hard and fast necessary relationship between the pitch and the gullet depth as they are actually two independent geometries of the saw and its teeth.

See the gullet depth picture here:

https://www.toolsforworkingwood.com/blogimg/sawspectra.pdf

Also see here and notice the image of several tooth patterns showing how only for the "plain tooth" filed with the 60 deg triangular file has the necessary tie-in between pitch and gullet depth, as the other tooth patterns can (and usually do) have much deeper gullets for their pitch compared to the "plain tooth"

https://en.wikipedia.org/wiki/Crosscut_saw

Or here, in the section about "Tooth Patterns"

https://www.fs.fed.us/t-d/pubs/htmlpubs/htm06672805/page05.htm

Yours in sawing minutiae ...

:spit:
 
To avoid these ads, REGISTER NOW!

CRSINMICH

Well-known member
Joined
Aug 15, 2015
Messages
2,397
Location
Southeastern Michigan
MoonRise: Thanks for the added information. It's always good to have more info. Some of those tooth patterns you linked to are for one or two-man felling crosscut saws. I recognized one of them, the Perforated Lance Tooth. I believe that was a Disston pattern. It's the tooth pattern on my grandfather's saw hanging in the garage.
 
Last edited:

Craptain

Well-known member
Joined
Apr 18, 2013
Messages
4,028
Location
Tampa Bay FL
CRS, I would be restoring that plane. In fact it looks better than one I picked up this weekend.

abe8777a2e6cfab8d96ab7c62bcaf110.jpg

I will be attempting restoration of this one. I already have wood picked out for the tote.

Sent from my SM-G900T using Tapatalk
 

Attachments

  • abe8777a2e6cfab8d96ab7c62bcaf110.jpg
    abe8777a2e6cfab8d96ab7c62bcaf110.jpg
    47 KB · Views: 0

CRSINMICH

Well-known member
Joined
Aug 15, 2015
Messages
2,397
Location
Southeastern Michigan
CRS, I would be restoring that plane. In fact it looks better than one I picked up this weekend.

abe8777a2e6cfab8d96ab7c62bcaf110.jpg

I will be attempting restoration of this one. I already have wood picked out for the tote.

Sent from my SM-G900T using Tapatalk

Craptain: I see some interesting features on your plane. Does it read Stanley on the front? See that rib that runs under the front knob? I can't recall seeing a plane with that feature and the same goes for the ribs running back in a V-shape from the tail of the tote. I'll bet Jim knows about it. Let me know what you find when you start breaking it down. Pay attention to grain direction when you lay out your new tote.

I would recommend Paul Seller's videos for you too. He has one that's an hour and eight minutes long about restoring bench planes plus one or two shorter ones. He's been making a living as a hand tool woodworker for over 50 years. He knows hand tools.
 
Last edited:
OP
J

jimreed2160

Well-known member
Joined
Aug 7, 2016
Messages
3,589
Location
Tallahassee FL
Craptain--That plane is in sad shape but too nice to be forgotten. Thanks for taking it on. We are all rooting for you and anticipating its fluffy shavings.
 

CRSINMICH

Well-known member
Joined
Aug 15, 2015
Messages
2,397
Location
Southeastern Michigan
Craptain--That plane is in sad shape but too nice to be forgotten. Thanks for taking it on. We are all rooting for you and anticipating its fluffy shavings.

jim: Do you recognize that plane? The rib under the knob and the two ribs behind the tote are new to me. Also, the whole thing is rusty and dusty but look how shiny the snap lever is.
 
Last edited:

ztorres

Well-known member
Joined
Sep 22, 2016
Messages
195
Location
Iowa
I've been workin on the dresser for the wife more now and am finally to the staining portion so while the stain dries I've been making keepsake boxes.
3ca56073e2e4851eb70f3a320d869b2b.jpg
And then I've had a handful of people ask me to make them some cutting boards.
8b1187ada49e27f477a8957dfe8670c9.jpg9549e93ff6f280d74cef14e41f5a1bc8.jpg3c277b96cd9ebe32f3ec36bf8cfd3489.jpg
I need to find a way to sell these boxes better than just word of mouth. So if anyone has some tips that'd be great.
This past weekend went back to Colorado to see my family, and on the way back I picked up some wood from the local rockler. (There isn't a lumber yard near my house that has more exotic or good cut wood). So I picked up some Paduk, Cherry, and Black Walnut35042a0df1f5d7651eb0259a8cc3efd1.jpg


Sent from my iPhone using Tapatalk
 

Attachments

  • 35042a0df1f5d7651eb0259a8cc3efd1.jpg
    35042a0df1f5d7651eb0259a8cc3efd1.jpg
    555 KB · Views: 0
  • 3c277b96cd9ebe32f3ec36bf8cfd3489.jpg
    3c277b96cd9ebe32f3ec36bf8cfd3489.jpg
    498.3 KB · Views: 0
  • 9549e93ff6f280d74cef14e41f5a1bc8.jpg
    9549e93ff6f280d74cef14e41f5a1bc8.jpg
    534 KB · Views: 0
  • 3ca56073e2e4851eb70f3a320d869b2b.jpg
    3ca56073e2e4851eb70f3a320d869b2b.jpg
    659.7 KB · Views: 0
  • 8b1187ada49e27f477a8957dfe8670c9.jpg
    8b1187ada49e27f477a8957dfe8670c9.jpg
    481.3 KB · Views: 0

Craptain

Well-known member
Joined
Apr 18, 2013
Messages
4,028
Location
Tampa Bay FL
This is not my first plane restoration but it is the first time I have to make a new tote. I believe, but am open to learning otherwise that it is a regular number 5 Stanley.
I will attempt to document the process but concede that is not my strength. It may also be a while before I get to it. But I will try not to make you wait too long.

Sent from my SM-G900T using Tapatalk
 

CRSINMICH

Well-known member
Joined
Aug 15, 2015
Messages
2,397
Location
Southeastern Michigan
This is not my first plane restoration but it is the first time I have to make a new tote. I believe, but am open to learning otherwise that it is a regular number 5 Stanley.
I will attempt to document the process but concede that is not my strength. It may also be a while before I get to it. But I will try not to make you wait too long.

Sent from my SM-G900T using Tapatalk
Craptain: Sorry! I guess I went into teacher mode too quickly. I've never made a new tote either but he idea appeals to me. It has a touch of carving/sculpture to it.

There are a couple of sites that help with dating Stanleys which go into finicky little details. I think that's why I noticed the ribs. Good luck.
 
OP
J

jimreed2160

Well-known member
Joined
Aug 7, 2016
Messages
3,589
Location
Tallahassee FL
CRS--The casting ribs do indicate a later Stanley. I am sure a good type study of post WWII planes would give an accurate date. Later model and even current Stanley bench planes can be good users. Much of the usefulness depends on backlash (lack therof). I am partial to the vintage planes with their brass, rosewood and corrugated soles.
 

Craptain

Well-known member
Joined
Apr 18, 2013
Messages
4,028
Location
Tampa Bay FL
I have previously seen a site that covers the history and development of Stanley planes very well. In fact I think I have it bookmarked on my computer. I will have to check back and find out more. Especially, I am intrigued that the ribbed sole is earlier than the flat sole. I can easily believe that the ribs are later and would add stiffness.
On another note I am thinking of Monkey Pod wood for the tote as I have a perfectly sized piece and it is nice to work. It is also strong and dense.

Sent from my SM-G900T using Tapatalk
 
OP
J

jimreed2160

Well-known member
Joined
Aug 7, 2016
Messages
3,589
Location
Tallahassee FL
I have been searching and it looks like the ribs in the casting mean the plane was made in the UK by Stanley. My guess is that these planes all date from the 1960s and later.
 

Craptain

Well-known member
Joined
Apr 18, 2013
Messages
4,028
Location
Tampa Bay FL
I have been searching and it looks like the ribs in the casting mean the plane was made in the UK by Stanley. My guess is that these planes all date from the 1960s and later.
Could be. But made in England is already cast into the base. In fact I think all my Stanley planes are made in England. I used to live just a few miles from the factory in Sheffield.

Sent from my SM-G900T using Tapatalk
 

CRSINMICH

Well-known member
Joined
Aug 15, 2015
Messages
2,397
Location
Southeastern Michigan
ztorres: Very nice cutting boards but how could anyone bring themselves to run a knife across those beauties? What kind of joint did you use on those boxes? It looks like a combination of **** and miter. Clearly you have mastered making precise cuts. I would like to see a demonstration of how it's done. You may have already done that but at my age you tend to forget and at my age you tend to forget.;)

EVERYONE: Don't forget to add your comments, questions, and suggestions to CAN THIS PLANE BE SAVED. The original post was #1582
 
Last edited:

ztorres

Well-known member
Joined
Sep 22, 2016
Messages
195
Location
Iowa
ztorres: Very nice cutting boards but how could anyone bring themselves to run a knife across those beauties? What kind of joint did you use on those boxes? It looks like a combination of **** and miter. Clearly you have mastered making precise cuts. I would like to see a demonstration of how it's done. You may have already done that but at my age you tend to forget and at my age you tend to forget.;)


Thank you. Most people tell me they use them as center pieces or as a platter. Depends on the box for the joint. There are boxes with dovetails, some with miter and **** joints combined, a couple with miter and **** and spline joints combined, some have lap joints, and some have dowel joinery. As far as making the precise cuts, I kind of "cheat" with my current shop setup. My table saw is at a fixed 90° angle so I can't cut them there, so I use a chamfer bit and the router table. I can discuss this further if someone wants to know. Here is a closer look at a couple of the boxes.
Miter, ****, and spline joinery
61fc79612fa921389a41cee21d853365.jpg
Miter and **** Joinery
4b460d12a7f1f530b493de506963a33d.jpg
Dovetail
fdb7dc5ce46d727d7c246759fad08482.jpg
Lap Joinery
92f57d64e8ebae34fad121ec6e34cdd8.jpg


Sent from my iPhone using Tapatalk
 

Attachments

  • 92f57d64e8ebae34fad121ec6e34cdd8.jpg
    92f57d64e8ebae34fad121ec6e34cdd8.jpg
    551.6 KB · Views: 0
  • fdb7dc5ce46d727d7c246759fad08482.jpg
    fdb7dc5ce46d727d7c246759fad08482.jpg
    515.3 KB · Views: 0
  • 4b460d12a7f1f530b493de506963a33d.jpg
    4b460d12a7f1f530b493de506963a33d.jpg
    533.7 KB · Views: 0
  • 61fc79612fa921389a41cee21d853365.jpg
    61fc79612fa921389a41cee21d853365.jpg
    543 KB · Views: 0
To avoid these ads, REGISTER NOW!
Top Bottom