So as promised here is my tutorial on how to burn logos, names, dates, art, whatever you want onto wood using graphite, Carbon, paper. This process is nice and easy but requires some patience which can be difficult - trust me.
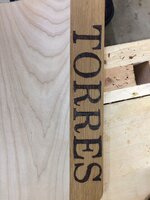
The first step is to select your piece or make it. For this tutorial I will use an Iowa cutting board that I made out of figured maple and 100+ year old white oak that was cut in two towns over by a family friend's uncle. I'm going to be burning my last name into this board, the wife wants to have this piece be wall mounted at our new house we just bought. The next step is to use a computer program to layout your design. I've used Creo Parametric, which is a 3-D modeling program, but for names or logos I use Word or Photoshop. I used Word for this project and determined font and text size; a helpful note to remember is that 72 point font is equal to 1" tall text. So knowing that I wanted 2" tall text all that was left was to determine the font style, I decided on Century font that has a bit of a rustic look to it which matches the Western theme that we have in our house.

The next step is to cut away some of the excess from the print of your design, I use a straight edge and cut right below the text because this will be my reference line for placement.


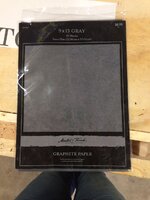
Once you have this you are ready to place the graphite paper and the picture on the piece. Graphite paper has two sides a shiny, glossy side and a dullish, gray side; you'll want the shiny side down - this is the graphite. Put this piece down and secure it using some painters tape; the nice thing about graphite paper is that it's clear and you and see through it. With this ability I am to translate the paper onto the wood line.


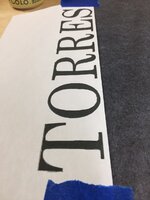
Secure the text with painter's tape . You are now ready to transfer your design to the wood. To do this you need to use a pen or pencil and trace the outside of the design. You need to use a pencil that has a large diameter; I used a 0.9 mm mechanical pencil. The reason for this is if you use a soft pencil or small diameter the tip breaks and doesn't transfer as well.


Go slow and apply a good amount of pressure; however, don't push too hard or you'll tear through the graphite paper. Another tip is to constantly rotate the tip because this makes it easier to follow a smooth line and not jump around.

I had a video of doing this for a letter but I cannot figure out how to upload it to here. You'll want to do a little bit in a non visible area, or on a piece of scrap, to see how well it will transfer to that wood. It is good to note that this process doesn't transfer the same to all wood; for example this process works well on hard maple and cherry but requires more work for white oak. On this same note another important reminder is to try burning each wood species on a scrap paper because they all burn differently. Hard maple take more to burn but is easy to follow lines, cherry burns amazingly and easily, purpleheart is easy to follow but burns extremely differently than other woods. Once you have all the tracing done you can pull off the graphite paper and design. Be sure to check the design to make sure that everything transferred well, if it didn't transfer perfectly just find the lines and re-sketch it freehand - there should be at least a faint line there.

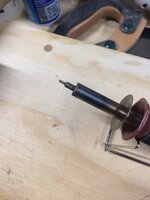
With this all done you are now ready to start burning. Start by using a small ball point tip and trace the outline, again I had video of this but can't get it to upload. You'll want to use very light pressure and go at a slow and steady pace. Going too fast will not give you a good burn; going too slow will give you a very deep, dark burn that isn't always satisfying to the eyes. You'll want that pressure to be light for same reasoning; remember you can always go back and re-burn the outline.


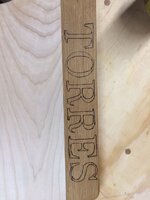
Be careful with certain woods that have very defined grains because it will make it hard to flow a smooth line. I've done outline with pin points like pointilism art, this doesn't look good on wood. The next part is to shade the outline in. Same principal applies here about slow and steady and light pressure; the nice part is you can go with the grain on this and it will go fast. If you put too much pressure you will fight the grain all the way through, and you don't want this because it will turn you away from this beautiful art process.


So what are the key points to make burning wood an easy process?
1 - KISS
This is an acronym that I've heard all my life that probably stemmed from the military, but it stands for Keep It Simple, Stupid. Do this on your first few burning pieces because the first ones are more about technique and mastering it not doing extensive designs above your capabilities to start.
2 - Be the Tortoise
This is from the old children's story of the Tortoise and the Hare. Slow and Steady win the race, this definitely applies to burning wood as an art form. Slow and steady makes sure that you are not fighting the grain, it'll be easier to follow the lines both when you are tracing onto the graphite paper and when you actually burn.
3 - Float like a butterfly, sting like a bee
What I mean by this is don't have a lead hand, and apply extreme pressure, but at the same time be precise with your tracing and apply the perfect pressure. This makes sure that the design transfers to the wood perfectly and that your burn lines look exactly how you intend them to. It's easier for you to make a darker burn than to have to plane the face down to get rid of all the burning you've done and start over. Sometimes starting over isn't even possible without starting the project completely over.
4 - Practice and Learn
The age old saying "practice makes perfect" applies to all things, especially wood burning. Practice burning your design on scrap to make sure it looks how you planned, and that you're not getting to deep in over-your-head with the level of difficulty. Practice burning on different species of wood so you know how burning varies from one piece to another; this also will let you get an idea for what might look better for future projects.
If you have any other questions about burning please let me know and I will try to answer them the best as I can, or try something out myself and let you know how it turns out. I am by no means an expert wood burner but I thought I should share my techniques and let others try their hands in it and experience it and let people tell me their thoughts and techniques. I


")


 ).
).