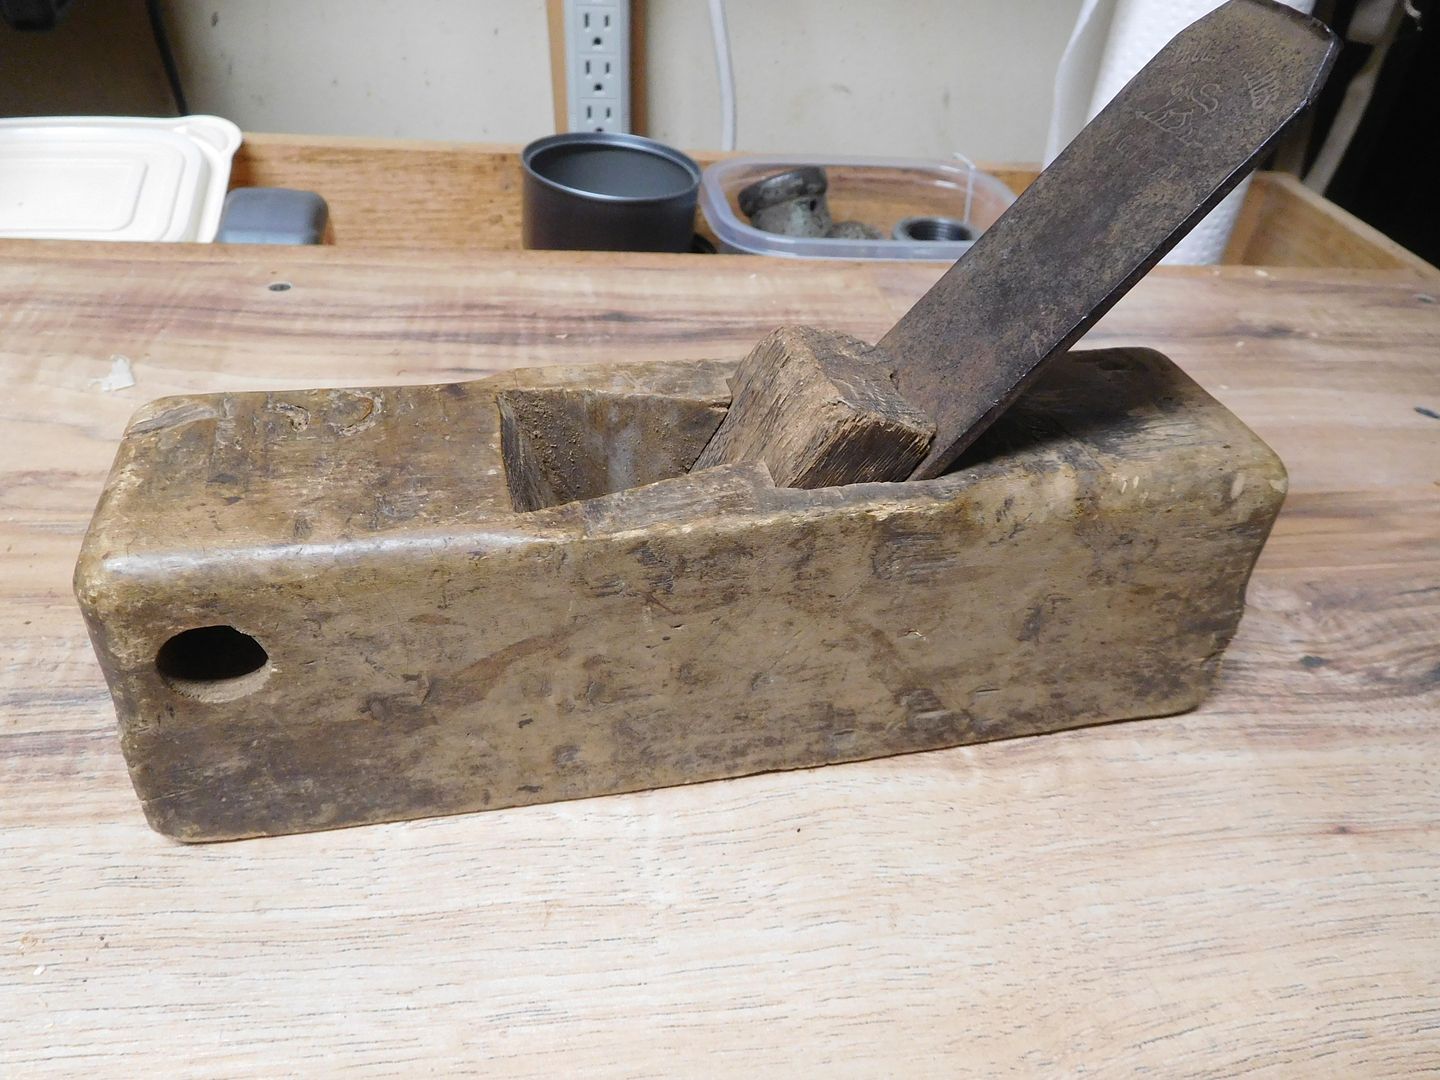
To avoid these ads, REGISTER NOW!

Woodworking 101--Tools and Tips

rrich1

Well-known member
Joined
Oct 7, 2015
Messages
793
Drive: thanks. About glue. Any pva yellow glue will hold up great and the wood should give or break before the glue joint will. Titebond 3 has a longer open time and is what I used for my table when I was putting it all together. It dries darker than 1 and 2. The other difference between the titebonds are 1 is non waterproof/resistant. 2 is water resistant. And 3 is waterproof. 3 is more expensive but not by much. I have a gallon of 2 but have smaller bottles of 3 and use it when I need the longer open time.

Sent from my Pixel XL using Tapatalk
 
To avoid these ads, REGISTER NOW!

Teenager with old tools

Well-known member
Joined
Jun 3, 2015
Messages
595
Location
riverside california
Jim: yep Titebond III it is the next time i buy some. just curious i found a maybe never opened gallon jug of Elmers on my shelf and i bought it from a hardware store that is out of business now and has been for maybe 25 years now. still good for a test and i'll see if it still works for some NON SPECIAL glue ups. or maybe i should just clear off the shelf of some OLD STUFF and just stock up with the GOOD STUFF?

TEEN: agreed it's a nice looking knife. is that the first one you've made?
Third I've done. All ground out with angle grinder. First two were over a year ago and the scrappy belt sanded wasn't suited to handle shaping. But now we have a 1x42 with almost no backing behind the belt great for handle shaping plus I've got more skill now than then.other two have no finish on handle and fit and finish is horrible

Sent from my P027 using Tapatalk
 

R_einan

Well-known member
Joined
Aug 29, 2016
Messages
461
Location
Eastern WA
With everyone's suggestions in mind, I started rearranging the maple before final dimensioning. Taking into account the walnut I plan to edge the maple with, this is what I've come up with.
 

Attachments

  • IMG_2405.jpg
    IMG_2405.jpg
    140.1 KB · Views: 49
OP
J

jimreed2160

Well-known member
Joined
Aug 7, 2016
Messages
3,589
Location
Tallahassee FL
Here is a simple way to test both your glue and your methods. Get two pieces of scrap and joint an edge on each. Apply glue and clamps. Let the glue dry overnight and remove the clamps. Let it dry for a week in normal humidity. Then stress the joint until it breaks. I like to clamp the bottom board in a vise and whack the top piece with a mallet. Good glue and good methods will show breaks in the wood. Bad glue and/or bad methods will show glue still adhering to the jointed edges.

I test glue joints all the time just as a quality check. As I mentioned before, it is not hard to test cut off edges.

As for the glue, when it goes bad, it separates into clots and watery goo.
 
OP
J

jimreed2160

Well-known member
Joined
Aug 7, 2016
Messages
3,589
Location
Tallahassee FL
Desk glue up

So the big day finally came. Everything fit well and I was surprised at the lack of glue points. I popped a few brads into the glue blocks to hold them in place. Hope this sucker stays together.

DSCN4090.jpg


DSCN4091.jpg


DSCN4092.jpg


DSCN4093.jpg


I measured the diagonals in both directions and they came out equal. I put a square over places and they looked true. I tried a drawer and it fit.

So now we just wait. I will leave it in the clamps until tomorrow. Clamp breakdown and storage will take one sweaty hour. Next task is to work on the drawers and repair them enough to get by for another decade or so. The best news is that (with some luck) this thing comes off the bench tomorrow!!!
 

R_einan

Well-known member
Joined
Aug 29, 2016
Messages
461
Location
Eastern WA
Hey Jim, what are the other jorgensons? Look like the aluminum bar clamps but more heavy duty. What are your thoughts on them? I'm going to need something longer than what I have and Amazon still hasn't shipped the 60" Jets I ordered in July.
 
OP
J

jimreed2160

Well-known member
Joined
Aug 7, 2016
Messages
3,589
Location
Tallahassee FL
The three clamps on the bottom are 60" Jorgenson I-bars. The others are Bessie K and Bessie Tradesman. Up top is a pair of HF 37". All of these clamps are 10+ years old. I had to sacrifice a bit 20 years ago when I bought the I-beams but they are my favorites. If I were buying today, I guess I would go with Bessies.
 

R_einan

Well-known member
Joined
Aug 29, 2016
Messages
461
Location
Eastern WA
I've seen a similar clamp from bessey which was a cheaper than a parallel clamp, but didn't know if they were actually worth while. Never used on like it.. rated at like 7000 lbs
 

R_einan

Well-known member
Joined
Aug 29, 2016
Messages
461
Location
Eastern WA
Scored a set of older bessey k-bodies on Craigslist today, not sure what size they call them, but they are about 46" long total with ~43" clamping area. $50 was more than worth it to me!
 
OP
J

jimreed2160

Well-known member
Joined
Aug 7, 2016
Messages
3,589
Location
Tallahassee FL
Scored a set of older bessey k-bodies on Craigslist today, not sure what size they call them, but they are about 46" long total with ~43" clamping area. $50 was more than worth it to me!

Good score! The adjusters are a little fiddly for me but Bessie Ks are GREAT clamps. :rocker:
 

R_einan

Well-known member
Joined
Aug 29, 2016
Messages
461
Location
Eastern WA
Good score! The adjusters are a little fiddly for me but Bessie Ks are GREAT clamps. :rocker:

They seem like they will be nice; however I don't think they compare to the Jorgenson Cabinet Masters I bought on Craigslist a couple months ago. The oversized wood handles and the way they will stand on a flat surface are preferable to me.

The Yost clamps I ordered off Amazon last week when they were on deal came in, not as smooth as either the bessey or Jorgensen clamps, but they are nice as well, the handles are rubberized and have a locking collar you can unlock and fold the handle perpendicular for extra leverage. They also don't slam closed when tipped like the Jorgensen. I'll have to post a couple of pictures tonight when I get home.
 
OP
J

jimreed2160

Well-known member
Joined
Aug 7, 2016
Messages
3,589
Location
Tallahassee FL
Desk repair continued

I removed the clamps today and put the desk into an upright position so I can work on the drawer slides. Mr Leverage and Mr Gravity helped me do it without hernia damage. I put it on top of the sawbench to make the work a little easier.

DSCN4094.jpg


But the sawbench is 14 inches wide and the desk is 18 inches deep. I needed to use a piece of plywood. And then I ended up with a tippy and top heavy carcass to work on. The simple solution was to rope it off.

DSCN4095.jpg


I got to use my shoulder vise.

DSCN4096.jpg


DSCN4097.jpg


DSCN4098.jpg


It does look comical. Kinda like the Three Stooges School for Rigging.

DSCN4099.jpg


But it is only a safety rope and I only need it to slow the carcass down as I run away.

I hope you enjoyed the entertainment value.
 

drivesitfar

Well-known member
Joined
Oct 23, 2013
Messages
36,007
Location
Pacific Northwest
JIM: you're right pretty entertaining and another way to do something that is for certain.

just curious if maybe 4 screws through the top of your plywood into your little bench might have been a better option or was the desk already on the plywood?

have fun and looks great so far.

did you use a quart of glue like you mentioned or did you have issues finding a lot of cracks to put some in?

cheers
 
OP
J

jimreed2160

Well-known member
Joined
Aug 7, 2016
Messages
3,589
Location
Tallahassee FL
Drives--This desk is a very odd piece of furniture. The top is almost solid and the interior has drawers and pigeonholes. The lower portion is dainty by comparison with lightweigh panels and soft wood frames. I can hardly lift it on one end--my guess is that it weighs 60-80 lbs without the drawers. And the parts below the desk probably top out at 10 lbs. It is WAAAAY top heavy. In fact, one of the mods I plan to make is adding something on the rear so it can be fastened to the wall. This thing is dangerous when loaded. In fact, I am surprised that IKEA did not pick up this design as they seem to like tippy case goods.

It probably would have been OK just perched on the bench, but I am more cautious at this stage of life. Besides, I had fun with the rope.

I used much less glue than I thought and most of it went on the frame mortices. It worked because the carcass is very tight now.
 
OP
J

jimreed2160

Well-known member
Joined
Aug 7, 2016
Messages
3,589
Location
Tallahassee FL
New project

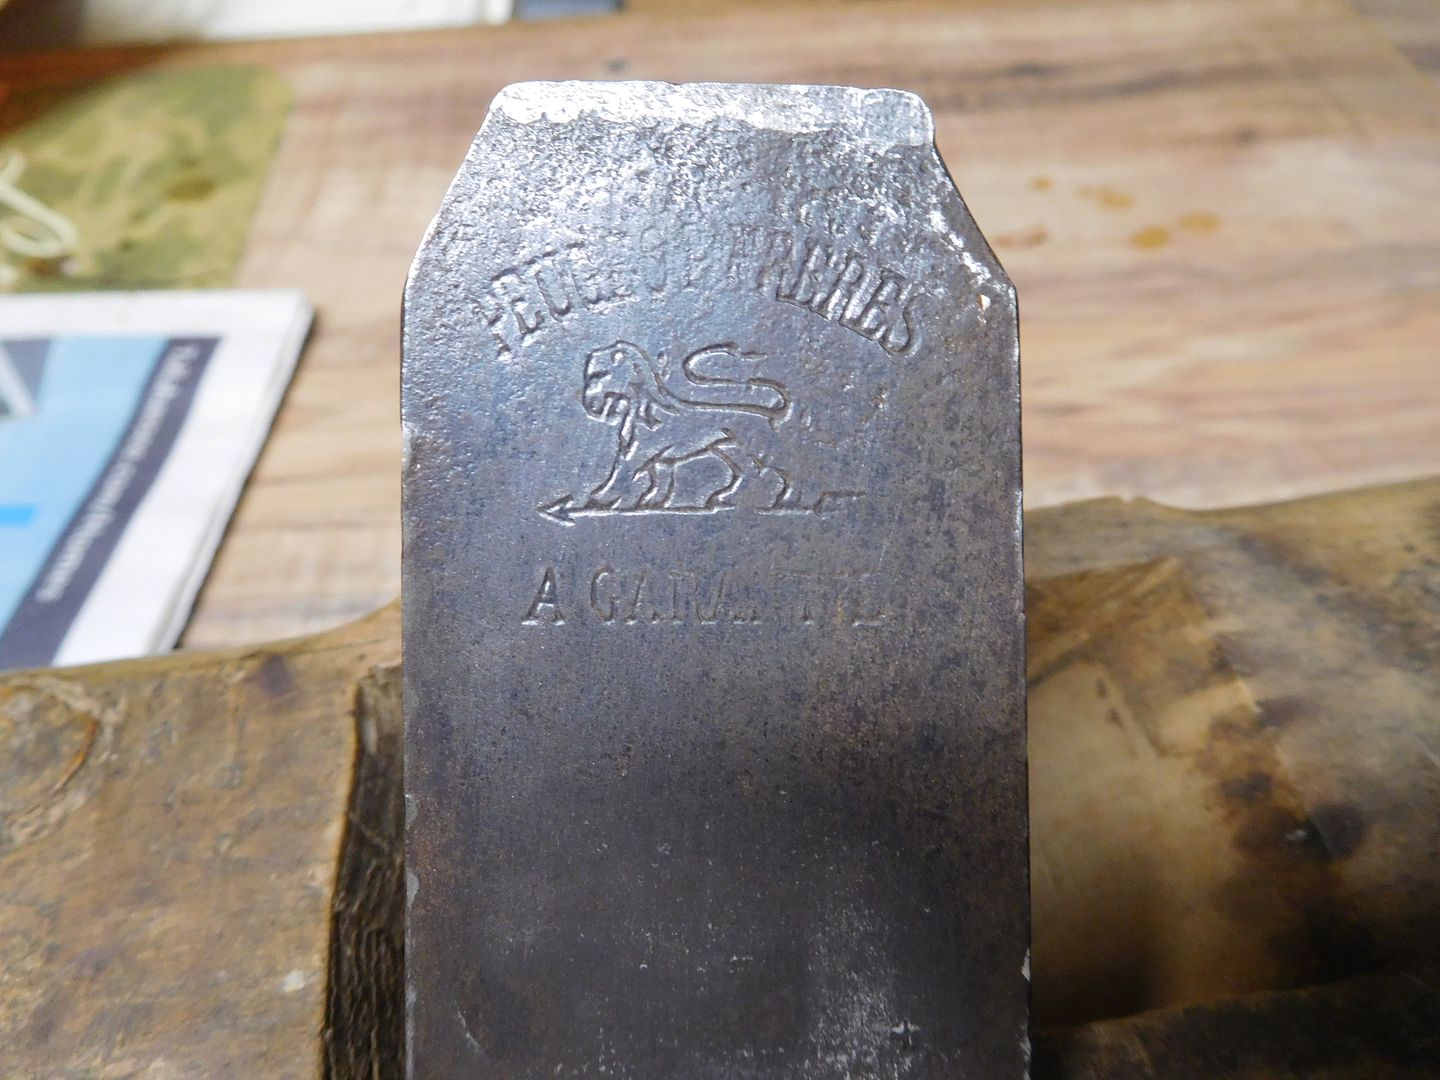
The mailman brought me a new project. It is a small #3 sized smoothing plane made by Peugeot Freres. As best as I can tell, the lion was first used in 1850. I have a later model just like this one and really don't need it. BUT I just could not resist the offer of $14.53 delivered to my door. Besides, it will be a fun rehab and the finished project should have lots of charm.

DSCN4101.jpg


DSCN4102.jpg


DSCN4103.jpg


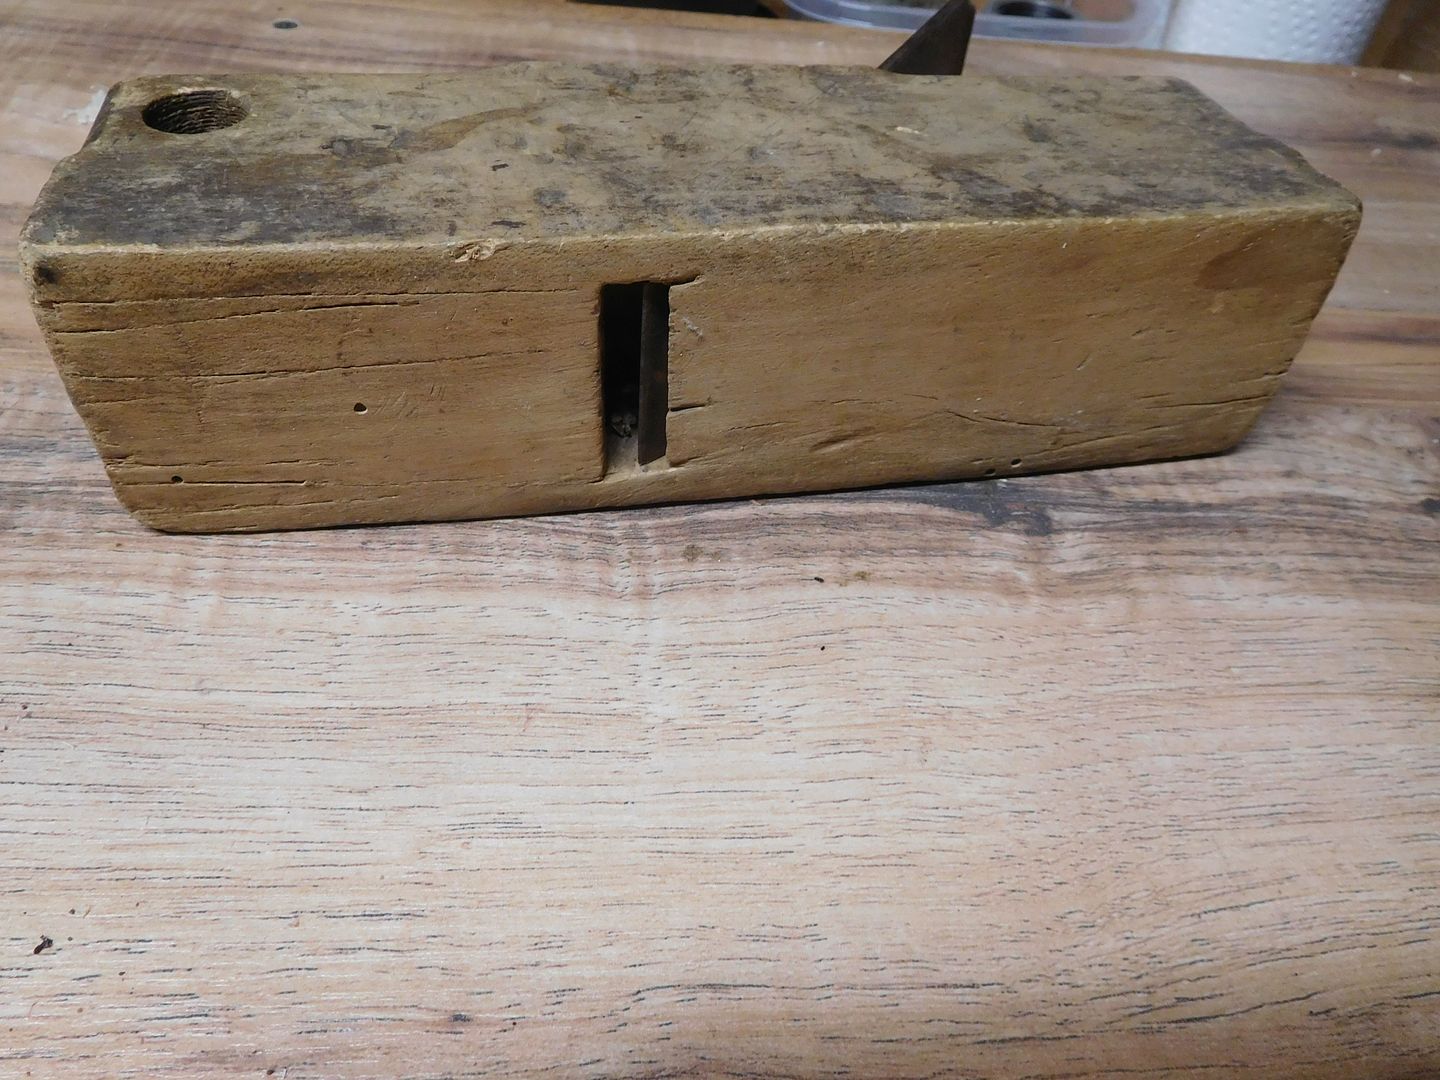
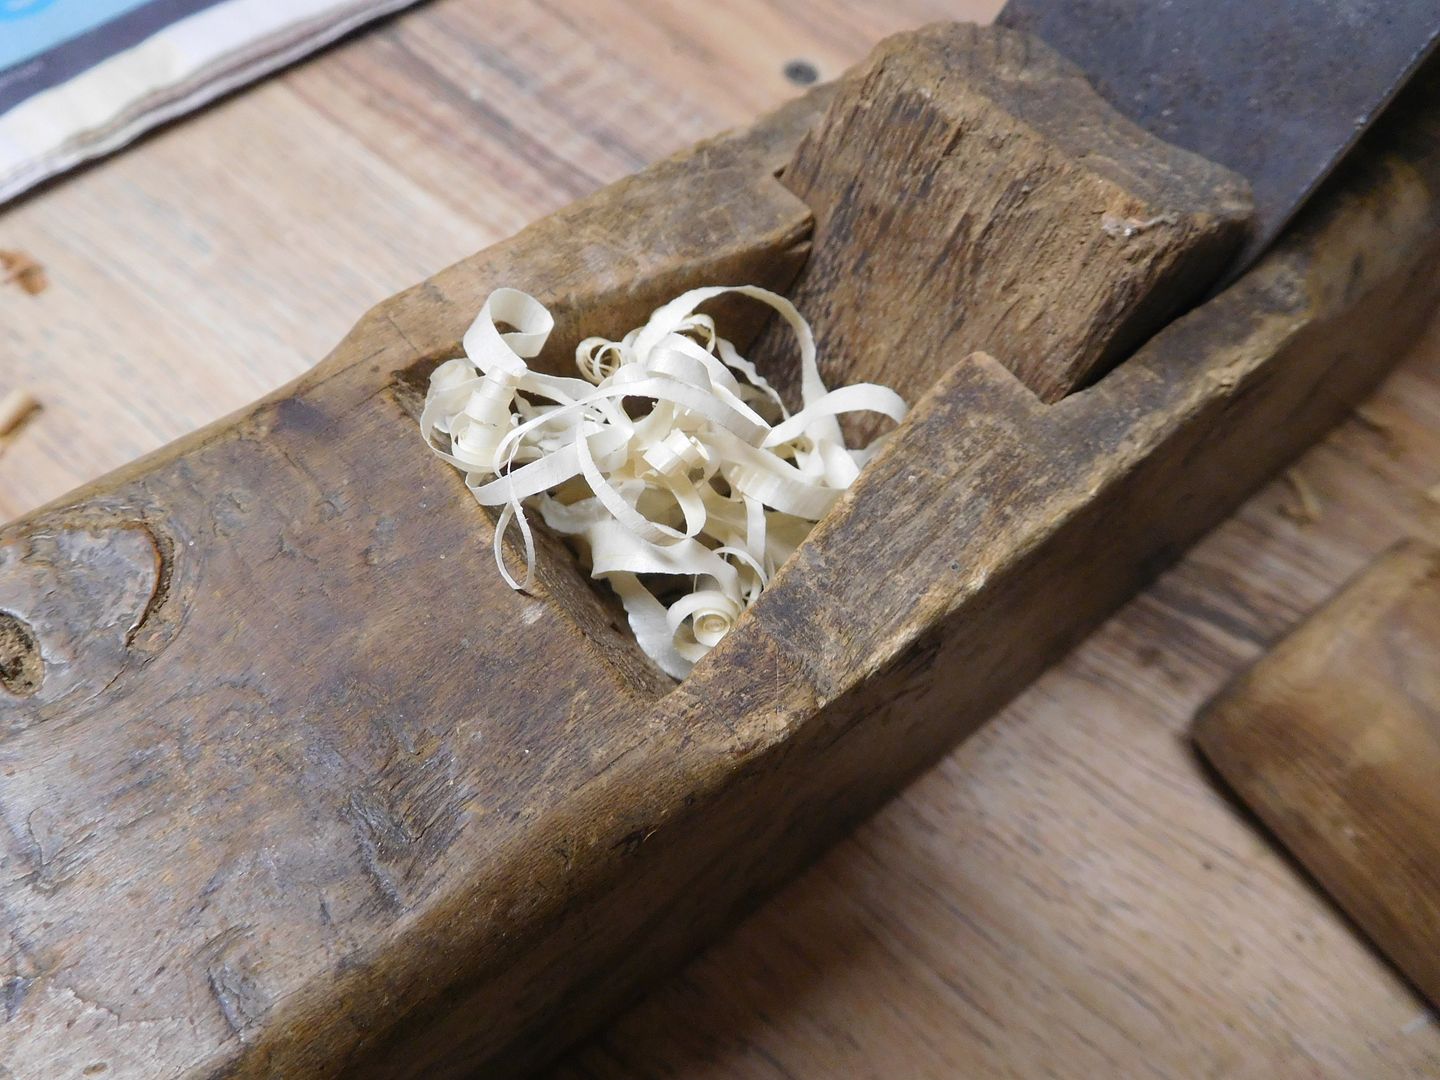
The body looks like very tight grained beech. The sole is dished and needs to be flattened.

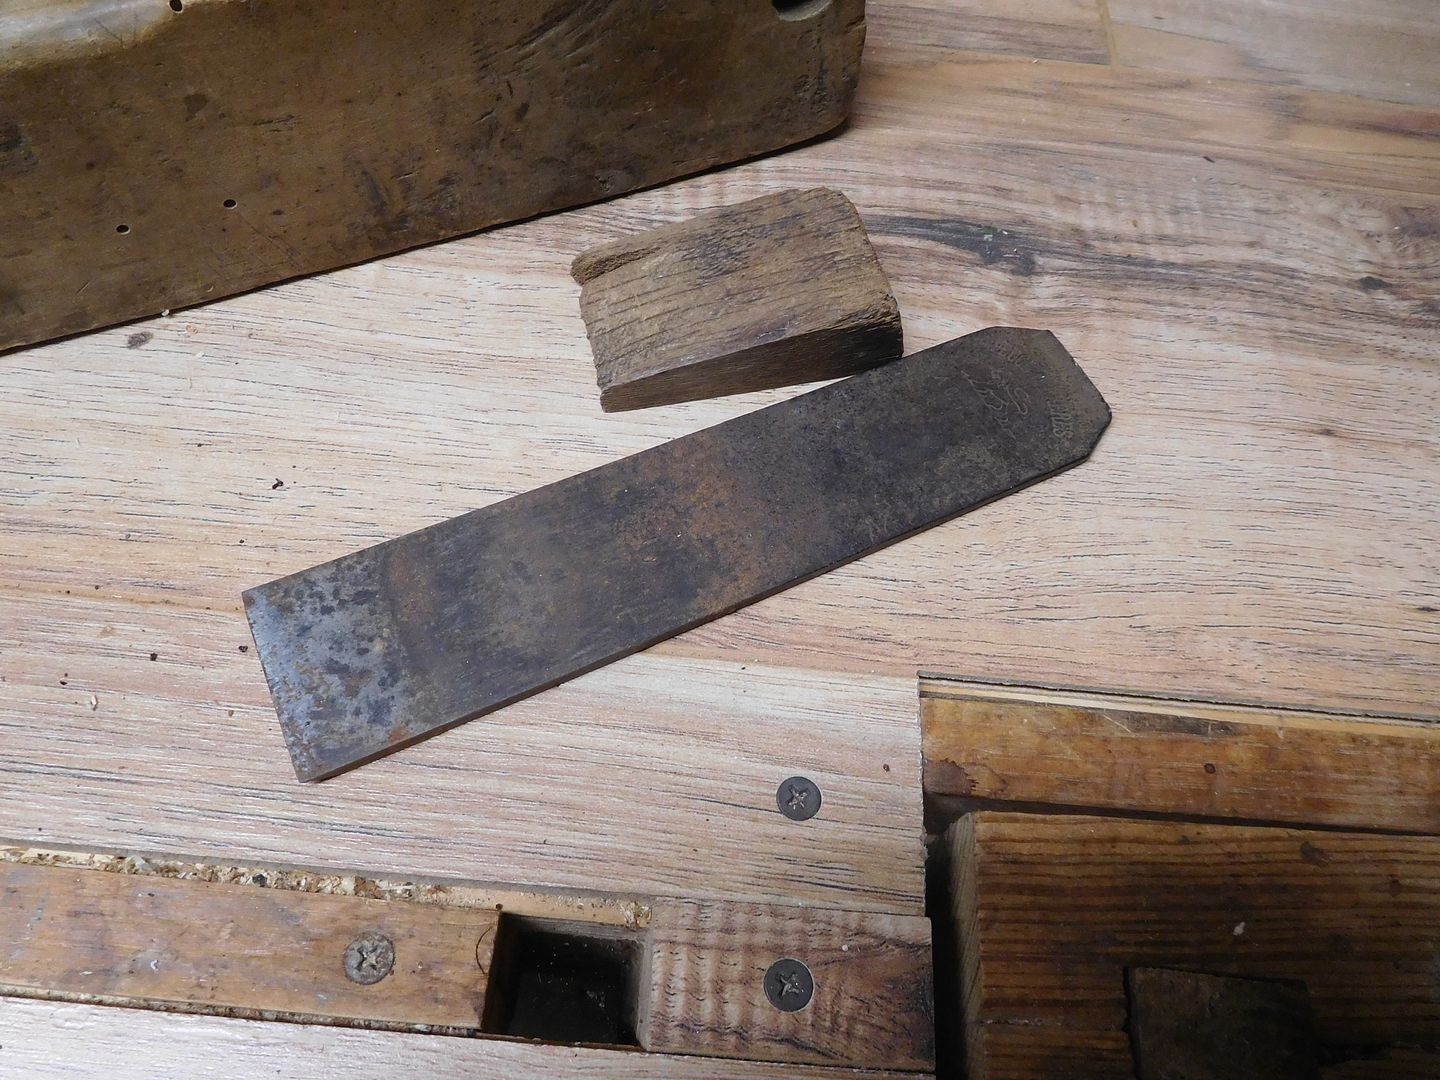
But I started with the blade. Seems the previous owner used a steel hammer on it.

DSCN4106.jpg


So I need a little anvil time.

DSCN4107.jpg


About fifty licks later and it was in much better shape. I can grind the edges flat from here.

DSCN4108.jpg


The blade is in really nice shape, especially on the cutting end. It has a nice taper and is very thick at the end. I wire brushed it and cleaned off most of the scale and heavy rust.

DSCN4109.jpg


DSCN4110.jpg


It needs a new wedge but lucky for me the original wedge is present, well, most of it is--at least the important part. The blade is a little tight on the sides so I will carefully grind it to remove just a hair from each side. I find this a common issue with older woodies. The wood continues to shrink and it prevents the blade from adjusting properly. In my opinion, it is better and easier to grind the blade instead of opening up the mortise.
 

rrich1

Well-known member
Joined
Oct 7, 2015
Messages
793
More work done on the table today. We got the plywood panels pieces rough cut. Also got 4 cup holders roughed out as well. Only need to sand, round over the edges, and glue them together. Fit nicely.43cfed94a03b75043b98db62fb6decf8.jpg a9ba51455acecc2290ef6688b808495b.jpgb56f98d9b44971dffce743d04513b68c.jpg

Sent from my Pixel XL using Tapatalk
 

Attachments

  • 43cfed94a03b75043b98db62fb6decf8.jpg
    43cfed94a03b75043b98db62fb6decf8.jpg
    63.4 KB · Views: 0
  • b56f98d9b44971dffce743d04513b68c.jpg
    b56f98d9b44971dffce743d04513b68c.jpg
    51.9 KB · Views: 0
  • a9ba51455acecc2290ef6688b808495b.jpg
    a9ba51455acecc2290ef6688b808495b.jpg
    61.5 KB · Views: 1
To avoid these ads, REGISTER NOW!

R_einan

Well-known member
Joined
Aug 29, 2016
Messages
461
Location
Eastern WA
Here's the pic of the Yost clamp. Haven't put it ro use yet, but it seems pretty decent.
 

Attachments

  • IMG_2408.jpg
    IMG_2408.jpg
    131.3 KB · Views: 40
  • IMG_2407.jpg
    IMG_2407.jpg
    136.1 KB · Views: 43
  • IMG_2409.jpg
    IMG_2409.jpg
    133.6 KB · Views: 43

R_einan

Well-known member
Joined
Aug 29, 2016
Messages
461
Location
Eastern WA
The 32" was $35, the 40" was $38 on the Amazon sale I posted last week. I got a pair of each. Now I have 2@24" (Jorgensen), 2@32" (Yost), 4@40" (1 pair Yost, 1 pair Bessey Ks). I still have a pair of 60" jets on order, Amazon will fulfill it eventually. Hopefully soon; I'll need them to clamp the breadboard ends so I can set the dowels when I get the walnut machined. Planned coffee table top dimensions are 54"x20".
 

rrich1

Well-known member
Joined
Oct 7, 2015
Messages
793
Rrich is that table from the Wood Whisper?


Sent from my iPhone using Tapatalk
Yes it is. Been a great build so far. He has it on sale soon in the guild for 30% off. I just purchased the Morris chair build this past weekend.

R - those clamps look pretty decent.

Sent from my Pixel XL using Tapatalk
 
Last edited:

drivesitfar

Well-known member
Joined
Oct 23, 2013
Messages
36,007
Location
Pacific Northwest
RR: your table is looking great so far. what type of plywood is that and what is the plan for stain or finish on it and your cool table?

EZ: cool addition to your nice plane collection!

Jim: so is the desk still *******? :D:D

i bet you never get tired of getting parcels with Woodworking items in them do you?

ALL: so i'm thinking about putting some cedar bracing under the 4x4's to the 8x8's but not sure yet. for all intents and purposes this project is just waiting for the neighbor to print off some #'s for our mailboxes and it's done. I might have done a couple things different, but it's good for now and my bride seems to like it. I saw our mailman yesterday who was watching me plane, stain and work on it all along and he said it's the best mailbox stand he delivers to or has and he loves the height which is a bit higher than standard.

a couple before pics and after and i'm off to the next project even though the rains have started now.
 

Attachments

  • WP_20171016_007.jpg
    WP_20171016_007.jpg
    152.7 KB · Views: 50
  • WP_20170802_003.jpg
    WP_20170802_003.jpg
    154.3 KB · Views: 48
  • WP_20171016_006.jpg
    WP_20171016_006.jpg
    151.3 KB · Views: 40
  • WP_20170802_002.jpg
    WP_20170802_002.jpg
    156.9 KB · Views: 42
  • WP_20170802_001.jpg
    WP_20170802_001.jpg
    152.5 KB · Views: 47
  • WP_20171016_005.jpg
    WP_20171016_005.jpg
    152.2 KB · Views: 45
  • WP_20171016_008.jpg
    WP_20171016_008.jpg
    154.4 KB · Views: 53
Last edited:

rrich1

Well-known member
Joined
Oct 7, 2015
Messages
793
Drive: the plywood is cherry veneered. No plans to stain it. I will most likely be using general finishes armor seal semi gloss.

Sent from my Pixel XL using Tapatalk
 
OP
J

jimreed2160

Well-known member
Joined
Aug 7, 2016
Messages
3,589
Location
Tallahassee FL
Plane project

I did not have much shop time today so I worked on the plane. Time to true up the sole. Good thing I have a spare ww bench.

DSCN4111.jpg


The first pass shows the high spots.

DSCN4113.jpg


DSCN4114.jpg


DSCN4115.jpg


DSCN4116.jpg


Looking better now. My guess is that the original owner was right handed and wore down the upper right corner of the sole.

DSCN4117.jpg


DSCN4120.jpg


By now I had a handful of shavings and most of the sole was dead flat. I will stop and work on the blade. No need to overshoot as I can always take off more.

Time for the blade. Turns out it was sharpened but was badly out of square. I had to grind quite a bit. The blade is laminated and is very hard. Look closely and you can see the lamination line. The hard steel is a lighter color.

DSCN4121.jpg


I also polished the back and worked off the wire edge.

DSCN4122.jpg


Time for a test drive.

DSCN4123.jpg


DSCN4124.jpg


OK. Fluffy shavings. The plane has a smooth action and is easy to adjust. I filed the sides of the blade to make it move easier.

After the test drive, I cleaned up the plane with a Scotchbrite pad and then washed it down with turpentine.

DSCN4125.jpg


Next task is to make a new wedge, stain it to match and then put some sort of finish on the whole thing.
 

Teenager with old tools

Well-known member
Joined
Jun 3, 2015
Messages
595
Location
riverside california
Jim how do you get rid of the bur on the back edge when sharpening? I can sharpen my straight razor just fine but when it comes to plane blades I feel like its luck every time it is sharp enough so what do you do to get the back bur off

Sent from my P027 using Tapatalk
 

rlitman

Well-known member
Joined
Oct 18, 2010
Messages
24,592
Location
Long Island
Jim how do you get rid of the bur on the back edge when sharpening? I can sharpen my straight razor just fine but when it comes to plane blades I feel like its luck every time it is sharp enough so what do you do to get the back bur off

I'll lap the flat side in a figure 8 motion on a diamond hone. Then sharpen the bevel. If I get too much of a burr, it's because I'm pushing too hard on the stone, but I can work it back into shape with the cylindrical part of a sharpening steel slid flat against the bottom of the iron, run at an angle to push the burr where you want it.
 

rrich1

Well-known member
Joined
Oct 7, 2015
Messages
793
To get rid of a burr put the back side of the blade down and two short swipes.

Got the 4 cup holders all done. Been working on the birthday box as well today. Dovetails are coming out nicer than the last set. bbc5a9b743766d7ef949a77bfad78e7a.jpg0ae09894ae1c49753f2b6b3fdaf003bf.jpg

Sent from my Pixel XL using Tapatalk
 

Attachments

  • 0ae09894ae1c49753f2b6b3fdaf003bf.jpg
    0ae09894ae1c49753f2b6b3fdaf003bf.jpg
    50.7 KB · Views: 0
  • bbc5a9b743766d7ef949a77bfad78e7a.jpg
    bbc5a9b743766d7ef949a77bfad78e7a.jpg
    77 KB · Views: 3
OP
J

jimreed2160

Well-known member
Joined
Aug 7, 2016
Messages
3,589
Location
Tallahassee FL
Jim how do you get rid of the bur on the back edge when sharpening? I can sharpen my straight razor just fine but when it comes to plane blades I feel like its luck every time it is sharp enough so what do you do to get the back bur off

When you sharpen blades in a single direction away from the bevel, you create a wire edge or burr. As that metal at the edge gets thin, it has a tendency to deform and bend up from the sharpened edge. When I used to work blades on the Tormek water wheel, sometimes I got a wire edge that was 1/16" or more long. The traditional way of dealing with this metal is stropping. Just move the edge back and forth on something firm--first one side and then the other. Repeated flexing of this thin metal causes it to break off at the edge.

Sometimes I strop blades on the heel of my hand or even slice a piece of soft wood by using the blade like a knife. It depends on how much edge has been worked up. Whatever I do to remove it, I usually drag the bevel on very fine (worn 800 or higher) sandpaper and then polish the flat side with the same paper. It leaves a sharp edge and also a mirror finish on the flat.
 
To avoid these ads, REGISTER NOW!
Top Bottom