To avoid these ads, REGISTER NOW!

Woodworking 101--Tools and Tips

turbowoodworker

Well-known member
Joined
Mar 18, 2012
Messages
3,531
Location
Apex NC
Hey rich, not sure if this has been mentioned concerning your screw troubles, but I find that dipping brass screw in beeswax can help avoid breaking too.
 
To avoid these ads, REGISTER NOW!
OP
J

jimreed2160

Well-known member
Joined
Aug 7, 2016
Messages
3,589
Location
Tallahassee FL
Alright guys, need a little help. I have been designing this coffee table as I go and have a leg and apron design in mind. But I have run into an issue... I want to do a double bridle in the top of the legs. I had planned the aprons to be 3" tall which means the cuts in the end of each leg need to be 3" deep. The idea is to have the aprons run through each leg so that you see the end grain of the maple aprons on both outsides of each leg. I was going to notch the top of one apron and the bottom of the apron so they lock together in the center of each leg. I really didn't want to rebate the aprons where they meet the leg. The legs will be tapered from 3" down to 2" or 1 1/2" after the bridle cuts are made. My intention was to bring the taper all the way up to the table top.

Here is my issue: my dado set is only an 8" blade, leaving me with a maximum depth of ~2"... leaving me with 2 options... 1.) rebate the height of the apron to 2" where it will enter the leg, which takes away from the visual on the outsides of the legs, and also leaves me a angular issue to overcome so the joinery is tight. Or 2.) use a standard kerf blade to make multiples cuts until I reach the ~13/16" width thickness of the aprons and clean up the bottom of the notch with a chisel.

Any thoughts gentlemen? I am leaning towards the 2nd option, but thought I might ask some more experiences individuals.

I would combine your ideas. Use your dado blade to make a precise, but shallow, dado which will be your guide for the standard sized blade. With side guides, it should not be too hard to nibble out the last inch by eye. There should be little chisel clean up.
 
OP
J

jimreed2160

Well-known member
Joined
Aug 7, 2016
Messages
3,589
Location
Tallahassee FL
Sandpaper

We all have it. We all use it. Here is how I deal with standard sized paper.

DSCN4177.jpg


This happens to be 100 grit flint (or something else inexpensive).

DSCN4179.jpg


I first fold it in half with the grit on the outside. Then I make a crease and cut the crease from the inside with a hunting knife (the first one I ever made). Then I fold each piece in half and cut them into rough rectangles.

For simple projects, I fold the paper over again and use it doubled up. Sometimes I need a sanding block to keep my project square.

DSCN4178.jpg


This sharp sided scrap of hickory is just right. Fold the paper over it and go to town.

DSCN4180.jpg


Fresh paper cuts the best and used paper is great for cleaning up old tools. Good luck sanding.
 

ez-duzit

Well-known member
Joined
Jun 24, 2013
Messages
5,096
Location
Marina del Rey
R--I would be inclined to make intersecting blind mortises against a shoulder and miter the ends of the tenons where they come together inside the mortise. These could be pinned if desired and should make a much stronger joint.

jr--for use with wooden sanding blocks I have found that self adhesive sanding discs are far handier than loose sheets of sandpaper, which require gripping to the block and which tend to wrinkle and move around.
 
Last edited:
OP
J

jimreed2160

Well-known member
Joined
Aug 7, 2016
Messages
3,589
Location
Tallahassee FL
Moving the desk

So the big day has arrived and I am finally able to move the desk from my workbench. These came in the mail last week from Rockler.

DSCN4182.jpg


If you recall, the original casters caused damage to the desk because of the extreme stress they put on the feet. I removed them and will advise these in lieu of the others. My daughter and family will have to decide but at least I can move it around the shop and get it delivered in one piece. It will be OK on my watch.

The plan is to move it from the sawbench down to a footrest I made for The Queen when she did office work.

DSCN4183.jpg


DSCN4184.jpg


Once again, it is kitty litter pail to the rescue.

DSCN4185.jpg


DSCN4186.jpg


Whups!

DSCN4187.jpg


The footrest was not very stable and it gave away as I was moving the plywood off the sawbench. It left the desk wedged up against the bandsaw.

I coaxed, cursed, and kicked things out of the way and finally got the end on the dollies.

DSCN4188.jpg


From there, it was pretty easy to lower the other end to dolly set #2.

DSCN4189.jpg


Whew!

That famous American actor Clint Eastwood (as Harry Callahan) once remarked that "a man's got to know his limitations." How true. I just discovered some of mine. No more wrestling big furniture in my shop. Done.
 
OP
J

jimreed2160

Well-known member
Joined
Aug 7, 2016
Messages
3,589
Location
Tallahassee FL
Safety issues

I noted how top heavy this desk was and got concerned. It could fall and hurt someone. I had to come up with something to hold it to the wall. I have been sleeping on this for several weeks and my batch mode brain had it all worked out. I started with a hinge. I marked the holes with an awl.

DSCN4190.jpg


There is an internal brace on the inside a few inches down from the top. I can drive screws through the back piece and into that brace.

I have a scrap that is about 24" long so it can center easily on 16" stud walls. I will bolt a chain to that piece.

DSCN4191.jpg


But I need to open the links a bit for the large #6 bolt. I twisted with a screwdriver as I closed the vise jaws and the link opened easily.

DSCN4192.jpg


I drilled two holes and chamfered the ends. That part is easy if you have a hand vise and a chamfer bit loaded and ready to go. I like the short throw 3" brace because it is compact.

DSCN4193.jpg


Here is the trial fit.

DSCN4194.jpg


I used the forstner to countersink the bolt heads/washers so they would be flush with the wall. The nuts can stick out a bit.

So my SIL will have to attach the cleat to the wall studs and clip on the "S" hooks. Tipping accident avoided!
 
OP
J

jimreed2160

Well-known member
Joined
Aug 7, 2016
Messages
3,589
Location
Tallahassee FL
Finishing touches on desk

You may have noticed some defects in the finish on the desk top.

DSCN4196.jpg


The large spot in the back looks like moisture from a flower pot. That is common with antique furniture. Long surface contact turns the walnut black. There are also a few water stains on the front. Sorry for the glare in the photo.

DSCN4197.jpg


I sanded the water stain and then gave the whole top a light sanding.

DSCN4198.jpg


And then I used shellac to pad the whole surface.

DSCN4200.jpg


The repaired drawer front got a light sanding followed by a shellac rub. Here is the before.

DSCN4199.jpg


I replaced the drawer knobs but will tighten them later. Here is where we are now.

DSCN4201.jpg


I just need to check out the other drawers and we will be good to go. But first, the kitties and I need to nap it out.
 

rlitman

Well-known member
Joined
Oct 18, 2010
Messages
24,596
Location
Long Island
...The large spot in the back looks like moisture from a flower pot. That is common with antique furniture. Long surface contact turns the walnut black...

Looks like iron in the water reacted with the tannins in the wood. You can bleach out the black with oxalic acid.
 

rrich1

Well-known member
Joined
Oct 7, 2015
Messages
793
Two coats of shellac are on. I chiseled out a recess for a finger grab to open the top. Contrast on the dovetails really stand out. Liking it so far. 49a46e3b098e0cb5dcaf120c68657483.jpg4bb0bb1b345a102dfb0ccfcf4d80382b.jpgdd041b60de540b7cddae1b4b52bc55f7.jpg

Sent from my Pixel XL using Tapatalk
 

Attachments

  • dd041b60de540b7cddae1b4b52bc55f7.jpg
    dd041b60de540b7cddae1b4b52bc55f7.jpg
    133.1 KB · Views: 1
  • 4bb0bb1b345a102dfb0ccfcf4d80382b.jpg
    4bb0bb1b345a102dfb0ccfcf4d80382b.jpg
    87.5 KB · Views: 1
  • 49a46e3b098e0cb5dcaf120c68657483.jpg
    49a46e3b098e0cb5dcaf120c68657483.jpg
    110.6 KB · Views: 3

drivesitfar

Well-known member
Joined
Oct 23, 2013
Messages
36,008
Location
Pacific Northwest
RR: nice looking box and you learned quite a bit making this one didn't you?

Jim: too bad we don't live closer cause i could come over to do the heavy lifting and take advantage of your cool tutorials in person. WHEW just about broke the desk before it left your WATCH.

ALL: i have to pick up lumber for a few projects and thought some of you might want to see a 12 foot Uhaul carry 17 foot 4x10's. the neighbor provided some vinyl #'s with nice sticky backs and after taking this picture i moved our #'s down a few inches to be more in line with the neighbor's #'s even though our box is a bit bigger.

the wood on the trailer is 4x10'sx17, 2x8's 12 and 14 footers and cedar 3x10x14's to give you an idea about size and yes i loaded them all myself. heading now to use trailer to pick up 30 80 pound bags of concrete for a little late night exercise.

cheers
 

Attachments

  • WP_20171024_006.jpg
    WP_20171024_006.jpg
    162 KB · Views: 59
  • WP_20171024_001.jpg
    WP_20171024_001.jpg
    154.1 KB · Views: 67
  • WP_20171024_007.jpg
    WP_20171024_007.jpg
    155.3 KB · Views: 60
  • WP_20171024_002.jpg
    WP_20171024_002.jpg
    155.9 KB · Views: 57
OP
J

jimreed2160

Well-known member
Joined
Aug 7, 2016
Messages
3,589
Location
Tallahassee FL
Shorty--I am sure that everything you know about material handling is VASTLY superior to my pitiful knowledge of the subject. :lol_hitti

rrich--I think your wife will be thrilled. What is your plan for the bottom? Feet? Felt? Buttons? I ask because I always ponder the underside design. Just replaced some button feet on kitchen chairs and I picked up some of those plastic buttons for drawer fronts.

Drives--At least you did not strap that stuff to your roof. After all of this concrete work, don't be surprised if you receive a visit from your friend, Arthur (itis).
 

rrich1

Well-known member
Joined
Oct 7, 2015
Messages
793
Drive: thanks. Yep learned a lot. It was a nice build and happy I did it.

Jim: I bought some clear half sphere rubber type pads. I wanted something that wouldn't make the box slide around.

Sent from my Pixel XL using Tapatalk
 

drivesitfar

Well-known member
Joined
Oct 23, 2013
Messages
36,008
Location
Pacific Northwest
JIM: i might push it a bit for my EXERCISE, but my 82 year old neighbor sat on his deck drinking cocktails and saying i work too hard and he's the one that met Arthur and is all crumpled up now. anything can happen, but if we just get up and keep moving it is a lot better than sitting. BTW the Lowes store only had 29 dry 80 pounders that i could load without having to find the help that usually isn't around the cement pile. the hard part was unloading them into my shed that was 100 feet from the back of the trailer, but my son in law helped and he's still breathing hard.

I could have paid to have it delivered, but i don't mind the EXERCISE.

in case you have some aches and pains (and anybody else that might) i bought an inversion table about 10 years ago and i've still yet to take an ADVIL or any medication for a sore back. I hang 5 minutes every day whether i hurt or not and other than a little knee popping which might not be from the inversion i'm in pretty decent shape for an old guy.

best of luck on finishing the desk and is there a project waiting or have you always want to build something?

RR: keep up the good work.
 

BobLon

ALLIANCE MEMBER
Joined
Apr 19, 2017
Messages
141
Location
Florida
RR, that box came out nice. Good job on the hand cut dovetails. I really need to try that sometime.

BobL.
 
OP
J

jimreed2160

Well-known member
Joined
Aug 7, 2016
Messages
3,589
Location
Tallahassee FL
Drives--Your concrete work IS impressive and I agree with the exercise thing. I continue on a more modest scale as head of maintenance here. Maintaining my little half acre of north Florida paradise keeps me occupied while landscaping trucks and trailers crisscross my neighborhood all day long.

As for projects, that empty bench is singing like the sirens of old. Their allure is intoxicating, the weather is great and the project list is long. Wonder who has the next ticket?
 

CRSINMICH

Well-known member
Joined
Aug 15, 2015
Messages
2,397
Location
Southeastern Michigan
rrich: Great job on the box. It is beautiful. I'm sure it was a wonderful learning experience for you. Keep up the good work. If you haven't thought of it already, the teacher in me wants to suggest that you go back and watch Paul Sellers' videos again. You'll have a deeper understanding of what he does and why he does it that way.
 
OP
J

jimreed2160

Well-known member
Joined
Aug 7, 2016
Messages
3,589
Location
Tallahassee FL
Drawer slide issue

As I attempted to replace the drawers, I found an issue.

DSCN4204.jpg


When I tightened everything up, one of the side stops now protrudes into the slide. Maybe I can pry it up.

DSCN4205.jpg


DSCN4206.jpg


DSCN4207.jpg


It is not a hard fix, just a time consuming one. Now added to the punch list.
 
To avoid these ads, REGISTER NOW!
OP
J

jimreed2160

Well-known member
Joined
Aug 7, 2016
Messages
3,589
Location
Tallahassee FL
Drawer assessment

I need to look over the remaining drawers for issues. All of them have worn slides, but this one passes (just barely).

DSCN4203.jpg


As you can see, the sandpaper passes under but the rule does not. But the next one is not so lucky.

DSCN4208.jpg


I use a screwdriver as a wedge to raise the back end until the entire side is level. This unlucky drawer is missing a lot of meat.

And this drawer has bad splintering on the end.

DSCN4209.jpg


I need to remove the bottom but the previous repair dude GLUED the bottom.

DSCN4210.jpg


They used thin wood for drawer bottoms and let them float to prevent cracking. Glue is a no-no. Luckily there was just a 2 inch area at the end. I was able to loosen it with a sharp knife and tap the drawer bottom out.

DSCN4211.jpg


The glue was on both sides.

DSCN4212.jpg


Now I need to ponder the repair. Unfortunately, the previous worker GLUED the box up real tight. Need to fix quickly and effectively without rebuilding the whole dang thing. Ponder time...
 
OP
J

jimreed2160

Well-known member
Joined
Aug 7, 2016
Messages
3,589
Location
Tallahassee FL
Brasses

When this desk was acquired way back in the day, it had mismatched and broken brasses. I replaced all of them with repops. Most of them are acquiring a nice patina. One backplate, however, seems to have gotten a cat spray or something.

DSCN4213.jpg


I cannot get to the scrap bin, so I grabbed a cherry stick from the trash and started with Scotchbrite pad.

DSCN4214.jpg


DSCN4215.jpg


The brass wire brush did a little better but it is still green. Dipping makes it new again and I need some patina to match the others. Maybe Mr Dremel can help.

DSCN4216.jpg


I got a whole bagfull of brass brushes at HF. They don't last long but they work well.

DSCN4217.jpg


I followed the brushwork with a green Scotchbrite.

DSCN4218.jpg


Ahhhh. That's more like it.
 

R_einan

Well-known member
Joined
Aug 29, 2016
Messages
461
Location
Eastern WA
Last homemade taper jig was a piece cut from a hunk of 2x6 that was hanging around the scrap pile. Started to twist as soon as I cut it and was too short for the tapers I intend on the 3” walnut legs. So I made an improved one from some red oak. This one is tall enough for the walnut I need to use it on, and much better designed than the last one. This should be able to be used for more than on job. Limited shop time today as we are getting ready to head out on vacation tomorrow, so this jig is all I managed.
 

Attachments

  • F812D345-1B74-498E-A881-79C59A007FDA.jpg
    F812D345-1B74-498E-A881-79C59A007FDA.jpg
    23 KB · Views: 80
OP
J

jimreed2160

Well-known member
Joined
Aug 7, 2016
Messages
3,589
Location
Tallahassee FL
Plane rehab

It is a slow day for me. I did get some shop time and used it to get a little plane orphan back on its feet.

DSCN4223.jpg


I have had this Stanley #40 1/2 scrub plane for years but it was missing its lever cap. These planes, the #40 1/2 and its little brother #40, had long blades which projected. So of course they were stored with the blade removed. By the time they hit the market, only the plane survives. I was lucky enough to find a lever cap that only needed a little side grinding to make a perfect fit. So now it can get back to work.

That's me. Saving one plane orphan at a time.
 

eba3317

Active member
Joined
Dec 17, 2013
Messages
36
Working on a wedding gift for a friend of mine. I will post more about the gift itself when I get it finished but need some advice on the handles.

The one closer to me in the picture is tighter when rotating but stays in place laterally on the dowels. The one on the far side rotates more freely but likes to move around laterally on the dowels seeming like eventually vertical pieces would fall off the dowels. Any thoughts on how to prevent that? Or why it's happening on one but not the other?

None of the parts of the handles are gluedbde8f20c9b8b1fe8cc256964b7c4d220.jpg

Sent from my LG-M153 using Tapatalk
 

Attachments

  • bde8f20c9b8b1fe8cc256964b7c4d220.jpg
    bde8f20c9b8b1fe8cc256964b7c4d220.jpg
    71.5 KB · Views: 1
OP
J

jimreed2160

Well-known member
Joined
Aug 7, 2016
Messages
3,589
Location
Tallahassee FL
Eba--Looks good. Is that a basket or tote? The dowels need to be fixed in place or trouble will ensue. All you need is a pin. Good luck to you and your project and to your friend who is getting married.
 
OP
J

jimreed2160

Well-known member
Joined
Aug 7, 2016
Messages
3,589
Location
Tallahassee FL
Desk

The Queen had an appointment today and that got in the way of my shop time. And then there was that nap... Anyway, I need to get something done each day so today I sprayed the top of the desk.

DSCN4248.jpg


It was looking a little shopworn and I needed to work on the spot where the water marks were. A little sanding and a shellac padding made it look really nice but shellac is not very durable. And this top needs durability because it is a nice flat space that begs for stuff. So I coated the shellac with two heavy coats of semi gloss poly. That will leave a nice finish that will wax up nicely and be very durable for the next few decades.
 

eba3317

Active member
Joined
Dec 17, 2013
Messages
36
Eba--Looks good. Is that a basket or tote? The dowels need to be fixed in place or trouble will ensue. All you need is a pin. Good luck to you and your project and to your friend who is getting married.
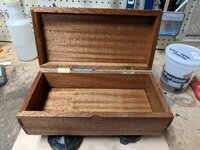
I'm not sure haven't figured out what I'm calling it yet. But it's probably more of a tote than a basket

When you say a pin, are you thinking a pin through the dowel on the outside of the vertical member of the handle?or holding the dowel to the main box?

Sent from my LG-M153 using Tapatalk
 

shortykorte

Well-known member
Joined
Sep 1, 2014
Messages
8,039
Location
Tallahassee, Fl
I believe he does mean that. You could also put a dowel pin through the handle on the outside of the vertical pieces. I nice touch would be to use a dark wood dowel pin.


Sent from my iPhone using Tapatalk
 

drivesitfar

Well-known member
Joined
Oct 23, 2013
Messages
36,008
Location
Pacific Northwest
Jim: i was thinking of a way that you could bring in heavier objects into your shop and raise them to a working level without hurting yourself or damaging the project and i think this might work if you have level ground from the truck to your shop.

your desk is looking better all the time.
 

Attachments

  • 37308_700x700.jpg
    37308_700x700.jpg
    40.3 KB · Views: 37
OP
J

jimreed2160

Well-known member
Joined
Aug 7, 2016
Messages
3,589
Location
Tallahassee FL
eba--Sorry I was unclear but Shorty saved me. All you need is something to keep the dowel from rotating. The easiest way to pin the rod into place is to drill a pilot and insert a small brad. Even brass would work because there should be little stress. Of course, a 1/4" walnut dowel would look spiffy.

Drives--That table is just the thing to keep my insides inside and to keep the whack IN my back. The floor space required, however, is impressive. I used my substantial clout with the Procurement Department and was able to get VISE off the resupply list. So at least the spigot is turned off. Most of them are cleaned and in use now. I gave a few to my daughter. I even snuck a few inside and put them on display. The rest are in the back grinding room and out of the way--for now. BUT that table would be just the stuff and the top would be a nice workspace. Hmmmmm...
 

eba3317

Active member
Joined
Dec 17, 2013
Messages
36
Thanks for the ideas Jim and shorty. I may try out the Walnut dowel idea

Sent from my LG-M153 using Tapatalk
 
OP
J

jimreed2160

Well-known member
Joined
Aug 7, 2016
Messages
3,589
Location
Tallahassee FL
Sorry but it looks like Photobucket s__t the bed again today. I have logged in dozens of times since this morning and have downloaded only three pictures. Last time it was down for days. At least I have had good shop weather and I am making good progress on the desk.
 

Mr_P

Well-known member
Joined
May 29, 2015
Messages
557
Location
Tinley Park, IL
You guys do way more detailed work than I, but I thought i'd share my little shop sign....


Woops. I forgot to attach. Thanks Jim.
 

Attachments

  • 20171029_183949.jpg
    20171029_183949.jpg
    131.2 KB · Views: 36
Last edited:
To avoid these ads, REGISTER NOW!
Top Bottom