To avoid these ads, REGISTER NOW!

Woodworking 101--Tools and Tips

OP
J

jimreed2160

Well-known member
Joined
Aug 7, 2016
Messages
3,589
Location
Tallahassee FL
Table finished

So I cleaned up the table today and reattached the top. Looks like my repair was 100% success. I think that is a tribute to the design which let weak glue joints to fail and allowed lots of movement.

Anyway, time to get it out of the shop and back into service.
 

Attachments

  • DSCN5968.jpg
    DSCN5968.jpg
    151.9 KB · Views: 74
To avoid these ads, REGISTER NOW!

BMR24

Well-known member
Joined
Oct 2, 2017
Messages
234
Location
Rocky Mountains Colorado
Jim& Chrisinmich
Thank you both. I've been looking for a Stanley router plane for a very long time, this is the only one I've ever seen in the wild. The only thing I'm going to do to it is sharpen the iron and buff the tiny bit of rust off of the sole.
The Bedrock appears to be in near mint condition as well, it's a 602, so a little small but I'll find use for it.
The sellers saw me taking them apart for inspection and gave me a deal because they knew I would appreciate them.
Anyone know of an ideal situation for a small plane that isn't a block plane?
 
OP
J

jimreed2160

Well-known member
Joined
Aug 7, 2016
Messages
3,589
Location
Tallahassee FL
Anyone know of an ideal situation for a small plane that isn't a block plane?

Well I would find a use for that small #602. Like when I took down the drawer side. I used my #62 because I like the low angle. My second choice would have been my #603 because of its size. I know block planes are handy but I like them more for non bench projects. Once I dog a piece into the bench, a bench plane seems to be the easiest to use. Block planes seem awkward to me at that height.
 

hunterguy86

Well-known member
Joined
Jan 22, 2012
Messages
168
Location
Central Texas
1st unplugged dado in an actual project. 7 more to go. These will be for the shelves to slide in to for a bookcase I'm making.

eae421cdc42bad6cd96dba61f8518724.jpg


Sent from my iPhone using Tapatalk
 

Attachments

  • eae421cdc42bad6cd96dba61f8518724.jpg
    eae421cdc42bad6cd96dba61f8518724.jpg
    551.4 KB · Views: 2

Bob Heine

ALLIANCE MEMBER
Joined
Oct 24, 2009
Messages
10,703
Location
Boca Raton, Florida
Here in the shallow end of the woodworking pool I got out my brace and bits. I don't think I've used them in 40 years, mostly because they didn't work all that well.

Cleaned up the brace with a gray Scotchbrite and put the bits in the ultrasonic cleaner with some Evapo-Rust. A half-hour with the fluid heated to 122*F (50*C) and the rust is gone. After running the auger bit file over the larger bits, I used a jeweler's file on the small ones. I also lightly polished the bits with the EXL wheel.
attachment.php


I suspect I haven't used the brace and bit because it is out of sight. I wanted to store them in a visible spot but didn't have a good way to make a square tapered hole for the tangs. Solution is to put the square tang in a round hole and my collection of Harbor Freight stepped drill bits came to the rescue. The long narrow bit works best but I have to start with a shallow hole and test fit each tang because they are different sizes. The largest tangs required drilling the hole with the full length of the stepped bit.
attachment.php


I need to set up the drill press to make the final holder but dinner brought a halt to my progress. The tang fits securely in the hole so I just have to find another piece of walnut....
attachment.php
 

Attachments

  • Brace & Bit 1.jpg
    Brace & Bit 1.jpg
    116.4 KB · Views: 529
  • Brace & Bit 2.jpg
    Brace & Bit 2.jpg
    106.5 KB · Views: 526
  • Brace & Bit 3.jpg
    Brace & Bit 3.jpg
    78.6 KB · Views: 521
OP
J

jimreed2160

Well-known member
Joined
Aug 7, 2016
Messages
3,589
Location
Tallahassee FL
Hunter--Nice dado! Too bad it will be covered up. That LV plane did a good job. I upgraded all of my Stanley routers with LV blades.

Bob--I think that tapered drill idea for square taper shanks is brilliant. You are now the "King of Holes". :rocker:
 

hunterguy86

Well-known member
Joined
Jan 22, 2012
Messages
168
Location
Central Texas
Thanks for the comments. I really enjoy the router plane. It works really well. I cut the dado using he Paul sellers method. It goes surprisingly fast.


Sent from my iPhone using Tapatalk
 

CRSINMICH

Well-known member
Joined
Aug 15, 2015
Messages
2,397
Location
Southeastern Michigan
Bob: Good post about Evapo-Rust. I did the same thing yesterday so I will only post a before and after shot. Also, here is a page from a 1920 catalog about different types of augers. The bottom bit in my pictures is a ship auger. It only has a single cutting edge but it cuts fast and smoothly. The other three augers are double twist. Most of them are Russell Jennings' bits. He was the premier auger manufacturer for many years. I think I'll give your auger rack idea a try.
 

Attachments

  • Auger bits before and After.jpg
    Auger bits before and After.jpg
    125.2 KB · Views: 43
  • 1920 Types of auger bits.jpg
    1920 Types of auger bits.jpg
    121.3 KB · Views: 48
Last edited:

Bob Heine

ALLIANCE MEMBER
Joined
Oct 24, 2009
Messages
10,703
Location
Boca Raton, Florida
CRSINMICH, thanks for the great information. My adjustable bit on the left is a Craftsman 2- to 3-inch and the seven bits next to it are also Craftsman Solid Center, Extension Lip. The next two are Russell Jennings Double Twist, Extension Lip. The last two twist bits are 9/32" and 3/8". I suspect the 9/32" bit came in handy to enlarge a 1/4" hole so a 1/4" bolt would slip through a 2x4 more easily.
attachment.php
 

Attachments

  • Brace & Bit 4.jpg
    Brace & Bit 4.jpg
    86.7 KB · Views: 459

hunterguy86

Well-known member
Joined
Jan 22, 2012
Messages
168
Location
Central Texas
Table finished


So I cleaned up the table today and reattached the top. Looks like my repair was 100% success. I think that is a tribute to the design which let weak glue joints to fail and allowed lots of movement.


Anyway, time to get it out of the shop and back into service.


Jim, that table is fantastic. I want to make a set of these at some point.


Sent from my iPhone using Tapatalk
 
OP
J

jimreed2160

Well-known member
Joined
Aug 7, 2016
Messages
3,589
Location
Tallahassee FL
Jim, that table is fantastic. I want to make a set of these at some point.

Thanks for your kind words. It's hard to believe but they still offer the exact same kit. New version has different drawer hardware. Fifty years ago I think it was $17.95 and now it is $200.

www.cohassetcolonials.com/catalog/view/small-tables/No.-311-Sewing-Table/311

Twenty years ago I made a pair of similar tables from cherry and birdseye maple. Kept one and gave one to my sister.
 

Attachments

  • DSCN5996.jpg
    DSCN5996.jpg
    133.1 KB · Views: 74

osumet

Active member
Joined
Sep 12, 2017
Messages
32
I've got a question. What does everyone do with their shavings and saw dust? I feel like there has to be a use instead of throwing them all away
Zach

I give the larger shavings from my planer and jointer to my MIL who likes to put them around her blueberry bushes, but I just toss the fine stuff.
 
OP
J

jimreed2160

Well-known member
Joined
Aug 7, 2016
Messages
3,589
Location
Tallahassee FL
+1 on sawdust+glue for filler. I just throw my sawdust and shavings in the trash. No need to put out more termite food here in north Florida.
 

Notgrownup

Well-known member
Joined
May 5, 2014
Messages
5,867
Location
Snow Hill NC
Here in the shallow end of the woodworking pool I got out my brace and bits. I don't think I've used them in 40 years, mostly because they didn't work all that well.

Cleaned up the brace with a gray Scotchbrite and put the bits in the ultrasonic cleaner with some Evapo-Rust. A half-hour with the fluid heated to 122*F (50*C) and the rust is gone. After running the auger bit file over the larger bits, I used a jeweler's file on the small ones. I also lightly polished the bits with the EXL wheel.
attachment.php


I suspect I haven't used the brace and bit because it is out of sight. I wanted to store them in a visible spot but didn't have a good way to make a square tapered hole for the tangs. Solution is to put the square tang in a round hole and my collection of Harbor Freight stepped drill bits came to the rescue. The long narrow bit works best but I have to start with a shallow hole and test fit each tang because they are different sizes. The largest tangs required drilling the hole with the full length of the stepped bit.
attachment.php


I need to set up the drill press to make the final holder but dinner brought a halt to my progress. The tang fits securely in the hole so I just have to find another piece of walnut....
https://www.garagejournal.com/forum/attachment.php?
attachmentid=745998&d=1520957127

Growing up in eastern Canada, my dad always used a Brace n bit, we’ll being french or bilingual we “Frenglished” a lot of words and one of these words was a ”Brezzbit” ...not until years later did I discover that this wasn’t actually a word but it was a variation of the “brace n bit”....It was so funny to me...Nice job cleaning up the “Brezzbit” Bob...looks great.
 
Last edited:

CRSINMICH

Well-known member
Joined
Aug 15, 2015
Messages
2,397
Location
Southeastern Michigan
Notgrownup: Great story about "brezzbit". It reminded me of "gettu", the Japanese word for a double play in baseball. They got it from American coaches yelling at the players on the field to, "Get two!"
 
Last edited:

CRSINMICH

Well-known member
Joined
Aug 15, 2015
Messages
2,397
Location
Southeastern Michigan
This is part of yesterday's take at an estate sale. Top to bottom: Stanley #80 cabinet scraper, Stanley #68 spokeshave, Stanley #52 spokeshave. They are all Sweethearts and, for some reason, all of their blades were installed backwards.
 

Attachments

  • Stanley #52, #68, #80 (3-16-18).jpg
    Stanley #52, #68, #80 (3-16-18).jpg
    154.2 KB · Views: 56
OP
J

jimreed2160

Well-known member
Joined
Aug 7, 2016
Messages
3,589
Location
Tallahassee FL
CRS--Nice group of shaves. I am not surprised about the blades being backwards. Many of the planes I find in the wild have *user issues*--esp with blades. It seems that if there is a way to do it wrong, someone will find that way. Just goes to show you that all ww of yore were not experts.
 
To avoid these ads, REGISTER NOW!

CRSINMICH

Well-known member
Joined
Aug 15, 2015
Messages
2,397
Location
Southeastern Michigan
CRS--Nice group of shaves. I am not surprised about the blades being backwards. Many of the planes I find in the wild have *user issues*--esp with blades. It seems that if there is a way to do it wrong, someone will find that way. Just goes to show you that all ww of yore were not experts.

"I never could get those danged things to work right. Just throw them in that drawer."
 
Last edited:
OP
J

jimreed2160

Well-known member
Joined
Aug 7, 2016
Messages
3,589
Location
Tallahassee FL
Stanley type 5

I was cleaning up today and ran across this old #4 1/2 smoother. It is a type 5, the first lateral. Those were made from 1885--1888. Since this one has the earlier body, I assume it was old stock parts at the factory so this one is closer to 1885. Note the body has no casting marks but everything else is dated and stamped.

I included a picture of it beside a LN #4 1/2. They look like cousins.
 

Attachments

  • DSCN6022.jpg
    DSCN6022.jpg
    147.8 KB · Views: 48
  • DSCN6024.jpg
    DSCN6024.jpg
    148.1 KB · Views: 44
  • DSCN6028.jpg
    DSCN6028.jpg
    112.7 KB · Views: 42
  • DSCN6032.jpg
    DSCN6032.jpg
    115 KB · Views: 46
  • DSCN6034.jpg
    DSCN6034.jpg
    148.8 KB · Views: 47
OP
J

jimreed2160

Well-known member
Joined
Aug 7, 2016
Messages
3,589
Location
Tallahassee FL
Stanley shave

I have this nice Stanley #67 spokeshave to rehab. The previous owner drilled a hang hole (?!!) in one of the ROSEWOOD handles. I think I can minimize the scarring effect by plugging the holes with walnut. The hole is 5/16. I did not want to set up the dowel maker for just two plugs so I checked to see what I had on hand. Well, there was a 1/4 and a 3/8. The small one just rattled around and the larger would not fit. So I took it over to the pencil sharpener and made a nice cone on the end, cut it off, rinsed and repeated.

A little glue and a few taps and these things are ready to dry. Nice project for the afternoon.
 

Attachments

  • DSCN6075.jpg
    DSCN6075.jpg
    146 KB · Views: 43
  • DSCN6076.jpg
    DSCN6076.jpg
    151.7 KB · Views: 44
OP
J

jimreed2160

Well-known member
Joined
Aug 7, 2016
Messages
3,589
Location
Tallahassee FL
Bandsaw blade

I inherited my grandfathers band saw when I was ten. It was the only power tool I was allowed to use and I babied it. When I was twelve I even replaced the tires. That saw cut everything from plywood to beef bones and firewood. Later, when my last kid came off the payroll, my first purchase was a Jet 14" with riser. So after 50+ years I kinda know my way around the BS. Anyway, I noticed poor cuts lately and a straining saw--sure signs of a tired blade. My experience tells me that 95% of all bandsaw problems are due to dull blades. Somehow I found myself out of spares and had to order some. Like clamps, bandsaw blades should be purchased in pairs. You just never know when one is going to give up but it is usually in the middle of a project.

The upgraded blades arrived over the weekend and today seemed like a good time to switch. When I opened up the saw I discovered that one of the rollerbands was waaay out of adjustment because it came loose. I fixed that.

How it works
The circular bandsaw blade runs on the outside of two wheels that are aligned in the same plane. One is powered (usually the lower) and the other just spins. The blade runs on the crown in the middle and that is adjusted with the tracking mech. It tilts the top wheel to control tracking. There is another spring adjuster on the top wheel that controls tension. Of course, the blade cuts more true with more tension. I like mine tight.

Blade control mechanisms are located just above the blade and just below it. Side blocks control lateral movement and a thrust wheel keeps the blade from moving to the rear as pressure is applied. Some ww have elaborate bearings (Carter guides) and some ww use wood like maple. Since friction causes heat, the guides should not touch the blade at idle. I like the dollar bill thickness. My saw was upgraded from nylon blocks to rollerbands. They are ball bearing rollers inside a block of aluminum.

When I use my saw, I listen carefully. I can tell when the blade deflects and touches the rollerbands because they "sing". It is a sign for me to back off on feed pressure. I can also hear the thrust bearings "sing". That means to lower the feed rate. Constant singing means that the blade needs to be replaced because a dull blade tends to deflect.

So now my saw is upgraded and dialed in. Time for some work.
 

Attachments

  • DSCN6068.jpg
    DSCN6068.jpg
    101.4 KB · Views: 36
  • DSCN6070.jpg
    DSCN6070.jpg
    150.6 KB · Views: 33
  • DSCN6074.jpg
    DSCN6074.jpg
    107.3 KB · Views: 35
OP
J

jimreed2160

Well-known member
Joined
Aug 7, 2016
Messages
3,589
Location
Tallahassee FL
BS blade one step

Pay attention to your bandsaw blade when you unpack it. It will be neatly coiled. You need to do the same to the one you replace. Some users prefer to wear gloves for this operation.

Step on the old blade with you big boot. Grab the top and twist. Then fold over and go to the floor. You should have a neatly coiled blade.

Or a mess. :willy_nil

This take practice. Remember the glove thing. Good luck.
 

Attachments

  • DSCN6072.jpg
    DSCN6072.jpg
    115.1 KB · Views: 31
  • DSCN6073.jpg
    DSCN6073.jpg
    151.3 KB · Views: 27

rlitman

Well-known member
Joined
Oct 18, 2010
Messages
24,591
Location
Long Island
BS blade one step

Pay attention to your bandsaw blade when you unpack it. It will be neatly coiled. You need to do the same to the one you replace. Some users prefer to wear gloves for this operation.

Step on the old blade with you big boot. Grab the top and twist. Then fold over and go to the floor. You should have a neatly coiled blade.

Or a mess. :willy_nil

This take practice. Remember the glove thing. Good luck.

It took me a moment to realize that you were talking about the side guides, as I don't have much experience with side rollers. The rear roller should just barely make contact at one point along the blade, and should be in continuous contact during the cut (though singing certainly would be a sign of too high a feed pressure).

Yeah, knowing how to fold a blade is a handy skill. It works on my folding car windshield shades too. Gloves are a good idea for coarser blades, because there's a lot of spring in a resawing blade like that.
 

Blue Frog

Well-known member
Joined
Jun 22, 2014
Messages
363
Location
Lynn Haven, FL
Stanley type 5

I was cleaning up today and ran across this old #4 1/2 smoother. It is a type 5, the first lateral. Those were made from 1885--1888. Since this one has the earlier body, I assume it was old stock parts at the factory so this one is closer to 1885. Note the body has no casting marks but everything else is dated and stamped.

I included a picture of it beside a LN #4 1/2. They look like cousins.

Jim,

I have a couple of #3's of that vintage, with beaded knob. They're sweet users.

Blue
 

jalind

Well-known member
Joined
Feb 21, 2018
Messages
94
Location
Northern mid-west USA
Had the opportunity this past week to use a homemade fixture I hadn't used in at least a decade . . .

This door (turned sideways on the work bench), made of particle board (ugh!) was part of a computer desk on the side pedestal to be used for a PC in a tower case or as storage space. I use it for storage as I've got a horizontal desktop case I've used for my PC builds for nearly two decades, not a vertical. It hinges on pins extending from the top and bottom of its right side into the shelf above it and into the bottom of the cabinet below it. The side of the cabinet only allows the door to open about 135 degrees from its closed position. It was open and inadvertently hit, pushing the door against the right side of the cabinet and breaking the hinge pins out of the top and bottom right corners. Predictable failure mode for its particle board construction and how the hinge pins are mounted to the door with plates on the back of the door.

40021300215_b4627a5741_b.jpg


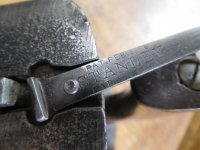
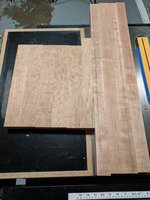
Note the blonde color of the wood. The "ex" bought the computer desk, assembled it, and put my computer on it while I was gone on a business trip. I haven't found any manufacturer markings but it has all trappings of Ikea or a clone thereof. The door's dimensions are 11-1/2" wide x 19-1/4" tall and 1/2" thick. Got a 1' x 2' piece of 1/2" birch plywood made for cabinetry with finish grade birch veneer layer on both sides and 7 interior layers. I've used it before and it's fairly strong stuff, orders of magnitude stronger than particle board with fake birch plastic veneer. I inherited my father's 1954 Craftsman 10" table saw when he passed away in 1984. More than sufficient to create a panel the same dimensions as the broken particle board door.

40206373114_5e5da98495_b.jpg


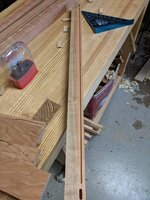
The rip fence is obviously not original. That's barely visible just below it. The handle and mechanism to lock it down fractured at some time before I inherited the saw and my father jury-rigged a way of locking it down using a long bolt and wing nut. It was a royal PITA to use and was time consuming to lock down with any appreciable precision for the width of the rip. The replacement, bought and installed about ten years after I inherited it, is an order of magnitude improvement and includes a vernier adjustment. Also added the left and right bed extensions at about the same time. The original miter gauge is below the bed on the left. What makes this saw special are two features:
  • A massively thick cast iron bed that's still still dead flat after nearly 65 years and several cross-country moves.
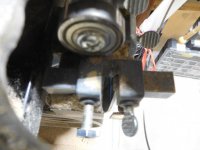
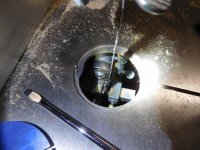
  • An indirect belt drive arbor that can be raised until it's just below the blade change panel in the bed. You get to use a whole lot more of that 10" saw blade than a direct drive saw. I can cut 4 inch thick wood on it with plenty of saw blade still showing.
They don't make 'em like this any more.

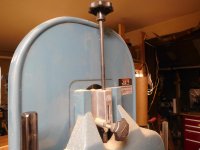
Checking the blade to ensure it's a true vertical 90 degrees to the saw bed. Blade is a fine tooth combination blade with carbide teeth that I've used on birch and oak veneer plywood before. Leaves extremely smooth and clean cuts. A finer tooth crosscut finishing blade I've got tends to burn the edges of plywood a little if you don't feed quickly enough.

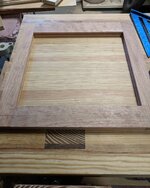
Ripping the panel was straightforward. It is making the crosscuts square to the rip that is the reason for posting this. I've done mission style furniture and cabinetry with rail and stile panels before, and some of the doors on those pieces are solid without a rail and stile around them. Getting them truly square is essential to having a very thin, visually even gap around the door. If it and the cabinet around it aren't perfectly square, it will show immediately. I built a fixture for cutting panels as perfectly square as I can measure years ago when making the furniture. I called it a panel cutter. Others call it a crosscut sled. The sliding panel is, yup, a 2'x2' panel of 1/2" birch plywood. The leading edge stop is a strip of 1" x 2" ash, sold for making exterior door thresholds.

40021301815_c7144a5352_b.jpg


Note the hole with no screw in the photo above. There's a second one hidden by the panel that's about to be crosscut and they have a purpose to be explained later. Has a metal rail on the bottom that rides in the miter gauge groove in the saw bed.

40021301705_f542646526_b.jpg


To make the fixture:
  • I first ensured I had a true straight edge for the leading edge. Simple enough to rip a strip using the fence.
  • Next, I attached the metal rail to the bottom side ensuring it was perfectly square to the edge just ripped. The rail was placed about a half inch farther from the edge of the fixture that ran parallel to the saw blade.
  • After that the 1"x 2" ash was made perfectly true on one edge using a jointer and then carefully ripped on the other edge to make it parallel.
  • As the leading edge of the fixture was already square to the rail, the leading edge of the stop only needed to be perfectly aligned with the leading edge of the fixture.
  • Note the two square nuts in the rail. These are just below the two holes in the fixture and are used to tweak the precise width of the rail, to ensure it rides in the saw bed's miter gauge groove with no lateral play. They were adjusted for just a slight bit of friction. I don't recall where I got that rail from, or even what it's called, it's been that long ago, but it's not the standard piece of u-channel extrusion and was perfect for this fixture.
40872720172_aa2216ed46_b.jpg

  • Once the glue attaching the ash stop was completely cured, I ran the panel through the saw, ripping off the extra half-inch or so, to create an edge parallel to the blade and the rail underneath.
  • It rides against the saw blade with near zero clearance. Checked for squareness of the stop to the new fixture edge, and I had done my earlier work attaching it perfectly.
40021301645_3113db1ee1_b.jpg


One can buy a commercially made panel cutter (aka crosscut sled), but why do that when you can make your own. In addition, the distance of the miter gauge grooves do not match any table saws that I know of that were made from 1995 onward. Buying one for this vintage table saw wasn't an option either.

The first crosscut was about 1/8" wide to ensure one (top or bottom) edge is square to the ripped edge. Then it was flipped over to crosscut the other edge to the desired finished height of the door. The marked cut line can be aligned precisely with the edge of the stop. No guessing on where the left edge of the saw kerf will land.

40021301745_ae9cc9a2ba_b.jpg


Slide it through, pushing on the panel being crosscut to keep its leading edge firmly against the sled's stop. Gives perfectly square crosscuts on a panel every time.

40872720242_8bd861f20a_b.jpg


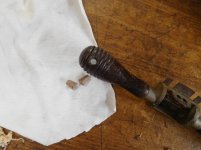
The last steps were putting the door hinge, and magnet plate onto the back of the new door . . .
(the extra holes in it are from being used as a backstop on the drill press ;) )
40021300195_784a945593_b.jpg


. . . and then mounting the handle onto the front. This new door has machine screws running through the door holding the hinge pins onto the back, unlike the 3/16" long wood screws that were used in the original, which weren't much to hold hinge pins onto particle board.

40872718752_0fc093288c_b.jpg


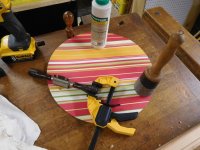
Installed onto the computer desk for now. I will remove it and use some satin Varathane (urethane) to finish it after the weather warms enough that I can do it in the workshop. I'd do it in the house but for the two cats who would find it necessary to investigate the new horizontal surface, and there's nowhere I can put it that they cannot get to (one in particular can leap incredible heights). The finish will darken it slightly to better match the rest of the particle board desk.

40872718702_8bfa886739_b.jpg


I keep the panel cutter stored near vertical along its leading edge to prevent it from warping. It has remained perfectly stable dimensionally for about fifteen years, in an unheated and zero A/C workshop. I fabricate most fixtures like this as needed instead of buying commercially made ones. Provided the process by which I created this panel cutter so that someone wanting to make their own can do so successfully.

Oh, and the sawdust on the saw? It gets used routinely. Thorough cleaning beyond what's needed to do the work at hand is occasional. Pitching wood scraps is rare. There's always a use for them, if nothing else, than for pads in a vise or clamp or as a backstop on the drill press. It's not there to look pretty for a House Beautiful tour. The old door will get pitched. No use for scrap particle board!

John
 
Last edited:

drivesitfar

Well-known member
Joined
Oct 23, 2013
Messages
36,006
Location
Pacific Northwest
Jalind: thanks for taking the time to post the pictures and all your thoughts.

ALL: so I have more material than some commercial woodworking shops in some respects and very little indoor space to put them. here's a commercial rack I set up so I could use the space over my garage fridge and rolling workbench. i'm not sure i'm going to keep this spot just for scrap wood, but its working at the moment.

this is mostly oak plywood and i've got fair amount of it to make some cabinets for these old boxes when i GET ORGANIZED. I need to buy that Kreig Jig so i can get started. are there certain types of screws that work best with this Kreig Jig?

keep up the great posts on planes and woodworking in general cause this is still one of my favorite threads here on GJ. :thumbup:
 

Attachments

  • Oak plywood 2 (2).jpg
    Oak plywood 2 (2).jpg
    154.2 KB · Views: 49
  • Oak plywood (2).jpg
    Oak plywood (2).jpg
    152.3 KB · Views: 50
  • Oak plywood 1 (2).jpg
    Oak plywood 1 (2).jpg
    115.5 KB · Views: 48
  • 00j0j_dOfxlIrNItO_1200x900.jpg
    00j0j_dOfxlIrNItO_1200x900.jpg
    96.3 KB · Views: 45
  • 01717_gLLRlIWPKuv_1200x900.jpg
    01717_gLLRlIWPKuv_1200x900.jpg
    104.8 KB · Views: 45

ckadams00

Well-known member
Joined
Sep 12, 2011
Messages
1,273
Location
Seattle, WA
Drives - I recently got the Kreg jig and love it. The screws come in fine and coarse (coarse for plywood) at different lengths. Any of the big box stores will have a section full of them - you pick the size based on the thickness of the wood you are using. I built a bunch of record cases and once I got everything set up and marked it was a snap to duplicate. I made a mock up of the first one - it is easy to mess up and drill on the wrong side of the cabinet face if you are not paying attention. Here's a quick run down of how to choose a screw: https://www.kregtool.com/store/c20/kreg-jigreg-screws/#tab4818
 

ez-duzit

Well-known member
Joined
Jun 24, 2013
Messages
5,095
Location
Marina del Rey
Finally had a use for the Kreg jig...fastening a piece of wood framing that is hidden under the plywood that is hidden under a mattress.
 
OP
J

jimreed2160

Well-known member
Joined
Aug 7, 2016
Messages
3,589
Location
Tallahassee FL
Jalind--Great write up on your sled. It is exactly backwards from something I would make but I like that. It shows that there is room for many techniques in woodworking. Much of what we do can be adapted to our most comfortable working styles. Glad to see you could improve the desk and keep it in service.

Drives--Get that Kreg and use it. Only Kreg screws for me. They have a smooth upper shank, a nice pan head, and a self tapping point. And they are sized in 1/4" increments for specifically for woodworking. These features make them idiot proof. Except for selecting the wrong size once, I have had NO screw failures. And those bins of yours are da-bomb. All you need is a cubbyhole framework to shove them into. Good luck with that.

EZ--It's true. When you have a Kreg, you can jump right on those unusual projects. It is very versatile.
 

drivesitfar

Well-known member
Joined
Oct 23, 2013
Messages
36,006
Location
Pacific Northwest
ALL: thanks guys on the tips to get the Kreig screws too. so I heard there is a HF knock off, but i'm a fan of the real one and is there just one cause i've also heard of a JR. version?

best place to buy my Kreig and screws? i'm not looking for the 50% coupon and running across the country to buy one to get the cheapest price (I do like a good deal though), but just looking for the one with the best quality or the one that has all the screws in maybe a package deal if there is such a thing.

thanks guys
 

rrich1

Well-known member
Joined
Oct 7, 2015
Messages
793
ALL: thanks guys on the tips to get the Kreig screws too. so I heard there is a HF knock off, but i'm a fan of the real one and is there just one cause i've also heard of a JR. version?

best place to buy my Kreig and screws? i'm not looking for the 50% coupon and running across the country to buy one to get the cheapest price (I do like a good deal though), but just looking for the one with the best quality or the one that has all the screws in maybe a package deal if there is such a thing.

thanks guys
Sometimes Lowe's will run a special with the kreg k4 and the $25 set of mixed screws. If you have a Menards around they have the best selection of kreg accessories around. Lowe's also tends to have more than home Depot in stock as well. I would get the k4 or k5. Some k4 kits have ana adapter to use outside of the jog base and able to clamp it directly to a board.

Sent from my Pixel XL using Tapatalk
 

rrich1

Well-known member
Joined
Oct 7, 2015
Messages
793
My son needs a new bedroom set as he is growing out of his converted crib and the changing table dresser is falling apart. I decided to build him a whole new bedroom set from cherry and walnut. The hamper is first. Next will either be the bed or the dresser and nightstand. The bed will be a modified version of Anna white storage bed. The dresser and nightstand will be wood whisperer guild project build from his modern guild build.

I decided to make the hamper on the taller side as it is a single unit and not wide. It is 16 1/2" square. The frame is cherry with 1/4" walnut plywood for the panels. It should match up nicely with the dresser and the eventual bed.

I got the pieces cut, jointed, planed to thickness. Then I borrowed a domino from my friend. I liked it a lot but I need to work on getting the pieces precisely lined up. When I dry fit the pieces they were not always flush on top.

Next I used my router table to route the dados to accept the plywood. This is where o currently stand. Hopefully tomorrow or this week I can get the plywood cut to fit and cut the dados for the bottom panel. I purchased a half sheet of walnut ply so the back panel will most likely be painted a brown color. No big deal as it really won't be seen.

I will also need to cut in an area to allow for a hand to lift the lid. Not sure the best way to do it yet. Most likely will try it on the band saw

I'm really happy so far with the figure in this board. There seems to be a good amount of quilting type figure in it. 21f2e7ec9998443b2f9f072ac9010a09.jpg2ed94b8aa0aea241a32916a3cb8187b0.jpg5c0639ced90b3abe77402171fb5ba9a8.jpg0722aa4ecdc1185653f2f841de99bea9.jpg

Sent from my Pixel XL using Tapatalk
 

Attachments

  • 2ed94b8aa0aea241a32916a3cb8187b0.jpg
    2ed94b8aa0aea241a32916a3cb8187b0.jpg
    120.2 KB · Views: 2
  • 0722aa4ecdc1185653f2f841de99bea9.jpg
    0722aa4ecdc1185653f2f841de99bea9.jpg
    162.9 KB · Views: 1
  • 5c0639ced90b3abe77402171fb5ba9a8.jpg
    5c0639ced90b3abe77402171fb5ba9a8.jpg
    143.4 KB · Views: 1
  • 21f2e7ec9998443b2f9f072ac9010a09.jpg
    21f2e7ec9998443b2f9f072ac9010a09.jpg
    99.1 KB · Views: 1

rlitman

Well-known member
Joined
Oct 18, 2010
Messages
24,591
Location
Long Island
My son needs a new bedroom set as he is growing out of his converted crib and the changing table dresser is falling apart. I decided to build him a whole new bedroom set from cherry and walnut. The hamper is first. Next will either be the bed or the dresser and nightstand. The bed will be a modified version of Anna white storage bed. The dresser and nightstand will be wood whisperer guild project build from his modern guild build.

I decided to make the hamper on the taller side as it is a single unit and not wide. It is 16 1/2" square. The frame is cherry with 1/4" walnut plywood for the panels. It should match up nicely with the dresser and the eventual bed.

I got the pieces cut, jointed, planed to thickness. Then I borrowed a domino from my friend. I liked it a lot but I need to work on getting the pieces precisely lined up. When I dry fit the pieces they were not always flush on top.

Next I used my router table to route the dados to accept the plywood. This is where o currently stand. Hopefully tomorrow or this week I can get the plywood cut to fit and cut the dados for the bottom panel. I purchased a half sheet of walnut ply so the back panel will most likely be painted a brown color. No big deal as it really won't be seen.

I will also need to cut in an area to allow for a hand to lift the lid. Not sure the best way to do it yet. Most likely will try it on the band saw

I'm really happy so far with the figure in this board. There seems to be a good amount of quilting type figure in it. 21f2e7ec9998443b2f9f072ac9010a09.jpg2ed94b8aa0aea241a32916a3cb8187b0.jpg5c0639ced90b3abe77402171fb5ba9a8.jpg0722aa4ecdc1185653f2f841de99bea9.jpg

Sent from my Pixel XL using Tapatalk

Wow. I can only hope your son one day understands how lucky he is!
 

Attachments

  • 5c0639ced90b3abe77402171fb5ba9a8.jpg
    5c0639ced90b3abe77402171fb5ba9a8.jpg
    141.3 KB · Views: 1
  • 21f2e7ec9998443b2f9f072ac9010a09.jpg
    21f2e7ec9998443b2f9f072ac9010a09.jpg
    96.5 KB · Views: 1
  • 0722aa4ecdc1185653f2f841de99bea9.jpg
    0722aa4ecdc1185653f2f841de99bea9.jpg
    159.4 KB · Views: 1
  • 2ed94b8aa0aea241a32916a3cb8187b0.jpg
    2ed94b8aa0aea241a32916a3cb8187b0.jpg
    117.2 KB · Views: 3

drivesitfar

Well-known member
Joined
Oct 23, 2013
Messages
36,006
Location
Pacific Northwest
ALL: thanks guys for the heads up on the Kreg jig. here's a link to a bundled package for the Kreg 4 and for $50 more than the Kreg 4 without all the extras seems ok. thoughts?

https://www.amazon.com/dp/B00KVL7P8I/?tag=atomicindus08-20

is the K5 just added storage or am I missing something?

granted there are nicer ways to put stuff together just like RR just showed us with his new project for his son, but sometimes we just need to have something utility and quick to make.

this Kreg system looks a bit cheesy with all the plastic, but i've yet to hear any of you or other members not like or love it.

hope you all have a great day cause i'm planning on having one especially if it doesn't rain.
 

rrich1

Well-known member
Joined
Oct 7, 2015
Messages
793
Drive: that is the kit I have. The kit minus the screw kit is $139 at Lowe's. Sometimes thr package deal will throw it in for free. If you don't need it now you could wait it out and buy it when needed.

The k4 vs k5 has a few refinements. The handle to lock the pieces is was moved from the back to the front. This would be very nice when working on larger pieces like the armoire I built. No having to try and reach around the work piece. Thendle I believe is auto adjusting vs Having to manually move a nut and twist the piece in and out depending on what thickness of board you are working on. The extra storage and board support would be nice as well. That k4 kit comes with a container but is somewhat of a pain to put back in all the time.

The clamp it comes with is nice to hold the pieces when you are attaching them flat as it has a wide pad to cover the joint. The updated automax clamps from kreg are much nicer than the older style which is like a vise grip where you turn a bolt in the handle to adjust the tension.

Sent from my Pixel XL using Tapatalk
 

drivesitfar

Well-known member
Joined
Oct 23, 2013
Messages
36,006
Location
Pacific Northwest
RR: so if you had the choice to do it over you'd buy the K5 package cause it sounds like it might be a bit easier to use cause it sounds like you own the K4?

thanks for you thoughts!!
 
To avoid these ads, REGISTER NOW!
Top Bottom