
You are using an out of date browser. It may not display this or other websites correctly.
You should upgrade or use an alternative browser.
You should upgrade or use an alternative browser.
Woodworking 101--Tools and Tips
- Thread starter jimreed2160
- Start date
ez-duzit
Well-known member
Holesaw through a piece of scrap plywood. Then use a pattern-follower bit inside the plywood clamped to your workpiece.
Alternatively you can use a guide bushing with straight bit.
Alternatively you can use a guide bushing with straight bit.
CRSINMICH
Well-known member
Box for STANLEY #66 Beading Tool
I also wanted to try making hand dovetails for a second time. I used Paul Sellers' Dovetail Technique and had excellent results. You may recognize the lid from my previous post about repairing dents in wood.
In general, when you make a mistake on a project you have a few options. You can: 1) live with it, 2) replace it, 3) hide it, or 4) feature it.
I made a huge mistake on the beader box. I made the lid too narrow to fit from the back to the front. It wasn't possible to live with it and
I didn't have enough wood left to remake the lid. I thought about buying more white oak but one of the main reasons for making the box
in the first place was to use up left over wood, not generate more left overs. That left options 3 and 4. I chose to make a feature of the solution by adding a small strip of mahogany (more leftovers) to the front edge of the lid to make it wide enough.
In addition to making a big mistake, I also overlooked decorating the box with some beading. I corrected that by making beaded mahogany side handles for it. Serendipitously, the three mahogany pieces added some style to the box. They're accent pieces. Yeah, that's what they are. I meant to do that.
Attachments


Last edited:
ez-duzit
Well-known member
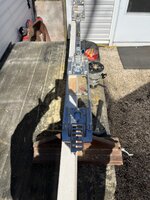
Recent project on 93' yacht. Owner wanted 4 single bunks for crew, where there was 1 island double with narrow shelves outboard. I widened the shelves and installed bunk rails, then reconfigured the double bunk into 2 singles with a filler (not shown).
Paint grade cabinetry, to match existing, with rails and double-doors to be finished natural.


Paint grade cabinetry, to match existing, with rails and double-doors to be finished natural.
txlonghorn1989
Well-known member
- Joined
- Feb 27, 2017
- Messages
- 2,786
Nice CRS! How are those No. 66 cutters held in place on the inside of the box?
RickP
Well-known member
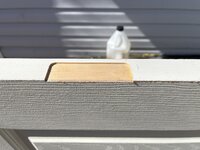
Really nice looking woodwork! I like the contrasting colors and grain on the doors -- should take stain or clear sealer well and look even better.Recent project on 93' yacht. Owner wanted 4 single bunks for crew, where there was 1 island double with narrow shelves outboard. I widened the shelves and installed bunk rails, then reconfigured the double bunk into 2 singles with a filler (not shown).
I often think about how smart you are to have "others" do the paint/stain work. That's the part of wood projects that I always hate. Do the boat owners usually hire the finish work out themselves, or do you ever act as a "GC" and subcontract out the finish work? I saw a can of West System on the shelf -- were you using that as glue, or did any of wood get an epoxy coating?
fartymarty
Well-known member
I think I see a little round magnet on the right side embedded in the wood, so I'm guessing a bunch of those with a screw at each end holding the "magnet board" to the side of the case.Nice CRS! How are those No. 66 cutters held in place on the inside of the box?
CRSINMICH
Well-known member
tx: marty was exactly right. It is another left over strip of mahogany with Forstner holes drilled a bit deeper than the neodymium magnets. I wanted to be able to see the profiles on both ends of the cutter. The uncovered magnet is for some future shop-made custom cutter. Well, that and the magnets came in a 10-pack.
Those small magnets are interesting to work with. They tend to unexpectedly fly off. You won't have to look far though. They'll be firmly stuck to the nearest piece of steel.
Those small magnets are interesting to work with. They tend to unexpectedly fly off. You won't have to look far though. They'll be firmly stuck to the nearest piece of steel.
Attachments

Last edited:
ez-duzit
Well-known member
Thank you.Really nice looking woodwork! I like the contrasting colors and grain on the doors -- should take stain or clear sealer well and look even better.
I often think about how smart you are to have "others" do the paint/stain work. That's the part of wood projects that I always hate. Do the boat owners usually hire the finish work out themselves, or do you ever act as a "GC" and subcontract out the finish work? I saw a can of West System on the shelf -- were you using that as glue, or did any of wood get an epoxy coating?
WEST System is virtually all I use for glue.
My work philosophy is "Always leave a little for the next guy." There are many professional finishers who will sand, paint, varnish for much less than my hourly rate. Additionally my woodshop is a dust hole and not conducive to finish work. Also I get paid much quicker and avoid common complaints such as: "there is a dust speck in the finish."
") The boat owners sometimes want to do their own finish work, or already have someone they use for that type of work. Though I am often asked to refer them to someone, which I am glad to do. Never do I try to be the general contractor on that stuff.
The boat owners sometimes want to do their own finish work, or already have someone they use for that type of work. Though I am often asked to refer them to someone, which I am glad to do. Never do I try to be the general contractor on that stuff.67carl
Well-known member
tx: marty was exactly right. It is another left over strip of mahogany with Forstner holes drilled a bit deeper that the neodymium magnets. I wanted to be able to see the profiles on both ends of the cutter. The uncovered magnet is for some future shop-made custom cutter. Well, that and the magnets came in a 10-pack.
Those small magnets are interesting to work with. They tend unexpectedly fly off. You won't have to look far though. They'll be firmly stuck to the nearest piece of steel.
I'm doing something similar with a dowel pin marker holder. Cut down a rift sawn oak floor board and drilled holes with Forstner bits, then used a regular bit to drill a deeper, smaller hole in the middle for the tiny magnets. Glued them in with CA glue. They are 1mm deeper than the point of the marker pin so it doesn't touch when in place. I am having trouble figuring out how to sand the flat bottom of the Forstner holes. I don't have dowels so I'm trying to figure out another way.

Last edited:
CRSINMICH
Well-known member
carl: I'm not sure why you would want to sand the bottom of those holes. They won't be seen when the pins are in place. Is it the case that some of the pins don't sit in their holes correctly? If you had dowels of the same size you might be able to put PSA (Pressure Sensitive Adhesive) sandpaper on the ends and spin them in the holes. If you have a drill press and a short length of mild steel you could make a dowel plate and make the holes in it the same size as your dowel pins. Or, you could just buy short lengths of the appropriate size dowels.
Whatever your reasons for wanting them flat, it's a clever idea. Hey, I have some dowel pins too and a bit more scrap mahogany. Hmmm...
Whatever your reasons for wanting them flat, it's a clever idea. Hey, I have some dowel pins too and a bit more scrap mahogany. Hmmm...
ez-duzit
Well-known member
Use self-stick sandpaper on the end of a dowel....I am having trouble figuring out how to sand the flat bottom of the Forstner holes...
67carl
Well-known member
carl: I'm not sure why you would want to sand the bottom of those holes. They won't be seen when the pins are in place. Is it the case that some of the pins don't sit in their holes correctly? If you had dowels of the same size you might be able to put PSA (Pressure Sensitive Adhesive) sandpaper on the ends and spin them in the holes. If you have a drill press and a short length of mild steel you could make a dowel plate and make the holes in it the same size as your dowel pins. Or, you could just buy short lengths of the appropriate size dowels.
Whatever your reasons for wanting them flat, it's a clever idea. Hey, I have some dowel pins too and a bit more scrap mahogany. Hmmm...
I know it seems like an unnecessary step, but it just seems unfinished to not do it. This is going in a walnut box I'm giving as a gift. If it was just for me I probably wouldn't bother. I had forstner bits for all but one size (holes 2nd from the left). For that I used a brad point bit, but it left a dome shape. I went back with a regular bit but that left a concave hole. Lol. So I decided to use the same forstner bit as I did for the next larger size hole and just live with the extra space around the smaller pin. I did all this after the pic above and its a bit rough. I went after some of it with a small chisel so the pin would sit flat, but still needs some attention. I do have contact spray adhesive (made a sanding board), but no dowels or mild steel. I'm just getting started in this hobby so I haven't built up a lot of stuff. Seems like a good reason to get some dowels!
Last edited:
67carl
Well-known member
Still need to do some sanding to get tighter joints but I got the dowel pin marker tray cut and temporarily held together by a rubber band. Miracle of miracles, it fits. Progress...


67carl
Well-known member
My first box is done and I'll hand it off tomorrow. It was fun, I learned a lot and built some useful tools along the way. Although it's a simple thing, there were many challenges.
I don't think I'll try the barrel hinges again anytime soon! What a massive PITA. The dowel pin holder turned out ok. The mitered frame around it wasn't planned and I threw it together last-minute. I'm not happy with the sloppy mitered corners, and I wish I grain matched them, but that's another lesson! Take your time or don't do it. The "Made by Carl" on the back is from a branding iron my other half got me for Christmas. It's whimsical and fun. Good thing we aren't expecting kids!


I don't think I'll try the barrel hinges again anytime soon! What a massive PITA. The dowel pin holder turned out ok. The mitered frame around it wasn't planned and I threw it together last-minute. I'm not happy with the sloppy mitered corners, and I wish I grain matched them, but that's another lesson! Take your time or don't do it. The "Made by Carl" on the back is from a branding iron my other half got me for Christmas. It's whimsical and fun. Good thing we aren't expecting kids!
CRSINMICH
Well-known member

Woody1320
Well-known member
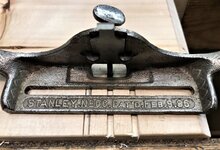
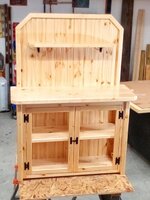
CRS, pics don't do the box or the table justice especially after seeing them in person. They came out amazing.I had some thin white oak that I wanted to use up and decided to make a box to hold my STANLEY #66 Beadng Tool and its accessories.
Box for STANLEY #66 Beading Tool
I also wanted to try making hand dovetails for a second time. I used Paul Sellers' Dovetail Technique and had excellent results. You may recognize the lid from my previous post about repairing dents in wood.
In general, when you make a mistake on a project you have a few options. You can: 1) live with it, 2) replace it, 3) hide it, or 4) feature it.
I made a huge mistake on the beader box. I made the lid too narrow to fit from the back to the front. It wasn't possible to live with it and
I didn't have enough wood left to remake the lid. I thought about buying more white oak but one of the main reasons for making the box
in the first place was to use up left over wood, not generate more left overs. That left options 3 and 4. I chose to make a feature of the solution by adding a small strip of mahogany (more leftovers) to the front edge of the lid to make it wide enough.
In addition to making a big mistake, I also overlooked decorating the box with some beading. I corrected that by making beaded mahogany side handles for it. Serendipitously, the three mahogany pieces added some style to the box. They're accent pieces. Yeah, that's what they are. I meant to do that.
I actually finally started my basement "baby" gate project today. I look forward to using all of the woodworking tools I've acquired (many from CRS, who has been incredibly helpful and generous) over the past year or so. I'll post pics very soon, as the glue up will start, imminently. This has become one of my favorite threads due to the amount of help and encouragement from all of the posters. Also, the finished projects are incredible, to say the least.
Carl,carl: Nice job all around! I like the look of barrel hinges but I imagine that alignment could be tricky. I put a brand on my last box too.
I need one of those even though those are not my initials; for me it would stand for Can't Remember Stuff!
CRSINMICH
Well-known member
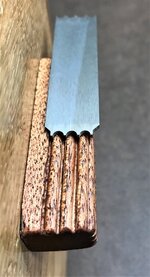
STANLEY #66 as Router Plane
I knew that this odd cutter for the Beading Tool was for routing. One end is 1/4" wide and the other is 1/8" wide. Until today it was hard to imagine what I would do with a 1/8" router bit however, I'm installing 1/8" plywood partitions in a box to hold sharpening stones. Using the #66 I was able to make 1/8" wide stopped dadoes with flat bottoms exactly 3/16" deep. I'm amazed I could do that.Attachments


Last edited:
RickP
Well-known member
Sounds like you're putting that router plane to work exactly as it was designed. Narrow stopped dadoes are a perfect application for it. How 'bout some pictures?STANLEY #66 as Router PlaneI knew that this odd cutter for the Beading Tool was for routing. One end is 1/4" wide and the other is 1/8" wide. Until today it was hard to imagine what I would do with a 1/8" router bit however, I'm installing 1/8" plywood partitions in a box to hold sharpening stones. Using the #66 I was able to make 1/8" wide stopped dadoes with flat bottoms exactly 3/16" deep. I'm amazed I could do that.
fartymarty
Well-known member
I am too.STANLEY #66 as Router PlaneI'm amazed I could do that.
I'm kidding of course, but ..........how did you keep the slots straight and parallel without a straight edge to run the fence against? Just by eye and skill?
CRSINMICH
Well-known member
Rick and marty: The picture shows three practice dadoes. The one on the left hasn't been routered yet. I think Paul Sellers sometimes uses this technique to hand cut dadoes. I used a combination square and a knife to score two parallel lines 1/8" inch apart then slightly deepened them with a chisel. I then chiseled across the dado from center out on both sides. On a dado this narrow that is best done with hand pressure and not a mallet. Use the chisel to deepen the outside wall and repeat the chiseling. Use the beader/router to flatten the bottom of the dado and get it to the correct depth. The dado on the right was done differently. I only used the knife and chisel to score the sides of the dado and the beader/router to remove the wood in between. The cutter had to be set shallow and slowly lowered to avoid splintering or chip out.
This was only a trial to see if it worked and if so how well. It did work and like I said I was amazed at how neat and precise it was.
This was only a trial to see if it worked and if so how well. It did work and like I said I was amazed at how neat and precise it was.
Attachments
Renegade1LI
Well-known member
Stanley hinge template, picked this up off eBay, i always make my own door jambs and hang the doors, i hate prehungs. It seems the prehung jambs are like 5/8s now and made of junk. I like to use poplar for paint grade and solid core Masonite doors. Well onceI finally set this up and dialed it in, it’sa pleasure to use and if doing multiple assemblies, it’s fast. I have about to doors to hang soon so I’ll get a good test in but the first one came out perfect, easy to transfer from door to jamb, took seconds. The only drawback is you will it’s you can only cut 1/4” or square corner hinges.
Attachments
-
 C504E5B7-C091-45B6-AEF2-CB25CE0BE310.jpeg587.8 KB · Views: 45
 -
 E647B2C5-4A1F-47E4-90D4-037D488C9B92.jpeg489.6 KB · Views: 36
 -
 21EA2749-1282-4593-BFB4-251DAF662146.jpeg215.9 KB · Views: 35
 -
 111EA317-2877-4D6F-8D0A-2B504481FC90.jpeg278.3 KB · Views: 36
 -
 3C0A7B25-49BE-44E0-84E0-79C429D605E0.jpeg335.6 KB · Views: 36
 -
 2DCE32ED-2111-4D50-9334-DCF5DFF30107.jpeg310.6 KB · Views: 92
I have been playing with this for awhile. Relearning old skills and developing new ones. Glass retaining clips will be here Monday and it goes in the house.
If this doesn't belong here, please delete.
If this doesn't belong here, please delete.
Attachments


CRSINMICH
Well-known member
Fun With Scraps
Using pieces of 1-by, 2-by, and 1/4" plywood that were laying around, I made a thicknessing jig specifically for a Stanley 5 1/4. It's used to reduce stock to a desired consistent thickness. The concept is simple but, like many such things, it was a little more difficult and needed a bit more precision than anticipated. I used it to reduce scrap strips of mahogany to a precise 9/32". It took a bit of figuring and fettling to get it to perform well.More Fun with Scraps
I saw a blog from Chris Schwarz about a way to make adjustable pinch sticks. There are other names for them but they're used to compare the lengths of diagonals in a box to check squareness. It's much easier and more precise than measuring. Put the beveled end of one beam of the pinch stick in one corner and slide the other beam until its bevel is in the opposite corner then set the thumb screw. Place the pinch stick into the other diagonal corners. If its fits you're square. The same thing can be done with two sticks taped together in the middle but that will only work for that one box. I added a picture of pinch sticks in the box I made for STANLEY #66 beading tool.I made the beams from scrap mahogany left over from the trestle table build and the metal brackets pairs from 3/4" square steel tubing cut into 5'8" lengths. One of each pair has to be tapped for the thumb screw. Both of the brackets have to have a through hole for a #6 round headed wood screw. The outside measurement of the tubing is 3/4". The inside measurement is a bit less. In order for the two beams to fit inside the bracket and still be able to slide against each other, they have to be milled down to a consistent 9/32" thickness. Bingo!
Attachments


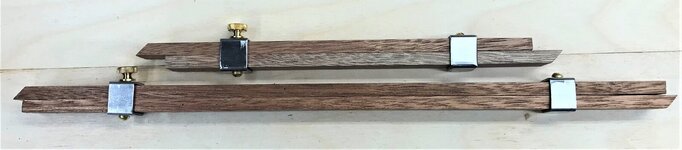

I have a nice set of 'bar gauges' that have different tips you can use - inside measurements, corners, etc. They were a little spendy but I actually use them quite a bit instead of a measuring tape. They are from Lee Valley, current price is $75 but I have head them for years and don't remember what I paid for them. (I also have the 12" extensions, so they can measure up to 44" in length) Very handy to have

67carl
Well-known member
This may be more home improvement than woodworking, but it is wood... Really just posting to lament a bad decision and how trying to save a little sometimes costs a lot. In this case, time.
We have a while house fan mounted in a hallway ceiling. To those not familiar, it's a giant fan that pulls air from inside your house and up into the attic, where it exits. It's great when hot summer days give way to cool nights. Open some windows and pull that cool air in.
There's nothing between those plastic louvers and the hot, dirty attic air. And no seal to keep it from seeping into the house. This became very evident when we had the terrible fires (I'm in Cal). We temporarily taped plastic over it too keep smoke out, but now it's time for something sturdier, insulated, air tight and easy to install and remove.
Simple thing, build something akin to a picture frame, where the glass is a sheet of 3/16 wood and the picture is foam board insulation. I have some 8ft 1x2 pine boards leftover from another project and decided to use those. Only when I looked at them they were banana shaped. This is where better judgement should have kicked in.
I tried to find straight parts and cut those out to use, but in the end there really wasn't. I also found the ceiling isn't flat, and the different boards were not exactly the same width and depth. So this has been a clusterf*** of a simple project. Gaps and ill fitting boards everywhere. I'm hoping to wrap it up today, but who knows. I did learn cheap can be expensive.
CRSINMICH
Well-known member
carl: Those simple projects can getcha. I have a suggestion for sealing against the ceiling (see what I did there?) You may already know this but foam insulation 'tape' is cheap and comes in rolls. There is adhesive on one side. Peel off the cover and stick it to the frame. It comes in different widths and thicknesses.
67carl
Well-known member
carl: Those simple projects can getcha. I have a suggestion for sealing against the ceiling (see what I did there?) You may already know this but foam insulation 'tape' is cheap and comes in rolls. There is adhesive on one side. Peel off the cover and stick it to the frame. It comes in different widths and thicknesses.
Great minds think alike! I have that very thing and was planning on using it. I've also caulked all the places where materials come together.

Renegade1LI
Well-known member
Just remember, good, cheap & fast, you can only get 2, good & cheap wont be fast, cheap & fast wont be good & good & fast wont be cheap!This may be more home improvement than woodworking, but it is wood... Really just posting to lament a bad decision and how trying to save a little sometimes costs a lot. In this case, time.
We have a while house fan mounted in a hallway ceiling. To those not familiar, it's a giant fan that pulls air from inside your house and up into the attic, where it exits. It's great when hot summer days give way to cool nights. Open some windows and pull that cool air in.
There's nothing between those plastic louvers and the hot, dirty attic air. And no seal to keep it from seeping into the house. This became very evident when we had the terrible fires (I'm in Cal). We temporarily taped plastic over it too keep smoke out, but now it's time for something sturdier, insulated, air tight and easy to install and remove.
Simple thing, build something akin to a picture frame, where the glass is a sheet of 3/16 wood and the picture is foam board insulation. I have some 8ft 1x2 pine boards leftover from another project and decided to use those. Only when I looked at them they were banana shaped. This is where better judgement should have kicked in.
I tried to find straight parts and cut those out to use, but in the end there really wasn't. I also found the ceiling isn't flat, and the different boards were not exactly the same width and depth. So this has been a clusterf*** of a simple project. Gaps and ill fitting boards everywhere. I'm hoping to wrap it up today, but who knows. I did learn cheap can be expensive.
BuffettFan
Well-known member
Some questions for those who spray the poly, or whatever you use for final finish.
What products and what sprayers do you use?
Currently, I'm using polyurethane, brushed with foam brushes, multiple coats, sanded between coats.
Satisfactory results, but time consuming.
Better options?
What products and what sprayers do you use?
Currently, I'm using polyurethane, brushed with foam brushes, multiple coats, sanded between coats.
Satisfactory results, but time consuming.
Better options?
67carl
Well-known member
Some questions for those who spray the poly, or whatever you use for final finish.
What products and what sprayers do you use?
Currently, I'm using polyurethane, brushed with foam brushes, multiple coats, sanded between coats.
Satisfactory results, but time consuming.
Better options?
Hardly an expert, but I used Deft lacquer satin spray and really liked it. But I guess it depends on what you are spraying.
Deft 037125017132 Interior Clear Wood Finish Satin Lacquer with 12.25-Ounce Aerosol Spray - Household Wood Stains - Amazon.com
Deft 037125017132 Interior Clear Wood Finish Satin Lacquer with 12.25-Ounce Aerosol Spray - Household Wood Stains - Amazon.com
www.amazon.com
jar944
Well-known member
Typically precat lacquer, through a fuji 4 stage.


Some questions for those who spray the poly, or whatever you use for final finish.
General Finish. Below are links to a couple of pdf files from their website. I have used their Enduro Black Poly, Enduro Clear Poly as well as their Milk Paint and have been very pleased. The second link is a comparison chart which includes how to apply and other specs. I usually spray with a compressor/hvlp gun
General Catalog
Comparison chart
TV Stand top in Black Poly (it was just sprayed in the pic)

Kid's play table with Milk Paint with a Clear Poly top coat and black poly frame

Some questions for those who spray the poly, or whatever you use for final finish.
What products and what sprayers do you use?
Currently, I'm using polyurethane, brushed with foam brushes, multiple coats, sanded between coats.
Satisfactory results, but time consuming.
Better options?
Personally I think wipe-on poly is the way to go for poly, it's just way too hard to get wrong.
Time consuming in that I use a lot of coats, but most of that is down time, not actually me doing anything.
I did just buy some rubio monocoat and will likely use that going forward. The fact that you can touch up without sanding the entire piece is huge, pricey tho, and probably not as protective as poly
cycle61
Well-known member
Love this. My dad was a marine carpenter and I fondly remember watching him put together cabinets and furniture like this in his shop, and then getting to tour client's boats as it got installed.Recent project on 93' yacht. Owner wanted 4 single bunks for crew, where there was 1 island double with narrow shelves outboard. I widened the shelves and installed bunk rails, then reconfigured the double bunk into 2 singles with a filler (not shown).
Paint grade cabinetry, to match existing, with rails and double-doors to be finished natural.
I still brush Minwax polyurethane with a Purdy natural bristle brush. I've played with it for years and I'm finally getting decent at it. I was always worried about overbrushing unnecessarily. As long as you get on it and off it you can pull it very, very thin.
BuffettFan
Well-known member
Thanks for all the great info guys!
That'll give me some reading to do while the poly dries!
That'll give me some reading to do while the poly dries!
drivesitfar
Well-known member
I just spent 15-20 minutes catching up and love all the new posts. Good to see this woodworking thread ALIVE AGAIN.
I’m getting ready to finish up cedar fence and start new deck so should have plenty of pics and work to share soon.
that said any of you know a good source for nice gate hinges?
I’m getting ready to finish up cedar fence and start new deck so should have plenty of pics and work to share soon.
that said any of you know a good source for nice gate hinges?
Woody1320
Well-known member
I'll be using some Everlast Hinges from Home Depot for my basement gate project. Being all wood, I needed something heavy duty. They apparently can handle 60 lbs apiece. I went for function over looks, but they have a bunch of decorative hinges for gates.I just spent 15-20 minutes catching up and love all the new posts. Good to see this woodworking thread ALIVE AGAIN.
I’m getting ready to finish up cedar fence and start new deck so should have plenty of pics and work to share soon.
that said any of you know a good source for nice gate hinges?