To avoid these ads, REGISTER NOW!

work benches... from scratch

coolreed

Well-known member
Joined
Apr 10, 2012
Messages
595
Location
Oklahoma City, It's a Windy Heat.
I built these Cabinets/Workbenches from scratch. They match my kitchen cabinets. Used a granite look formica top.
IMG_0054.jpg


I also made this Roubo Split Top Woodworking Workbench that utilizes Benchcraft Vises. Weighs about 300 lbs.
ReedRoubo8-1.jpg


Also made this Cabinet for my Garage Sink.
IMG_0100.jpg
 
To avoid these ads, REGISTER NOW!

c10bonanza

Well-known member
Joined
Jul 25, 2011
Messages
67
I also made this Roubo Split Top Woodworking Workbench that utilizes Benchcraft Vises. Weighs about 300 lbs.
ReedRoubo8-1.jpg


Looks like a recent Guild build from Marc at The Wood Whisperer. Nice job! :thumbup:
 

Gunnert

Well-known member
Joined
Jan 30, 2011
Messages
64
Base of my workbench is 3/4" plywood attached to a header on the wall and angled braces. On top of that I glued and nailed Exotic Brazilian Imported Cherry hardwood flooring. Got a deal at Lowes on the Cherry when someone returned a special order. < $200 invested in 18' x 30" Workbench.
 

Attachments

  • IMG_2616.jpg
    IMG_2616.jpg
    149.9 KB · Views: 668
Last edited:

stonewellmark

Well-known member
Joined
Nov 6, 2010
Messages
204
Location
Hudson Valley, N.Y.
Finally got a chance to start on my Bench, played with the idea of steel but already have one with casters under it. I just wanted a heavy duty solid wood bench that was cool. Let me know what you all think. Ill be posting more pictures as it comes along. Thankx

Mark
 

Attachments

  • IMG_20130205_113159.jpg
    IMG_20130205_113159.jpg
    131.1 KB · Views: 269
  • IMG_20130205_113210.jpg
    IMG_20130205_113210.jpg
    130.5 KB · Views: 234
  • IMG_20130205_113228.jpg
    IMG_20130205_113228.jpg
    134.6 KB · Views: 247

black88coupe

Active member
Joined
Dec 16, 2007
Messages
31
Location
S/E Michigan
Seems like I posted this already somewhere .. don't remember .. anyway, I found a guy who once worked on a crew remodeling a Lowe's. They were told to scrap out the metal drawers that used to hold their fasteners back when they still were pretending to be a hardware store. Anyway, I bought 8 of those drawer units from him and knocked together a base and had my woodworking buddy help me with the tops and the other day we got 'em together. About sixteen feet long, plus they have 11" of clearance underneath for storing toolboxes, floor jack, chain saw or other awkward things. Have a look:

Thats awesome!
 

duude

Well-known member
Joined
Feb 25, 2012
Messages
58
Location
Michigan
Mine aren't nearly as fancy as some. ImageUploadedByTapatalk1360100791.054277.jpgImageUploadedByTapatalk1360100957.547851.jpgImageUploadedByTapatalk1360101104.435182.jpg
 

Attachments

  • ImageUploadedByTapatalk1360100713.101966.jpg
    ImageUploadedByTapatalk1360100713.101966.jpg
    60.2 KB · Views: 312

mattmatthew

New member
Joined
Jan 27, 2013
Messages
4
The trick to cleanly cutting melamine is 4 things.

1. Sharp, new blade
2. Use a zero clearance blade insert.
3. Put masking tape on the bottom where the blade will exit (top if using a circular saw)
4. Set the blade in your table saw as high as it can go. You want the teeth of the blade exiting the piece as close to vertical as you can get them. If the blade exits lower as it normally would when the blade is set 1/8-1/4 above the material it tends to want to peel back into the plastic.

Other things to consider when cutting melamine or any type of brittlelish material like solid surface (Corian) are the type of grind and rake on the blade.

Most people try to cut melamine with wood blades. Two big issues with that: Wood blades have a more positive, forward, aggressive rake and an Alternate Top Bevel (ATB) grind (every other tooth cuts a slant in opposing directions), which essentially amounts to a controlled tearing effect. Wood is cut most efficiently with this because of the nature of the wood grain.

Blades with a Triple Chip Grind (TCG) and -5 degree rake are better suited for more brittle materials like high density plastics. The Triple Chip Grind has an alternating tooth design like the ATB wood blades but instead the first tooth cuts a swath in the middle, like a right side up triangle, and the second tooth that follows is a completely flat grind tip that cuts the remainder away. The negative rake also performs less of a tearing cut and more of a shearing action, in much the same way metal cutting blades work — in fact if you look at every circular saw blade that's designed to cut steel, most likely it is a TCG blade with either a neutral or a negative rake.
 

rpearlberg

Well-known member
Joined
Jun 20, 2012
Messages
413
Location
Fairfield, CT
I built this bench that my lathe sits on. All 2x6 top framing and blocking for stiffness, and 4x4 legs for solid footing. Adjustable feet for leveling and a 12ga steel top over a 1-1/4" thick melamine commercial workbench top that I salvaged from a used office supply place.

i-7BsRJtJ-M.jpg

IMG_0319-M.jpg

IMG_0320-L.jpg

IMG_0321-M.jpg


Someday, when I get caught up on some other projects, I may build an all-steel bench for the lathe.

I love this!!
 

zoomzoomjeff

Well-known member
Joined
Sep 21, 2009
Messages
1,471
Location
Des Moines, IA area
Finally got a chance to start on my Bench, played with the idea of steel but already have one with casters under it. I just wanted a heavy duty solid wood bench that was cool. Let me know what you all think. Ill be posting more pictures as it comes along. Thankx

Mark
I love it! Because it's absolutely over-built, which is just my style!
 

KCobra

Member
Joined
Oct 7, 2012
Messages
13
Location
Clarksville, md
I've been lurking for quite a while and have really enjoyed the forum. Now, I finally have something somewhat "worthy"...

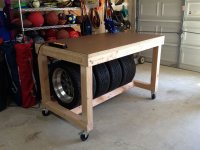
I have a small 2 car garage, which is really only a 1 car with storage on the other side. The garage is only 18' wide by 20' deep. And I have to store all the yard stuff in it as I can't have a shed. And the ceiling has 2 levels, 8'4" in the back half and 9'6" in the front half (where the doors are located).

So, I have been wanting a workbench, just haven't got around to it, plus space is so tight.
But, I really need tire storage. And I don't have wall space to hang a tire rack.

So I thought, why not combine the 2!?!?

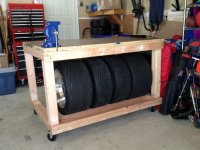
I built a 39"x60" workbench, with a tire rack underneath. It is on casters so I can move it around. The caster lock for both swivel and rolling. It's a little taller than I wanted, but with the space needed to get the tires in there and the casters, it ended up at 39 1/2" to the top. I made it deep enough so that the tires can be all the way to the back and still leave room for my legs/stool to sit and work.

Anyway, I know it doesn't stand up to the fine craftsmanship I've seen on this forum, but I'm pretty happy with the way it turned out.
 

Attachments

  • Workbench Front.jpg
    Workbench Front.jpg
    134.7 KB · Views: 451
  • Workbench Back.jpg
    Workbench Back.jpg
    134.3 KB · Views: 372
Last edited:
To avoid these ads, REGISTER NOW!

Courtney

Member
Joined
Jan 5, 2012
Messages
7
Location
Dayton, Ohio
Courtney - I am looking at post #677 on this thread. Is your bench frame out of 2x4's with the legs 2x6? Just curious.

Doug

Thanks!!

The frame and legs are 2x4s.

Sorry for the late reply! Getting ready to build a 10x12 shed. Came here for ideas and saw this.

Courtney
 

Reitwagen

Active member
Joined
Jun 24, 2013
Messages
26
Location
Vermont
It's nice and sturdy. Everything was free except the bolts and the top.
 

Attachments

  • image.jpg
    image.jpg
    136.9 KB · Views: 893

stewie97

Well-known member
Joined
Jul 5, 2012
Messages
59
It's not a work bench but a drinking bench for the patio. :) This was my first wood working project and I am happy with the way it turned out.

20121219134754-d2d46017-sm.jpg

Very cool bar....er....bench! Really digging the cooler idea!
 

964haus

Well-known member
Joined
Nov 1, 2010
Messages
498
Location
Vancouver, BC
Here's mine.

8986765939_ddd6380343_c.jpg


2x4s, lag bolted to walls, toolbox incorporated into lower left, double layered 3/4" ply top with trim, inspired by GJ....

M.
 

jesse72

Well-known member
Joined
Sep 26, 2011
Messages
352
Location
California
Here is the one I just finished. Did a build thread on it a minute ago. 4x4 legs and 2 sheets of 3/4" plywood on top.


tjwrnglr

New member
Joined
Dec 1, 2013
Messages
2
Those of you with double layered 3/4" plywood on top, Can you give me some pointers on attaching these together and then attaching them to the frame?
 

peelman

Well-known member
Joined
Jan 13, 2011
Messages
198
Location
Seymour, Indiana
Those of you with double layered 3/4" plywood on top, Can you give me some pointers on attaching these together and then attaching them to the frame?

As far as putting the sheets together, I recommend some good wood glue (liquid nails or gorilla or something) and some clamps. You can run some short screws from the bottom up, or use a short nails in a brad nailer to keep it in place while the glue sets, but if you use a sufficient amount, you won't ever get them to separate.

As far as mounting it to the frame, use cleats on your cross members or small pieces of angle on the underside of the bench to secure the top to the frame. Makes removing it / replacing it later a lot easier. I did double 1/2" screwed from the top then layered 1/4" hardboard on top with brad nails on mine and have been dreading the day I have to replace the top since. What i get for invoking alcohol in my workbench construction process. Hopefully this spring I'll be rebuilding mine using 4x4s, 2x6s, and stacked 1x3s or 1x4s for the top to make it vice-ready. 2x4s and OSB didn't make for a heavy enough bench.
 

5Cent

Well-known member
Joined
Sep 11, 2008
Messages
113
Location
North Central, OH
Here is mine I threw together this summer. I was tired of only having the small cabinet section to work on, but was waiting until I came across the right bench top material. The neighbor had a 9' section of bowling alley that I couldn't pass up! Bench is hard mounted to the wall studs, the block foundation and is supported by 4x4's. Just need to finish it with paint, and then finish the over head cabinets. Kept it shallow as the garage is only 19x19, and kept the 2x4's around the top about 1/8" above the top service so things can roll/fall off.

Old
image_zpsc99208c6.jpg


Top:
image_zps2bfff6ff.jpg


90%:
image_zps6b374881.jpg
 
Last edited:

tjwrnglr

New member
Joined
Dec 1, 2013
Messages
2
As far as putting the sheets together, I recommend some good wood glue (liquid nails or gorilla or something) and some clamps. You can run some short screws from the bottom up, or use a short nails in a brad nailer to keep it in place while the glue sets, but if you use a sufficient amount, you won't ever get them to separate.

As far as mounting it to the frame, use cleats on your cross members or small pieces of angle on the underside of the bench to secure the top to the frame. Makes removing it / replacing it later a lot easier. I did double 1/2" screwed from the top then layered 1/4" hardboard on top with brad nails on mine and have been dreading the day I have to replace the top since. What i get for invoking alcohol in my workbench construction process. Hopefully this spring I'll be rebuilding mine using 4x4s, 2x6s, and stacked 1x3s or 1x4s for the top to make it vice-ready. 2x4s and OSB didn't make for a heavy enough bench.
Worked on my benchtop today. Lowes plywood has their 4x8s painted with white primer on one side which was a pain to sand out. Left it on and did it without the glue. Used brad nails and screws to attach the two pieces from underneath, along with angle ties to fasten it onto my frame. Also didn't like the edges of the plywood showing through, so I added some trim to the visible edges for a clean look.

Before on the left, after on the right:


Waiting on stain to dry and then I'll post complete pics of everything.
 

67carl

Well-known member
Joined
Dec 10, 2013
Messages
3,878
Location
California
I found this design this design (Torsion Box) and have drawn up plans for one to fit my space. Nice and strong, won't flex and is damn near perfectly flat - if your cuts are straight!
 

Attachments

  • image.jpg
    image.jpg
    134.3 KB · Views: 482
To avoid these ads, REGISTER NOW!
Top Bottom