To avoid these ads, REGISTER NOW!

work benches... from scratch

R6rider

Well-known member
Joined
Jan 25, 2005
Messages
115
Location
Birmingham Area, alabama
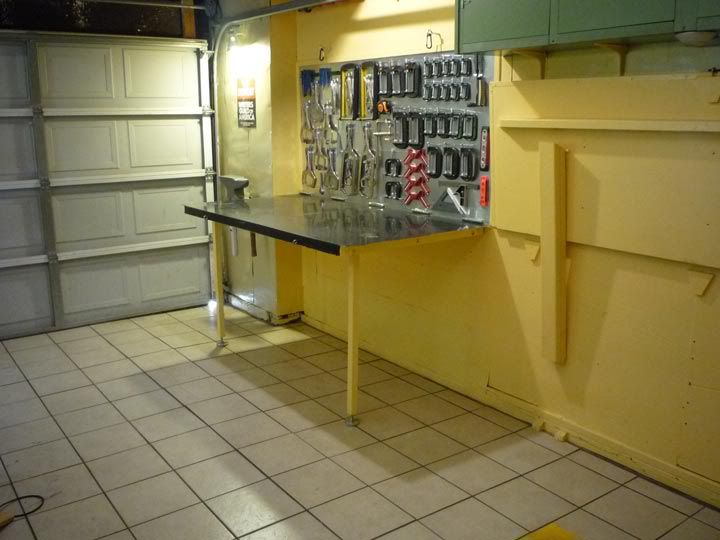
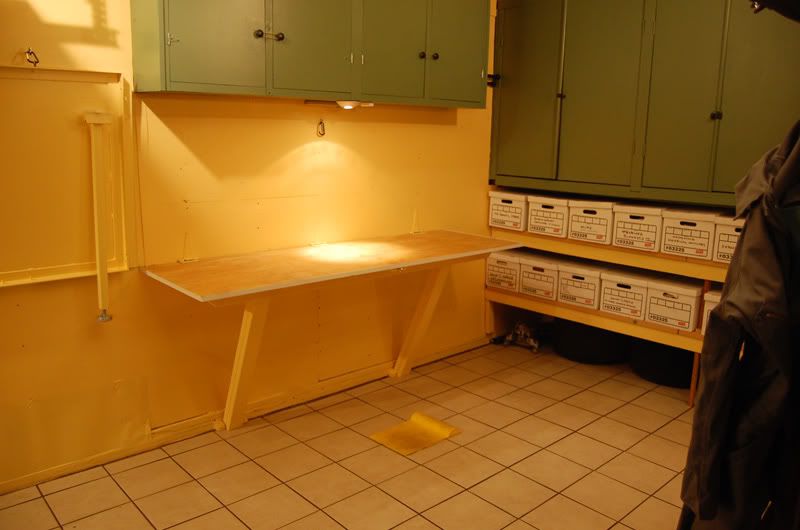
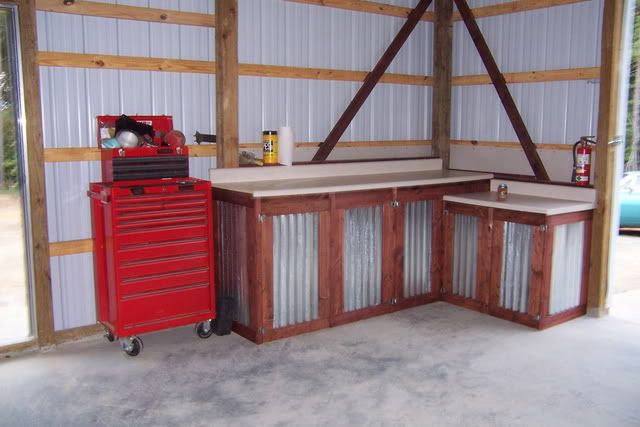
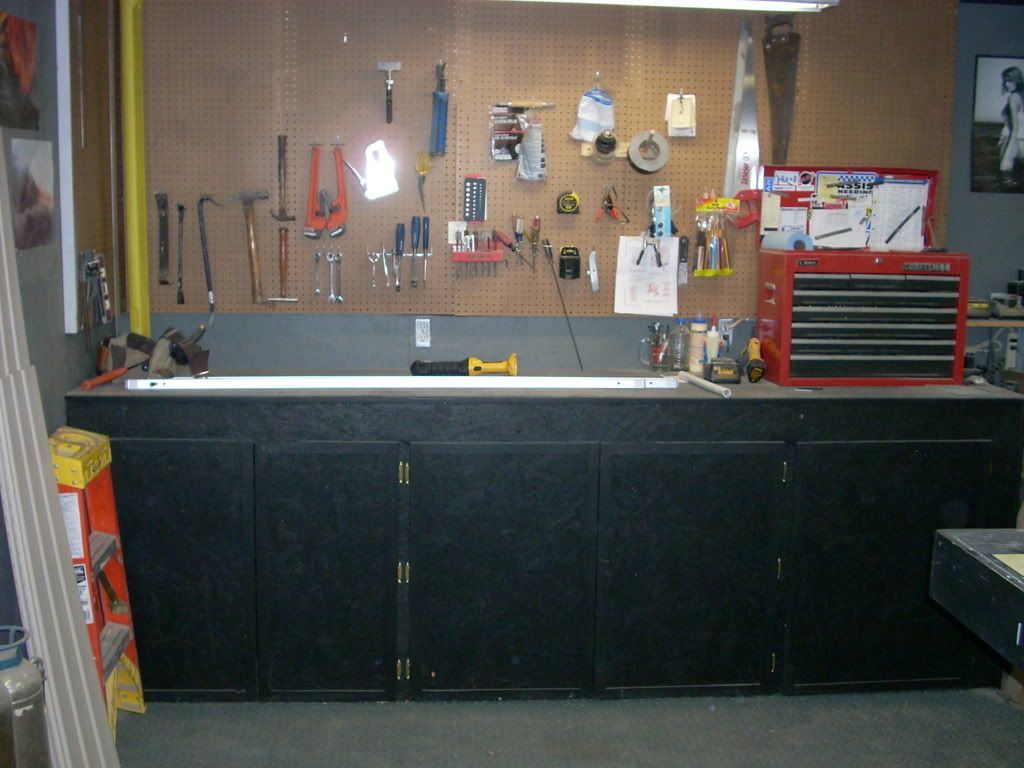
Hey guys... I'm in the process of building a couple of workshop tables for my new shop. I've already finished one of the two... so, i was looking for ideas on the second to change it up slightly.

i will take a pic or two when i get home... :thumbup:


so, anyone build there own workshop tables??? I did a search but didn't find much...
 
To avoid these ads, REGISTER NOW!

APEowner

Well-known member
Joined
Oct 2, 2009
Messages
4,164
Location
Sunny, New Mexico
I've built several benches in a couple of different shops. I use 2 x 4 frame construction with 4 x 4 posts. I built the frame on the floor with the "studs" on 24" centers. I screw the legs to the frame and then screw the back of the frame to the wall. I skin with 3/4" plywood and cover with sheet metal. I prefer stainless but i had mild steel on the benches at the motorcycle dealership I worked at and since I was working on them everyday I never had a problem with rust.
 
OP
R

R6rider

Well-known member
Joined
Jan 25, 2005
Messages
115
Location
Birmingham Area, alabama
yeah, i've got 22 2x4's left over from our fence that i'm using... and i got a sheet of 3/4 plywood cut in half long ways.. so i'm going to have 1 2x8 foot surface area(already built) and 1 2x4 surface area with same height and 1 2x4 surface area just a bit shorter b/c i'm using the 4x4 posts(this one will have my drill press on it).

i've thought about covering them with sheet metal... but, i'm on a budget right now. maybe later...
 

Cameronl

Well-known member
Joined
Nov 5, 2009
Messages
572
Location
Connecticut
I built this for my garage:
1003877x.jpg


Simpson Strong-Tie corner connectors from HD and 2x4s. Fast and bomb-proof.

parts and cut lists here
 

mustangcrazy77

Well-known member
Joined
Oct 15, 2009
Messages
174
Location
Simpsonville, SC
Here's mine. I used 3/4 (or maybe it was 5/8) sheet's of OSB for the bottom platform and the same doubled up for the top. The section on the left is a full 8' long by 42" high with 2x4 construction throughout while the section on the right is 6' long by 36" again with 2x4's throughout.

1881356_600.jpg


1881357_600.jpg


1881358_600.jpg
 

usmc_noma

Well-known member
Joined
Mar 9, 2009
Messages
1,219
Location
virginia
i built a 2x6 bench out of simpson strong ties. i've got a shelf at the bottom and a small cabinet built into it on the right side. it's approximately 2ft wide that's got a shelf inside. i haven't put a door on it yet though. for the top i just got 2 1/2" osb sheets and a 1/4" hardboard for the top. solid as a rock.
 

Jack Olsen

Super Moderator
Staff member
Joined
Mar 22, 2009
Messages
6,678
Location
Los Angeles
My garage has eight work surfaces in it. Three are steel and five are wood. I built all of them.

1+41260834630.jpg


5+81260834637.jpg


#7 and #8 work like this:

DownPosition.jpg


Fold-Down-Table2LR.jpg


#1 is a solid-core door on a structure made of paired 2x4s. It's faced with some old (water-damaged) roofing stock.

Bench1227395135.jpg


#2 is the strongest of the bunch. It weighs close to a thousand pounds.

Compliance+Station1254984045.jpg
 

toxicz28

Well-known member
Joined
Sep 23, 2006
Messages
738
Location
NY
I have a 2'6" x 8' bench about 42" high that I built. I used 4x4's for the posts, 2x4's to tie it all together, a shelf about halfway up and a butcher block top.
 
OP
R

R6rider

Well-known member
Joined
Jan 25, 2005
Messages
115
Location
Birmingham Area, alabama

pseudorealityx

Well-known member
Joined
Nov 10, 2009
Messages
999
Location
USA
nicely done... i'm wanting to put drawers on mine too. i'll have to figure that out when i have more time.


thanks for all the pictures guys... some great ideas posted in here. :thumbup:


Jack, i like #5... looks to be a solid work table.

If I could do it again, or on my next one... I'd build the drawer supports differently. It ended up being a situation where I has mis-measured and mis-calculated a few little things, and I wanted to get it done with what I had left.

But, it works well.
 

Bill K

Well-known member
Joined
Oct 21, 2005
Messages
100
Location
Thomasville NC
I got this idea for my homemade bench from a magzine whos name escapes me. The trick is in how it's built. You start by building uprights with 2 2x4's cut to the desired height with plywood sides attached. Build as many uprights as you want bays under the bench. Run 2x4 stringers top and bottem on both sides cut to the length you want the bench, then slap a top on. Whats cool about this method is it's easy to add drawer hardware, cleats for a shelf, or whatever to the plywood sides. You can space the uprights however far apart you like. It's a simple modular design with unlimited possibilities
Bill
 

Attachments

  • workbench.jpg
    workbench.jpg
    125.9 KB · Views: 3,361

NUTTSGT

Super Moderator
Staff member
Joined
Sep 14, 2009
Messages
50,863
Location
Northern Central Ohio
I have work benches and a work table. The workbench was built with 2x6s and 2x4s, covered with 3/4" plywood on top. I added OSB for doors on the front.
garage005.jpg


The work table started life as 2 lower kitchen cabinets, I framed a 4'x6' out of 2x6s and 3/4" plywood. It has to casters on the back to make it easier to move around.
garage006.jpg
 

Jack Olsen

Super Moderator
Staff member
Joined
Mar 22, 2009
Messages
6,678
Location
Los Angeles
Jack, i like #5... looks to be a solid work table.
Thanks. I chopped a steel cabinet in half to make it, and then went to Ikea for the butcher block. I wrote it up here.

Jack where do you source your sheet metal for the tops? Do you take dimensions to a shop?
The only one that has a sheet metal top is the fold-down one -- it's a 1/8" thick steel table I picked up used, and adapted to swing down.
 

Wow

Banned
Joined
Dec 12, 2009
Messages
80
I just used some 2x4s and OSB. I think I calculated it out to be $11 each for two work benches 2'x8'. They could be a little more heavy duty with 4x4s, some more bracing, and a thicker top...but I'm happy. I weigh 200# and I can get on top and jump around, solid as a board....

Mostly I built them for temporary use but I'll probably keep 'em since they turned out better than I thought...
 
To avoid these ads, REGISTER NOW!

Boosted1

Well-known member
Joined
Nov 25, 2007
Messages
1,676
Location
Georgetown, KY
Here are a couple I recently built

First is a near complete 8 ft bench on Casters I made for a Stainless Top I picked up on sale at Sears for the top only.
The frame I built with 2 x 4s, Pocket Hole Screws, clamps and Glue. This resulted in a frame with no Flex compared to the first frame I built with just Screws. I have since added shelf on botton (3/4" birch) and removed the plastic film.

<a href="http://s272.photobucket.com/albums/jj168/btskaggs/?action=view&current=DSC03530.jpg" target="_blank"><img src="http://i272.photobucket.com/albums/jj168/btskaggs/DSC03530.jpg" border="0" alt="8ftBench"></a>

Second is a 4 foot also on Casters built with Kreg's Pocket hole screws, clamps, and glue for frame. I used Oak Shelf material 3/4" thick for top and then trimmed top with 1" x 2" Oak (not yet sealed in this picture). Also very rigid structure.

<a href="http://s272.photobucket.com/albums/jj168/btskaggs/?action=view&current=DSC03532.jpg" target="_blank"><img src="http://i272.photobucket.com/albums/jj168/btskaggs/DSC03532.jpg" border="0" alt="4ftBench"></a>

After building these two, I think I will rebuild my first 8ft x 30" bench with Glue and pocket hole screws.
 

denis4x4

Well-known member
Joined
Jul 23, 2006
Messages
508
Location
Durango CO
I built two 4' X 6' roll around benches with HD casters. One has a masonite top I replace from time to time and the other has a sheet metal top. Both benches have shelves below to store hand power tools. The fact that I can do large projects and have 360 degree access makes these benches very practical.
 

brownbagg

Well-known member
Joined
Mar 20, 2006
Messages
5,208
mine are 4x4 legs with 2x6 top. I like to beat on mine, so not pretty buy tough. one is over twenty years old. I wish I had one with sheetmetal top for transmission tear down
 
OP
R

R6rider

Well-known member
Joined
Jan 25, 2005
Messages
115
Location
Birmingham Area, alabama
Re: Here are a couple I recently built

First is a near complete 8 ft bench on Casters I made for a Stainless Top I picked up on sale at Sears for the top only.
The frame I built with 2 x 4s, Pocket Hole Screws, clamps and Glue. This resulted in a frame with no Flex compared to the first frame I built with just Screws. I have since added shelf on botton (3/4" birch) and removed the plastic film.

<a href="http://s272.photobucket.com/albums/jj168/btskaggs/?action=view&current=DSC03530.jpg" target="_blank"><img src="http://i272.photobucket.com/albums/jj168/btskaggs/DSC03530.jpg" border="0" alt="8ftBench"></a>

Second is a 4 foot also on Casters built with Kreg's Pocket hole screws, clamps, and glue for frame. I used Oak Shelf material 3/4" thick for top and then trimmed top with 1" x 2" Oak (not yet sealed in this picture). Also very rigid structure.

<a href="http://s272.photobucket.com/albums/jj168/btskaggs/?action=view&current=DSC03532.jpg" target="_blank"><img src="http://i272.photobucket.com/albums/jj168/btskaggs/DSC03532.jpg" border="0" alt="4ftBench"></a>

After building these two, I think I will rebuild my first 8ft x 30" bench with Glue and pocket hole screws.

those are nice... great job and thanks for sharing the pics...
 
OP
R

R6rider

Well-known member
Joined
Jan 25, 2005
Messages
115
Location
Birmingham Area, alabama
it's a crappy cell phone pic... but, this is what i have so far. i still need to brace the bottom though.

peg board was already there... so, i built the workbench to be a 1/2 inch above the lip

workbe10.jpg


oh, and the bench you see on the left of the pic is a freebee from a friend(co-worker)... it has a vice on each side. made it easier to build the bench and is very much appreciated.
 

Ron69

Member
Joined
Jul 23, 2009
Messages
14
I had 2 lower toolboxes and positioned them 6 feet off the wall in a corner to make a nice corner bench. I got the idea from going through other peoples pictures here in this forum.
I screwed 2x4 supports into the walls at the proper height and overlapped 3/4 and 1/2" plywood and capped it with some galvanized 16 gauge formed top.
The metal cost me 200.00 to get, cut and break.
I created a rolling welding bench out of some left-over pallet racking. I cut the side beams to just under 5 feet, and welded it all together for strength. Welded some heavey duty swiveling and locking casters to the bottoms, and topped it with some 3/8 plate. It has a shelf below for storage and strength. I have no pictures of it yet but can get some to post if needed. (The vise is now attached to the welding bench. It was sitting on the corner bench.
Next is some 14 guage aluminum checker-plate to finish the face of the cabinets, and some garage art.
 

Attachments

  • Nov 29-5.JPG
    Nov 29-5.JPG
    53.1 KB · Views: 3,347

Cobra4B

Well-known member
Joined
Feb 26, 2006
Messages
1,200
Location
Virginia Beach, VA
What does overlapping the different thicknesses of plywood do? Where'd you get the top material? Was it pre-formed to your specs?
 
OP
R

R6rider

Well-known member
Joined
Jan 25, 2005
Messages
115
Location
Birmingham Area, alabama
I had 2 lower toolboxes and positioned them 6 feet off the wall in a corner to make a nice corner bench. I got the idea from going through other peoples pictures here in this forum.
I screwed 2x4 supports into the walls at the proper height and overlapped 3/4 and 1/2" plywood and capped it with some galvanized 16 gauge formed top.
The metal cost me 200.00 to get, cut and break.
I created a rolling welding bench out of some left-over pallet racking. I cut the side beams to just under 5 feet, and welded it all together for strength. Welded some heavey duty swiveling and locking casters to the bottoms, and topped it with some 3/8 plate. It has a shelf below for storage and strength. I have no pictures of it yet but can get some to post if needed. (The vise is now attached to the welding bench. It was sitting on the corner bench.
Next is some 14 guage aluminum checker-plate to finish the face of the cabinets, and some garage art.


wow, that looks nice and clean... :thumbup:
 

07classic

Active member
Joined
Jul 10, 2009
Messages
26
Location
Edmonton AB
Some great work benches guy's, hay Ron69 can you post a few more pic's of your work bench, I would like to see how you did the corner. Thanks
 

Ron69

Member
Joined
Jul 23, 2009
Messages
14
What does overlapping the different thicknesses of plywood do? Where'd you get the top material? Was it pre-formed to your specs?

Overlapping the plywood in the corner gave the bench allot of strength on the inside corner, where you would lean into it. I used the different thicknesses of plywood, because I happened to have a full sheet of each leftover from the build. Thats all. The top galvanized piece are 2 pieces of galavized that are easily available from any fab shop. I drew up what I wanted and they purchased, sheared and broke it to my drawing. The contractor made thigs very square so the 2 pieces fit together well.
 

tez929rr

Well-known member
Joined
Dec 26, 2005
Messages
3,752
Location
Welfare, TX
Simpson Strong-Tie corner connectors from HD and 2x4s. Fast and bomb-proof.

parts and cut lists here

Yep - I have built 4 workbenches using the strong ties and serveral very large shelving units - good stuff. Home Deport used to sell a kit that included all the Simpson parts for a workbench. It was a huge savings considering how expensive it is to buy just the screws.
 

Eds_tls

Well-known member
Joined
Feb 26, 2009
Messages
389
Location
Rockford, IL
This thread inspired me to replace the **** bench I have now.

So here was my solution. I've never really worked with wood much in the past so its not perfect. But I'm very happy how solid it came out. Not bad for an afternoons work

The top is 26 x 80 so its plenty big

4x4 legs
2x4 framing
3/4 plywood for the lower shelf
3/4 MDF for the work surface

Total cost $62 in materials (the MDF was $26 by itself)

Its not complete yet. Still need to cut the plywood for the bottom shelf, need to screw down the top and I need to buy nuts for the bolts. I also plan on doing a full length hutch for the top with a pegboard back and a flourcent light under the hutch.

I'm happy so far

100_0141.jpg


100_0143.jpg


100_0144.jpg
 

mjozefow

Well-known member
Joined
Apr 9, 2009
Messages
2,111
Location
Lafayette, IN
If you are going to use plywood as a top, I would HIGHLY recommend using at least two layers of 3/4 " plywood. One layer has far too much bounce IMNSHO.

If you go 32" wide you can get three layers from two 4x8 sheets.

Garageprogress3034.jpg


GarageProgress1060.jpg
 

Jack Olsen

Super Moderator
Staff member
Joined
Mar 22, 2009
Messages
6,678
Location
Los Angeles
And as mjozefow's second picture shows, you can save yourself the trouble of notching a 4x4 upright if you simply sister up a pair of 2x4's.

Same bearing strength, quicker build.

Depending on the use, it's also nice to have a ridge of some sort on the back and two sides, at least if you're bothered by little parts rolling away.
 

brownbagg

Well-known member
Joined
Mar 20, 2006
Messages
5,208
there some pretty work bench here. I be afraid to work on them, afraid I might scratch the varnish. I would have to build something outside that I could beat on.
 

Eds_tls

Well-known member
Joined
Feb 26, 2009
Messages
389
Location
Rockford, IL
And as mjozefow's second picture shows, you can save yourself the trouble of notching a 4x4 upright if you simply sister up a pair of 2x4's.

Same bearing strength, quicker build.

Depending on the use, it's also nice to have a ridge of some sort on the back and two sides, at least if you're bothered by little parts rolling away.

Yeah, I thought about marrying up a pair of 2x4's instead of notching the 4x4. And if I had to do it again, thats what I would do.

Notching those with a circular saw was a pain in the *** and took forever
 

mjozefow

Well-known member
Joined
Apr 9, 2009
Messages
2,111
Location
Lafayette, IN
Yeah, I thought about marrying up a pair of 2x4's instead of notching the 4x4. And if I had to do it again, thats what I would do.

Notching those with a circular saw was a pain in the *** and took forever

Forgot to mention that. Another advantage is you can orient the crowns to prevent warping. But the main advantage is it is way easier. And cheaper.

And ya, lap joints cut on a circ saw are a royal pain in the @$$.

I also chose to put a piece of sacrificial luan on the top of my benches. That way, once they get all beat up, I'll just swap it out.
 
To avoid these ads, REGISTER NOW!
Top Bottom