To avoid these ads, REGISTER NOW!

Below 265 SQ/FT "you should knock it down" single car garage rescue

All workspaces below 265 squarefeet.

old_smokey

Well-known member
Joined
May 16, 2018
Messages
409
Location
Manitoba
"you should knock it down" single car garage rescue

EDIT/UPDATE:

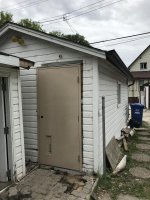
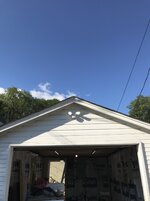
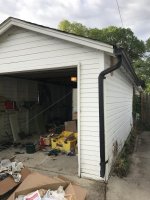
Condition of garage when I bought the house, June 2018

8f955fdd8840aa3229a08b01c33b90b4.jpg

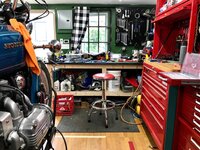
progress as of 2020:

a38b7cf93ecfd63dc4e831c839bf1285.jpg

bd5bf0407cfa9f49a47aa8ddc91e74e4.jpg


Wife and I bought our first house a couple weeks ago. I enjoy restoring and modifying motorcycles, so having a garage was a 'must' while buying. I live in central Canada where it gets verrrrrry cold in winter, so insulating it for those -30C days was a requirement as well.


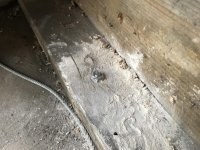
Long story short, I technically ended up with a garage, but it's a 'pile' to put it lightly. Leaning 3" toward my neighbour's parking pad, and a few inches toward the house. Frame has a lot of rotten bits, no proper bracing inside the building, a few real bodge attempts at shoring up the building to prevent collapse. The man door is broken and the overhead door is good for scrap and nothing else.


A perfect summer project :)


Everyone looks at me funny and says it's not worth it to repair, just knock it down and rebuild. But after getting some quotes in, that wasn't an option. Just bought a house, I don't have cash for a new building. But I do have time, and I do like fixing stuff, so why not.


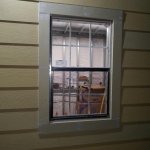
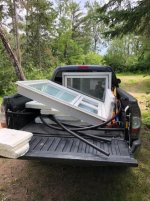
First was a trip to the local rural dump, where I scored two lovely double pane windows. They're in great shape, just need a wash and paint on the trim. My Dad's shop has a nice big window in front of the work bench and it's a real treat to work on an engine with all that natural light pouring in.

IMG_2745.jpg


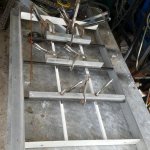
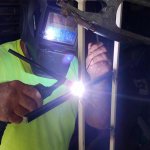
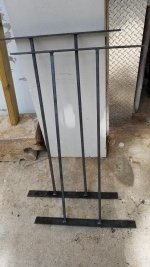
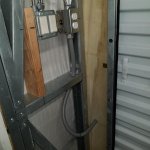
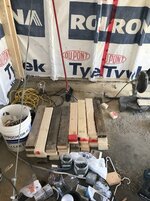
Next up was some hunting on Kijiji (that's Craig's list for canucks). Garage theft is an issue in my area I learned. Neighbour had his garage raided and lost 25K in tools. So I need to make this thing fort knox. I found a guy gutting a commercial building and got this solid steel fire door for a song. With a jimmy-proof lock, it should keep all but the most committed thieves at bay. For the windows I'll weld up some bars, and the car door still needs some figuring.

IMG_5280.jpg

The plan is to pull the building straight with cables and turnbuckles, run a sub panel from the house for power, insulate, and sheet the inside with plywood. Install some good lights and an electrical heater, and I should have a nice place to play with motos over winter.

Dad came over last night to give me a hand and we started pulling the walls straight. My East wall is anchored to the concrete pad and is solid at the bottom, but leaning out a bit. I placed a concrete anchor in the pad and used a rock climbing anchor to attache the turn buckle. I drilled a hole through the wood siding and through a piece of 2x4 that spread the force across the top plate, frame, and some of the siding. A few twists of the turnbuckle and the wall came in. 2" out before, now the plumb line is bang on.

IMG_5690.jpg
IMG_5685.jpg

The West wall had spread out by several inches at the bottom and needed to be pulled back in. The previous owners had done some real bodgy things, like mounting a garage door to the sagging frame before fixing it, so there was a 3" gap at the bottom of the door when closed. I removed all the garage door mounting bolts and ran a cable from the East, well anchored bottom plate across the floor and through the sagging West wall. The cable was also anchored into a big 2x6 on the outside of the building to spread the force along the wall. A few turn buckle twists, some light taps along the base with a rubber mallet, and the wall slowly crept back to level.

IMG_5678.jpg


At this point, my East and West walls were now straight and level. I drove 3/8" concrete anchors through the bottom plate of the West wall and into the pad, bolting the plate to the pad. Now my whole garage is bolted in the corners. I have a slight 1/2" bow in the middle that I'll pull in and bolt tonight. At that point, I will only have a slight lean toward the North, by about 1". Using anchors in the pad I'll pull it back the same way.


Once the frame is straight (hopefully by Sunday) I'm going to enforce and replace a few sections of rotten wood, then rough in the windows and man door.


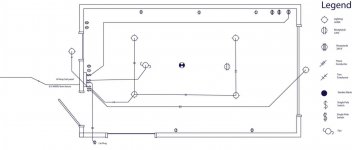
I have most of my electrical bits ordered (sub panel, wiring to run from the house, lights etc and just need to make a better floor plan before starting to run the wiring.


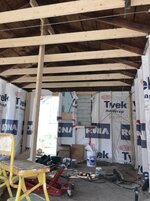
The siding is not great but it's thick lead paint and I don't wanna even go there right now. Instead I'm going to patch a couple small cracks and holes, then use Tyvek house wrap from the inside (kinda bodgy I know). It'll save me a lot of work, but also keep the garage from looking too nice...might help with theft.


More to come!
 

Attachments

  • IMG_5689.jpg
    IMG_5689.jpg
    104.8 KB · Views: 911
  • bd5bf0407cfa9f49a47aa8ddc91e74e4.jpg
    bd5bf0407cfa9f49a47aa8ddc91e74e4.jpg
    163.6 KB · Views: 25
  • a38b7cf93ecfd63dc4e831c839bf1285.jpg
    a38b7cf93ecfd63dc4e831c839bf1285.jpg
    105.4 KB · Views: 25
  • 8f955fdd8840aa3229a08b01c33b90b4.jpg
    8f955fdd8840aa3229a08b01c33b90b4.jpg
    318.1 KB · Views: 42
Last edited:
To avoid these ads, REGISTER NOW!
OP
O

old_smokey

Well-known member
Joined
May 16, 2018
Messages
409
Location
Manitoba
Here's a close up of the turnbuckle anchors.

And a photo of the garage - it's gonna be small and cramped, so shelving and storage will need to be well thought out. You can also see the bracing that was placed across the roof. I can't see it doing much, if anything. So I have a pile of lumber here to run across the roof, which will tie into the top plate and roof. That should help reduce the bowing, and also give me something to sheet to for the ceiling.
 

Attachments

  • IMG_5684.jpg
    IMG_5684.jpg
    132.7 KB · Views: 990
  • IMG_5601.jpg
    IMG_5601.jpg
    127.8 KB · Views: 1,025

ForceFed70

Well-known member
Joined
Apr 27, 2010
Messages
3,441
Location
BC, Canada
Quite the project! Looks like you are well on the path to having a nice garage!

Planning on electric heat?
 

crguy

Well-known member
Joined
Jan 24, 2016
Messages
2,637
Location
SW Washington
Forget the Tyvek on the inside - now how/what it was designed for and it's not cheap. Seems like putting big windows in makes it easier for thieves unless you put security bars on the inside.
 
OP
O

old_smokey

Well-known member
Joined
May 16, 2018
Messages
409
Location
Manitoba
Yes to electric heat. It's a small space inside and won't take much. I've already got a free 220V heater donated to the cause. It heated my Dad's shop for about $5 a day when running at full volume 24 hours straight, and his shop is easily 8-10 times the size of mine. I'll just keep mine on when working inside.

Stuart - just started reading the rat shack thread, I love it! I'll probably pull a few ideas from there for sure. Thanks!

crguy - I already have a roll of Tyvek that is big enough to wrap up the whole garage. I want to reduce drafts, as well as keep moisture away from the glass-batt insulation, so I figure it can't hurt. Totally right about windows and thieves, but I'll be welding up some proper security bars in the near future to keep prying hands away.
 

driftpin

Well-known member
Joined
Dec 22, 2016
Messages
11,178
Location
Miami-Dade/Broward Co. Florida
Seems like you've got the lot-of-plumb issues under-control. Better get those burglar bars in before you store any stuff in there, and what is the plan for the OH door?

I did these bars at first (pic 1 just two vertical stiles) but decided I needed to secure it better, so I added two rails (pics 2, 3, 4) and they are much better for security now.

What type of fasteners are on the wall footer plates? That sounds like someplace I would be examining for structural integrity given what you've already discovered.

If you have any humidity there, I think the Tyvek may allow a condensing on its surface just where you don't want it, inside the building envelope. Others more-knowledgeable may offer opinions.
 

Attachments

  • window bars.12.jpg
    window bars.12.jpg
    127.8 KB · Views: 509
  • window bars.11.jpg
    window bars.11.jpg
    83.1 KB · Views: 455
  • window bars.05.jpg
    window bars.05.jpg
    117.2 KB · Views: 449
  • window bars.13.jpg
    window bars.13.jpg
    117.5 KB · Views: 589
Last edited:

captain14

Well-known member
Joined
Dec 19, 2012
Messages
7,013
Location
Near College Park Maryland 20740
Two more threads for inspiration , ideas and a good ending are:

1 Fergies rebuild of his original garage

2 Leaning tower Piece of A.... by Talonsair

Both threads probably have lots of missing pictures due to the photobucket scam.
 
Last edited:
OP
O

old_smokey

Well-known member
Joined
May 16, 2018
Messages
409
Location
Manitoba
Nice looking security bars! I intend to have the bars welded to some kind of bracket on all four sides. Basically a metal frame that completely surrounds the window and is screwed into the wall frame. One challenge will be retaining the ability to open the windows, as one of them has two smaller windows with a rotating handle to open.

The fasteners on the bottom plate - Are you referring to how the bottom plates are fastened to the concrete pad? I'm a bit loose on proper terminology for all these pieces, so I'll be asking some dumb clarification questions throughout the process here.

If so, each corner had expanding concrete anchors coming out of the pad and through the plate. It looks like someone added a number of them along the East wall at some point, but never did the West wall. There are no anchors on the West wall beyond the original two - one in each corner.

In the South-West corner, the anchor wasn't even placed on the West bottom plate, but rather installed right next to the car door along the South wall, which ran through a 8" long section of bottom plate. The force of the wall being pushed out caused the plate to split (all the force was being pushed along the grain too, didn't help...) allowing the wall to slowly push away and spread the bottom of the car door opening apart by 3" That's what I pulled in last night.

With the bottom plates back in place, I put in five 3/8 hilte anchors along the length of the plate. That plate is in good shape, no sign of rot (surprisingly enough), so I have two nice solid plates on each side to build from.

Regarding the car door: the 9' door leaves only about 1' of wall on each side before the corners. That's not much to work with to keep the walls from leaning again. I'm thinking of putting in a 8' wide door instead, so I have a bit more material there to work with. Once my tools and workbench are installed, there is no room for any car to ever go in there. I have a parking pad next to the shop anyway. As long as motorcycles can come and go, I'm happy. I found an insulated door with hardware and an opener for $150 locally, going to go have a look this week.


Hope this makes sense. I'll take more photos tonight as I fine tune the West bottom plate and add the last anchors.
 
Last edited:

GrayFlattop

Well-known member
Joined
Jan 18, 2018
Messages
1,037
Location
Chicago
Those security bars look similar to mine, but I had a third horizontal piece of angle iron in there as well. I used 1/4 x 2 x 2 angle at the top bottom and middle - with 4 pieces of 3/4 round bar for the vertical pieces. I screwed them directly to the studs on either side of the window (on top of the drywall) with 12 3-1/8 long GRK screws.

Before I put up the bars, I applied a reflective tint film to the inside of the glass. It lets in plenty of light, but keeps prying eyes at bay. Unless I'm working inside with the lights on - then they would likely be very bold or very stupid...

No worries saving a questionable garage - I fully understand limited funds right after buying a house. The 18' x 18' garage that was on our lot when we bought the house (that probably should have been knocked-down) probably should have been knocked-down itself. But with a few hundred, I insulated and put up drywall (no taping - just paint). Put in a 60A sub panel and it served as my starter woodshop for about 8 years until we saved up enough money to build a larger (still not big enough) garage. This tiny workshop housed a full-sized panel saw a Powermatic 66 with dust collector, a lumber rack and enough tools to create a revenue stream. No heat - just a Kerosene heater that probably explains why I'm a bit brain addled 30 years later...

Looking back, it was a great, fun time. You can make that small garage work for you!
 

driftpin

Well-known member
Joined
Dec 22, 2016
Messages
11,178
Location
Miami-Dade/Broward Co. Florida
I am not a structural engineer.

Sounds like you did some good reinforcement of the wall footer plates (yes, the bottom plates fastened to the concrete pad) w/the Hilti anchors, and that you may intend to add more where you need them. Something like a ~6 inch X 1/2" anchor w/a nut and a wide flat washer should provide you with a good retention for the plate. A spacing of about 18" O.C. should provide plenty of uplift, though to get an exact engineered measurement, you would need to discover what uplift protection you need to have where you live.

The windows of my building pictured are attached to the galvanized steel frame that the structure has. The top and bottom of the security bars are 2" X 1/8" plates, through-bolted to the steel header and footer for the window opening with 3/8" machine screws and flat and lock washers. I thought about making the bars framed on the sides too, but I decided that the 1/2" square stock solid steel rods would be capable of repelling anyone trying to get in that way. It's all TIG welded very securely.

You can make a shear wall on your one foot returns you have next-to the OH door opening. Use 3/4" PT plywood, secured about every 6-8" all-around the perimeter of the plywood. If you have to sister some additional wood into the stud bays to give you a bearing surface for the shear wall panels, make it PT lumber. This will greatly stiffen your opening, and protect against 'racking' of the wall in the future. The shear wall should continue down the side wall with the 3/4" PT plywood for several feet, for best strength.

I don't think you need to narrow the opening, especially if you do the shear wall plywood. use construction screws like SPAX, Deckmate, or equivalent, not drywall screws. The ones that have square-drive heads are easy to drive, be sure to drill pilot holes. Screws 2-1/2" would probably be longer than you need, but that extra length makes the shear wall better.

Dunno if you are a Costco member, but their 4 ft LED double-bulb shop lights are on-sale, I think they are about the cheapest way to get good lighting quickly. Up-to 4 fixtures can be ganged together, they come w/120 V plugs and single outlets on opposite ends, and include wires for hanging, if you don't want to screw them directly to the ceiling. $20 apiece. I highly recommend them.

In the first pic, you see the side wall has the shear wall 3/4" lumber removed for adding reinforcement for the electrical boxes, and to run a service to the outside wall exterior of the garage. On one side I have 120 V and on the other side of the OH door a 240 V.
 

Attachments

  • electrical-outside duplex outlet.02.jpg
    electrical-outside duplex outlet.02.jpg
    88.3 KB · Views: 424
  • FEIT LED shop lights.03.jpg
    FEIT LED shop lights.03.jpg
    72 KB · Views: 422
Last edited:

Toothaker

Well-known member
Joined
Nov 25, 2016
Messages
1,367
Location
Wichita, Kansas
I like what you're doing; keep updating your thread, please.

About window film, I found the mirrored works great during the day, but at night you can see in. I used the frosted film on the glass in my garage. During the day it diffuses the light and illuminates the interior very well, and nobody can see in - either during the day or night.

https://www.homedepot.com/p/Gila-4-ft-x-6-5-ft-Frosted-Privacy-Window-Film-PFW486/100155257

Here is the window, with it partially open.
attachment.php


attachment.php


There are no lights on in my garage - except for the motion sensing light on the garage door opener. Ok, it's not as bright as the camera makes it appear - but it is very easy to see things during the day without turning on the overhead lights.
 

Attachments

  • Window1.jpg
    Window1.jpg
    73.3 KB · Views: 5,351
  • Window2.jpg
    Window2.jpg
    139.6 KB · Views: 5,377
Last edited:

Toothaker

Well-known member
Joined
Nov 25, 2016
Messages
1,367
Location
Wichita, Kansas
Smokey, you might think about asking the moderators to move your thread to Garage Gallery. That is where these builds / refurbish threads go. Ryan, 1/2 Cup and others are the moderators.
 

KEH

Well-known member
Joined
Jan 31, 2010
Messages
5,142
Nice job.

The gutter downspout in the last pic is letting water splash up on the wood and there is some paint flaking and possibly rot. Looks like a piece of tin behind the downspout extending all the way to the concrete would easily solve the problem.

KEH
 

johnnyradiant

Well-known member
Joined
Mar 27, 2017
Messages
833
Location
Vancouver, BC
The only problem I see with fixing an old rotten little garage is once it looks good somebody will probably assume what's good on the outside must have goodies on the inside.
 

couch67

Well-known member
Joined
Mar 18, 2016
Messages
1,398
Location
Ontario Canada
Smokey, I will be watching your thread with interest. Nice job on saving it, I`m sure its going to be an awesome space. Last year I revived an old shed on my property (2nd link in my signature). A smaller job than what you are undertaking but may have something useful in there for what you are doing.

couch
 
Last edited:

gahrajmahal

Well-known member
Joined
Dec 12, 2008
Messages
2,515
Location
Cincinnati, Ohio
Saving the garage probably saved you lots of headaches as the permits you would need might have ment you sometimes cannot even replace it. Definitely make sure the drainage is good around the slab.
They also make a security window film to reinforce the glass. The Harbor freight driveway motion sensors are a cheap deterrent that work well. Makes a loud annoying "ding dong" that keeps going when sensing motion. We use one in the hallway when our grandsons stay over so when they wake up we know they are moving around the house. Cheap enough to own several waking you up when someone comes in the yard.
 
To avoid these ads, REGISTER NOW!
OP
O

old_smokey

Well-known member
Joined
May 16, 2018
Messages
409
Location
Manitoba
Great suggestions here guys. Little things like water splashing from the downspout, never would have thought of that. Thanks!

I also love that frosted window treatment. I had planned on putting in some blinds or curtains or something to keep people from looking inside when I wasn't in the shop. I do like the idea of a clear window for the view, but frosted sure would add a level of privacy. I'll have to think about that.

klassen - I'm in Winnipeg. Just moved into a place in Glenelm, that's just North of Elmwood cemetary.

Last night I ran another cable to the North-East corner and pulled the wall plumb. Guess what - I know have one full wall that is plumb in all directions. Success! My East wall looks downright respectable now.


I pulled the West bottom-plate bow back into line and put 4 concrete anchors in between the existing corner anchors. The two bottom plates are now straight and parallel.

Someone had suggested earlier that I look closely at what anchors exist. Funny, the East wall has 1/2" anchors between every other stud. That plate is solid. No sign of rot either. West wall has no anchors along it's length. Well, at least until last night. I included a photo of the only corner anchor near the West wall, which was actually on the South wall next to the car door, and had split, enabling the building to spread apart. That'll get fixed up soon, but in the mean time it's been pulled back together and anchored.

Tonight I'll run the last cable I think I'll need to straighten the walls. I have to pull the West wall about 1/2" back toward the house. This is the only time I'll need to pull the garage along it's depth, so far everything has been side to side.

Once that's done, I'm going to switch gears and rough in the windows and new door on Saturday. Between today and Saturday, I'm going to draw up my electrical plan so I can get a permit. It's 24' from the house to the garage, and I need to bury the cable 18". I'm debating whether I should rent a trencher for $80 or just dig it by hand. Could use the exercise lol.

One funny thing, now that the walls are just about all straight, the man door doesn't close and the dead bolt is about 1/2" off. And the car door has a 3" gap on one side. Looks like both doors were installed long after the building was leaning, lol.
 

Attachments

  • IMG_5708.jpg
    IMG_5708.jpg
    151.1 KB · Views: 506
  • IMG_5699.jpg
    IMG_5699.jpg
    155.9 KB · Views: 508
  • IMG_5700.jpg
    IMG_5700.jpg
    141.2 KB · Views: 494
  • IMG_5705.jpg
    IMG_5705.jpg
    152.8 KB · Views: 530
OP
O

old_smokey

Well-known member
Joined
May 16, 2018
Messages
409
Location
Manitoba
I'll try to get some better pictures on Saturday when it's actually light outside. Need some proper "before" pictures before things get too serious!
 

Vegaman_Dan

Well-known member
Joined
Jun 1, 2012
Messages
2,453
Location
Pacific, WA
Repairing what you have there is cheaper than building all new, and that would likely require permitting and all that fun as well. You've got a good start to a solid structure.

Once you get some cross bracing to replace your cables, it should be a base to work from that you can rely on. If you insulate and then sheath the inside with OSB or plywood or other sheet material, that will really strengthen the structure- the walls could rot away but your sheathing would still keep it up!

Now that said, I would love to see some external pictures of the other sides of the garage and rear. You might be able to expand it slightly by building out a small bumpout for the work bench or other storage options while keeping the floor open and clear. Even building a blister on the outside that is just a couple of feet deep, but 8-10 feet long would allow you to store sheet goods or lengths of pipe/angle/metal work out of the garage. Whatever you can do to get stuff OUT of the garage and leave you space, all the better.

If you ever want to run airlines, this is also a good time to run some black iron pipe through the walls before you sheath them.

I'm kind of envious. Standalone small garage makes modifications so much easier than an attached garage with living space.
 

theoldwizard1

Well-known member
Joined
Feb 22, 2011
Messages
43,072
Location
SE MI
Before you started, I hope you did a thorough inspection on the foundation. It that is not good, you are just "building a castle in the air" !

Have you figured out what cause the structure to shift ? You have to prevent that from happening again.

Also a little late, I would have replaced all of the bottom plates with pressure treated lumber. The bottom plate on most old garages is rotten.
 
OP
O

old_smokey

Well-known member
Joined
May 16, 2018
Messages
409
Location
Manitoba
Pretty much wrapped up the wall straightening business tonight. Once i had all four walls pulled they started to influence each other, necessitating a lot of tweaking this way, then that way, and so on. But long story short, all four walls are darn close to plumb. I’m going to let it sit a few days and check again on the weekend.

To the previous poster - my slab is not great. But it’s also not going anywhere soon. This is not intended to be a 25 year structure. If long term longevity was my priority, starting from scratch would definitely be wise. But I’m cash poor after buying the house, saving for a new one is years away, so I’m doing the best with what I have. The foundations sank on both the east side corners by about 2-3”. At some point a previous owner lifted the building and laid new concrete along the edges, then lowered the building onto it. It hasn’t sank since that happened. I don’t know when that happened but it was over ten years ago at minimum, before the people I bought the house from lived there.

Anyway, that’s my situation at the moment. Friday night I’m starting to work on the man door and windows. I also started my electrical drawings. More to come soon.


Sent from my iPhone using Tapatalk
 
OP
O

old_smokey

Well-known member
Joined
May 16, 2018
Messages
409
Location
Manitoba
Some more dump scores today - found an identical window to the first one I got, but in better shape. So now I have three windows to choose from. The extra's I'll either give away or sell to help fund the project.

Also found some rigid foam insulation from some forms that I can maybe cut up and use between the walls and eves or something. But the big score was a couple of garage door rails that I can use to adapt a 7' tall car door to fit in my low-headroom 6.5' opening possibly. I've been looking at kits and it's pretty straightforward. So I'll explore that a little, though I've also got some local suppliers quoting on a new door. If it's not too pricey I'll just replace it.

The black piping is for running my cables inside, underground from the house to the shop. Fun!

Tomorrow I'm going to have a look at flipping the hardware in the larger window upside down, so the opening sections will be at the top rather than the bottom. That'll put them 6' above the ground - more difficult to break into, but more importantly they won't interfer with my future work bench. Because the building is pretty low, the top plate is only about 7' above the pad, this window will come down so far down that i'll be below the work bench surface. That means I can't access the arms to open the windows. Preliminary look suggests no big deal to flip it all around.

More this weekend...
 

Attachments

  • image1.jpg
    image1.jpg
    68.6 KB · Views: 260

KEH

Well-known member
Joined
Jan 31, 2010
Messages
5,142
Good progress. Those windows are a great score.

KEH
 
OP
O

old_smokey

Well-known member
Joined
May 16, 2018
Messages
409
Location
Manitoba
Big weekend working in the shop!

I let the building sit a few days after pulling the walls straight. They settled in a bit and I did last minute tweaks which brought all the walls plumb at the corners. There is some bowing in the middle of the long walls but I'll deal with that later.

Next big step was the steel commercial door I bought locally. This turned into a funny story. Long story short, the door had to be mounted upside down with the little window by my knees. Turns out I bought a left-handed door frame and a right-handed door. The design of the door does not allow it to be flipped. Basically there was nothing I could do about it. I noticed it was upside down in the online ad when I bought it, and I asked the seller about it. He just said "oh, it's just piled that way in my garage, it'll mount up the right way". Either he lied to me, or was clueless, but either way I have a funny lookin' door now haha!

I also decided the set the door so it opens to the outside. That saves me some space in my already very small garage. I'll have to get some non-removable pin commercial hinges though, as these can be tapped out with the right sized punch. i

The door installation went fairly smoothly, but it did take almost 8 hours. I had to grind the concrete footing level first, make a few cut outs in the stud so the frame could slide all the way in (there are a couple little brackets to stiffen the frame on the inside of the frame channel), and I doubled up the studs on both sides, plus added a double header, since this door is heavy and carries some momentum as it swings.

After some fiddly work we got the frame square and the door mounted. I went to close it and doh! The little garden shed next to my garage is too close, the door it's it on the way closed! Since it's coming down in a few weeks anyway, I took the sawsall and cut the corner of the shed roof off. Now the door fits perfectly and feels really, really solid. It'd take a huge effort to get through this door! One job done.


Next up I cut all the lumber to size to rough in the two windows. I've decided not to put the larger window above the work bench. The wall is already so small that cutting out a big chunk of the framing seems un-wise. It was leaning hard side-to-side, so I want to retain as much wall there for sheeting. Besides, that'll leave me with more wall space to hang a cabinet or peg board or something, and the big window can go in the wall that gets the most direct light. I'll install that framing later this week.

I'm getting pretty close to finishing up the big framing jobs outside of the car door, which means I need to start thinking about electrical drawings and getting a permit. I've filled out my applications and came up with this drawing based on a rough floor plan I dreamed up. I have four LED panel lights that'll go on the ceiling, and have a few switched circuits - one for an air compressor, outside plug, and a fan that I'll hook up to **** air out when using smelly solvents. I'm going to run a 40amp sub panel into the garage, with three 240V circuits to run a little heater, a small MIG welder, and one extra incase the air compressor needs it.

Regarding the door, I got a few quotes and have two options really. The first is a conventional car door - 6.5' tall by 8' wide to fit the existing opening, with a low-headroom style track system. Rated R10.4, $730.

Option two is to ditch the car door entirely and go with a steel roll-up door. I can get a 5' wide or 6' side door for about $480. They aren't insulated at all, but are more secure/difficult to break into. Keeping in mind, a car will never park in this garage. With my work bench installed, there won't be room to fit one even if I wanted to, so there is no reason to have a door there at all except to get the motorcycles in and out. I could build a removable insulated panel that covers the door on the inside for use in winter, and store it in summer months. I'm leaning that way - cheaper, more wall space, and safer.
 

Attachments

  • IMG_5824.jpg
    IMG_5824.jpg
    109.7 KB · Views: 343
  • IMG_5855.jpg
    IMG_5855.jpg
    75.9 KB · Views: 339
  • IMG_5842.jpg
    IMG_5842.jpg
    109.9 KB · Views: 358
  • IMG_5840.jpg
    IMG_5840.jpg
    113.4 KB · Views: 378
  • IMG_5871.jpg
    IMG_5871.jpg
    147.5 KB · Views: 342
Last edited:

OccupantRJ

Well-known member
Joined
May 15, 2009
Messages
10,906
Location
Eastern North Carolina
With the door like that, at least the dog or cat can look outside.

I started with a wobbly building with bowed walls and no bracing and with a bit of work turned into a viable workshop. I added a room on the rear for tool storage and air compressors and a room onto the side for my machine shop. Link to my album below.

https://www.garagejournal.com/forum/album.php?albumid=1545
 
Last edited:

dfiler2

Well-known member
Joined
Dec 15, 2014
Messages
2,858
Location
NW Minnesota
Looking good, that is a nice door. You can just weld the hinge pins in so no one can pull them to get inside. I did that once years ago, just took the hinges off and brought them to a friend, just welded the top of the pin to each hinge.
 
OP
O

old_smokey

Well-known member
Joined
May 16, 2018
Messages
409
Location
Manitoba
"you should knock it down" single car garage rescue

Haven't updated in a while but I've definitely made some progress.

First up I finished pulling the building plumb. All four corners are straight, and I've also run two cables across the middle of the building as it was bowing into a barrel shape. That also caused the roof to sag in the middle like a saddle. There are zero trusses or any kind of support for the roof at all, so as I pulled the two walls back together, the roof lifted up and regained a flat roof ridge. Score!


I helped the roof along by using a jack with a 2x6 on it to push the centre up as the walls were pulled in. It came together with minimal effort - about 2.5 inches required to pull in.

ce0a4fc36a2e4781fe70a88277a871fd.jpg

I cut 9 2x6's and ran them across the top plates, screwing and gluing them into the roof beams as well as the top plate. I went through about 120 screws and 1.5 tubes of glue hah. These should keep the shop from ever turning into a barrel again I hope.

423b49cd89b313ab30d513872717deea.jpg

I decided I should also make some roof supports that sit on the 2x6's at the bottom, and up against the roof at the top. That should provide some needed strength for snow weight in winter, and also help minimize the chance that the roof's weight will push the walls out in the future. That's this week's job.

Next up I stripped all the old shelving, scrap wood and other bodge fixes that were left over inside. Pulled out around 150 nails randomly sticking out all over the place, used for hanging stuff I guess. I patched up a number of larger holes in the siding with some 1/4 plywood patches, glued and stapled in place. Then I wrapped the entire inside in Tyvek, with about 1" overlap along the top and bottom plates.

26819b42b5bca65e84062033c5792bf3.jpg

I cut about 40 'doublers' out of 2x4 and screwed them between the studs at the top and bottom. That sealed up the Tyvek against the frame, and also gives me a lot more material to screw my sheeting into later this month. Given how much the building had sagged, I figured more 'meat' would be useful. I don't want this simply falling right back to where it was before.. Also, my siding doesn't quite overlap the bottom plate, so there is a great opportunity for critters to sneak into my walls. Now my siding is securely fastened to the doublers on the outside. Should keep the critters at bay.

6ae4a184062e327510c82231bb0b25ce.jpg

I removed my car door opener as there isn't room for one with the new 2x6 joists. It'll be a manual door from here on out. I'm getting one final quote tomorrow for a new door, so should be able to pull the trigger on that this week. I've pretty much ruled out the steel rolling sheet door option as they just don't have any weather proofing what so ever. The rolling sheet doors (also called security shutters) don't seem up to the security task. And rolling segmented doors weight hundreds or pounds or more, and are too expensive. I've got a quote for a 5' wide, 6.5' tall R12 steel conventional garage door for around $700. Might be the best option.


Also coming up is roughing in my electrical junction boxes. My Dad put together these little plywood boxes with rigid blue insulation glued all the way around, which we found at the dump. Score! It'll keep things nice and warm around the junction boxes. This week I'm going to install them, meaning I'll be ready to start pulling wires.

62d3dc4769c7eeeef699df52e6f16d19.jpg


Sent from my iPhone using Tapatalk
 

Attachments

  • 62d3dc4769c7eeeef699df52e6f16d19.jpg
    62d3dc4769c7eeeef699df52e6f16d19.jpg
    388.2 KB · Views: 19
  • 6ae4a184062e327510c82231bb0b25ce.jpg
    6ae4a184062e327510c82231bb0b25ce.jpg
    196.9 KB · Views: 13
  • 26819b42b5bca65e84062033c5792bf3.jpg
    26819b42b5bca65e84062033c5792bf3.jpg
    640.2 KB · Views: 12
  • 423b49cd89b313ab30d513872717deea.jpg
    423b49cd89b313ab30d513872717deea.jpg
    414.4 KB · Views: 12
  • ce0a4fc36a2e4781fe70a88277a871fd.jpg
    ce0a4fc36a2e4781fe70a88277a871fd.jpg
    492.8 KB · Views: 13
Last edited:

donpauli2

Well-known member
Joined
Aug 6, 2013
Messages
91
Location
central Illinois
I have a small single stall garage similar to your situation. Once I got it plumbed back up I used construction adhesive and construction screws to attach grooved panel siding outside and 1/2” plywood inside. Glued and screwed I doubt if it will rack again in my lifetime


Sent from my iPhone using Tapatalk
 
OP
O

old_smokey

Well-known member
Joined
May 16, 2018
Messages
409
Location
Manitoba
I have a small single stall garage similar to your situation. Once I got it plumbed back up I used construction adhesive and construction screws to attach grooved panel siding outside and 1/2” plywood inside. Glued and screwed I doubt if it will rack again in my lifetime


Sent from my iPhone using Tapatalk

Nice! I have a similar plan, minus the siding - for now at least.

inside I'm going to sheet it with 1/2" plywood. I'm going to secure my vapour barrier between the doublers, not the top/bottom plate I should get the same level of sealing, but that way my top/bottom plates aren't covered in plastic, meaning I can glue my plywood as well as screw it. I'm going to cut a tongue and groove along the seam between the top and bottom pieces of sheeting, glue that as well. That should create a real strong bond between the sheeting and the frame I think.

I'm leaving my siding as is for now, just due to time and cash constraints. I'm thinking I'll replace my roof first as the shingles are curling and quite bad. Maybe a metal roof. Then I could do the sides in metal as well, though that might look a bit too....well....metal. Not sure yet.

Finally landed on a garage door. Rolling sheet door is out due to a host of reasons. I've got a 6'6" by 8' R16 conventional door, double wall 26g steel construction ordered. A narrow rolling door would have been really cool but the cost, weight, and insulation challenges were too much. Hey, at least with an 8' door I can get my truck halfway inside if I ever need to work on it :beer:


Tonight I'm installing my little roof supports, turning those joists into real trusses. Also planning out the window bars - making some measurements and ordering the steel this week. The car door should be ready in 3-4 weeks, so I want to have the rest of the building secure by then so I can get my tools and motos out of my Dad's garage already.
 

donpauli2

Well-known member
Joined
Aug 6, 2013
Messages
91
Location
central Illinois
Nice! I have a similar plan, minus the siding - for now at least.


inside I'm going to sheet it with 1/2" plywood. I'm going to secure my vapour barrier between the doublers, not the top/bottom plate I should get the same level of sealing, but that way my top/bottom plates aren't covered in plastic, meaning I can glue my plywood as well as screw it. I'm going to cut a tongue and groove along the seam between the top and bottom pieces of sheeting, glue that as well. That should create a real strong bond between the sheeting and the frame I think.


I'm leaving my siding as is for now, just due to time and cash constraints. I'm thinking I'll replace my roof first as the shingles are curling and quite bad. Maybe a metal roof. Then I could do the sides in metal as well, though that might look a bit too....well....metal. Not sure yet.


Finally landed on a garage door. Rolling sheet door is out due to a host of reasons. I've got a 6'6" by 8' R16 conventional door, double wall 26g steel construction ordered. A narrow rolling door would have been really cool but the cost, weight, and insulation challenges were too much. Hey, at least with an 8' door I can get my truck halfway inside if I ever need to work on it :beer:


Tonight I'm installing my little roof supports, turning those joists into real trusses. Also planning out the window bars - making some measurements and ordering the steel this week. The car door should be ready in 3-4 weeks, so I want to have the rest of the building secure by then so I can get my tools and motos out of my Dad's garage already.


Sounds like you’re on top of it. I’d like to try metal roofing also since I have very shallow roof pitch. Time will provide or decide.


Sent from my iPhone using Tapatalk
 
OP
O

old_smokey

Well-known member
Joined
May 16, 2018
Messages
409
Location
Manitoba
"you should knock it down" single car garage rescue

Great progress over the weekend - I got the entire interior electrical roughed in

This is my first time running wire, so my Dad came by and showed me the ropes. Didn’t take too long and I was able to make sense of it all. Actually it was quite fun, probably my favourite part of this project yet.

Here’s a photo of the sub-panel and ‘command central’ so to speak.

c4bfc37591b6f87b6781eb1c182b23f0.jpg

I’ve got four switches here - inside lights, which will be two banks of 4 LED strip lights. Then backline-side exterior motion-sensor light, front-side exterior light, and a switch for a fan that I don’t have yet, but will soon. I’m going to put something like a bathroom ceiling fan in above the work bench for days when I’m using lots of brake/carb cleaner and other smelly solvents. It’ll also be great if I ever need to throw parts in the oven, etc.

I hooked the sub panel up to my existing supply just to get the lights on for now. Here’s the motion sensor light, LED and super bright.

dc3cd8fd31a5cbeb744e982605e53963.jpg

Up top I have a single box for a timer, for the external plug. Good for scheduling power to my truck’s block heater in winter, and shutting power off when we’re not home.

Next to it I have two boxes that will be for the electric heater. One is for a thermostat, and the other is a on/off switch for the circuit.

Bottom lower right side is a box for a switched circuit for my air compressor. I hate digging around for the power switch, so now it’ll be right at my fingertips.

At the bottom is a double box for 4 plugs, on a 15A circuit. This area will be mostly for chargers, basic powered hand tools etc. Not shown in this photo is another single box to its left, where I’ll have an ethernet cable coming in. My plan is to hook up a wifi antenna of some kind, so I have internet in the shop and the backyard too. My area is a cell reception dead zone more or less, so this should be really useful.

O the topic of heaters, I’m also wiring in a small box in the ceiling to use as a provision for a solar heater. I’m really keen on building one of these DIY solar heaters using black aluminium cans, window screen, or some other source of harnessing the suns heat. I’ve found a lot of reports online of guys with comparable winter temps getting their shops up to 15C in the dead of winter. All for free! As long as it’s sunny, it’s blowing warm air. I’ll need power for the fans, as well as some kind of thermostat that powers it on/off depending on cloud cover. Anyway, that’s a project for the fall. Right now I’m focused on getting the main electrical done.

Tonight I’m going to start digging the trench to supply power to the shop. That way I can get my inspection next week, and finish up all the receptacle wiring and start insulating. Progress!


Sent from my iPhone using Tapatalk
 

Attachments

  • c4bfc37591b6f87b6781eb1c182b23f0.jpg
    c4bfc37591b6f87b6781eb1c182b23f0.jpg
    450.4 KB · Views: 12
  • dc3cd8fd31a5cbeb744e982605e53963.jpg
    dc3cd8fd31a5cbeb744e982605e53963.jpg
    310 KB · Views: 10
OP
O

old_smokey

Well-known member
Joined
May 16, 2018
Messages
409
Location
Manitoba
Well if electrical was the most fun part yet, this was the least.

Picked up a length of 8G 3c wiring, some PVC pipe and CAT 5e cable. I had intended to rent a trencher from Home Depot but it was broken. So I left with a shovel and got to it.


28750637e854fa5b487adde7ecd53893.jpg
Only took two hours or so, so i shouldn’t complain. 18” deep, 10” across. I’ll run the power cable along one side and the cat 5e on the opposite, both in their own conduit.

Cable goes in tomorrow, then inspection


Sent from my iPhone using Tapatalk
 

Attachments

  • 28750637e854fa5b487adde7ecd53893.jpg
    28750637e854fa5b487adde7ecd53893.jpg
    715.3 KB · Views: 11
To avoid these ads, REGISTER NOW!
Top Bottom