To avoid these ads, REGISTER NOW!

ZMotorsports Shop Projects 2.0

OP
Z

zmotorsports

ALLIANCE MEMBER
Joined
Oct 20, 2009
Messages
21,598
Location
Northern Utah
AC is a tier 1 manufacturer Mike. It’s a Danish company, utterly highly rated. It a lot of money but it’s great value, so well worth it. Plus they is extremely well stocked with spares comes the time for a re seal or something.

Thanks again Anders. I did some research and when I discovered it was made in Denmark, I started seeking feedback on some foreign forums and other outlets and saw that they get rave reviews from their end users. Unfortunately, there just not a lot of them here in the states, probably because of the elevated initial layout of money, but also the added cost of freight.

Some of us on this side of the pond seem to want to buy the absolute cheapest garbage we can and then complain about it when we find out it isn't the quality that was expected. I didn't think I was of this mindset and insisted on buying quality, however, I guess I am just as guilty of this based on my latest fuel tank cradle disaster. :rolleyes: I am also finding this as I have posted my old engine hoist on FB MP and the low ball offers I've been getting are frustrating to say the least. I have it listed for less than a new Harbor Freight 2-ton hoist, but everyone seems to want it for nothing regardless of the fact that it is so much better than the average import engine hoist. I'll keep it before I give it away.
 
To avoid these ads, REGISTER NOW!
OP
Z

zmotorsports

ALLIANCE MEMBER
Joined
Oct 20, 2009
Messages
21,598
Location
Northern Utah
I was going to ask about the material thickness of the cradle. I installed a 23 gallon tank under the back of my Bronco and purchased the skid plate that goes with it. It is just a center protection plate and nothing on the sides which would help minimize side compression if it got smacked on the edge. I need to find some thicker metal and box it in before I install it.

In my opinion, I think the OEM did a pretty good job of not only designing the fuel tank cradle but choosing the correct thickness as well as how they reinforced it across the three sections where the fasteners are located. They used some formed rib designed supports that span the cradle's cross section to add strength as well. Could they have used thicker material? Absolutely, but I fully understand that it comes down to a balancing act between not only providing a mounting point for the fuel cell, but also protection, and just as important, weight. Especially when designing these for the "average" end user and trying to meet their CAFE requirements. Many of these Jeeps never see off-road duties even though that is what they are "supposedly" designed to handle. We as Jeep owners or insert any group who modifies their vehicles for use other than designed, and we take those design concepts and throw them out the window as we enforce much higher demands on the vehicles to do things well beyond their intended purposes. While these skids/cradles can take a fair amount of abuse or beating, I don't think they were designed to take as much as some of them get. I have seen Jeep owners replacing these with much, much beefier and heavier duty skids much sooner than I and with very few miles on them, then proceed to beat the ever-loving hell out of those beefier skids.
 
OP
Z

zmotorsports

ALLIANCE MEMBER
Joined
Oct 20, 2009
Messages
21,598
Location
Northern Utah
Never! I always appreciate your insight, I will be curious to see how you like the Steel-It, that was one that I keep seeing people on YT using, then it seemed Seymor jumped into the mix in full force recently.

Yeah, I really haven't had anything to give the small sample of Steel-It a try that I can use to give it what I would feel is a good honest test yet. I have sure been impressed with all three of the ones I mentioned above though, the Eastwood, Summit Racing and now the Seymour Big Rid paints. All work well, with only slight differences in places I think I would use them. For the longest time I used the Eastwood as a one size fits all, but recently started rethinking that philosophy as I don't necessarily think there is a one that works perfectly in all situations.
 

ScepterToad

Well-known member
Joined
Nov 9, 2023
Messages
357
Keith, while I appreciate your vote of confidence, this one is nearing the point of being so corroded there's not a lot of structural left to build off of. Unfortunately, the nature of the beast with these things as they trap in moisture and debris which causes their demise over time. Plus the rocks I've allowed it to come into contact with haven't helped much. :unsure:
Makes sense Mike. I guess I should add a check of mine to the list this fall. Last time I looked at it, it was pretty decent but I didn't pull it down and look at the inside.
 
OP
Z

zmotorsports

ALLIANCE MEMBER
Joined
Oct 20, 2009
Messages
21,598
Location
Northern Utah
Makes sense Mike. I guess I should add a check of mine to the list this fall. Last time I looked at it, it was pretty decent but I didn't pull it down and look at the inside.

Keith, I didn't pull it down to look at it, the rust was pretty evident right where they overlapped the skid with the reinforcement. I will take a picture of the corrosion when I drop it, but it is visible without needing to drop the tank.

That being said, mine isn't quite as bad as the last one I did for a client, but bad enough I don't feel comfortable letting it go much longer.
 
OP
Z

zmotorsports

ALLIANCE MEMBER
Joined
Oct 20, 2009
Messages
21,598
Location
Northern Utah
How much salt does Utah use on their roads Mike?

Nowhere near as much as other areas in the snowbelt across the country. We use what's called a "hot mix" which is a combination of sand and salt plus when a big storm is coming in many times UDOT will spray a brine solution on just before the storm hits which really helps keep the snow from building up initially. We have the Great Salt Lake right here in our backyard so brine is something we have in exorbitant amounts. :ROFLMAO:

I have had pretty decent results with my vehicles just by getting on them quickly with a pressure wash after a storm so with a little attention, our vehicles will last a very long time, unlike someplace like New York or around the Great Lakes areas. I've seen 6-8 year old vehicles from those regions that are literally falling apart as you look at them. Some of their frames are even rotting in half, it's unbelievable.
 

Mr.zippy

Well-known member
Joined
Apr 27, 2020
Messages
2,225
Location
Wyoming
Years ago my son bought a 91 Chevy pickup from the Logan area. When he got home I checked the frame over. It had quite a bit of rust, actually surprised me. We cleaned it up and treated as best we could, but it was more rust than we see on local stuff...truck was 20 plus years old at the time, so I supposed it was somewhat normal though.
 
OP
Z

zmotorsports

ALLIANCE MEMBER
Joined
Oct 20, 2009
Messages
21,598
Location
Northern Utah
Years ago my son bought a 91 Chevy pickup from the Logan area. When he got home I checked the frame over. It had quite a bit of rust, actually surprised me. We cleaned it up and treated as best we could, but it was more rust than we see on local stuff...truck was 20 plus years old at the time, so I supposed it was somewhat normal though.

Here in northern Utah, I think it comes down to how the vehicle is cared for most importantly. While I've seen some pretty bad ones, upon speaking to the owners, I have learned that they don't do anything in terms of getting the road grime off after a storm. I think some owners wash their maybe once a year, whether it needs it or not. :ROFLMAO:

My truck and Jeep both still looks pretty good underneath other than a little corrosion here and there and could use a fresh coat of paint. My son's truck is coming up on 24 years of age with 300k and still looks decent underneath, although we did sand and coat it about 3 years ago.

The wife's car is 13 years old and still looks pristine underneath with 200k on the clock so no reason to think I can't get another half dozen or so years out of it if I keep doing what I normally do.
 

Fixr

Well-known member
Joined
Dec 23, 2012
Messages
9,862
Location
SW VA
Thanks again Anders. I did some research and when I discovered it was made in Denmark, I started seeking feedback on some foreign forums and other outlets and saw that they get rave reviews from their end users. Unfortunately, there just not a lot of them here in the states, probably because of the elevated initial layout of money, but also the added cost of freight.

Some of us on this side of the pond seem to want to buy the absolute cheapest garbage we can and then complain about it when we find out it isn't the quality that was expected. I didn't think I was of this mindset and insisted on buying quality, however, I guess I am just as guilty of this based on my latest fuel tank cradle disaster. :rolleyes: I am also finding this as I have posted my old engine hoist on FB MP and the low ball offers I've been getting are frustrating to say the least. I have it listed for less than a new Harbor Freight 2-ton hoist, but everyone seems to want it for nothing regardless of the fact that it is so much better than the average import engine hoist. I'll keep it before I give it away.
Mike, Having seen the pictures of your old hoist, it looks like it's faded to about the same pink as an HF one does. Lots of people truly can't see past that to the differences in structure and quality. One of my early mentors used to say "Run it may, but shine it must" in reference to selling. People will walk right past a car in really great shape that has faded paint in order to buy an utter POS with a shiny paint job. Would it be worth spending like an hour or maybe two at the most rattle-can repainting it to gather some more attention? It's not like that would be at all deceptive. Just shining the good old girl up a bit.

Edit: Actually, a coat of rattle can clear might make it red again.
 
OP
Z

zmotorsports

ALLIANCE MEMBER
Joined
Oct 20, 2009
Messages
21,598
Location
Northern Utah
Mike, Having seen the pictures of your old hoist, it looks like it's faded to about the same pink as an HF one does. Lots of people truly can't see past that to the differences in structure and quality. One of my early mentors used to say "Run it may, but shine it must" in reference to selling. People will walk right past a car in really great shape that has faded paint in order to buy an utter POS with a shiny paint job. Would it be worth spending like an hour or maybe two at the most rattle-can repainting it to gather some more attention? It's not like that would be at all deceptive. Just shining the good old girl up a bit.

Edit: Actually, a coat of rattle can clear might make it red again.

I agree that people's attention is grabbed by shiny objects.

I couldn't give it a quick rattle can job, if I were to paint it I would take it completely apart, paint it piece by piece then reassemble. That's way too much time spent for a few hundred dollars.
 

signcrafter

Well-known member
Joined
May 9, 2012
Messages
12,605
Mike, do you do any undercoating or just wash after storms? They use that brine like crazy here and I think it makes the vehicles rust faster. Or at least it seems like vehicles 15 plus years ago didn't seem to rust as fast and now that they are using brine anytime a flake or two is predicted it seems like vehicles are starting to rust out a lot quicker then I remember.
 

Scuderia-F1

Well-known member
Joined
Feb 9, 2011
Messages
1,198
Location
Stockholm, Sweden
Thanks again Anders. I did some research and when I discovered it was made in Denmark, I started seeking feedback on some foreign forums and other outlets and saw that they get rave reviews from their end users. Unfortunately, there just not a lot of them here in the states, probably because of the elevated initial layout of money, but also the added cost of freight.

Some of us on this side of the pond seem to want to buy the absolute cheapest garbage we can and then complain about it when we find out it isn't the quality that was expected. I didn't think I was of this mindset and insisted on buying quality, however, I guess I am just as guilty of this based on my latest fuel tank cradle disaster. :rolleyes: I am also finding this as I have posted my old engine hoist on FB MP and the low ball offers I've been getting are frustrating to say the least. I have it listed for less than a new Harbor Freight 2-ton hoist, but everyone seems to want it for nothing regardless of the fact that it is so much better than the average import engine hoist. I'll keep it before I give it away.
It does make my head in when people doesn’t reque and or want quality. I rate a hoist as a security classed equipment as well. Then to settle for an inferior product should in my opinion void any kind of insurance. But yeah, I’m aware that you and I both are a bit on the extreme end. We take care of our stuff, so it looks fresh even at age. So I can’t understand why that hoist isn’t picked up and payed for already.

A fun sidenote, I don’t know if you’re aware of that the guy that makes the AGA table, is a Dane (although based in the USA). I wouldn’t be surprised if he in some extent uses AC bits in his tools.

One of the absolute tier 1 globally 2 post, 4 post and scissor lift manufacturers Stenhøj now AutoP Stenhøj is a Danish company.
 
OP
Z

zmotorsports

ALLIANCE MEMBER
Joined
Oct 20, 2009
Messages
21,598
Location
Northern Utah
Mike, do you do any undercoating or just wash after storms? They use that brine like crazy here and I think it makes the vehicles rust faster. Or at least it seems like vehicles 15 plus years ago didn't seem to rust as fast and now that they are using brine anytime a flake or two is predicted it seems like vehicles are starting to rust out a lot quicker then I remember.

Scott, I don't do any preliminary treatments such as Fluid Film or the like, I just try to keep any bare metal from being exposed by touching up during routine maintenance and keeping them cleaned as much as possible during the winter months.
 
OP
Z

zmotorsports

ALLIANCE MEMBER
Joined
Oct 20, 2009
Messages
21,598
Location
Northern Utah
It does make my head in when people doesn’t reque and or want quality. I rate a hoist as a security classed equipment as well. Then to settle for an inferior product should in my opinion void any kind of insurance. But yeah, I’m aware that you and I both are a bit on the extreme end. We take care of our stuff, so it looks fresh even at age. So I can’t understand why that hoist isn’t picked up and payed for already.

A fun sidenote, I don’t know if you’re aware of that the guy that makes the AGA table, is a Dane (although based in the USA). I wouldn’t be surprised if he in some extent uses AC bits in his tools.

One of the absolute tier 1 globally 2 post, 4 post and scissor lift manufacturers Stenhøj now AutoP Stenhøj is a Danish company.

Again Anders, thank you for so much information, especially about some of these tools that are less known to us here in the States.

I did not realize that the owner of AGA was also from Denmark, but the couple of phone conversations I had with him, I think his name was Rick, I was very impressed and made me want the lift table even more.

When they came out with their new version of the lift table that is air over hydraulic, I contacted him to inquire about it and was told they were working on a retro kit to convert the older ones like mine over to the new style. Then a couple months ago sure enough, I received an email. I called back and talked to him again and was quoted what I felt like a fair price to upgrade but opted to not pull the trigger at this time as I am very happy with the table as is and have laid out enough money for the time being.
 

Fixr

Well-known member
Joined
Dec 23, 2012
Messages
9,862
Location
SW VA
I agree that people's attention is grabbed by shiny objects.

I couldn't give it a quick rattle can job, if I were to paint it I would take it completely apart, paint it piece by piece then reassemble. That's way too much time spent for a few hundred dollars.
I get that. Could you stand just spending 5 minutes wiping on some spray wax without going full detail, just to counteract some of the oxidation and make it red again? (I've known people who would just hit it with WD40). If not, someone will eventually buy it anyway.
 
OP
Z

zmotorsports

ALLIANCE MEMBER
Joined
Oct 20, 2009
Messages
21,598
Location
Northern Utah
It actually sold a couple days ago, just holding it until the guy can pick it up. Turns out a guy in my cousin's car club wants it, especially when he heard it had the parallel outriggers. Looks like I'm not the only one who feels strongly against the angled outriggers.

I get that. Could you stand just spending 5 minutes wiping on some spray wax without going full detail, just to counteract some of the oxidation and make it red again? (I've known people who would just hit it with WD40). If not, someone will eventually buy it anyway.
 

Scuderia-F1

Well-known member
Joined
Feb 9, 2011
Messages
1,198
Location
Stockholm, Sweden
Again Anders, thank you for so much information, especially about some of these tools that are less known to us here in the States.

I did not realize that the owner of AGA was also from Denmark, but the couple of phone conversations I had with him, I think his name was Rick, I was very impressed and made me want the lift table even more.

When they came out with their new version of the lift table that is air over hydraulic, I contacted him to inquire about it and was told they were working on a retro kit to convert the older ones like mine over to the new style. Then a couple months ago sure enough, I received an email. I called back and talked to him again and was quoted what I felt like a fair price to upgrade but opted to not pull the trigger at this time as I am very happy with the table as is and have laid out enough money for the time being.
That kind of customer service/care is what makes me genuinely happy. I bet it made you feel even happier with your equipment.
I really want one of them earlier generatio (the one you have) tables, but they’re impossible to find over here. The AGA tables are at a pricepoint that I can’t justify here (to be precise I have purchase it and collect it in Denmark, which isn’t a big deal). Actually the newly released Snap-on table is cheaper here than the AGA, but I wouldn’t be surprised if the AGA also is the better option.
 
To avoid these ads, REGISTER NOW!

Jgaz

Well-known member
Joined
Dec 16, 2016
Messages
1,748
Location
AZ
There are a couple of tire carrier manufactures offering something similar and I contemplated incorporating something similar into my design back when I built my bumpers. However, in wanting to not add more weight to the rear bumper of the Jeep, I opted to keep it simple. If needs be, I could back up nearer to a rock or mound to load, but so far I just heave ho it up there, even in the shop. I can usually get it up onto my thighs and then it's a simple matter of leveraging it onto the studs.
Mike,
Here is a post of how a friend of mine incorporated a simple but effective tire hoist into his carrier. If I’m not mistaken Kris (my friend) is running 37’s

 
OP
Z

zmotorsports

ALLIANCE MEMBER
Joined
Oct 20, 2009
Messages
21,598
Location
Northern Utah
Hope everyone had a great weekend.

Friday night consisted of a late night of doing lawns and Saturday morning I went and enjoyed a relaxing breakfast with my son and grandson. I'm really digging these breakfasts with just the "guys" once in a while. Looked forward to these for longer than I can remember and they are everything I imagined they'd be.

After breakfast I dropped my tires and wheels off at my local tire shop to be mounted and balanced then returned home to work in the shop.

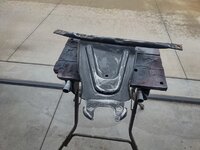
I began by cleaning the factory skid from my Jeep in preparation for paint. It has been needing a good coat of paint for quite some time now, but I've kept putting it off during routine maintenance work but seeing as how it's off and I had a few minutes, I took the time to clean it with some all-purpose cleaner followed by some brake cleaner to get a few spots of grease off then another wash job with all-purpose cleaner and blew it off with compressed air.
skid1.jpg

Next, I ran a DA over it with some 80-grit to hit the surface rust and remove some of the old and failing paint.
skid2.jpg

The next task was not necessary, but the last couple of times I removed it to service my transfer case, I felt some sharp edges from the original stamping process and thought since I was painting it, I would remove those sharp edges with a die grinder and Roloc disc.
skid3.jpg

Also ran the Roloc disc down the long edge to roll it a bit and remove the sharp edges.
skid4.jpg

Using the Roloc disc, I put a slight radius on the ears of the skid and broke the sharp edge.
skid5.jpg

When painting small parts I generally either bead blast them if they fit in my blasting cabinet or hit them with 120-grit on the DA, but I wanted to test the filling capabilities of the Seymour High Solids primer so see if it would fill 80-grit scratches or if in the future I need to continue using 120-grit. The 80-grit just adds so much more "bite" that I really hoped it would fill nicely. I began by hitting it with some Wax & Grease Remover for a final wipe while the primer was in the paint shaker.
skid6.jpg

Just about the time I was ready to spray the skid, a small rain storm rolled through so after it quit raining, I was able to apply a couple light to medium coats of the Seymour primer. It really laid down nice.
skid7.jpg

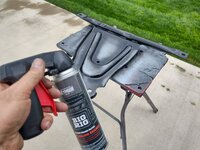
After about a half hour of drying, I moved on to the Seymour Big Rig gloss black. I hit it with two light coats followed by a final wet coat.
skid8.jpg

The skid turned out excellent and I was very pleased. However, I had to hurry and get it back into the shop because another rain storm looked like it was approaching.
skid9.jpg

Back in the shop it was evident that the primer did a great job of filling even the course 80-grit scratches and the overall gloss was excellent.
skid10.jpg


Thanks for looking.
 
OP
Z

zmotorsports

ALLIANCE MEMBER
Joined
Oct 20, 2009
Messages
21,598
Location
Northern Utah
A month or so ago, I rebuilt the two upper front Johnny Joints on my Jeep as they were exhibiting some play. When I dropped the rear lower from the Jeep the other night in preparation to replace the fuel cradle/skid, I noted some play in the rear lower so I just decided that I would rebuild the remaining 6 Johnny Joints on the Jeep starting with the one I had to remove.

Just as I was beginning to tear the joint apart, the guy who was buying my engine hoist called to see if I was home. This gentleman is a friend of my cousin's and his same Model A club. I posted the engine hoist on FB MP Thursday and then just text my cousin to see if he knew anyone who could use one. I guess as soon as my cousin contacted this guy and told him it was the style that had the parallel outriggers, he said he'd take it without even seeing any pictures of it. I text my cousin some pictures anyways, but it sounded like it was a done deal based on the parallel outriggers. Seems like he feels the same way I do. :unsure:

I grabbed the engine hoist and moved it from the RV/storage bay over into the main shop awaiting his arrival. It's been a great hoist, but time to go to a new home.
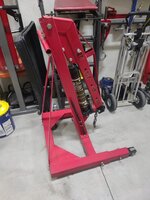
lift1.jpg


I just started disassembling the Johnny Joint when the guy arrived to pick up the engine hoist. He was thrilled with the hoist and then we stood around talking cars for nearly an hour after he wanted a tour of my shop. Turns out this gentleman owns 31 different collector cars, many of them from the 1920's era. When he spotted my welders and machining equipment, he asked if I ever take on the occasional welding or machining side job and I told him I had been known to take on a little side work. ;) He enjoys buying and fixing up older cars but when it comes to welding and machining, he usually has to either scrap the parts or hire out the work because it is beyond his capabilities, so I mentioned I would be interested in the future if he needs something worked on, so it turned out to be a great chance meeting and he seems like a very nice gentleman.

After he left, I continued work on the joint. Here it is disassembled and ready to be cleaned and prepped for reassembly.
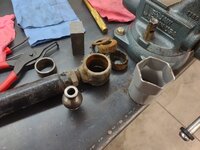
joint1.jpg

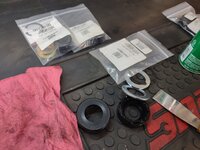
New rebuild kits at the ready.
joint2.jpg

The zerk didn't want to accept grease so I replaced it while I had it apart.
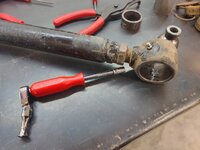
joint3.jpg

Pressed the new bushing with greased ball into the housing.
joint4.jpg

Compressed enough to install the new snap-ring.
joint5.jpg

With the joint rebuilt, it was time to grease the joint. The greasing of these is critical, even though there are grease grooves/slots around the joint, I don't feel the grease gets evenly distributed around the spherical joint unless the joint is moved through its range of motion while greasing. I add a small amount of moly grease during assembly, but then once assembled I clamp it in the vise, grease the joint, then move it through the full range of motion while continuing to add a bit of grease.
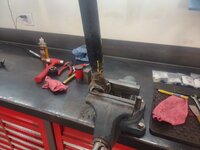
joint6.jpg

Moved to one extreme.
joint7.jpg

Then back to the other extreme, greased and repeat. Then after removing from the vise a final wipe to remove any excess grease.
joint8.jpg

Then it is set aside and ready for installation.
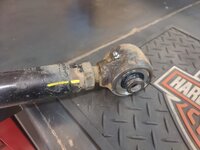
joint9.jpg


My fuel cradle/skid should be here in the next day or two so I can replace it and move on to rebuild the remaining Johnny Joints. These joints have held up the best of any I have tested and the only ones I stand behind. I've used some imitations but these are the best on the market, hands down.

I have just over 80k on these particular joints on my personal Jeep and many of the Jeeps I work on see routinely over 50k between rebuilds, with many of them seeing much more extreme use than I put mine through. Some of the imitation joints I've used over the years are lucky to get 10k-15k out of them and even less after one good off-roading trip where the Jeep flexes a lot, such as the Rubicon or a weeklong off-road trip with a lot of technical trails which can clap out a set of lesser quality joints in short order. Yet these original Johnny Joints by Currie, just keep on going and take the abuse.

Thanks for looking.

Thanks for looking.
 

fouckhest

Well-known member
Joined
Jul 24, 2013
Messages
1,945
Location
Greer, SC
I didn't bring it up during the conversation. :ROFLMAO:

We did talk cars and then trailers. He had one of the new Maxx D Drop & Load air ride trailers that was pretty slick. Way beyond what I'm looking to build, but pretty slick nonetheless.

I have seen plans for some air ride trailers, Mike! LOL

Admittedly, I am excited for when you take on that project, I'm hoping you will inspire/motivate me to build one too!
 
OP
Z

zmotorsports

ALLIANCE MEMBER
Joined
Oct 20, 2009
Messages
21,598
Location
Northern Utah
I have seen plans for some air ride trailers, Mike! LOL

Admittedly, I am excited for when you take on that project, I'm hoping you will inspire/motivate me to build one too!

Mike, I've looked at a couple different drop deck trailers over the past couple of years and although they are very appealing and solve a lot of loading/unloading issues, they are expensive, even to build. There were multiple exchanged comments between myself and various forum members a year or so ago when I first mentioned I was looking to build a car hauler and my reasoning for simplicity as well as budget. At this stage of my life, I really just want a nice quality and reliable trailer that I can use in the event one of mine or my son's vehicles needs a haul, plus I would like to venture into buying some non-running or project vehicles in the future to play with and sell. I really only see myself using a car hauler maybe a half dozen times a year or so at most so not something I want or even can spend upwards of $10k to $15k plus on. When I finally get around to building a trailer, it will be a budget friendly project in all aspects, but something I won't be embarrassed to hook up to.

Speaking of trailers, kind of a cool story from Saturday. When I dropped off my tires/wheels on Saturday the young man that was helping me was going on and on about my truck, even to the extent of kneeling down and looking under it. Then when I started unstrapping the tires from the trailer, he was walking around looking for a brand on the trailer. When he asked me what brand of utility trailer it was, he didn't believe me when I told him I built it from scratch. He loved the boxed taillights and small flush mounted LED marker lights plus the tapered front that I incorporated into the design. I will admit though, I need to polish out the black paint as it is starting to fade a bit from sitting outside for the past 10+ years, but it is still such a pleasure to hook up to and tow. For a small utility trailer it tows so nice. As I was driving home I thought I wanted the same feeling when I finally get around to building my flatbed car hauler.
 

ScepterToad

Well-known member
Joined
Nov 9, 2023
Messages
357
That skid plate turned out super Mike! That paint is definitely in my Amazon wishlist now!

I think once I get a lift, I'll be able to manage the paint scuffs/scratches the way you do to mitigate the rust on my vehicles due to road salt and brine. For now though, I'm in the camp of using fluid film. It's kept my Jeep pretty rust free on a two year application. I'll have to shoot it again this fall, but it's a small price to pay for the protection it supplies.
 

fouckhest

Well-known member
Joined
Jul 24, 2013
Messages
1,945
Location
Greer, SC
Mike, I've looked at a couple different drop deck trailers over the past couple of years and although they are very appealing and solve a lot of loading/unloading issues, they are expensive, even to build.

I do recall going down a small rabbit hole and looking into them and remember being surprised at the cost estimates, even when building. I will be following your build for sure, I know you don't cut corners!

That's a great story on the current utility trailer, and very funny, we helped my step-daughter move into the new house Saturday, I dug out my trusty utility trailer and it served its duties as it always does. However, upon putting it back in its parking spot, I began to feel bad for how much its been neglected over the years, I might need to carve out some time to give it a little refresher.
 

aka Larry

Well-known member
Joined
May 2, 2012
Messages
8,149
Location
Eastern, NC
When he asked me what brand of utility trailer it was, he didn't believe me when I told him I built it from scratch.

Same for me Mike. I could have bought one for a lot less than it cost for me to build my own, but I know it was done the way I wanted, and was built to last. Of course when I need to move it just a few feet (and I'm not on concrete), I'm still questioning my choice of using that heavy 3/16" angle!
 

ntsqd

Well-known member
Joined
Jan 22, 2005
Messages
1,031
Location
Lower left coast
Any thoughts about something that is waterproof that might seal the tank to the skid to keep water, junk, and dirt from getting between them where they can promote rust?
 
OP
Z

zmotorsports

ALLIANCE MEMBER
Joined
Oct 20, 2009
Messages
21,598
Location
Northern Utah
Any thoughts about something that is waterproof that might seal the tank to the skid to keep water, junk, and dirt from getting between them where they can promote rust?

Not really. It's not as tight a fit between the cradle and the fuel cell as you might think. The top is fully open and the vertical areas are ribbed so large gaps between the actual strapping. There's really no way to totally prevent anything from getting inside the cradle.
 
OP
Z

zmotorsports

ALLIANCE MEMBER
Joined
Oct 20, 2009
Messages
21,598
Location
Northern Utah
So while I'm waiting for my OEM fuel cradle to arrive, I thought I would build a couple of tools that I have wanted to build for many years now. I have had no issues rebuilding Johnny Joints using the method above, but I have wanted to build an actual tool to rebuild them. It's kind of a balancing act to hold a long suspension arm while using the press and something that will make it easier, plus I wanted to make a really nice one so when I'm gone, by son and grandson will remember me whenever they use it to rebuild their suspension links.

I also didn't want to wait for materials to arrive so I dug through my supplies on hand and found everything to build one for the 2.5" Johnny Joints as well as the 2" joints, which are really the only two sizes I use.

Found a chunk of round stock that had to come down to size.
jj1.jpg

Drilled to tap a 9/16"-12 thread and recessed the bore for the spherical center as well as a step to locate the joint on the tool. I made the step just a few thousandths shallow so it won't come in contact with the center washer, but be fully supported on the outside of the joint.
jj2.jpg

Moment of truth.
jj3.jpg

Like a glove.
jj4.jpg

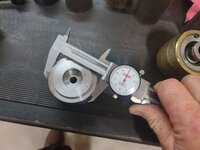
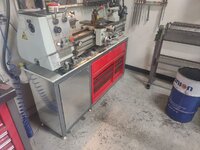
I pulled the base for the 2.5" tool out of the lathe chuck and took a final measurement. Right to the target size. I love running this lathe and it makes me smile whenever I do so. I'm really liking the addition of the DRO and finally getting used to looking at it rather then the dials. Should have added the DRO years ago. I haven't been doing a lot of machining lately, but it sure makes me miss it when I get to build something useful for the shop.
jj5.jpg

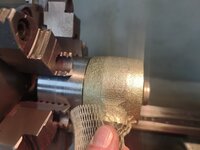
Now to make the cup part of the tool. I didn't have any thick-walled tubing, so I had to start with another chunk of solid stock. After bringing the OD to size, I drilled the center using a 1" bit, then went to the boring bar.
jj6.jpg

Sneaking up to size.
jj7.jpg

When I started getting close, I indexed the tool holder and thought I'd machine a very slight tape in the cup to aid in compressing the poly bushing ever so slightly so it passes into the body of the joint more easily. I played with angles and this was way too aggressive.
jj8.jpg

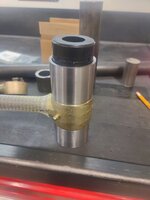
I settled on just under a degree of taper which netted me a nice transition for the bushing material. It also indexes onto the joint and will allow the bushing to transition from the cup right into the body of the joint.
jj9.jpg

The bushing starts in nicely, then the tool will draw the bushing and outer washer into the joint.
jj10.jpg


Stay tuned for a couple more pictures.
 
OP
Z

zmotorsports

ALLIANCE MEMBER
Joined
Oct 20, 2009
Messages
21,598
Location
Northern Utah
Continuing on.

With the 2.5" base and cup completed, I turned my attention to the 2" tool and repeated the process. I was able to get the lathe work completed on the 2" tool and I had some 1/2"-13 allthread. I also have some 2" OD thick-walled tubing that will shorten the time required to bring the 2" cup to size, but it was time to call it a night.
jj11.jpg

I hate leaving the shop and equipment messy when I close up for the night, but I still have a lot of chips to make on these tools.
jj12.jpg


I think the only thing I need to purchase is a small length of 9/16"-12 allthread, then I can complete the tools and give them a try on the remaining joints on the Jeep.

Thanks for looking.
 

Jgaz

Well-known member
Joined
Dec 16, 2016
Messages
1,748
Location
AZ
Mike,
I know what you mean about lathe work making you smile. I miss that about being retired.

The department I retired from used to strain gage ball joints to collect load data on vehicles that were instrumented for data collection.

The ball joints had to be pressed in and out of the control arms and many times we didn’t have the correct adaptors due to these vehicles being prototypes.

I loved to work an afternoon shift and machine the necessary pieces. Time flew by!
I’m no machinist. No where near your level of skill.
I always considered myself a safe and reasonably competent operator.
 
OP
Z

zmotorsports

ALLIANCE MEMBER
Joined
Oct 20, 2009
Messages
21,598
Location
Northern Utah
Mike,
I know what you mean about lathe work making you smile. I miss that about being retired.

The department I retired from used to strain gage ball joints to collect load data on vehicles that were instrumented for data collection.

The ball joints had to be pressed in and out of the control arms and many times we didn’t have the correct adaptors due to these vehicles being prototypes.

I loved to work an afternoon shift and machine the necessary pieces. Time flew by!
I’m no machinist. No where near your level of skill.
I always considered myself a safe and reasonably competent operator.

I am no machinist either, just play one on the internet. :ROFLMAO:

I concur that time flies by. When I arrived home yesterday I had a couple things in the yard to do, then scrounged up the material and began making chips. I'm completely winging it and didn't take the time to draw out any design plans or anything as I'm really just winging it. By the time I started the second one I had a good idea of what I wanted and before I knew it the wife was walking into the shop, home from work. I was hoping I would at least get the base and cup for each one done before she arrived home from work, but time got away from me and I didn't get done what I had hoped to.


Nice work on the new tools Mike! :thumbup:

:beer:

Thanks Dan.
 

signcrafter

Well-known member
Joined
May 9, 2012
Messages
12,605
I wanted to make a really nice one so when I'm gone, by son and grandson will remember me whenever they use it to rebuild their suspension links.
I love that Mike. It would be really neat if you had something like "ZMotorsports" and a part number engraved into it. Or even a case with foam inserts for all the parts and then a set of instructions. I can picture your son or grandson opening up the case many years down the road to do the repair and getting a big smile knowing the maker of the tool and how well it works.
 
To avoid these ads, REGISTER NOW!
Top Bottom