To avoid these ads, REGISTER NOW!

Between 265 & 485 SQ/FT Nick's Two-Car Detached Vdub Garage

Workspaces sized between 265 and 485 squarefeet.
To avoid these ads, REGISTER NOW!

bj383ss

Well-known member
Joined
Sep 29, 2011
Messages
3,166
Location
TX
Lol you guys are a bunch of comedians!

Then again... could be the right move. I'll give it a good solid think. :ROFLMAO:

(image from Gran Turismo)

6441izuw38191.jpg


Yeah that's what I would expect in my area, too. I don't have "a paint guy". I think I'll try to touch it up myself... any suggestions other than what I outlined? I'm not too worried about the looks since it's in an inconspicuous location, more just want to be 100% sure the rust is stopped.

Nick this is what I have used on the rust on the 64' for the last 10 years. Spray a couple of light coats and it converts the rust to black and you can prime and paint it. You can get it at Lowes.20230511_135853.jpg
 

isonic

Well-known member
Joined
Aug 1, 2018
Messages
213
Location
Ham Lake, MN
I brought my truck in to a few shops around the area looking to get some door pins replaced and they wouldn't touch it. They have too much work. Even my Jetta I just brought in for actual insurance work...I can't get in until July to get the work done.
 
OP
N

nicholam77

Well-known member
Joined
Dec 18, 2016
Messages
2,673
Location
Minneapolis, MN
I brought my truck in to a few shops around the area looking to get some door pins replaced and they wouldn't touch it. They have too much work. Even my Jetta I just brought in for actual insurance work...I can't get in until July to get the work done.

Thanks for the local POV 😁

I figured as much. I think I'll just watch some YouTubes and DIY fix, probably use what Bret suggested and the official VW touch up paint kit. I think I might even have one.
 
OP
N

nicholam77

Well-known member
Joined
Dec 18, 2016
Messages
2,673
Location
Minneapolis, MN
Another small punch list item completed. Fixing my leaky hose spigot. Again.

I replaced all the washers and gaskets a year ago, and it worked great for a few months and then started leaking again. Both from the faucet and from behind the handle. I let it sit over winter, and just decided to start fresh with a new repair kit.

IMG-1232.jpg
IMG-1231.jpg

It seems to have worked for now.

With the hose operational, I did something I haven't done in forever — hand washed the GTI.

IMG-1282.jpg

She has some dings and scratches, but still cleans up pretty nice.

One thing I hate about these wheels is cleaning them. They show the brake dust a lot and every time I clean them my hands cramp up. :ROFLMAO:

IMG-1287.jpg

I'm taking my kids and dad to a local "caffeine + octane" show tomorrow morning, so I thought I would get it cleaned up.

The car needs a claybar treatment and seal really badly, but I'm out of consumables so that will have to happen on the next wash.

Also want to get the exhaust tips polished up, I've never done them. I've heard some people use WD40 and aluminum foil, may have to give that a try.
 

Bob Heine

ALLIANCE MEMBER
Joined
Oct 24, 2009
Messages
10,707
Location
Boca Raton, Florida
Also want to get the exhaust tips polished up, I've never done them. I've heard some people use WD40 and aluminum foil, may have to give that a try.
Nick, with so little room between the tips and the body, I use two strips of cloth. One strip with some Simichrome or other polish pressed into it and the other with nothing on it. Wrap the strip around the tip and pull on each end. Kinda like the final step in old fashioned shoe shining or using a cable saw.
Shoe shine.jpg
It's even possible to hold both ends and do it one-handed.
 
Last edited:

bj383ss

Well-known member
Joined
Sep 29, 2011
Messages
3,166
Location
TX

kaymccampbell

Well-known member
Joined
Feb 27, 2015
Messages
29,587
Location
Upstate New York
Another small punch list item completed. Fixing my leaky hose spigot. Again.

I replaced all the washers and gaskets a year ago, and it worked great for a few months and then started leaking again. Both from the faucet and from behind the handle. I let it sit over winter, and just decided to start fresh with a new repair kit.

IMG-1232.jpg
IMG-1231.jpg

It seems to have worked for now.

With the hose operational, I did something I haven't done in forever — hand washed the GTI.

IMG-1282.jpg

She has some dings and scratches, but still cleans up pretty nice.

One thing I hate about these wheels is cleaning them. They show the brake dust a lot and every time I clean them my hands cramp up. :ROFLMAO:

IMG-1287.jpg

I'm taking my kids and dad to a local "caffeine + octane" show tomorrow morning, so I thought I would get it cleaned up.

The car needs a claybar treatment and seal really badly, but I'm out of consumables so that will have to happen on the next wash.

Also want to get the exhaust tips polished up, I've never done them. I've heard some people use WD40 and aluminum foil, may have to give that a try.
Put one of these in your cordless drill. It should help save you from hand cramps.
 
OP
N

nicholam77

Well-known member
Joined
Dec 18, 2016
Messages
2,673
Location
Minneapolis, MN
+1. I use this stuff on all my non coated aluminum valve covers and wheels. Works really well. When you get it out of the can you are going to think no way this stuff works. :ROFLMAO:

Thanks, I'll give it a go!

Nick, with so little room between the tips and the body, I use two strips of cloth. One strip with some Simichrome or other polish pressed into it and the other with nothing on it. Wrap the strip around the tip and pull on each end. Kinda like the final step in old fashioned shoe shining or using a cable saw.

Good idea, Bob.

Put one of these in your cordless drill. It should help save you from hand cramps.
https://www.amazon.com/dp/B07G7XG6BV/?tag=atomicindus08-20

Thanks, I'll check that out!
 
OP
N

nicholam77

Well-known member
Joined
Dec 18, 2016
Messages
2,673
Location
Minneapolis, MN
More GTI updates

sport-damper-order.png

Got the shocks ordered! Now need to source the mounts / bushings / bolts from FCPEuro.

I made another impulse purchase for the GTI the other night. Well, I have been aware of this upgrade and wanting to do it for a long time, but decided to pull the trigger.

Basically the Mk7 GTI's in the U.S. got a 6.5" infotainment display starting in 2016, which is my car's model year. While Canada, and the rest of the world (Europe) got an 8" display on certain trims. The head unit in the glove box is identical, so all that needs to be swapped is the screen itself, and the surrounding trim which includes the AC vents.

When people first started doing it the cost didn't make sense. Like... $800. The larger screen is the same resolution, just bigger, and you get no new features.

Complicating that, most ROW cars with the larger screen had factory Navigation, which mine does not. And finding an 8" Non-Nav screen (has slightly different buttons) was even harder and more expensive.

Fast forward to 7 years later and it's much easier to find cheap-ish used ones on eBay. VW being a big conglomerate and modular manufacturer, they used the same screen in many current gen cars, not just the Golf. So armed with the right part number and some patience, there are options out there.

Anyways, found a price I liked, was 20% off from eBay, and after putting it in my cart for a bit the seller kicked me another 7%. It worked. :ROFLMAO:

Not my picture, but you can see how much larger it is, area-wise:

screens2.jpg

Now I need to source the matching carbon fiber pattern trim surround piece:

screens1.jpg

All in with tax and shipping, it was about $150 for the screen, and will be $150 for the trim + vents. Not exactly cheap, but should be a nice visual upgrade and modernize the interior a bit. I'm fortunate enough to have Apple CarPlay (even if it's sluggish to connect!), it was one of the first model year cars in the U.S. to offer that.

🍻
 

jake28

Well-known member
Joined
Aug 28, 2018
Messages
488
Location
SF, CA
OP
N

nicholam77

Well-known member
Joined
Dec 18, 2016
Messages
2,673
Location
Minneapolis, MN
@nicholam77 you’ve put more research into shocks than I did into graduate school. Kudos. I’ve got little to offer except that KWs get rave reviews in Porsche land. But Porsche land is off the deep end when it comes to relative price points.

I tend to do that. 😁 The ST's I was considering are made by KW. I would have been sold on KW, except they are more than I wanted to spend. It just doesn't make sense to spend close to $2k all said and done to drop it just a *little* bit more. It's too late, anyways, I already ordered the VWR sport dampers. Should be here tomorrow.

I did go to a car show this weekend and saw a GTI with (in my opinion) that perfect amount of low. Made me second guess for a second, but I think I did the right thing since mine isn't a show car, a track car, or a garage queen.

FWIW, I think you should go opposite route and lift that sucker. https://www.b2bfab.com/products/b2bfab-mk7-gti-golf-r-camber-correcting-lift-kit
Now that is madness! :ROFLMAO:
 
OP
N

nicholam77

Well-known member
Joined
Dec 18, 2016
Messages
2,673
Location
Minneapolis, MN
Philips Hue Bias Light

Another small smart home project.

As I've probably mentioned before, I work from home often, and my job is computer-based (video editing). For the longest time I've meant to set up a bias light (light that goes behind the computer screen). This eases eye strain, especially in a dark room (although I like to keep it bright).

I was organizing some old smart home stuff recently and found an extra Philips Hue bulb that wasn't being used. I thought I could use that as a bias light, and ordered a small table top fixture for it on Amazon.

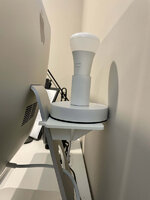
I placed it behind my work iMac, but it wasn't lighting as evenly / centered as I wanted, so I browsed Thingiverse for a iMac rear shelf. Of course someone had made one.

imac-shelf-stl.png

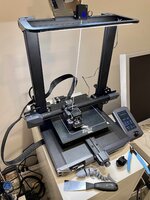
During the basement water leak fiasco I moved my 3d printer, and I haven't leveled it for a bit. 1st layer was going down thin so I had to manual adjust the Z offset. I wish you could do this with Octoprint, because I seem to need to adjust it often enough I just print from the SD card.

IMG-1108.jpg
IMG-1110.jpg

It's really just that first layer on larger models. The parts always come out pretty nice.

IMG-1112.jpg

So this shelf thingy hooks on the back of the iMac stand like this:

IMG-1172.jpg

And you can see below a comparison of no bias light (top) and with bias light (bottom):

IMG-1174.jpg
IMG-1173.jpg

I do think it helps. Not perfect, but it was cheap and easy.

I often get up from my workstation during the day, so I don't want to have to pull out the Hue app on my phone to turn it off and on all the time as I come and go. I experimented with an NFC tag (affixed to the lower right corner of the iMac), but I don't love the way my iPhone triggers the NFCs. You have to wake the screen as you do it and it just feels a little clunky.

So my solution was to write a simple "toggle" action in WebCoRE:

webcore-bias-light.png

WebCoRE pistons (automations) have an external URL end point that will execute the automation when loaded. With no triggers in the script, this will simply do whatever is in the automation — in this case toggle the Philips Hue bulb state.

Since I'm activating it from my computer anyways, it's easy to load the piston URL from a simple bookmark:

Bias-Light.png

The one downside is it will either reload the page I'm on, or I have to open it in a new tab and then close that tab. But other than that it's pretty slick.

I know you can save Javascript to a bookmark, and Javascript can call a GET URL command that I presume would run in the background. This would make it really seamless, as then the bookmark would act like a true "button" for the light, but unfortunately I don't know Javascript.

If anyone on here knows how, let me know!
 
OP
N

nicholam77

Well-known member
Joined
Dec 18, 2016
Messages
2,673
Location
Minneapolis, MN
...and because I can't leave well enough alone, I just ordered a used Lenovo ThinkCentre thin client on eBay to get back into the Home Assistant game 😁

Was going to try and snag a Raspberry Pi 4, but lost patience, and this should be plenty powerful for my application.

It has a 4th Gen Intel Core i5 (4570T 2.9 GHz) processor, 8 GB DDR3, and a 128 Gb SSD, all for a whopping $56.

Overall I'm happy with Hubitat, so the purpose of this new Home Assistant installation is more auxiliary. To be able to take advantage of a few integrations Hubitat doesn't have, and then bridge those devices into Hubitat, and vice versa. Hubitat will still handle the automation, and of course all Zwave and Zigbee devices.

I also want to be able to use Home Assistant's dashboards as a front end controller, NFC and RFID tag scanning ability, and excellent iOS and MacOS companion apps that expose various sensors of the iPhone or Mac they are installed on.
 
OP
N

nicholam77

Well-known member
Joined
Dec 18, 2016
Messages
2,673
Location
Minneapolis, MN
OK, I think what I read was English? You have way more home automation than I would ever be comfortable with. But you like it and it's your home, which is a very nice home BTW.

:beer:

Ha! Thank you. Yeah, I know I'm probably losing some people with the smart home talk, but I know a few are interested.

To each their own of course, but I've worked hard to make sure it's something... I'm comfortable with. Which could mean:

1/ the setup and maintenance / time / tinkering required
2/ being okay with things not working the way they are intended on occasion
3/ annoying others in the household
4/ privacy and security

90% of my automations are related to lighting. The key is to make automations that aren't annoying and are actually useful.

When it comes to privacy and security, both Hubitat and Home Assistant are local-only systems by default, meaning they don't connect to the internet. Currently all my devices are Zwave or Zigbee (those are wireless protocols, like WiFi, but for smart home devices), which means they do not need the internet, or even a home network, to work. If my internet connection goes down, if my router breaks, my stuff still works. And because of that it's quite secure.

I do have a few LAN devices like my Logitech Harmony, but it's locally controlled and is as secure as anything else behind my home router.

I got rid of any voice assistants when I moved to Hubitat. No Alexa, no Google Assistant, no always-on microphones.

I intentionally don't connect or automate anything that's a point of entry to the house (door locks, garage door, etc).

My only camera is a Nest Video Doorbell, which does connect to the internet and process video through the cloud. I don't love this, but it's sequestered from the rest of my stuff, and a compromise I've made for features and ease of use.

At the end of the day, though, it's not for everyone, and it is partially a hobby, aka fun to tinker around with.

Thanks for reading along!

🍻
 
OP
N

nicholam77

Well-known member
Joined
Dec 18, 2016
Messages
2,673
Location
Minneapolis, MN
Painting The Garden Shed

First off, let me just say things have been busy. Playing catch up with posts here.

Painting our shed was on my punch list for last summer, and due to a then-9-month-old, it didn't happen.

This year, I was feeling motivated to get it done at the beginning of the season before the garden exploded.

As a refresher, we have a free standing garden shed kit that was here when we bought the house. It's right up next to the garage. And I mean right up next to it.

It was also a beige-brown-tan-green combo.

IMG-0220.jpg

Pardon the snow pic, that's the most recent I found. But somewhat topical, because the two flower boxes fell off from all the snow this winter. They were rotting, anyways.

Time to take action. In a shocking turn of events, after contemplating the rainbow of colors we could do, the wife and I decided to paint it white, to match the garage.

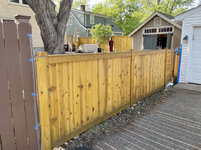
But first, let's touch up the back fence oil:

IMG-1324.jpg
IMG-1325.jpg

Ah, much better.

Back to the shed. First thing I took off the remaining bits of the flower boxes, and removed the shutters. They were screwed from the inside and I had to remove some pegboard and garden tool wall.

IMG-1345.jpg
IMG-1348.jpg
IMG-1349.jpg

Shuffling things around I made a total clusterfudge, but hey, at least all this :poop: isn't in the garage! Shed for the win.

IMG_1346.jpg

Then pressure wash.

IMG-1350.jpg

Then primer.

IMG-1359.jpg

Turns out with all the detail brushing work this is going a lot slower than I thought...

On top of that, some of the trim boards were rotting, and needed to be replaced. So I got some kiln dried cedar from Home Depot and primed with oil-based primer. The GTI loads 8' boards just barely. :cool:

IMG_1358.jpg
IMG_1323.jpg
IMG_1355.jpg
IMG_1362.jpg
IMG_1363.jpg

After a full day of work I had only managed the one coat of primer. So for the next day I called in my Dad to help. I also elected not to paint the wall in between the shed and garage — too tight.

70630522500.jpg

Another day of painting, brushing all the details and rolling on the rest.

IMG_1365.jpg

And it's finally done.

IMG_1369.jpg
IMG_1368.jpg

I think it looks pretty good, but the white isn't a perfect match to the garage. In retrospect I should have brought a piece of siding to the paint store and had a custom color made. The shed is brighter. It looks passable in most lighting, but especially in direct sunlight it's more noticeable, and that's the sort of detail that will likely eat away at me for the rest of its tenure. I know it won't stay this clean and pristine, so I'm hoping it will blend a little more eventually once the elements hit it. The pics don't really accurately show this.

I do plan to rebuild the flower boxes out of PVC, and replace the barn hinges with some standard heavy duty door hinges that will be black, and hopefully help the white-on-white-on-white look (I painted over the existing ones for now).

More to come... the garage exterior itself needs a ton of work, and I have a lot of other projects in the works. It's going to be a busy summer!

🍻
 
To avoid these ads, REGISTER NOW!

Denwood

Well-known member
Joined
Sep 22, 2014
Messages
4,192
Location
Thunder Bay, Ontario, Canada
The GTI is looking pretty awesome. You need to get it out to an autocross track once you dial in the suspension. If you haven't done it before, beware as it can be very addictive. I got sucked in for decade...

Your bias light "hack" is very cool. That's likely a marketable product if not already...
 
OP
N

nicholam77

Well-known member
Joined
Dec 18, 2016
Messages
2,673
Location
Minneapolis, MN
Nick, what kind of river flows between the shed and the garage from the rain that is running off the shed roof? Any concerns about wood rotting around there?

:ROFLMAO: Great question, Dan. Years ago I installed a rain diverter under the shed shingles:

IMG-1398.jpg

It was supposed to be sloped towards the rear and go down to a splash pad to direct it away from the shed, and out a trough I had dug and sloped behind the garage to the alley.

Turns out I didn't slope the diverter enough, because the whole shed is not level (tilted towards front), so water drips off in front instead, by the garage door. 🤦‍♂️

I've been meaning to either reinstall, or add a blob of silicone at the front end to try and redirect it. No great excuses, just haven't gotten to it.

Secondly, since that drainage project, I've dumped excess garden soil and other dirt back behind the shed because I have nowhere else to put it, and it's kind of messed up the grade. And the trough behind the garage I think has eroded and not sure it's sloped correctly anymore, and is also overgrown.

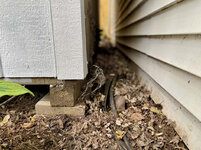
As you can see, it's Whirly Bird 🌪️🐥 season, so my gutter and rain diverter need to be cleaned out, too:
IMG-1400.jpg

As far as it dumping water in between the buildings, I'm not worried about the shed because it's raised on concrete pavers:

IMG-1397.jpg

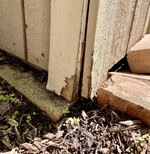
The garage, though... yes that's a problem. And my garage does not have a concrete block footing — the stud walls are mounted directly on the slab. I'm 99% sure the sill plate boards are rotting. I don't know how to fix this, except revisit the drainage and try to get it working again.

The larger problem is my whole back yard slopes down towards both structures. And the human door to the garage is perpendicular to the slope, so rain water pools at that threshold, as well as at my driveway gate because the garage apron is not sloped there.

It's pretty much a big mess and a bigger project to correct than I've been willing to submit to. If a new garage is in the cards some day, it will get rectified.

The GTI is looking pretty awesome. You need to get it out to an autocross track once you dial in the suspension. If you haven't done it before, beware as it can be very addictive. I got sucked in for decade...

Thanks Dennis! It's a subtle build for sure, in that there aren't that many obvious external modifications other than the mild drop and wheels. But I have done many OEM+ or European OEM mods that are creature comforts. The larger infotainment screen will fit right in with that theme. The suspension will be essentially the same, just refreshed.

Autocross sounds like a blast. I'm not sure I want to do it with this car, although many do. Maybe once or twice :)

Your bias light "hack" is very cool. That's likely a marketable product if not already...

Thanks! Bias lights certainly exist... the shelf I suppose I could redesign myself in Fusion360 and maybe tailor it more for a Hue light or specific lamp base product. Many times I've thought about an Etsy store or some sort of side hustle, but I can never land on a product or group of products that I can make quickly, cheaply, reliably, and have a market.

I've been glancing at your thread but really need to get caught up soon!
 

bj383ss

Well-known member
Joined
Sep 29, 2011
Messages
3,166
Location
TX
Looking good Nick. I had the same problem on my shed trying to color match to the house. Same result the Shed is a little brighter. It doesn't really bug me anymore. But I will be painting my house soon and will get enough paint so that I can repaint the shed finally.

Bret
 
OP
N

nicholam77

Well-known member
Joined
Dec 18, 2016
Messages
2,673
Location
Minneapolis, MN
Looking good Nick. I had the same problem on my shed trying to color match to the house. Same result the Shed is a little brighter. It doesn't really bug me anymore. But I will be painting my house soon and will get enough paint so that I can repaint the shed finally.

Bret

Thanks, Bret. I almost wanted to go back and get a custom color made, but I was sick of painting and didn't want to do another coat. I figure, like with most things, time will make me care about it less. White is a tough color, it's so easy to see if it's off.

That will be nice to get a fresh coat on everything for you. I'm stuck with the yellow vinyl on the house for now. I figured matching the shed to the garage at least they're unified now and I only have two color structures, not three like before.

Thanks for the very detailed reply Nick. Sorry if I tore a band-aid of an old wound. I don't suppose picking up and moving the shed away from the garage with a rented forklift would be possible?? Maybe I should just shut up now. :rolleyes2

:beer:

It's no problem, you're spot on with your comments, but honestly I'm not sweating it. It bugs me, but the garage is not in the best shape, anyways. My garage journey has been a lipstick-on-a-pig type situation. If we tear it down and rebuild some day, the whole thing will be re-thought and grading will be addressed.

I'm sure I could rent a forklift and move it, but not without destroying our fence, my lawn, and the gardens my wife has worked hard on over the years. It's just not worth the cost and commitment.


Continuing on sprucing things up, I replaced the exterior garage sconces the other night.

Old fixtures for reference:

IMG-1385.jpg

These worked great, and have a photocell sensor for dusk-to-dawn lighting. This "upgrade" is purely cosmetic, and because I got a killer discount on the new fixtures at the big box store. Discontinuation maybe. Anyways they've been sitting in the closet for a year.

IMG-1387.jpg
IMG-1388.jpg

A bit more contemporary. They are down lights, so there is much less light. I don't love this, but it's a compromise I'm willing to make for now. May have to get some brighter bulbs.

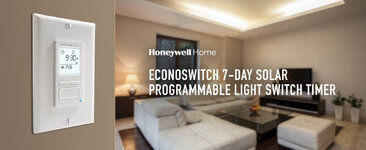
The new fixtures don't have the photocell sensor, so I need to automate the dusk-to-dawn lightning. There are many ways to do this, both "dumb" and "smart/connected" solutions, but for this scenario I prefer to use these Honeywell programmable solar switches:

honeywell.jpg

They come pre-loaded with solar timetables, and you enter your GPS coordinates. It can do offsets (30min before sunset), as well as normal time- and day-based scheduling, up to 7 programs. I only need the solar feature, but it's a versatile switch for having no connected radios.

The trouble is they are quite pricey ($40). Fortunately I found a clone on Amazon for half that. I think it might in fact be the exact same product without Honeywell branding.

🍻
 

Bakafish

Well-known member
Joined
Feb 7, 2017
Messages
477
Location
Tokyo
Thanks, Bret. I almost wanted to go back and get a custom color made, but I was sick of painting and didn't want to do another coat. I figure, like with most things, time will make me care about it less. White is a tough color, it's so easy to see if it's off.
If you are like me (and I suspect you are otherwise I wouldn't post this hot take) I think this is going to annoy you everytime you look at it. Time isn't going to fix it, you will forget the effort it took to paint it and just see the results of the work being unsatisfactory. I think you're going to end up repainting it anyway, so you may as well deal with it now when the current paint is new and clean and all the tricky spots are fresh in your memory. I know how it feels to close the book on a project and get it off the list, but closing it without reading the last few pages is about as unsatisfying as it gets.

Sorry to sound like an unsupportive a-hole, you did great work here, I'm just trying to say what I think you already know. I only wish I could lend you a hand.
 
OP
N

nicholam77

Well-known member
Joined
Dec 18, 2016
Messages
2,673
Location
Minneapolis, MN
If you are like me (and I suspect you are otherwise I wouldn't post this hot take) I think this is going to annoy you everytime you look at it. Time isn't going to fix it, you will forget the effort it took to paint it and just see the results of the work being unsatisfactory.

Oof. Well said, and you're probably right.

While I can tell the paint is brighter, it actually looks pretty good at times. The time of day and lighting factor in of course. Because of our big tree sometimes part of the shed is in full bright sun, but the garage is in shade, and then it's much more noticeable, but part of that is just the lighting and white being so reflective.

But in comparable light, brightness might not even be the right word. I think I'm more noticing the shed is slightly cooler and the garage is slightly warmer. I tried to take a pic of that below, but it's subtle. It's almost forgivable.

IMG-1439.jpg

I'm not sure where I was going with that :ROFLMAO:, but I'll consider what you said and see if I can motivate myself for one more coat...
 
OP
N

nicholam77

Well-known member
Joined
Dec 18, 2016
Messages
2,673
Location
Minneapolis, MN
Home Assistant: Take Two

Buckle up, nerdz!! It's about to get tech-y.

I know this might be boring for most, but tagging a few folks who might find it interesting @Denwood @B3D3G1 @slodat @loganb @kaymccampbell (since I know you're a linux user!)

I got my 2nd home automation hub up and running: Home Assistant. I've mentioned Home Assistant before, but for clarity it's an open source home automation software that can run on many devices. On Mac, Windows, Linux, in a virtual machine, in a container like Docker, on various hobbyist boards like the Raspberry Pi, Odroid, and basically any x86-based computer. Super flexible. And it's free!

The appeal of Home Assistant is it

1/ is extremely powerful
2/ can connect to a ton of devices
3/ is open source, free, community developed
4/ has extremely customizable dashboards
5/ has native apps for iOS and MacOS
6/ can bridge many disparate home automation platforms together

If you've been reading along here, you know I'm somewhat deep into home automation, and Hubitat is the platform I settled on. The only problem I've found with Hubitat is it doesn't integrate very well with LAN (local area network) products, i.e. WiFi devices, which are quite common these days. It's possible, but you can tell it's primarily built around Zwave and Zigbee devices.

Home Assistant on the other hand, excels at LAN/IP based devices, and connect to almost anything. And it's lightning fast. Faster than any other platform I've tried.

And what do you know, there is a Hubitat integration for Home Assistant, and vice versa, so devices can be imported from one system into the other. So my plan is to essentially have the best of both worlds.

A few weeks ago I ordered a cheap $50 Lenovo ThinkCentre x86 machine from eBay to run Home Assistant on.

IMG-1401.jpg

Raspberry Pi is one of the easiest Home Assistant installs, but this was half the price, readily available, and specs are way beefier.

Of course it came pre-installed with Windows. And while it is possible to run Home Assistant on Windows in a virtual machine, I'll be installing Home Assistant as its own full-fledged OS. Which is a bit complicated.

To do that I had to make a few changes to the BIOS settings.

IMG-1403.jpg

Install Ubuntu (linux) on a spare flash drive and live boot from it.

IMG-1404.jpg

This is Ubuntu running off the flash drive. It doesn't seem to have changed that much since I last took a look at it 10 yrs ago.

Next was install a free app called "Balena Etcher" onto Ubuntu, which will allow me to overwrite the internal hard drive with the Home Assistant OS.

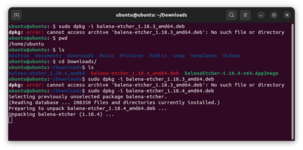
Installing Balena Etcher to Ubuntu required some Googling. And some shell commands.

terminal.png

I had to fix some dependencies which fortunately there were some commands available on the GitHub page for Balena Etcher to do that. Because I barely know what I'm doing. I used to run a hobby linux home server about 10 years ago, so I know some basics, but as with all things that require muscle memory I've forgotten 90% of it.

Miraculously, though, I figured it out and was able to write over the internal hard drive with Home Assistant.

balena-etcher.png

Booted up, Home Assistant just displays a shell prompt. The actual UI is accessed as a local web page. So it will be ran "headless" and I can take this big extra monitor off my messy desk.

IMG-1409.jpg
IMG-1408.jpg

In one afternoon I was able to connect my Philips Hue hub, Logitech Harmony Hub, Roku devices, Sonos devices, TP-link Kasa devices, my Synology NAS, my Denon AV Receiver, my Octoprint server, my Brother laser printer, and of course all my Hubitat Z-wave and Zigbee devices.

Once I get it set up fully, I'll quickly highlight a few neat automations I have planned.

Hope everyone in the U.S. has a great Memorial Day Weekend!

🍻
 

Denwood

Well-known member
Joined
Sep 22, 2014
Messages
4,192
Location
Thunder Bay, Ontario, Canada
Nick, great post. I've done about zero with Linux in a very long time, but I need to sort some immutable drive stuff with Linux for NAS backups. I'll be following along on HA as I have zero exposure there too. Nice find on that Lenovo box. I've purchased quite a few of the compact Dell PCs (used) from Amazon for client use and they are great value.
 

kaymccampbell

Well-known member
Joined
Feb 27, 2015
Messages
29,587
Location
Upstate New York
Oof. Well said, and you're probably right.

While I can tell the paint is brighter, it actually looks pretty good at times. The time of day and lighting factor in of course. Because of our big tree sometimes part of the shed is in full bright sun, but the garage is in shade, and then it's much more noticeable, but part of that is just the lighting and white being so reflective.

But in comparable light, brightness might not even be the right word. I think I'm more noticing the shed is slightly cooler and the garage is slightly warmer. I tried to take a pic of that below, but it's subtle. It's almost forgivable.

IMG-1439.jpg

I'm not sure where I was going with that :ROFLMAO:, but I'll consider what you said and see if I can motivate myself for one more coat...
It's fine. And time will fix it. It'll get dirty and the two will look more alike as time goes on. Spending your life obsessing over the shade of white on two separate buildings is like obsessing over the shade of green of two different trees. Move on to the next project.
 
OP
N

nicholam77

Well-known member
Joined
Dec 18, 2016
Messages
2,673
Location
Minneapolis, MN
Nick, great post. I've done about zero with Linux in a very long time, but I need to sort some immutable drive stuff with Linux for NAS backups. I'll be following along on HA as I have zero exposure there too. Nice find on that Lenovo box. I've purchased quite a few of the compact Dell PCs (used) from Amazon for client use and they are great value.


Thanks, Dennis. I feel like you would like Home Assistant, but I know you’re very deep into the smart home as well and already have complex automations configured with Hubitat.

If you have some spare hardware, it might be fun to give it a try, though. Maybe you’ll find an integration you like that Hubitat doesn’t have and be able to bridge the two.

Home Assistant has its own built in rule engine. I’ve done simple things with it, but I don’t find it as intuitive for complex stuff as WebCoRE or even day I say Rule Machine. But a lot can be done with it. For really advanced stuff, there’s a Node Red extension, but I’m not familiar with that at all.

My plan is to keep the logic on Hubitat, and just use Home Assistant to bridge in extra devices that Hubitat doesn’t support. As well as use their excellent dashboards and iOS app.

I know the Dell Optiplex is a popular micro PC for Home Assistant. My co-worker picked up a quad-core 6th gen i7 with plenty of RAM and large SSD for a bit over $100, but he was running multiple services in containers on the same machine.. They are really a great deal. The Lenovo is similar to the Dell’s in that there’s a wide range of used hardware out there. I might pick up more for future projects!
 
OP
N

nicholam77

Well-known member
Joined
Dec 18, 2016
Messages
2,673
Location
Minneapolis, MN
Hope everyone had a productive and/or relaxing Memorial Day Weekend. Mine was relaxing, we went to the in-laws cabin in Wisconsin and got some lake time.

IMG-1468.jpg
IMG-8512.jpg
IMG-8465.jpg

Back home this week I've mostly been taking care of house projects, especially the lawn.

But I have a few small Home Automation bits to post.

I would say 80-90% of my smart home devices pertain to lighting — either smart bulbs, smart switches, or motion sensors. They are all based on one of two wireless protocols designed for the smart home: Zigbee, or Z-Wave.

If you're interested you can read about them with a Google, but essentially they are local, private, and separate from your LAN (read: WiFi traffic). I view these all as good things. One downside, though, is the devices themselves tend to be on the expensive side. There's a range, but a quality Z-Wave switch can set you back between $30-$50 depending on features and brand.

I've been meaning to add more switches, and because of cost I decided to branch out and try a WiFi switch. Specifically the ones by TP-Link Kasa. I have other TP-Link products (routers and *network* switches) that I've been happy with, and the price is good. More like $15 a light switch. And they have some really neat features.

The one I got is their "motion dimmer" ES20M model. It has a motion sensor built into the switch, so you don't need a separate motion sensor to turn on the lights automatically. This one is a bit more expensive ($29), but when you factor in the motion sensor it's a pretty good price.

The really interesting thing, though, is you can program a schedule of how you want to turn the light on and off, and to what brightness, at different times of the day. Here's a picture showing how this "smart scheduling" feature can be set up in their app.


kasa.jpg

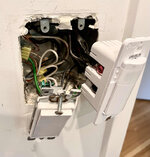
Installing was a bit of a pain as usual. Smart switches are generally quite large, need a neutral and ground, and take up too much room in the box.

IMG-1382.jpg
IMG-1383.jpg

Came out fine, though.

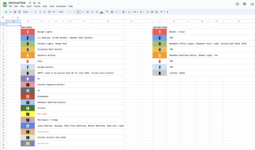
Is anyone else's electrical panel labels a nightmare? Both of my panels are so hard to read, I've been slowly trying to verify what's what and put it in a Google Sheets document.

IMG-1380.jpg
electircal-panel.png

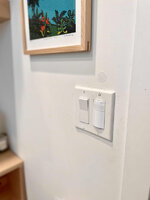
I installed the new TP-Link switch in our main floor bathroom. I think it's the perfect place to take advantage of the smart scheduling. I have it set up to come on with motion during the day, and off after 2min of no motion. A longer delay in the evening when we take showers. And then manual operation only at night, but lights come on at 50%.

After using it for a few weeks, I have no complaints. It works reliably, and was easy to set up.

And of course it integrates with Hubitat and Home Assistant, so I can add extra automations on top of the built-in ones if needed.

The built-in smart scheduling does rely on their cloud to configure, but not to operate. I do find this to be a downside, I would prefer it's completely local, but it's hard to complain about the feature set.

I think for anyone who doesn't want to mess with a hub, or complex rules engines, this is an excellent feature-rich switch with a solid mobile app.

This post got longer than intended, so I think I'll move the other bits to the next one!

🍻
 
OP
N

nicholam77

Well-known member
Joined
Dec 18, 2016
Messages
2,673
Location
Minneapolis, MN
More Automations

Diving back in! Here are a few cool things I've done with Home Assistant so far.

iMac Bias Light

Remember the Philips Hue / 3d printed "bias light" for my work computer a few posts back? That I was controlling with a Chrome bookmark (URL request)?

Well, not anymore! Home Assistant has a native MacOS app, that pulls in the computer as a "Device" and many "Entities". These entities are essentially sensors or parameters about the computer that can be used as triggers or conditions in automations. The list is quite extensive:

- whether or not the computer is active (clicking, scrolling, typing, etc)
- whether or the audio inputs or outputs are active (playing music?), can detect which is selected and if it's "in use" or not
- whether or not the built-in web cam is active
- current WiFi SSID
- connection type (wireless or wired)
- which display is primary / active, and it's name
- frontmost App name (i.e. Chrome)
- last software update
- storage (free space on boot drive)

This is pretty incredible. So I've used the "computer active" entity to automate the bias light. As soon as I move the mouse, wake the computer, login, press a key, etc, it's considered "active". So literally when I begin using my computer, the light comes on automatically, and immediately.

And then I use the opposite to turn it off (becoming "inactive"). I don't know the time, but it's after a certain amount of inactivity. The default has worked fine for me. If I walk out of the room for 15min, the bias light turns itself off. Completely automatic, no intervention on my part. Freakin' cool. This type of automation honestly feels magical.


Denon AV Receiver Power Check

Ever since I got a new Sony Android TV in the basement, my AV Receiver has done a weird thing where it turns off with the TV via HDMI-CEC, but then turns itself back on about 2min later.

This is annoying because if I forget to turn it off a second time, it powers itself back on and stays on all night.

Well, you guessed it, Home Assistant has an IP integration for Denon Receivers. Can send any command. On, off, volume, input source, even Denon-specific settings like Audyssey.

So my automation is: after it turns off... do a check 10min later and if it's turned itself back on, turn it off again. One of those invisible little helpers to maintain my sanity.


PlayStation 4 Scene

I've had a PS4 since it came out in 2013. Hadn't played it for a super long time due to kids and projects and whatnot. But my brother is into video games, and he moved to North Carolina just before Covid, and we've been meaning to use PS4 as a way to chat and catch up together online occasionally.

He finally bought a used one and we got up and running.

And... I'm sure you can guess where I'm going with this... Home Assistant has a PS4 integration! It can launch apps, detect the console power state, play media, and emulate any button on the controller.

So I'm using it as part of a start up sequence to:

- wake the PS4 from Rest Mode
- dim the basement Hue lights
- launch Logitech Harmony scene to turn on the TV and set the correct HDMI input
- turn on the Receiver
- set the Receiver to the correct input

I couldn't get this to work with Logitech Harmony alone due to some funkiness with Android TV, so Home Assistant was crucial to get the sequence right.

The best part is this automation is it's triggered by - the PS button on the PlayStation controller. Which is what you press to wake it up. So no touching an additional remote, it just happens when you do the thing you want to do, which is play PS4. Seamless.


And because a wall of text is boring, here's a pic of the solar timetable switch I installed to turn the new garage lights on and off at sunset and sunrise:

IMG-1480.jpg


Might need a 3d printed cover plate for this one...

🍻
 

Bob Heine

ALLIANCE MEMBER
Joined
Oct 24, 2009
Messages
10,707
Location
Boca Raton, Florida
Might need a 3d printed cover plate for this one...
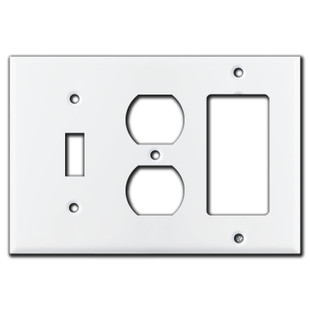
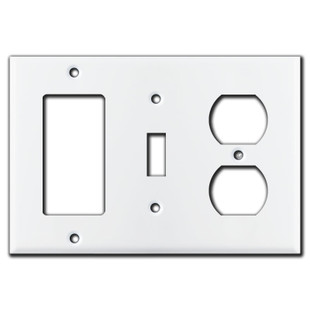
Nick, those are available, for various prices (none are 'cheap'). :
If you can wait 21 days:
Requires a little shuffling:
Exact fit:
Requires a little shuffling:

You might also consider replacing the switch and duplex outlet with Decora versions. Lots of those wall plates available in the color and finish of your choice.
 
Last edited:
OP
N

nicholam77

Well-known member
Joined
Dec 18, 2016
Messages
2,673
Location
Minneapolis, MN
Nick, those are available, for various prices (none are 'cheap'). :

Thanks for the options, Bob! Although I meant to 3d print myself :)

Check out this wall plate customizer on Thingiverse.

I generated an STL with my needed configuration: https://www.thingiverse.com/apps/customizer/run?thing_id=47956

And it's running on the printer now 😁

IMG_1495.jpg

It's replacing a nice stainless steel Leviton cover plate. I wouldn't go 3d printed inside the house, but the garage is fair game.
 
To avoid these ads, REGISTER NOW!
Top Bottom