

You are using an out of date browser. It may not display this or other websites correctly.
You should upgrade or use an alternative browser.
You should upgrade or use an alternative browser.
Built-it-myself tools/machines - show us what you've done
- Thread starter Jim Stabe
- Start date
bczygan
Well-known member
Me and the first tool I made.....
Termites.....YUM!

Termites.....YUM!
Fyrme
Well-known member
Here's a simple one:
Had a leaking drain plug on the hydraulic pump on a Case 1840 skid steer. Didn't have a hex socket big enough to fit the plug, so I had to make my own.


Brilliant!
sbhockey
Well-known member
Here's a simple one:
Had a leaking drain plug on the hydraulic pump on a Case 1840 skid steer. Didn't have a hex socket big enough to fit the plug, so I had to make my own.
Have the same "tool" in my box for the front axle on one of my motorcycles.
TJay
Well-known member
Have the same "tool" in my box for the front axle on one of my motorcycles.
Suzuki?
I had to make a similar one to remove the front axle for a fork rebuild on my brother in laws GSXR.
Was new to me since none of my hondas had a setup like that lol


MCFARMER, what is your sander drum made from?
Plywood stacked, glued and turned on the lathe. Before putting sand paper on it I ran some boards with paper glued to them to true it to the adjustable bed. There is an oak 1inch shaft running through the drum, a bearing on each end with a lock collar. The oak has held up well so far.
Alchymist
Well-known member
I am in the process of building a gantry crane , I have picked up a S10x25.4 beam that is 14 ft. long , my question here may be for a structural engineer and if im in the wrong forum please someone direct me to the right place , here is my question , I see on the Wallace crane website that some gantry cranes connect the legs to the I beam by suspending it from the top flange while other designs have the I beam mounted to the top of the legs where it is supported by the bottom flange ,I was wondering what the advantages and disadvantages were to both types of designs ?
pepi
Well-known member
I had a hard time removing some "stuck" rad and heater hoses today so I made the "hose ******" pictured below. I heated up the end of an awl with my torch and bent it into a hook.
If you can't pull the hose off by hand, gradually insert the sharp point under the end of the hose and gently work it around to free it up and "unstick" it.
View media item 35145
That tool was actually manufactured and sold in the US a while back. Thinking 60 or so, still a good idea and functional today. Some old school is still the better ideas of today and this is one of many.
That tool was actually manufactured and sold in the US a while back.
Still manufactured and sold today by several brands.
PCO6
Well-known member
I remember using my Dad's back in the '70's and it was home made too. I didn't even think to check if they were available but I can now see that they would be. I like cheap and cheary tools.That tool was actually manufactured and sold in the US a while back. Thinking 60 or so, still a good idea and functional today. Some old school is still the better ideas of today and this is one of many.

sbhockey
Well-known member
Suzuki?
I had to make a similar one to remove the front axle for a fork rebuild on my brother in laws GSXR.
Was new to me since none of my hondas had a setup like that lol
Yup, GSXR front end on my SV650 track bike.
larry4406
Well-known member
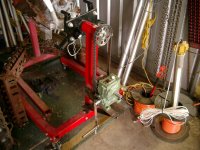
Rotating engine stand.
Nice engine rotating stand. What brand and where did you get the geared unit? Any reason why you didn't directly couple the drive to the arbor and eliminate the chain and sprockets? Bending over to crank the drive would seem uncomfortable.
Gearbox was an ebay special, I made the rest from what I had, SBC parts that were lying around
Very nice, I imagine with the gear box down on the bottom frame it is sturdier.
With an electric motor on the shaft coming out the back you could really make that baby spin.
Nice use of the timing chain.
atch
Well-known member
it looks like several of you are interested in rotating engine stands. here's more.
start at reply 664 and continue. there are a couple more engine stand rotator ideas after that.
WARNING: if you go to the start of that thread and read all the way through it you'll need several hours available.
start at reply 664 and continue. there are a couple more engine stand rotator ideas after that.
WARNING: if you go to the start of that thread and read all the way through it you'll need several hours available.
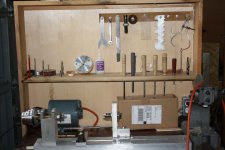
I wanted a slower speed on my drill press when useing big wood boring bits. At the slowest the chuck turned about 600 rpm.
It's an old Craftsman I've had forever.
The press has a pipe for the stand. I turned a piece of wood to fit tight with a cap on top.

I salvaged the shaft from an old electric motor, put a bearing on each end and two pulleys on top.

The shaft is off center so I can tighten the belt going to the quill. The regular motor adjustment keeps both belts tight.
The bottom bearing is trapped with a piece that can be taken off if I need to change it.

I used the old AC tachometer to see what I achieved, 180 rpm.

How long it will last, who knows. I can put the old belt on and by-pass the reducer without taking anything off. Other than the two short belts of course.
It's an old Craftsman I've had forever.
The press has a pipe for the stand. I turned a piece of wood to fit tight with a cap on top.
I salvaged the shaft from an old electric motor, put a bearing on each end and two pulleys on top.
The shaft is off center so I can tighten the belt going to the quill. The regular motor adjustment keeps both belts tight.
The bottom bearing is trapped with a piece that can be taken off if I need to change it.
I used the old AC tachometer to see what I achieved, 180 rpm.
How long it will last, who knows. I can put the old belt on and by-pass the reducer without taking anything off. Other than the two short belts of course.
Last edited:
pepi
Well-known member
Nice thinking, as to lasting lots of trees left so parts should not be a problem.")
BTW: worn or broken parts are a problem not an issue
BTW: worn or broken parts are a problem not an issue
JoeFin
Well-known member

Roll Over Jig for machining Sportster Heads
fred d
Well-known member
Really enjoy all of the inguinity by the folks here
Have got some great ideas
Have got some great ideas
Forgot about this one. Did this a while back because I needed to clean a bunch of rusty hardware (from a crowntop craftsman table saw), but didn't want to spend the money on a tumbler. All stuff I had, nothing permanently affixed. Worked really well.

I took a aluminum coffee can (with screw-on lid), cut a few pieces of scrap aluminum (from a second can), bent them into a few _||_ shaped "fins," and epoxied them to the inside wall of the can, at an angle. To attach this to the drill, I drilled a hole in the bottom of the can, and ran a bolt through it, tightening a nut onto the other side and chucked the threaded end of the bolt into the drill. The drill was clamped into a drill press vise, and the can rested on 4 ball-casters. I kept the can from jumping off of the casters while spinning with a piece of broken belt from the aforementioned table saw (screwed to the wood), and used electrical tape to keep the casters from eating through the can as it spun. I then let the drill run for a few hours with $3 HF tumbling medium ('green pyramids'), and voilà: shiny rust-free nuts and bolts.
I took a aluminum coffee can (with screw-on lid), cut a few pieces of scrap aluminum (from a second can), bent them into a few _||_ shaped "fins," and epoxied them to the inside wall of the can, at an angle. To attach this to the drill, I drilled a hole in the bottom of the can, and ran a bolt through it, tightening a nut onto the other side and chucked the threaded end of the bolt into the drill. The drill was clamped into a drill press vise, and the can rested on 4 ball-casters. I kept the can from jumping off of the casters while spinning with a piece of broken belt from the aforementioned table saw (screwed to the wood), and used electrical tape to keep the casters from eating through the can as it spun. I then let the drill run for a few hours with $3 HF tumbling medium ('green pyramids'), and voilà: shiny rust-free nuts and bolts.
Richard D
Well-known member
I'd like to see a picture of the attachment to the drill.
I'd like to see a picture of the attachment to the drill.
Here you go! I used a washer on both sides of the hole, and a nylock nut to keep it from rotating in the hole. I then chucked the end of the screw into the drill chuck (as you would a bit).

Richard D
Well-known member
O.K. now I see. Think it would work in a drill press without using a vise, bearings, etc?
Outlawmws
Well-known member
No, spun on a vertical axis you get a centrifuge not a tumbler. You want the media and the "stuff" roll along and tumble.
No, spun on a vertical axis you get a centrifuge not a tumbler. You want the media and the "stuff" roll along and tumble.
This.
O.K. now I see. Think it would work in a drill press without using a vise, bearings, etc?
With one of these it will:

With one of these it will:
Would still need bearings (or rollers) though, and a way to keep the can in place (even if the 90° adapter stays still, the spinning can will want to roll in circles, and very quickly.
Richard D
Well-known member
My thoughts as well
I picked up a Stanley Yankee 233H drill on Saturday, missing a part of the ratcheting apparatus, but with 6 original bits (4 drill and 2 flathead), for $2. I quickly replicated the part (the cam) from a washer (not shown here), making it functional again. I thought about ordering a Phillips head bit and a hex adapter from Lee Valley (very reasonable in price), but I figured I'd save that money for future garage sales and try to make one myself.

I have plenty of those freebie quick-change 1/4" hex adapters from past tool purchases, so although I don't have a lathe (at least not for metal), I figured I could pretty quickly file that down to the 7/32" I needed for my Yankee. To get it perfectly round, I popped a long bit into the adapter, chucked that bit backwards into my drill, and spun the adapter against the side of my bench grinder wheel (in the opposite direction). After this was roughly the right size, I spun it against a metal file, and then against a flexible sanding block until it was silky smooth. I placed that into a vise, and filed a notch into the end and a groove into one side to match the stock bits.

A perfect fit!

alpinewhite
Well-known member
What do you use for media?No, spun on a vertical axis you get a centrifuge not a tumbler. You want the media and the "stuff" roll along and tumble.
What do you use for media?
With mine, I've only tried the HF resin media (look like little green pyramids) that comes in a blue cylinder. Worked really well when I've used it, though I don't have anything to compare it to. I remember paying $3.99 last year before coupon, but the price on their website currently shows $19.99. Open to suggestions otherwise.
gball
Well-known member
Made this foam cutter a few years ago. worked really well for being so simple. the base has holes on one side and dowels on the other so it fits in the table like the add in leaf. used some random bracket i found, a broken mop handle, spring, throttle cable clamps, and a battery charger... oh and some wire for the cutter.


Made this foam cutter a few years ago. worked really well for being so simple. the base has holes on one side and dowels on the other so it fits in the table like the add in leaf. used some random bracket i found, a broken mop handle, spring, throttle cable clamps, and a battery charger... oh and some wire for the cutter.
Love it. Good work. Also, much safer than the "hook some uninsulated wire up to a battery and hold it with welding gloves" strategy I've seen elsewhere on the 'net.
Outlawmws
Well-known member
Gball: What kind of wire for the cutter? I want to make that!
ez-duzit
Well-known member
In my small shop I married a 3 hp Unisaw and a 1.5 hp contractors saw on a mobile base--a 10" carbide ripping blade on the big machine, and an 8" carbide dado (normally set to 1/2") on the small one. The Biesemeyer fence conveniently serves both machines. The large, flat top of this pair is often used as an additional workbench. A heavy duty 4'x8' workbench also serves as an out-feed table.

gball
Well-known member
Gball: What kind of wire for the cutter? I want to make that!
Thanks. when i made this i did a bunch of looking online. some people got pretty fancy and involved... i just wanted the finished product more than the actual tool.
don't remember what the wire was from. i know i started with old, non-wound guitar string, but it was too thin so i used something a bit heavier.