Griff93
Well-known member
Made some counterbored bushings on the bridgeport the other day.


Customer of ours is rebuilding 2 of their lathes, and hired us to machine down the saddles and insert bronze because the turcite wasn't lasting long enough. This is the little one. The big saddle was 4 feet long.
Made some counterbored bushings on the bridgeport the other day.


Some mods a few weeks ago to my lathe.
Mike.
Nice work on the lathe mods. What kind of lathe is it? Brand ? Size?Some mods a few weeks ago to my lathe.
And while I had swarf on the lathe I decided to address one more little item that was bugging me. I hated to have to reach for an allen wrench each time I wanted to lock down my compound slide so I machined a little lever and drilled for a small roll pin to act as a stop when the lever was loosened.
Mike.
An easy way to set this up is to put the indicator you use for tramming your machine into the spindle. Now, bring the machine a thou out of tram by loosening the head bolts until they're just snug and giving the head a few whacks with a rubber mallet.
Re-sweep the table with your indicator to confirm you have a thou tilt at the diameter of your fly cutter and go to town. I usually make the left side of the cutter low when viewed from the front of the machine. That way I don't get showered with chips.")
I was always taught in trade school that you didn't want the trailing sweep to touch if possible. I had to fly cut those bronze strips in my previous post, to make sure they were dead nuts flat. If I could have trammed out my cnc by a thou, I would have for sure. My surface finish was gorgeous on the front sweep and a tiny bit scuffed up after the back sweep.HI folks,
I'm new to this thread, but will be following with interest. Quick question on this topic: why do you want your head out of tram for fly cutting? Any amount of 'out-of-tram', either left or right, will lead to dishing of the surface. Now, this may be tiny and not be important depending on the application, but I don't understand why you would want to force it. If the head is trammed perfectly, you get a faint tool mark on the trailing side, and a nice even cross-hatch pattern in the surface finish, which I always thought was an indication that everything was perfect. I guess I'm missing something ...
Sent from my iPad using Tapatalk
Pretty cool handles.
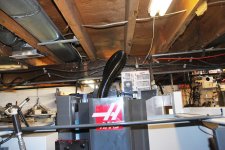
What are you using to hang up tooling?
Nice work on the lathe mods. What kind of lathe is it? Brand ? Size?
Customer of ours is rebuilding 2 of their lathes, and hired us to machine down the saddles and insert bronze because the turcite wasn't lasting long enough. This is the little one. The big saddle was 4 feet long.[/QUOTE]
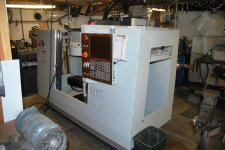
Interesting. Looks like a CNC lathe. Do they not have way wipers and way covers?
You should machine a relief in the middle of the bronze pads so that it only bears on the first and last third and doesn't rock. It will still need to be hand scraped to match the box ways.
Pretty sure they are both manual lathes. The customer in question is a steel manufacturer, all their work is roughing the forgings down, so they create a **** load of mill scale dust that murders the turcite, that's why they opted to try ampco bronze on these 2 rebuilds.Interesting. Looks like a CNC lathe. Do they not have way wipers and way covers?
You should machine a relief in the middle of the bronze pads so that it only bears on the first and last third and doesn't rock. It will still need to be hand scraped to match the box ways.
That was my thread on HSM as well. It's ampco 18, which is bronze, aluminum and iron.Is that aluminum bronze ?
Seems like there was a thread over on
The home shop machinist where somebody
was talking about Turcite.
I used Aluminum Bronze for my lead screw
nut in my mill, it's supposed to have
really good wear resistance.


Nice use of a collet holder and mill. Can I ask just out of curiosity why you did this on the mill vs. the lathe?
Mike.
I'm working on some new adjustable feet for an INDEX Model 40 project. Most of the stuff you guys are posting up here is far better but, I'm working on it. Anyway... Thanks for the motivation to make my parts as good as I can make 'em.
3 more to go...

Keep up the good work, boys.
Cheers,
Chris
I wanted the depth of the counterbores to be all the same. This is easy on the mill as it already has stops built in. With the lathe using the counterbore in the tailstock makes it hard to get them very close to the same. There's also a stop under the bungs in the 5C collet so it's pretty repeatable for quickly positioning the work piece. My lathe is an 18" swing so it doesn't lend itself well to making parts this small. Don't get me wrong, it can be done and we do it some. It's so big compared to the part it's kinda clumsy. I'd really like something like a haas TL1 or 2 for making this kind of part. Having a 5C collet chuck or some other type of collet would also help.
I'm working on some new adjustable feet for an INDEX Model 40 project. Most of the stuff you guys are posting up here is far better but, I'm working on it. Anyway... Thanks for the motivation to make my parts as good as I can make 'em.
Keep up the good work, boys.
Cheers,
Chris


I think I'd have to use stainless for a
project like that, just not sure about
using aluminum for something that
comes into contact with food.
Nice work though.
I like the drill rack too.


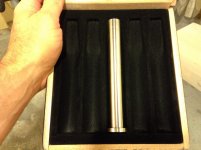
Machined a new brake lever knob for my mill Friday night.
Then made a wall mount rack for my MT3 drill bits.
Nothing major.
Mike.


Here is an example of the kind of stuff I sometimes do. First picture shows a disc (piece of farm equipment) and you cab see the little dog-bone shaped spacers that hold the discs in place on the shaft. They are cast iron. Bearing seized and spun one of them to destruction, so I fabricated a replacement from steel. It is relieved on the inside of the bell end to accommodate the shape of the disc and only registers on the outer rim. The step on the small diameter fits int a bearing. I also fabricated the red-painted part on the left-most disc (whose purpose is to level the outermost furrow). I can show pics of that if anyone is interested.
Sent from my iPad using Tapatalk
Haven't posted anything here yet, but here is a project my son and I started today. About 40 years ago I made a meat tenderizing hammer as a shop project in high school. I still have it and use it to this day. My son wanted to make one for himself so here we go ... Photos below show squaring up aluminium stock using a fly cutter, then chamfering, and finally starting to cut the 'teeth'. Will post more as we go ...
Sent from my iPad using Tapatalk
Haha I remember having to make one as well in high school shop probably about 30 years ago. I think my mom still has it.
I see you are in St Albert. I went to high school in Sherwood Park
Sent from my iPad using Tapatalk