To avoid these ads, REGISTER NOW!

Above 1200 Sq/FT Barn Workshop build

Wokspaces above 1200 squarefeet.
To avoid these ads, REGISTER NOW!
OP
U

ururk

Well-known member
Joined
Jan 9, 2010
Messages
739
Location
Southeast MI
Tuesday, Oct 29: Approved!

But the day... started off cool (40) but quickly got to t-shirt weather. None of this is in chronological order:

Last four pieces of soffit installed - from a ladder:


Covered the exposed wood by the door with PVC trim:


Made more progress on the entrance:


This is where I ended up stopping, ran out of time. I made some water table from the pvc trim, and used a board I prepped previously from some pallet wood.


So, I have a bit more work to do on the side entrance before the real cold weather hits. I'll post that progress this weekend, as it's going to rain for two solid days, and I want to rest a bit :p.


As for the inspection, went very well. He was impressed with the structure (nicer than some houses :p), and as he was leaving casually asked, "So, you planning on covering the foam with stone or something?".


Ultimately, I'm going to have to do something - either a latex-based stucco, or veneer stone. But... not sure I want to spend $$$$ to cover the bottom in fake stone.

Like I said before, I probably won't post to this thread too frequently. However, I will update on major milestones:

1) During the side entrance completion
2) During electrical install (if I take the project on myself)
3) After final grading
4) During foam covering
5) During/after interior wall covering

#5 could get *real* tedious. But I'm not going to attempt it withough electrical in place.

John
 
Last edited:

FTWingRiders

Well-known member
Joined
Mar 21, 2012
Messages
1,558
Location
Central Ma
First of... Congrats!! Must feel good to finally get to this point..

As to the foam, I went with the stone veneer.. worth it in my book to cover the concrete, I wanted it to have a field stone foundation look and it really finished it off. Something to consider down the road.. Now I'll just get some popcorn and watch you tackle the electrical with the same incredible detail you've given the exterior of this very cool barn!

 
OP
U

ururk

Well-known member
Joined
Jan 9, 2010
Messages
739
Location
Southeast MI
First of... Congrats!! Must feel good to finally get to this point..
Thanks - it does. I don't have the same angst I did when the wind came through last night, that's for sure!

As to the foam, I went with the stone veneer.. worth it in my book to cover the concrete, I wanted it to have a field stone foundation look and it really finished it off. Something to consider down the road.. Now I'll just get some popcorn and watch you tackle the electrical with the same incredible detail you've given the exterior of this very cool barn!

That looks very nice - is it real stone or concrete? I guess I just have to price the stuff out, my goal is to have a 12-8" exposure, so I should not need more than 110 sq ft.

As for electrical, plans are firming up, but the weather is taking a turn for the worse here. I don't mind the cold so much, but the rain/snow isn't pleasant. We haven't yet gotten snow that sticks to the ground, but the top of my MINI was covered in ice/snow this morning.
 
OP
U

ururk

Well-known member
Joined
Jan 9, 2010
Messages
739
Location
Southeast MI
Electrical!

With 8" of snow out there right now, not sure I'll make any progress on this this year. But, we'll see.

I posted in another thread here, got some advice I could work with. Without doing extensive research, this is what I'm planning:

* Get power from house
* House panel has a 200A breaker coming in - not going to upgrade service, but it is an option for the future
* Panel supports up to 125A breaker.
* Talked with my brother, he suggested running two 50A "legs" (so two 50A breakers), but only put a 60A breaker in at the barn for the moment. 60A covers his workshop sufficiently, with similar equipment running, though my space is a bit larger and if I add significant cooling I'll need more capacity.

Though I still have some wiring research to do, I first need to figure out what *path* to take to the barn. After measuring it out with a wheel, and going between trees, I have two options:

attachment.php


Blue line: EMT conduit from breaker panel through basement, exiting west side of house, about 25'. 75' from house foundation to entry point in barn. Cons: basement has drop-ceiling, will be a pain to run EMT.

Red line: exit foundation where electrical comes into house, under sidewalk. Cons: path will have more bends, have to tunnel under sidewalk, longer exterior trench

I prefer the blue-line route... any thoughts?
 

Attachments

  • Cable Path.jpg
    Cable Path.jpg
    17.2 KB · Views: 836

mike93lx

ALLIANCE MEMBER
Joined
Dec 9, 2013
Messages
37,356
Location
Richmond, VA
Put a 100a or 200a main panel in the shop. There is no benefit to breakering it less there. The breaker in the house determines the max load and the one in the shop is just a disconnect.

Before you buy a breaker for the house, make sure it fits the wire you want to run. 60a is a pretty standard breaker for this application

Why does the red line run so far away from the house?

Try to use gentle bends or 45's instead of 90's
 

matt_i

Well-known member
Joined
Mar 14, 2008
Messages
10,720
Location
SE Michigan
I would take a look at PVC conduit, even inside the house, its just a little floppier than EMT but is very easy to install.

Conduit bigger than you intend to use, i would recommend 2". That way you can easily run large conductors without worrying about the tight bends inside of LBs. And small conductors fit just fine as well. I'd glue up sweeps underground and only use gasketed conduit bodies like LB/LR/LL/C/T above ground. So you are going to have some radii.

Like Mike recommends I'd go for a 100 or 125A panel, usually the box stores have a package of panel + some breakers. Square D QO is a high quality panel in my opinion. You can feed that with a 60A service for now, the potential is there to upgrade later if you want.

Either blue or purple line should work, I'd add a pull-rope as you build the conduit, it will be easier to pull either the fish tape or the wires themselves.

I also recommend a 2nd conduit for low voltage stuff, Cat 5 would be highest on my list, you can easily setup a parent-child setup using an old router to have fast Wifi in your shop. I just use an "old" router that still functions but goes crazy when 4 devices connect to it. But out in the shop its usually just me or my Dad.
 

mike93lx

ALLIANCE MEMBER
Joined
Dec 9, 2013
Messages
37,356
Location
Richmond, VA
I would take a look at PVC conduit, even inside the house, its just a little floppier than EMT but is very easy to install.

Conduit bigger than you intend to use, i would recommend 2". That way you can easily run large conductors without worrying about the tight bends inside of LBs. And small conductors fit just fine as well. I'd glue up sweeps underground and only use gasketed conduit bodies like LB/LR/LL/C/T above ground. So you are going to have some radii.

Like Mike recommends I'd go for a 100 or 125A panel, usually the box stores have a package of panel + some breakers. Square D QO is a high quality panel in my opinion. You can feed that with a 60A service for now, the potential is there to upgrade later if you want.

Either blue or purple line should work, I'd add a pull-rope as you build the conduit, it will be easier to pull either the fish tape or the wires themselves.

I also recommend a 2nd conduit for low voltage stuff, Cat 5 would be highest on my list, you can easily setup a parent-child setup using an old router to have fast Wifi in your shop. I just use an "old" router that still functions but goes crazy when 4 devices connect to it. But out in the shop its usually just me or my Dad.

Adding a pull rope as you glue is just another thing to get in the way and potentially mess up, like gluing it in place. Just **** a plastic bag through with a shop vac attached to light string. Will take a couple seconds to pull through the conduit.
 
OP
U

ururk

Well-known member
Joined
Jan 9, 2010
Messages
739
Location
Southeast MI
So, things got a bit crazy around the world since I last posted. Hope everyone is doing well...

I've been using the barn for work video conferences, but the lack of proper electricity and lights is kind of a pain, plus I want to get started on using it, well, for its intended purpose. It's warm enough out to start doing stuff again.

I'm going to be posting some questions about electrical - also checking with our township to see if they are still handing out permits. Menards and Home Despot (trencher) appear to still be open... my original plan to hire an electrician for consulting kinda fell through with this COVID crisis.
 
OP
U

ururk

Well-known member
Joined
Jan 9, 2010
Messages
739
Location
Southeast MI
Argggg. Called the township, pre-recorded message that they are not handing out permits. Well, I think I'll focus on getting the plans drawn up for the electrical, as well as amass some of the supplies I'll need.
 
Last edited:

BoilermakerFan

Well-known member
Joined
Apr 17, 2006
Messages
2,188
Location
Indianapolis, Indiana
I believe that after this Friday, MI contractors are being hit with $1K a day fine if they continue to work on non-critical projects as well. I know my buddy near Holland is being impacted. He's having a shop built right now.
 

mas8849

Member
Joined
Feb 11, 2014
Messages
18
HI,
I have scanned your posts but can't find mention to what siding you chose and why. It's steel siding, correct?
 
OP
U

ururk

Well-known member
Joined
Jan 9, 2010
Messages
739
Location
Southeast MI
I believe that after this Friday, MI contractors are being hit with $1K a day fine if they continue to work on non-critical projects as well. I know my buddy near Holland is being impacted. He's having a shop built right now.
I'm not a contractor and would be working on my own project, in the good old US of A, where freedom... ah nevermind.

In all seriousness, I'm pretty sure I could go down to Menards and buy some PVC, wire, and safely work on this part of the project without much fuss, I'm in a rural area.
 
OP
U

ururk

Well-known member
Joined
Jan 9, 2010
Messages
739
Location
Southeast MI
HI,
I have scanned your posts but can't find mention to what siding you chose and why. It's steel siding, correct?
Steel. Why... longevity. I would have opted for a premium vinyl, but at that point the price was negligible compared to the longevity I hope to get out of it. My only real concern is chalking, and that, well, I'll live with if it happens.
 
OP
U

ururk

Well-known member
Joined
Jan 9, 2010
Messages
739
Location
Southeast MI
I'm pretty careful when it comes to this virus - I also have researched the death out of it and my family has so far escaped it's clutches (don't get me started about washing groceries, gloves, masks, etc...). If I do venture out to Menards for supplies - I'll probably pre-order so I don't have to spend a lot of time in the store.

My biggest concern is if I hurt myself in a way that requires medical attention. For this, I will have to be extra cautious and think through anything I do that could have a danger component to it before doing so. Which pretty much everything has.
 

BoilermakerFan

Well-known member
Joined
Apr 17, 2006
Messages
2,188
Location
Indianapolis, Indiana
I'm not a contractor and would be working on my own project, in the good old US of A, where freedom... ah nevermind.

In all seriousness, I'm pretty sure I could go down to Menards and buy some PVC, wire, and safely work on this part of the project without much fuss, I'm in a rural area.

Ah, I thought you were going to hire an electrician for part of the job...
 
OP
U

ururk

Well-known member
Joined
Jan 9, 2010
Messages
739
Location
Southeast MI
Ah, I thought you were going to hire an electrician for part of the job...
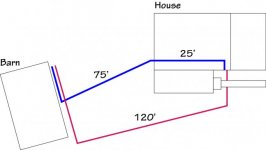
I had toyed with the idea - but since I'm just going to do a sub off the house, and planning on trenching on the side of the house that doesn't have a sidewalk, the task was made much easier. Plus, even though I am able to work from home, I have some extra time on my hands.
 
To avoid these ads, REGISTER NOW!
OP
U

ururk

Well-known member
Joined
Jan 9, 2010
Messages
739
Location
Southeast MI
Things are moving slowly, as should be painfully obvious when you consider the current situation out there in the world. It has given me some time to research, and pre-order a lot of what I need. So far I have ordered:

• conduit
• innerduct (for fiber)
• load center (42 breaker, 200A)
• breakers
• conduit fittings
• various other electrical needs (mogul LB, etc...)
• an LB fitting specifically for fiber, normally $50, got it for $17 as an Amazon warehouse deal :D

And so forth.

I've also gotten some estimates for things I need some help with, though no "real" work can begin without the state opening up. I am getting the basement prepped to run my wires, and started running the "innerduct" for an eventual fiber pull. I'm probably not going to pull fiber this year, just owing to the difficulty in obtaining things, and as a precaution as 150 feet of fiber is, well, "expensive" and I'm going to limp along with my powerline ethernet for the foreseeable future until things feel more stable.

So, here's a sneak peek at what I'm doing:

media


This runs about 30' to the rim joist where my 2" PVC conduit will exit the house. I debated whether or not to run ethernet to the rim joist, or do a single fiber run... and I decided on the latter. Doing ethernet would mean I'd need to locate the fiber converter in the ceiling (probably not a good idea) and I'd also have to install power at that point in the ceiling. I decided to 3D print clips, takes about 2.5 hours to print 6. Since I'm working from home full time now, babysitting the printer is pretty easy.

I also chose the smallest interduct, and probably am going to regret it. I needed this smaller size, though as the next size up was too large to pass through an obstruction. Like I said, I will probably regret this decision - although LC connectors are quite small and by my calculations this will pass 2 easily.
 
Last edited:
OP
U

ururk

Well-known member
Joined
Jan 9, 2010
Messages
739
Location
Southeast MI
However, even though I'm not fully utilizing the space, I will say, my Zoom (and sometimes BlueJeans) meetings have been quite fun. I've been using the barn for videoconferencing, although it is a bit too cold for sustained meetings (mid-50's, and with the recent snow, has stayed cold).

My goal - mid-summer to have a full-time office on the second floor. I don't anticipate going back to the office till late summer - maybe even later - so I am antsy to get the second floor in shape.
 
OP
U

ururk

Well-known member
Joined
Jan 9, 2010
Messages
739
Location
Southeast MI
Went to Menards today... it was packed. Probably should have gone at a different time, but, ah well. Picked up the last of the things I need - two ground rods, some tracer wire, and a roll of caution gas tape. I'm waiting on two electrical fittings before I can finalize the conduit run in the house - they were backordered - should arrive next week.

All that remains is the state to open up and I can pull a permit for electrical/gas (mechanical).

I probably didn't mention this - I found a company that will run two 2" electrical conduits, gas, and water (gas and water are separate bores) for a really good price - so good it makes me a bit anxious. I have to wait for the state to reopen (14th now?), and when they have an opening between jobs, so it won't be prioritized. But, when it happens I'll post some pictures.
 
OP
U

ururk

Well-known member
Joined
Jan 9, 2010
Messages
739
Location
Southeast MI
Sunday, April 26: Spent some time marking where I want my utilities to enter/exit for the boring company. Using physical sticks as I need to wait for Miss Dig (utility locator) and the state to open up.

I also uncovered my 2", 3", 1", and 2" conduit:

media


A little hard to see, but I didn't need to uncover these fully. Main goal was getting their positions. They are only stubbed out about a foot.

The first 2" is for ????. I was hoping I could run power out through this tube for an outdoor outlet fixed above the ground (PT wood, maybe plastic wood if I can locate a seller). I'd prefer not to drill through the side of the barn for a lonely outlet.

The 3" is for my feeder. The conduit from the house will be 2" - this will be stepped up to 3".

The 1" will carry my ground from the grounding rods.

The second 2" is for my data line - whether fiber or ethernet.


I really need the dedicated data line - I'm basically going to house my NAS backup in the barn, and I've found the throughput over powerline networking is so/so. It's good enough for now though, even once I get the load center installed.
 
OP
U

ururk

Well-known member
Joined
Jan 9, 2010
Messages
739
Location
Southeast MI
Tuesday, May 5: Did some testing for the conduit in the basement ceiling. It was kind of a pain getting 10' long conduit pieces above the drop ceiling. I have to use two 45's to align it with where I have to drill through the rim joist.

I have two 90's that get it out of the electrical box, so less than 360 for the run to the LB.

media
 
OP
U

ururk

Well-known member
Joined
Jan 9, 2010
Messages
739
Location
Southeast MI
Construction can technically start... the guy who is going to do my work said he'd fit me in this month. I have all the tubing he needs to do the job now, just waiting. In the interim as soon as the stay at home order is lifted I can get my permits... oh wait they extended it to the end of the month :(
 

jollygreengiant

Well-known member
Joined
Nov 10, 2013
Messages
2,354
Location
Ontario, Canada
Just read through the whole thread, very cool project!

Maybe I missed it but why are you putting insulation on the outside of the building vs the inside cavities?
 

mike93lx

ALLIANCE MEMBER
Joined
Dec 9, 2013
Messages
37,356
Location
Richmond, VA
Just read through the whole thread, very cool project!

Maybe I missed it but why are you putting insulation on the outside of the building vs the inside cavities?

I don't want to speak for the OP, but exterior insulation is very common. It creates a thermal break and is much easier to get a consistent layer. It can also be used as a weather resistant barrier (wrb) and for air sealing
 
OP
U

ururk

Well-known member
Joined
Jan 9, 2010
Messages
739
Location
Southeast MI
What mike93lx said! In addition, I didn't want drywall and wanted to see the entire frame. There are ways to insulate between posts but then you have areas that have less R-value.

If anyone asks - would I do this again? Heck no. I'd do SIPs. Just, so many details I had to work out, SIPs would have saved time. Not money necessarily.

Update on electrical - next Tuesday I'll be getting my conduit installed in the ground! I want to get this done ASAP as who knows if we'll have to close down again if cases start rising again when things start to open up.
 

matt_i

Well-known member
Joined
Mar 14, 2008
Messages
10,720
Location
SE Michigan
Sounds like you are getting close to having the planets align!

Having lights, outlets and fast wired Enet is a great thing :)
 
OP
U

ururk

Well-known member
Joined
Jan 9, 2010
Messages
739
Location
Southeast MI
Sounds like you are getting close to having the planets align!

Having lights, outlets and fast wired Enet is a great thing :)

I'm really excited. I've moved some furniture up to the second floor to work at:

media


And am spending at least two hours every day working there - any longer and I get too chilled. Plus the powerline internet is not stable enough for marathon zoom sessions (been averaging 3 meetings a day :() I get to pretend I'm going to my office - otherwise I've given up and just wear pajamas and work from the couch.
 
Last edited:
OP
U

ururk

Well-known member
Joined
Jan 9, 2010
Messages
739
Location
Southeast MI
Tuesday, May 26: Conduit is in the ground! What's a little bit of 90% humidity anyways?

media


I found a directional boring contractor that was able to run two 2" conduits (UL listed :D) and gas and a water line (separate pull). It was quite a feat as he brought the machine in right next to the barn - still surprised he was able to get it in there.

media


That's after he repositioned it for electric. Water was started further back to get to the proper depth (52").

The work unfortunately has just begun - I have to connect the conduit down at the barn, I'm using an epoxy-based system that can bond HDPE, PVC, metal to one another. I also have to connect it back up at the house... and dig a pit for the water line, which will be a major hassle. Anyone want to come over and help me dig :D

Since I now work from home I'm going to shift my hours a bit so I can do a little bit each day - in the sweet spot of the day between mosquitos and heat. Expect slow progress each day this week, with completion of the electric and fiber conduit by the end of the weekend.
 
OP
U

ururk

Well-known member
Joined
Jan 9, 2010
Messages
739
Location
Southeast MI
Saturday, May 30: Connected the electrical conduit at the barn, set up the conduit for the network cable. I used an epoxy-based product that bonds HDPE to PVC.

This picture shows where I had to "splice" the conduit. It was going to be impossible for me to join it up with the curved "memory" it had from the storage rack - so I cut a section off and rotated it:

media


I'm not... pleased with how the 3" (electrical) connection was made. It's probably OK, but I have this sinking feeling the conduit didn't seat fully in the reduction coupling. It's going to be impossible to remove, so I might just have to live with it. I couldn't see the stab mark I had made, but it could be covered by the epoxy. A little part of me wants to cut and splice it, redo it like I'm handling the network conduit. But... well... the epoxy is cured, and would require a lot of painful dremeling to remove it.

media
 
OP
U

ururk

Well-known member
Joined
Jan 9, 2010
Messages
739
Location
Southeast MI
Perfection is the enemy of good enough. I figured you would have learned that over the course of this build :thumbup:
Heh :D

I'm sleeping on it, probably won't tear it up. If I had an inspection camera I'd send it down for a look. Almost drilled a hole in the reduction fitting to see where the red pipe ended up, but then I'd have a real source for a leak even after filling it in. It's solidly connected - it took ALL of my strength to bend it over to fit in there, and it went in at least 1/4". At the moment when I pull on it there's no movement. It's probably OK.

But I'm making progress! Provided I can "easily" get the network conduit in, I'll have this backfilled and start on the house side of things tomorrow. I'm at anywhere from 18"-22" of depth (top of pipe), and took pictures using a yardstick per the inspector's guidance. So I have at least one positive thing going for me.
 
Last edited:
OP
U

ururk

Well-known member
Joined
Jan 9, 2010
Messages
739
Location
Southeast MI
Borrowed a friend’s (inexpensive) borescope. I was unable to measure the gap (there was one), even though I used a tape measure - after angsting about it for some time decided it was fine. Got everything hooked up on the barn side and buried most of the conduit. I left a small pit open so I can apply more epoxy around the conduit the next time I use it. Will post pics later.
 
OP
U

ururk

Well-known member
Joined
Jan 9, 2010
Messages
739
Location
Southeast MI
Sunday, May 31: Connected all the conduit at the barn, installed the ground wire through the smallest conduit:

media
 
OP
U

ururk

Well-known member
Joined
Jan 9, 2010
Messages
739
Location
Southeast MI
Saturday, June 6: Did a bit of work inside the house, drilled holes for the conduit and test fit the LB (mogul style):

media
 
OP
U

ururk

Well-known member
Joined
Jan 9, 2010
Messages
739
Location
Southeast MI
Sunday, June 7: Got the ground rods installed, and failed - miserably - to light the cadweld one-shot connections:

media


media
 
To avoid these ads, REGISTER NOW!
Top Bottom