

You are using an out of date browser. It may not display this or other websites correctly.
You should upgrade or use an alternative browser.
You should upgrade or use an alternative browser.
Built-it-myself tools/machines - show us what you've done
- Thread starter Jim Stabe
- Start date
e-tek
Well-known member
Here's a hacksaw I made in Grade 9 MetalWork - 32 years go!!! It takes 10inch blades, as you can see the 12inch is too long!
The dolly is made from lead, melted inot a tin can for me by an old bodyman I worked with at my Dads shop. It's used for pick work. I've wrapped it in duct tape to make it even softer, owing to metal becoming thinner and softer over time.
<table style="width:auto;"><tr><td><a href="http://picasaweb.google.ca/lh/photo/2UsVphotS9a-A4vG9Mzdgg?authkey=Gv1sRgCIvhh6SLk8TpLw&feat=embedwebsite"><img src="http://lh4.ggpht.com/_aqOnCVYCxbQ/SoDcgidJDJI/AAAAAAAAAfw/76CjLIxiF6Y/s800/IMG_2299.JPG" /></a></td></tr><tr><td style="font-family:arial,sans-serif; font-size:11px; text-align:right">From <a href="http://picasaweb.google.ca/edanneberg/ToolsMade?authkey=Gv1sRgCIvhh6SLk8TpLw&feat=embedwebsite">Tools made</a></td></tr></table>
How did you turn the nice groves in the dies?
On the rings do you cut the flat part out on the starting end and roll it closed??
BTW the stuff looks great!
William....
I used end mills of the appropriate diameter and held the die blank in the mill vise to rough out the shape. I would plunge cut then rotate a few degrees and make another plunge cut. After the groove was roughed out I installed the die in a fixture that spun it with a drill and finished the contour with the side of the mill cutter.
.jpg")
.jpg")
I'll have to use a radius cutter on the lathe when I make dies for larger tubing.
To make a circle I do 2 arcs of the same radius and lay them on top of each other to form the circle then tack them together. Make 2 bandsaw cuts and weld the halves together. You can make a really round and planar ring that way
Last edited:
GzrGlide
Well-known member
Made a "lift" for my bike so I could lever the front or the back tire up high enough, so I could take the wheels off.


Also took a basic scissor jack and welded on a new base for stability as well as a solid bar that runs the length of the frame brace under the bike that I can use to raise the back of the bike.


Also took a basic scissor jack and welded on a new base for stability as well as a solid bar that runs the length of the frame brace under the bike that I can use to raise the back of the bike.
I used end mills of the appropriate diameter and held the die blank in the mill vise to rough out the shape. I would plunge cut then rotate a few degrees and make another plunge cut. After the groove was roughed out I installed the die in a fixture that spun it with a drill and finished the contour with the side of the mill cutter.
That's dam clever! I like that one might be a little $$ for the larger cutters but way cheaper than the dies. Did you heat treat the dies or just run them as is?
I have looked into them but they seem to be more suited to larger radius'sI'll have to use a radius cutter on the lathe when I make dies for larger tubing.
That sounds like a good way to make them I will have to try that!To make a circle I do 2 arcs of the same radius and lay them on top of each other to form the circle then tack them together. Make 2 bandsaw cuts and weld the halves together. You can make a really round and planar ring that way
Thanks for sharing the ideas!
William.....
GzrGlide
Well-known member
GzrGlide:
You do use your electric drill to spin the jack, don't you?
Sadly...not yet. I have to weld a large nut onto the end of the "screw-shaft" and I'll use my impact gun. I just haven't gotten motivated enough to do that yet. For now, all I do is put a rod thru the hole, turn, remove & replace rod, turn etc etc.
But now that you've reminded me of that, guess I'll be doing that this week!

e-tek
Well-known member
I like the nut and impact gun better than the drill - for the weight of the bike.
Probably not going to be making the larger dies now. This weekend I bought the HF tubing roller that has 1", 1 1/2" and 2" dies that I will either use in my machine or just use the HF machine as is. The regular price is $159 and it was on sale for $139 and with a 20% coupon it was only $112. The dies are made from castings and are really nice quality, the machine isn't bad either although the screw might be a little difficult to work when bending 2" - 1/8" wall tubingThat's dam clever! I like that one might be a little $$ for the larger cutters but way cheaper than the dies. Did you heat treat the dies or just run them as is?
I have looked into them but they seem to be more suited to larger radius's
That sounds like a good way to make them I will have to try that!
Thanks for sharing the ideas!
William.....
GzrGlide
Well-known member
I like the nut and impact gun better than the drill - for the weight of the bike.
Well I welded a bolt to the jack and man does that work slick with the impact gun. It'll be interesting to see how fast it pushes the bike up!
Great thread, great ideas, thanks guys!
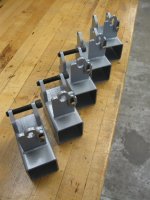
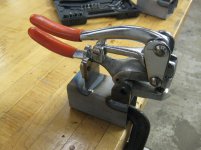
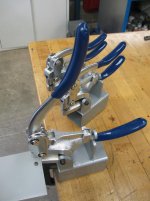
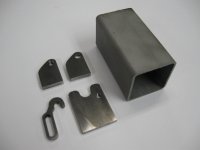
I've been scratching my head about how to fix my cheapie knockoff Roper Whitney hand punch to my bench to make it easier to use. I know they make a proper stand for the RW but it's kinda pricey and I couldn't be sure it would mate with my Taiwan made US Industrial Tools sourced punch so I decided to make one.
So I drew something up in Acad, fiddled around with it and cut some bits of CRS on my little self converted CNC mini mill to get the results you see here.
I highly recommended getting one of these punches if you don't have one, they're about 20$ at HFreight and if you are not inclined to make a stand, there's a guy on ebay making them for 25$, just do a search for "Hand held Sheet Metal Punch Mounting Bracket". He sells the punch too, just check his other sales. Here are the links to HF and US Industrial. I bought mine from US Industrial about 10 years ago, paid too much, D'OH!
HF: http://www.harborfreight.com/cpi/cta...emnumber=44060
US Industrial: https://www.ustool.com/store/cart.ph..._detail&p=1427
I think that if you fool around a bit with some end cuts out of your scarp bin you can come up with something that'll do the same thing.
In the end I ran a couple off for buds that I owed favors to. I am not selling them nor am I in any way affiliated with the ebay fellow.
Yes, there's lack of depth gauge with this setup. Still workin' on that part, that's half the fun of doing this stuff!
cheers!
Mark
Montreal
Attachments
Steevo
Well-known member
Bead breaker for motorcycle tires.

When needed, it just bolts to the top of my welding table.
I want to see more of that welding table. Did you build that?
senlow
Well-known member
Great thread, great ideas, thanks guys!
I've been scratching my head about how to fix my cheapie knockoff Roper Whitney hand punch to my bench to make it easier to use. I know they make a proper stand for the RW but it's kinda pricey and I couldn't be sure it would mate with my Taiwan made US Industrial Tools sourced punch so I decided to make one.
So I drew something up in Acad, fiddled around with it and cut some bits of CRS on my little self converted CNC mini mill to get the results you see here.
I highly recommended getting one of these punches if you don't have one, they're about 20$ at HFreight and if you are not inclined to make a stand, there's a guy on ebay making them for 25$, just do a search for "Hand held Sheet Metal Punch Mounting Bracket". He sells the punch too, just check his other sales. Here are the links to HF and US Industrial. I bought mine from US Industrial about 10 years ago, paid too much, D'OH!
HF: http://www.harborfreight.com/cpi/cta...emnumber=44060
US Industrial: https://www.ustool.com/store/cart.ph..._detail&p=1427
I think that if you fool around a bit with some end cuts out of your scarp bin you can come up with something that'll do the same thing.
In the end I ran a couple off for buds that I owed favors to. I am not selling them nor am I in any way affiliated with the ebay fellow.
Yes, there's lack of depth gauge with this setup. Still workin' on that part, that's half the fun of doing this stuff!
cheers!
Mark
Montreal
Well done. I like it.
And, welcome to the board.
Kevin54
MEMBER EMERITUS
Great thread, great ideas, thanks guys!
I've been scratching my head about how to fix my cheapie knockoff Roper Whitney hand punch to my bench to make it easier to use. I know they make a proper stand for the RW but it's kinda pricey and I couldn't be sure it would mate with my Taiwan made US Industrial Tools sourced punch so I decided to make one.
So I drew something up in Acad, fiddled around with it and cut some bits of CRS on my little self converted CNC mini mill to get the results you see here.
I highly recommended getting one of these punches if you don't have one, they're about 20$ at HFreight and if you are not inclined to make a stand, there's a guy on ebay making them for 25$, just do a search for "Hand held Sheet Metal Punch Mounting Bracket". He sells the punch too, just check his other sales. Here are the links to HF and US Industrial. I bought mine from US Industrial about 10 years ago, paid too much, D'OH!
HF: http://www.harborfreight.com/cpi/cta...emnumber=44060
US Industrial: https://www.ustool.com/store/cart.ph..._detail&p=1427
I think that if you fool around a bit with some end cuts out of your scarp bin you can come up with something that'll do the same thing.
In the end I ran a couple off for buds that I owed favors to. I am not selling them nor am I in any way affiliated with the ebay fellow.
Yes, there's lack of depth gauge with this setup. Still workin' on that part, that's half the fun of doing this stuff!
cheers!
Mark
Montreal
Nice job on the stands
 You can take it one step further and add that stand to a metal base that is as long as the centerline of the punch and as far back as the handle. That way you don't have to clamp it to a table and you can sit it anywhere. BTW....for anyone that DOESN'T have a Whitney Punch, I would recommend getting one. Real handy thing to have. I have one at work and use it weekly.
 Here's a weekend project. This guy built his own 3-axis CNC!!!!!
http://www.stanford.edu/~hydrobay/lookat/cnc.html
http://www.stanford.edu/~hydrobay/lookat/cnc.html
You get a lot longer weekends than I do!Here's a weekend project. This guy built his own 3-axis CNC!!!!!
http://www.stanford.edu/~hydrobay/lookat/cnc.html
smedly
Well-known member
GzrGlide
Well-known member
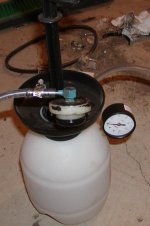
Likely done before, but here is my brake bleeder made from a cheap-o garden sprayer, pressure gauge and spare brake reservoir cap.
Dude!! Thats brilliant.

Any specific fab instructions or more pics! It's tough bleeding bakes when the only other person around is a 11 year old kid!

You can see a write up on the English wheel here http://www.metalmeet.com/forum/showthread.php?t=12554 and on welding it up here http://weldingweb.com/showthread.php?t=26663. The adjuster is described in post # 40 here http://www.metalmeet.com/forum/showthread.php?t=12316&page=2Jim,
I'm just looking at building a few shop tools as I'm rebuilding a number of old sports cars. Love your adjustable rotisserie. Also, the English Wheel -- any estimate on cost and where you got the parts?
Thanks,
Don
You can find some good info on rotisseries here http://www.metalmeet.com/forum/showthread.php?t=11993 and here http://www.metalmeet.com/forum/showthread.php?t=5041&highlight=rotisserie
Here's a hacksaw I made in Grade 9 MetalWork - 32 years go!!! It takes 10inch blades, as you can see the 12inch is too long!
The dolly is made from lead, melted inot a tin can for me by an old bodyman I worked with at my Dads shop. It's used for pick work. I've wrapped it in duct tape to make it even softer, owing to metal becoming thinner and softer over time.
<table style="width:auto;"><tr><td><a href="http://picasaweb.google.ca/lh/photo/2UsVphotS9a-A4vG9Mzdgg?authkey=Gv1sRgCIvhh6SLk8TpLw&feat=embedwebsite"><img src="http://lh4.ggpht.com/_aqOnCVYCxbQ/SoDcgidJDJI/AAAAAAAAAfw/76CjLIxiF6Y/s800/IMG_2299.JPG" /></a></td></tr><tr><td style="font-family:arial,sans-serif; font-size:11px; text-align:right">From <a href="http://picasaweb.google.ca/edanneberg/ToolsMade?authkey=Gv1sRgCIvhh6SLk8TpLw&feat=embedwebsite">Tools made</a></td></tr></table>
E-tec..... let me know if you need a 5lb. pig of lead. I use it on a daily basis.... We still do real plumbing in Chicago.
Lookin4'67Galaxieconv
Well-known member
Homemade sandblaster made out of propane tank


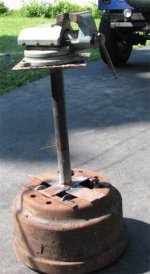
Anvil made out of I-beam

Anvil made out of I-beam
jmh21586
Well-known member
Sand blasting cabinet:
.jpg)
.jpg)
Hey... why don't you paint the inside of that blasting cabinet. Would look a lot better.


scottg1952
Well-known member
http://users.snowcrest.net/kitty/scott/anvil3.jpg
Homemade anvil from railroad track and caterpillar cutting lip steel?
http://users.snowcrest.net/kitty/sgrandstaff/images/house/speaker2.jpg
PA speaker cabinet, one of a pair. one 18" speaker and a large horn
different kind to tool?? hee eheheh
http://users.snowcrest.net/kitty/sgrandstaff/images/house/pipe8a.jpg
another kind of tool?? Padouk and vintage italian hard rubber stem
http://users.snowcrest.net/kitty/sgrandstaff/images/hometools/legdance2.jpg
calipers
yours Scott
smedly
Well-known member
Dude!! Thats brilliant.
Any specific fab instructions or more pics! It's tough bleeding bakes when the only other person around is a 11 year old kid!
Thanks, not an original idea though. There is one made by Motiv I think? I saw that and figured I could make my own pretty easily. just drilled the hole and turned the gauge in. Plastic ends up being self tapping. I use a strap to make sure the cap doesn't pop off the reservoir. Basic vinyl hose and I think the elbow at the cap came from an old glass fuel filter assembly.
scottg1952
Well-known member
Ok, how do you get pictures to open in the post?
S
S
Lookin4'67Galaxieconv
Well-known member
Paint the inside of the cabinet????? Are you friggin serious???
Seeing as how that's used for sandblasting, I think it was a joke!
")
Though I'd spray the outside of it to make it look nicer.
e-tek
Well-known member
Dude!! Thats brilliant.
Any specific fab instructions or more pics! It's tough bleeding bakes when the only other person around is a 11 year old kid!
GZRGLide - Have you tried a "One man bleeder" outfit? It's a vacuum pump, tubing and a cup. It ***** out the fluid rather than pushing it out with the pedal/lever...
Hey... why don't you paint the inside of that blasting cabinet. Would look a lot better.
It WOULD look better!! Think how much easier it would be on the parts in there too!
Seeing as how that's used for sandblasting, I think it was a joke!
.
We hope - anyways!!
OccupantRJ
Well-known member
Paint the inside of the cabinet????? Are you friggin serious???
Actually, the inside of my blast cabinet at work is painted white, and it makes it much lighter in it. It has a worn spot on the far wall, but has held up well for 25 years of daily use.
jmh21586
Well-known member
Paint the inside of the cabinet????? Are you friggin serious???
 Of course not.
 It was a joke.
I'll let you know next time.
GzrGlide
Well-known member
GZRGLide - Have you tried a "One man bleeder" outfit? It's a vacuum pump, tubing and a cup. It ***** out the fluid rather than pushing it out with the pedal/lever...
Yeah I bought one from PA last year. Worked ok, but took a very long time and made a bit of a mess. Maybe if I spent more money?
bluesman2a
Well-known member
Yeah I bought one from PA last year. Worked ok, but took a very long time and made a bit of a mess. Maybe if I spent more money?
You don't have to spend a bunch of money...
I made one of these not long ago... It's a pressure based model.
Take a flat plate (I have also seen people use a spare brake MC cover and do this too) and thread it for an air fitting. The idea is you want something you can clamp onto your MC and get a seal on.
Turn your air pressure down to 5 PSI or less (you don't need much). Put plate and fixture on the MC and turn on the air.
Go under the vehicle and crack the bleeder. Voila! It's like a pressure assisted gravity bleed.
Be careful NOT to let your MC go dry.
Though I'd spray the outside of it to make it look nicer.
It was part of the plan.. but I put it into use before I got around to it. I was also going to add a way of draining the sand out the bottom. I still might, but now I'm installing a new furnace.
Furnace? How's that relate to a sandblasting, you ask?
You see, my current furnace is an oil burner. It has a 250 (or so) gallon fuel tank that sits in my basement. My new furnace is gas, so I won't be needing that fuel tank. The idea is to turn the fuel tank into a blast cabinet. The drum cabinet works well, but it's a little bit on the small side.
Something like this:

I built this out of drill rod, its 2 ft by 3 feet. the small pipe is where I stick my wheels. in this picture its on its end. I use it to push car bodies around the shop. I can weld on it, paint, sandblast. I can put a piece of plywood on top and have a table, a counter, a saw house. I can throw it outside and forget about it, weather does not hurt it. I can put my wheels on, plywood on , and finish sheetrock ceilings with it. It make a good scaffold. I have used it to finish cabinet on, paint on, steamclean on.
Attachments
murph64
Well-known member
Anvil made out of I-beam
How about one made from a section of track?
And presto, chango, now it's a vise stand
Attachments

KBinCT
New member
Howdy All.
My 1st post. I built these tools for myself.

A rotisserie for my 60 Chevy pickup


The truck pics are a couple years old.. All the rust is now gone but it's still on the rotisserie..

Abrasive cabinet. Used a kit from TP Tools..
My 1st post. I built these tools for myself.
A rotisserie for my 60 Chevy pickup
The truck pics are a couple years old.. All the rust is now gone but it's still on the rotisserie..
Abrasive cabinet. Used a kit from TP Tools..
Lookin4'67Galaxieconv
Well-known member
Howdy All.
My 1st post. I built these tools for myself.
The truck pics are a couple years old.. All the rust is now gone but it's still on the rotisserie..
Abrasive cabinet. Used a kit from TP Tools..
Those are great! Do you have a link to the kit for the sandblaster?
KBinCT
New member
GzrGlide
Well-known member
You don't have to spend a bunch of money...
I made one of these not long ago... It's a pressure based model.
Take a flat plate (I have also seen people use a spare brake MC cover and do this too) and thread it for an air fitting. The idea is you want something you can clamp onto your MC and get a seal on.
Turn your air pressure down to 5 PSI or less (you don't need much). Put plate and fixture on the MC and turn on the air.
Go under the vehicle and crack the bleeder. Voila! It's like a pressure assisted gravity bleed.
Be careful NOT to let your MC go dry.
Simple, elegant and easy!!!! Now to figure out a way to keep the MC filled. I wonder if since you already have the air tight seal if the change in pressure would be enough to create a small vacuum that would draw fresh fluid into the MC from a bottle off to the side? hmmmmmm, worth a try!
Thanks for the idea.