To avoid these ads, REGISTER NOW!

Dr_Clyde's Shop Projects

NASTYZEN

Well-known member
Joined
Jun 11, 2010
Messages
2,823
Location
St-Colomban,Que. Canada
A bit late to this. First off, you ****!:) Nice piece of equipment.

I would paint then machine. That's what they do with castings around here.

If you could make the table height adjustable. Only needs 1/2' or so to precisely match to your other table. floors are always uneven. At least mine are.
 
To avoid these ads, REGISTER NOW!

sberry

Banned
Joined
Jun 18, 2005
Messages
35,747
Location
Brethren, Michigan
Good idea to sand it. Keeps spatter from sticking so bad after blast. I bet you can come up with something doesn't need bracing with 6 inch legs. I see it has heavy legs, sand and paint a little. I would skip the grind also,,, whats it really going to do for it?
 
OP
D

dr_clyde

Well-known member
Joined
Jan 7, 2009
Messages
6,425
Location
Holland, MI
Good idea to sand it. Keeps spatter from sticking so bad after blast. I bet you can come up with something doesn't need bracing with 6 inch legs. I see it has heavy legs, sand and paint a little. I would skip the grind also,,, whats it really going to do for it?

It doesn't NEED grinding for what I plan to do with it, but it would be a nice, fresh surface that will be good for many years to come. Its for sure more of a want than a need. Like I said, I'll probably just smooth it out with the DA for now and run it. Maybe when I move to my next shop will be a good time to grind it.

As far as the legs, it doesn't need bracing for stability but for shelving underneath and tooling storage. I also want to incorporate catch pans for spatter, grit and whatever falls through the holes.
 
OP
D

dr_clyde

Well-known member
Joined
Jan 7, 2009
Messages
6,425
Location
Holland, MI
Here's an interesting repair I helped with last night.

A good friend has a machine shop, one of the best in his area. Because he will deal with the walk in work, he gets a lot of farmers, excavators, and other small time repair work. They've got some good welders on staff, but they asked me for my help on this one.

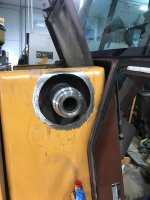
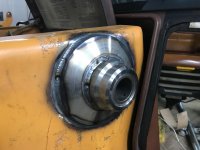
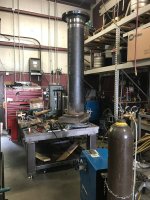
This Case backhoe had a pivot boss shear off. There is a pipe connecting the two sides of the front bucket arms going through the hydraulic tank on one side and the diesel tank on the other. The tanks are part of the chassis and not removable.

attachment.php


The bearing boss on on one side had broke loose from the pipe inside the diesel tank, and then cracked the outside of the tank right around the weld due to the forces from the loader arm.

attachment.php


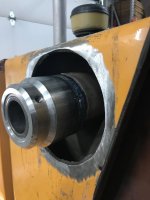
My buddy's shop machined a sleeved bearing boss that would slide inside the existing pipe, as well as a new flange to seal up the tank.

attachment.php


attachment.php


We had to weld the new boss into the pipe, and then slip the flange over the boss and weld that to both the tank wall and the boss.

attachment.php

The inner pipe weld was grooved out, and had 4 passes with 70S-2, and the outer plate and boss welds were each 2 pass welds with 70S-2.

We chose to TIG this repair for a couple reasons. First, there was some seriously tight fits between the weld and the tank wall, as well as up against the cab. No way a MIG gun was fitting in there, and a stick weld would have been quite difficult as well. I would have had to bend and contort the electrode to fit in a very tight gap that I couldn't see. The flange weld was a lot more roomy, but still kind of snug up against the cab. TIG was the easy way in this instance. We already had pulled a window, we didn't want to pull the cab.

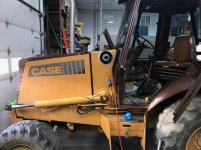
Second, we didn't want any spatter or slag getting into the tank to cause problems down the line. This backhoe is owned by a guy who takes the utmost care of his machines. This thing is like, 30 years old and still looks fantastic. He made a point to have us try not to scratch the paint or get spatter on the windows.

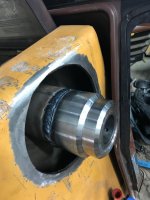
Looks pretty straightforward, but I'm here to tell you, that was a bit of a tricky weld on the bottom side of that pivot boss with the torch jammed up inside the tank and my head wedged inside the cab.

My buddy did a great job on the machine work, that outer flange has an angled bore, so the plate lays flat on the tapered fuel tank and still fits snug up on the pivot boss.

Yeah, most real heavy equipment repair guys could probably have gotten this done with 7018 upside down in a mud hole out in the oil patch with one hand or whatever, but this is what the customer wanted and they are happy with the results.

Thanks for looking.
 

Attachments

  • IMG_6599.jpg
    IMG_6599.jpg
    79.8 KB · Views: 1,325
  • IMG_6600.jpg
    IMG_6600.jpg
    149.2 KB · Views: 1,336
  • IMG_6601.jpg
    IMG_6601.jpg
    70.5 KB · Views: 86
  • IMG_6602.jpg
    IMG_6602.jpg
    63.2 KB · Views: 1,319
  • IMG_6603.jpg
    IMG_6603.jpg
    80.9 KB · Views: 1,314
  • IMG_6611.jpg
    IMG_6611.jpg
    122.8 KB · Views: 1,354

jeepinerdeep

Well-known member
Joined
Dec 28, 2013
Messages
2,099
Location
South Central PA
I mean the repair is outstanding and everything, but where did you find an old case without 1/2 of grease and 20 year old mud stuck all over it?
 
OP
D

dr_clyde

Well-known member
Joined
Jan 7, 2009
Messages
6,425
Location
Holland, MI
I mean the repair is outstanding and everything, but where did you find an old case without 1/2 of grease and 20 year old mud stuck all over it?

I kid you not, this guy was legit concerned about weld spatter on excavating equipment. He's still using equipment his dad bought new in the 60s.

His stuff is almost museum quality. He kicks out a lot of work, but takes really, really good care of his machines.
 

lis2323

Well-known member
Joined
Dec 25, 2016
Messages
3,234
I kid you not, this guy was legit concerned about weld spatter on excavating equipment. He's still using equipment his dad bought new in the 60s.


His stuff is almost museum quality. He kicks out a lot of work, but takes really, really good care of his machines.


Which is why he takes his stuff to you.....
 

zmotorsports

ALLIANCE MEMBER
Joined
Oct 20, 2009
Messages
21,312
Location
Northern Utah
I kid you not, this guy was legit concerned about weld spatter on excavating equipment. He's still using equipment his dad bought new in the 60s.

His stuff is almost museum quality. He kicks out a lot of work, but takes really, really good care of his machines.

I like him already. :thumbup:

Which is why he takes his stuff to you.....

Agreed. Properly maintained equipment by an **** owner deserves to have the repairs done by an **** welder/fabricator. And I mean that with the utmost respect.:beer:
 

rvieceli

Well-known member
Joined
Nov 3, 2013
Messages
774
Location
Illinois
Really outstanding work.

Truly surprised you didn't figure out a way to lay the thing on its side so you could weld it flat instead of vertical. :lol_hitti

Ron
 
OP
D

dr_clyde

Well-known member
Joined
Jan 7, 2009
Messages
6,425
Location
Holland, MI
Table update!

We got the base fabbed up finally. We've been waiting on both time and availability. Took forever to find the free time and have a free table top. I've been very busy, so my helper Ben did a lot of this welding.

First thing we did was cut off the existing legs. They were made from 8" x 1" thick angle iron. Heavy stuff. I wanted to re-use the existing mounting holes, and provide enough of a space for the tray slides. The old DoAll C69 made easy work of cutting these off.

attachment.php


We fabbed the base out of drops and leftovers from around the shop. We only bought laser cut feet plates, leveling pads and nuts. I bought 1"-8 swivel leveling pads from McMaster, good to 20K lbs each. Overkill, yes but I wanted the 4" dia foot pad. And they're pretty inexpensive. I wanted the ones that were 6" pads, but I couldn't justify over twice the price.

attachment.php


attachment.php


Here you can see the slide ways for the trays. I haven't built the trays or the lower shelves yet. My plan is to have 4 trays each covering 1/4" of the top. That will help catch any detritus that falls through the holes. Nothing fancy, but I saw Bellaireroad had done something similar and I liked the idea.

attachment.php


I plan to paint the table, so I made up this copper ground pad for a good place to clip ground clamps. I will just paint, then loosen the bolt and slip it back in between the washers again.

attachment.php


I discovered something cool about these StrongHand sliding bar clamps. They have a spring loaded clip to easily flip the dynamic arm. If you remove the dynamic arm, they can slip in any hole on the table. This allows you to get the body of the clamp down far enough to slip the clamp leg around where you need in the webbing. Then you just pop the arm back on and you can clamp anywhere. I probably will still buy a few drop in clamps, but these work for most things and I can double up and use them other places too. Win/win.

attachment.php


attachment.php


Next up is paint, trays and bottom shelves. I may weld a few more tubes under the shelves for belt and suspenders to keep from sagging. Easy to do now, hard later.

Hoping to have paint on it in the next few weeks. I have the paint, just have to schedule with my buddy who has a paint booth a few doors down.

Then I probably will get the top ground. Even after a little smoothing, weld spatter sticks really bad, and I really hate that. Hopefully we can find the time soon.
 

Attachments

  • IMG_6731.jpg
    IMG_6731.jpg
    109.7 KB · Views: 695
  • quick clamp release.jpg
    quick clamp release.jpg
    62.6 KB · Views: 698
  • IMG_6733.jpg
    IMG_6733.jpg
    116.5 KB · Views: 703
  • IMG_6729.jpg
    IMG_6729.jpg
    66.8 KB · Views: 696
  • IMG_6728.jpg
    IMG_6728.jpg
    101.3 KB · Views: 694
  • IMG_6727.jpg
    IMG_6727.jpg
    101.2 KB · Views: 697
  • Saw angle.jpg
    Saw angle.jpg
    126.7 KB · Views: 696
To avoid these ads, REGISTER NOW!

y'sguy

Well-known member
Joined
May 1, 2010
Messages
1,307
Location
Tulsa, Oklahoma
Awesome skills. Can't wait to see how the table finishes out. I am also very surprised to hear that the weld spatter is sticking to it?
 

Bellaireroad

Well-known member
Joined
Mar 22, 2013
Messages
636
Location
Fort Worth
Awesome skills. Can't wait to see how the table finishes out. I am also very surprised to hear that the weld spatter is sticking to it?


Same here, it will fuse but not penetrate, pops off easy with a flat edge. I just douche up the top with some ceramic spatter guard.... lasts a long time. no problems with grounding through it either...I have my ground on a corner like the good Doc


Sent from my iPhone using Tapatalk Pro
 

lis2323

Well-known member
Joined
Dec 25, 2016
Messages
3,234
I use these two anti spatters

218525cedc9da6044aa89ae686c4d02a.jpg

The Bio Circle by Walter is my fave.


Sent from my iPad using Tapatalk
 

Attachments

  • 218525cedc9da6044aa89ae686c4d02a.jpg
    218525cedc9da6044aa89ae686c4d02a.jpg
    450.5 KB · Views: 0
OP
D

dr_clyde

Well-known member
Joined
Jan 7, 2009
Messages
6,425
Location
Holland, MI
Hey guys,

Been a while since any updates, I apologize.

Anyway, here's a fun one that ran through the shop this last week.

14" Sch. 120 steel pipe had to be welded into a 3.75" thick steel square flange. There was a 3/4" groove weld on the face that took about 5 passes or so, and the fillet weld took 10 passes with .045" wire on the Millermatic 350P. We had 2 of these to do.

I was running it flat out for the groove weld, 500 ipm synergic pulse spray. For the fillets we could turn it down a bit, running 340 ish ipm synergic pulse. All done with .045" wire.

Heavy sons of *******, the pipe alone weighs about 1000 lbs, and the flanges added several hundred pounds.

The rotary table is an old 20" Troyke, with a homebrew Leeson variable drive. My buddy bought it at auction for $60 and loaned it to me, as my positoner is only good for 75 lbs or so. I could prop my gun hand on a bar clamped to the table and switch on or off the table and adjust the speed with my other hand.

attachment.php


The controller, simple to use and easy to operate with gloves on.

attachment.php


This was pass 4. This welder is sooooo nice for this kind of work. Put some big wire in and let the big dog eat.

attachment.php


6 passes in. These get wire wheeled in between every pass.

attachment.php


All 10 passes in. I am able to make a half turn before I have to stop and reposition my ground clamp, as I can't ground through the table on this rotatry table, seeing as how it was intended to be used for machining and not welding.

attachment.php


All done. Pretty straightforward weld job, but it takes a bit to handle it. Need a forklift and a pretty good welder, minimum.

attachment.php


More to come soon, hoping to splash some paint on the Acorn table this weekend if the weather cooperates.
 

Attachments

  • IMG_6953.jpg
    IMG_6953.jpg
    74.6 KB · Views: 586
  • IMG_6951.jpg
    IMG_6951.jpg
    57.1 KB · Views: 583
  • IMG_6950.jpg
    IMG_6950.jpg
    86.1 KB · Views: 586
  • IMG_6952.jpg
    IMG_6952.jpg
    120.8 KB · Views: 580
  • IMG_6942.jpg
    IMG_6942.jpg
    109.9 KB · Views: 588
  • IMG_6954.jpg
    IMG_6954.jpg
    125.1 KB · Views: 583
Last edited:

Strouty

Well-known member
Joined
Mar 21, 2010
Messages
38,209
Location
Southern Maine
Great idea for a rotary table, welds look great. I don't weld things that thick, so it is always neat to see it being done.

What color is the acorn table going to be, pink?
 
OP
D

dr_clyde

Well-known member
Joined
Jan 7, 2009
Messages
6,425
Location
Holland, MI
Great idea for a rotary table, welds look great. I don't weld things that thick, so it is always neat to see it being done.

What color is the acorn table going to be, pink?

Pink would definitely be eye catching.

I'm probably going with boring old machine grey because I happen to have some leftover expensive industrial paint in that color.

I will probably put the blue stripe around the top lip like my plate table so they match.
 

Strouty

Well-known member
Joined
Mar 21, 2010
Messages
38,209
Location
Southern Maine
Need to know basis and you don't need to know.....

I think making them match is definitely the best route. I like machine/battleship gray, that is what I usually paint my rims on trucks, except I mix my own from black and white rustoleum, I always seem to have those colors, but I never buy gray.
 
OP
D

dr_clyde

Well-known member
Joined
Jan 7, 2009
Messages
6,425
Location
Holland, MI
Very nice. What was the application for that pipe?

Customer picked these up a few hours ago, I asked him what they are for. These are for large injection molding machines, and these are the tubes that hold the molten material as it is pressed in to the mold. So basically, these are like super heavy duty syringes for molten plastic.
 

Opa

Well-known member
Joined
Oct 24, 2011
Messages
99
Location
placerville, ca
beautiful welds. i am new to welding. just curious, did you stagger your starts and stops so they aren't all in the same area? or does it matter?
 

Craftfab

Well-known member
Joined
Sep 19, 2018
Messages
411
Location
Garage
Customer picked these up a few hours ago, I asked him what they are for. These are for large injection molding machines, and these are the tubes that hold the molten material as it is pressed in to the mold. So basically, these are like super heavy duty syringes for molten plastic.

Very cool. Thanks. Always enjoy your shop updates.
 
To avoid these ads, REGISTER NOW!
Top Bottom