
You are using an out of date browser. It may not display this or other websites correctly.
You should upgrade or use an alternative browser.
You should upgrade or use an alternative browser.
Above 1200 Sq/FT Eastern Washington Workshop
- Thread starter slodat
- Start date
Wokspaces above 1200 squarefeet.
Toolfool
Well-known member
Excellent !!
Finallygotit
ALLIANCE MEMBER
It's aliiiiiiive!!!


Got the motion working with Mach3 on Windows 10 and a UC100. Going to swap the UC100 out for a Ethernet Smoothstepper so I can run the THC-300. The steppers run the gantry quite nicely.
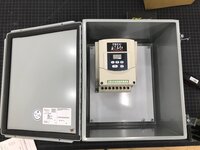
I had this nice Hoffman enclosure so I decided to use it to house all of the controls. Welded studs on. Looks good and will work great!

I'm going to order a Razorweld Razor Cut 30 to get this thing going. Thinking I'll have a sheetmetal shop weld up a water table tray. Not sure if I'll keep this guy. So, I'm going to get it going for as little cash outlay as I can, while still putting a quality machine together. So, mostly using what I have")
I had this nice Hoffman enclosure so I decided to use it to house all of the controls. Welded studs on. Looks good and will work great!
I'm going to order a Razorweld Razor Cut 30 to get this thing going. Thinking I'll have a sheetmetal shop weld up a water table tray. Not sure if I'll keep this guy. So, I'm going to get it going for as little cash outlay as I can, while still putting a quality machine together. So, mostly using what I have
Attachments


Hoffman enclosure came today. It's 10W x 12H x 8D to house a 2hp Teco FM50. Front panel controls will be start and stop push buttons and a matching Allen Bradley potentiometer for speed control. This will be running my open face paint booth exhaust fan from the adjacent room.


Plasma cutter arrived. Razorweld Viper Cut 30. It will get me cutting. When budget allows, I'll upgrade to a better machine.

Had some help last night on the plasma table frame. It's getting close to being sanded down and ready for paint.


Plasma cutter arrived. Razorweld Viper Cut 30. It will get me cutting. When budget allows, I'll upgrade to a better machine.
Had some help last night on the plasma table frame. It's getting close to being sanded down and ready for paint.
Attachments


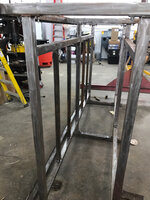
Brushed on a coat of primer.

The CNC router didn't come with T-track on the outside edges of the table. This meant no way to clamp the edge of the mdf spoil board down- the only place it really needs to be clamped. I found some 8' lengths of t-track. They are about 2" shorter than the others that came on the table. Plan is to build a program to drill holes and pockets for nylon socket head cap screws on the two long edges of the 5x8 mdf and thread them into nuts in the t-track.
Got the t-tracks installed this morning. There's a lot of 6-32 flat head cap screws in the 16 feet of rail!!
Attachments


Bib Overalls
Well-known member
[QUOTE=slodat;
I never get a good first coat on metal when I use a brush. Usually takes a minimum of three coats.
I never get a good first coat on metal when I use a brush. Usually takes a minimum of three coats.
rubberrodder
Well-known member
Ehh...a few brush strokes here, a couple dry spots there. It beats the heck out of rusty, crusty any day. I think it looks pretty dang good.
Getting lots of little stuff done in preparation for full custom interior projects. Not much that's photo worthy. I did get this knocked out today.. Added a compressed air system ON-OFF switch to the entry door lighting push button switch box.

Turning the switch to ON energizes the coil circuit for the compressor motor starter and the soft start valve which then slowly pressurizes the shop air system. Turning OFF means the compressor can't run and it dumps the air header pressure. This circuit is supervised by the lightning contractor. So the compressor can't run when I'm not here.
Turning the switch to ON energizes the coil circuit for the compressor motor starter and the soft start valve which then slowly pressurizes the shop air system. Turning OFF means the compressor can't run and it dumps the air header pressure. This circuit is supervised by the lightning contractor. So the compressor can't run when I'm not here.
Attachments

Bib Overalls
Well-known member
Sounds like you are getting close to the grand opening. No one on the Garage Journal Forum has worked as hard and expediently as you have. Envy you for your skills set.
Toolfool
Well-known member
Did someone say Grand Opening ?
hardly
Well-known member
Very nice setup! You're on the home stretch!
To get a spot in line for upholstery work, do we need to take a number?
To get a spot in line for upholstery work, do we need to take a number?
Last edited:
Thanks for checking out my shop and commenting guys! Looks like I've got some time to get the rest of the shop projects knocked out.
I'm itching to tear into this thing and get it together. It's "drivable" in town but not ready for prime time. In the mean time, I washed it off and drove to the shop this afternoon. I love it!!


I'm itching to tear into this thing and get it together. It's "drivable" in town but not ready for prime time. In the mean time, I washed it off and drove to the shop this afternoon. I love it!!
Attachments


BORING HOP YARD
Well-known member
Nice car! and the work you have done to your shop is outstanding.
Toolfool
Well-known member
It looks pretty good from here !


drivesitfar
Well-known member
SD: your shop is looking great as always and keep up the great work!!
just curious how you are posting your pictures cause there is a HUGE issue with Photobucket wanting to charge members $399 a year to do 3rd party hosting when they get to a certain amount of pictures. are you using PB cause if you are and you reach a certain limit they all of a sudden without warning keep the links from opening up on GJ. take a look at a few of the old GJ garage gallery threads and you'll see what i'm talking about.
anyway have a safe and happy 4th and good to hear you are about ready to open up for business. are you planning on quitting your day job and just working for yourself now or do tell?
SD: your shop is looking great as always and keep up the great work!!
just curious how you are posting your pictures cause there is a HUGE issue with Photobucket wanting to charge members $399 a year to do 3rd party hosting when they get to a certain amount of pictures. are you using PB cause if you are and you reach a certain limit they all of a sudden without warning keep the links from opening up on GJ. take a look at a few of the old GJ garage gallery threads and you'll see what i'm talking about.
anyway have a safe and happy 4th and good to hear you are about ready to open up for business. are you planning on quitting your day job and just working for yourself now or do tell?
I've been using Tapatalk's built in photo uploader and hosting for quite some time now. I have never liked or used photobucket. I had used Google Picasa for about ten years until they got rid of the photo link in their user interface. It's all a pain in the **** with the photo hosting.
I won't be quitting the day job anytime soon. Ultimately, that's the goal. For now, just keep plugging along at this crazy dream of mine.
drivesitfar
Well-known member
SD: good to know about Tapatalk if i ever get a new cell phone and want to try it. also happy you (and I) left Photobucket years ago before this latest fiasco.
KEEP THE DREAM ALIVE and it looks better at your shop every week you post up something you managed to do or buy for it.
do you maybe have a friend or an apprentice to help you and maybe learn some of what you do or is that in the plan? it's hard to do EVERYTHING yourself, but it's a lot easier to manage.
cheers


Finallygotit
ALLIANCE MEMBER
Man that is going to be so handy to have. Good job!

Man that is going to be so handy to have. Good job!
Thanks for checking back in on the shop, Dan! The spray booth is essential for the work I do. And, it has been the vision from the start. Not gonna pretend cutting into the roof wasn't a bit nerve racking. Turns out all of the layout work was worth the effort. Didn't have to move or adjust the booth at all once we started assembling the exhaust stack.
Thanks again!
Now, to get the inside done!
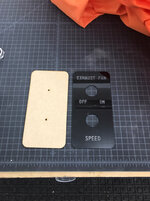
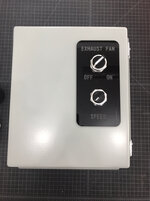
I ordered the exhaust fan with a 3 phase motor so I could use a VFD to control fan speed. I whipped up the control panel placard on the laser this morning. Test run in 1/8 MDF:

A few changes and added keys for each control to line them up:

Once it's right in MDF, cut in 1/8 acrylic along with a drilling template:

All together:

A few changes and added keys for each control to line them up:
Once it's right in MDF, cut in 1/8 acrylic along with a drilling template:
All together:
Attachments


drivesitfar
Well-known member
SD: since you might tend to either walk up on the roof or have workers up there before you close up the repair work you did on the rafters you might want to add some more support for that beam you cut. nails won't hold a lot of weight and home depot might have something that you can bolt or screw on to give it a little extra. it might be fine as is and i hear you about cutting into the roof especially since you just re roofed your shop.
looks great and I agree that is a great addition and should also help your long term health.
looks great and I agree that is a great addition and should also help your long term health.


Gizmosity
Well-known member
Your space and capabilities are amazing. You seem to have one speed:
Warp speed.
Warp speed.
Toolfool
Well-known member
Your space and capabilities are amazing. You seem to have one speed:
Warp speed.
The "capabilities" are what impress me most. Mechanical, electronics, automation, welding, etc. , etc..
Thanks for cheering me on guys! I appreciate you checking out my shop and commenting. Helps keep me going! I'm still smiling about locating the roof hole such that I didn't have to move the booth to line up, at all.
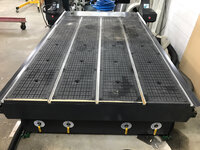
Getting there. In the process of assembling the filter wall.

Getting there. In the process of assembling the filter wall.
Attachments


BoilermakerFan
Well-known member
Love the spray booth!
zmotorsports
ALLIANCE MEMBER
WOW. Been away for a few days and trying to get caught up.
Shop is looking amazing. Great job.
Mike
Shop is looking amazing. Great job.
Mike