To avoid these ads, REGISTER NOW!

Above 1200 Sq/FT Eastern Washington Workshop

Wokspaces above 1200 squarefeet.
To avoid these ads, REGISTER NOW!
OP
S

slodat

ALLIANCE MEMBER
Joined
Feb 6, 2010
Messages
3,679
Location
Central-ish, WA
Got quite a bit done on the bathroom. A friend gave me this full size water heater a few years ago. I’m thinking I’ll want the additional size for the washing machine.

242acfac12dbd93f33f7327f6585e0b1.jpg

I drew a drywall layout template and cut on the laser so I would get it right (enough) the first time. Worked well.

91c376bc5612e0320cdc40f43854c447.jpg

7a2e75fe122b3e8d1e7442d6ac284c2d.jpg

Paint and flooring went well. I painted some of the trim items a satin black.

92880110a241692dda1d5c50b1ebcfe7.jpg

fe1e49ab14a799c47a3c7ce2505c4c6b.jpg

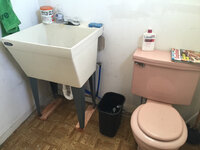
The sewer main moved on us when compacting the soil. This resulted in the sewer stack being about 10.5” rough in from the finished wall instead of the standard 12”. Luckily they make 10” rough in toilets.

fd416a9225ae0f1fd88b9a65f0289f7f.jpg

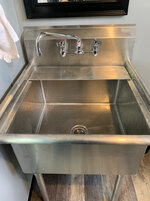
I bought this restaurant style sink when I bought the shop. It’s turning out well.

d57e261bf75610f04b42c5edaefd614e.jpg

I cut a chunk of 1/4” aluminum plate to serve as a shelf for soap and stuff.

afcdb06e85ba964d820251a3fd2255a0.jpg

Still have to run some power from the main panel. So much work.

Happy Fourth!!
 

Attachments

  • 242acfac12dbd93f33f7327f6585e0b1.jpg
    242acfac12dbd93f33f7327f6585e0b1.jpg
    100.8 KB · Views: 1
  • afcdb06e85ba964d820251a3fd2255a0.jpg
    afcdb06e85ba964d820251a3fd2255a0.jpg
    612.8 KB · Views: 1
  • d57e261bf75610f04b42c5edaefd614e.jpg
    d57e261bf75610f04b42c5edaefd614e.jpg
    522.6 KB · Views: 1
  • fd416a9225ae0f1fd88b9a65f0289f7f.jpg
    fd416a9225ae0f1fd88b9a65f0289f7f.jpg
    377.3 KB · Views: 0
  • fe1e49ab14a799c47a3c7ce2505c4c6b.jpg
    fe1e49ab14a799c47a3c7ce2505c4c6b.jpg
    390.3 KB · Views: 0
  • 92880110a241692dda1d5c50b1ebcfe7.jpg
    92880110a241692dda1d5c50b1ebcfe7.jpg
    462.1 KB · Views: 0
  • 7a2e75fe122b3e8d1e7442d6ac284c2d.jpg
    7a2e75fe122b3e8d1e7442d6ac284c2d.jpg
    436.9 KB · Views: 0
  • 91c376bc5612e0320cdc40f43854c447.jpg
    91c376bc5612e0320cdc40f43854c447.jpg
    467.1 KB · Views: 0
Last edited:

Corsair4360

Well-known member
Joined
Nov 7, 2013
Messages
63
Location
Logan, Utah
thanks for sharing what you have done and how. I have to get on with posting about my shop adventures. Should be finished later this year.
 
OP
S

slodat

ALLIANCE MEMBER
Joined
Feb 6, 2010
Messages
3,679
Location
Central-ish, WA
Great job, well done. Smooth design and execution.

Thank you for the kind words! It’s the same flooring and colors as the display room I did a couple years ago.


thanks for sharing what you have done and how. I have to get on with posting about my shop adventures. Should be finished later this year.

Thank you for checking out my shop. Looking forward to seeing yours!


Bathroom looks awesome

Thank you!


Nice work, it came out very well!

Thank you! I’m happy with it. Not what I wanted to be doing right now, happy with the result.


Bathroom turned out awesome Steven. Great recovery and nice execution. Clean looking.

Thanks, Mike! I still have some concrete block and dirt work to take care of outside.


This is a small bathroom.. about 69” x 82”. The 24” apartment style stacked washer dryer fits nicely, and fills up the room. I didn’t have much in the way of options on locating everything in the wall. That’s why it’s so busy looking. I got the remaining wall plates today. I’m happy with it considering.

ee461e015eae0959448f1946392c00b9.jpg

This is a before photo for comparison:
62292d423d2bd4cce921e94ffd8c8e64.jpg
 

Attachments

  • ee461e015eae0959448f1946392c00b9.jpg
    ee461e015eae0959448f1946392c00b9.jpg
    453.6 KB · Views: 1
  • 62292d423d2bd4cce921e94ffd8c8e64.jpg
    62292d423d2bd4cce921e94ffd8c8e64.jpg
    596.7 KB · Views: 1

Bob Heine

ALLIANCE MEMBER
Joined
Oct 24, 2009
Messages
10,703
Location
Boca Raton, Florida
Steven, the bathroom compliments the rest of the shop much better now. That's some amazing drywall cutting. I measure once, cut three times and then make patches. There is a lot of scrap drywall in the attic because of my method.
 
OP
S

slodat

ALLIANCE MEMBER
Joined
Feb 6, 2010
Messages
3,679
Location
Central-ish, WA
Wrapping the bathroom project up. Painted the cabinets to match.

eb1121ad17b2ebcf2f4ba779e6cc1d86.jpg

636f9408003e179f1dbb66dba53959df.jpg

Sandblasted and painted the door pulls. Details :)

2bcfb5a9ed06d2017e81e23b730a0a21.jpg

Laundry is connected up. That’s a lot of stuff in a 24” space.

352da71af590cc4fc95fe97e2548507e.jpg

It’s funny.. I’m quite utilitarian in most things. Once I give something my once over the minimalist comes out and I don’t want to look at clutter and I tend to want to not have things interrupt lines or the color pallet..

6d1496439f970de520e79e5e3807692e.jpg

I may make a cabinet over the laundry to hide that clutter at some point. All that’s left is to run the electrical back to the panel and re-hang the door.
 

Attachments

  • 6d1496439f970de520e79e5e3807692e.jpg
    6d1496439f970de520e79e5e3807692e.jpg
    447.4 KB · Views: 1
  • 2bcfb5a9ed06d2017e81e23b730a0a21.jpg
    2bcfb5a9ed06d2017e81e23b730a0a21.jpg
    814.8 KB · Views: 1
  • 636f9408003e179f1dbb66dba53959df.jpg
    636f9408003e179f1dbb66dba53959df.jpg
    408.4 KB · Views: 1
  • eb1121ad17b2ebcf2f4ba779e6cc1d86.jpg
    eb1121ad17b2ebcf2f4ba779e6cc1d86.jpg
    412.2 KB · Views: 1
  • 352da71af590cc4fc95fe97e2548507e.jpg
    352da71af590cc4fc95fe97e2548507e.jpg
    464 KB · Views: 0
OP
S

slodat

ALLIANCE MEMBER
Joined
Feb 6, 2010
Messages
3,679
Location
Central-ish, WA
Thanks for cheering me on guys!

I woke up at 5am, for no specific reason. I sure didn’t have an alarm set. So, I’ve been here for an hour already pulling in wire to the bathroom.
 
To avoid these ads, REGISTER NOW!
OP
S

slodat

ALLIANCE MEMBER
Joined
Feb 6, 2010
Messages
3,679
Location
Central-ish, WA
Shop laundry is really nice. I rarely use paper towels. I bought the Costco blue disposable shop towels ten years ago and still have a few rolls. I use the terry cloth shop towels, also from Costco, until they aren’t worth washing anymore. I also ran my microfiber mop and dust mop through the laundry. Worked great. It’s almost silly how much I’ve enjoyed doing the shop laundry.. in the shop.

I bought the big stainless sink used right after I bought the shop. I’ve since found I paid way too much for it. Live and learn. It’s a well made sink. I didn’t like the fixed spout on the faucet. I looked at converting to a swivel, but the valves were leaking a little. It cost less to buy a new faucet than throw parts at the existing one. Fisher makes a very nice faucet. Got it installed this morning.

243e0fb62ab41f24f74a821fea2611a9.jpg

Only thing remaining inside on the bathroom is to rehang the door. And move the light switch.
 

Attachments

  • 243e0fb62ab41f24f74a821fea2611a9.jpg
    243e0fb62ab41f24f74a821fea2611a9.jpg
    605.2 KB · Views: 0

Bob Heine

ALLIANCE MEMBER
Joined
Oct 24, 2009
Messages
10,703
Location
Boca Raton, Florida
Steven, that sink is fantastic. I especially like the ability to put a 5-gallon bucket in the sink to fill it, with hot or cold water.

I'm with you on the Costco terry towels. We use them in the kitchen and when they get grungy we move them to the garage. When the kitchen supply gets low we buy another pack. Now that my garage towel supply is too large, we recycle them. I fill a 5-gallon bucket with detergent, bleach and Shout or whatever other laundry chemical we have in the house. Soak the towels in the brew for a day or two and then rinse two or three times. Final step is to run them through the washer and dryer. They don't look new but they look good enough to be used in the kitchen again.

I'm getting close to the end of my second blue shop towel roll (after three years) and will then finish the three-pack by 2022.

To be fair, I use paper towels to blow my nose -- those "facial tissues" are like blowing my nose into my bare hand. Twelve rolls of Costco paper towels cost less than 12 boxes of Kleenex (or even Walnex).
 
OP
S

slodat

ALLIANCE MEMBER
Joined
Feb 6, 2010
Messages
3,679
Location
Central-ish, WA
The bathroom door was some work. It needed to be hung from the other side.. it never made sense the way it was hung before. The door opened into the sink. [emoji2357]

Door also had many layers of paint slathered on over the years. Lots of sanding with 40 grit and it cleaned up alright. Hardware made a trip through the sandblaster and a quick spray of paint. I’m happy with the results. At some point I’ll sort out the latch. It looks like a total pain in the ***.

641946d9843398ae84b5542dfd639581.jpg
 

Attachments

  • 641946d9843398ae84b5542dfd639581.jpg
    641946d9843398ae84b5542dfd639581.jpg
    507.4 KB · Views: 1
OP
S

slodat

ALLIANCE MEMBER
Joined
Feb 6, 2010
Messages
3,679
Location
Central-ish, WA
Nah, I think you can handle a simple strike mortise.


I had to shave about 1/8” off the edge of the door. Now I have to move everything over that amount... the internal door lock mortise, re-cut the lock plate mortise on the door edge and of course the associated strike mortise in the door jamb. Another day where I have more patience than I did last night ;)
 

Toolfool

Well-known member
Joined
Aug 22, 2011
Messages
4,980
Location
Tallahassee, FL
I had to shave about 1/8” off the edge of the door. Now I have to move everything over that amount... the internal door lock mortise, re-cut the lock plate mortise on the door edge and of course the associated strike mortise in the door jamb. Another day where I have more patience than I did last night ;)

Was that 1/8" because you didn't mortise the hinges into the other side of the jamb ? The mortise is what actually supports the door.
 
OP
S

slodat

ALLIANCE MEMBER
Joined
Feb 6, 2010
Messages
3,679
Location
Central-ish, WA
Was that 1/8" because you didn't mortise the hinges into the other side of the jamb ? The mortise is what actually supports the door.

I mortised the hinges into the door jamb. The 1/8" is because it never closed right. So, I trimmed just a touch off the edge with my track saw. It's all kinds of out of whack going into this. It opens and closes pretty nicely. I'll pull it off and get the latch fitted correctly along with the top plate and re-assemble.
 
OP
S

slodat

ALLIANCE MEMBER
Joined
Feb 6, 2010
Messages
3,679
Location
Central-ish, WA
A few things have followed me home recently.. Very nice condition, heavy duty drill press with an Albrecht chuck. This was a score for sure. I’ve been keeping an eye out for a drill press with table elevation for the woodshop for a while.

27bbcab5fac98461323d51402e58348a.jpg

76dd7bcb62737115b0d6580701e06f78.jpg

4d33f16a4505582dc3fc179d9e2b2a29.jpg

1b350fbe195d9f003b134685257b159b.jpg

I’ve always wanted a Workmate. Bought this one at a neighbors estate sale.

8f4a8a92ba6c341dc840758059cd666e.jpg

This Harbor Freight tool cart lives up to the hype. Will be nice to have portable hand tools I can wheel around the shop instead of always running for stuff.

6354ebcdd1aeb0425b7815c7268182d5.jpg

I found out about these Porter Cable 121 drum sanders on @lilscorpions thread. Hard to find. I picked it up with the drill press. Thinking I’ll make a plate to use in the router table.

1c88547320843a0faa2ee9083e683468.jpg

15fc1d401462bef72251bd8ce58e898b.jpg
 

Attachments

  • 76dd7bcb62737115b0d6580701e06f78.jpg
    76dd7bcb62737115b0d6580701e06f78.jpg
    463.9 KB · Views: 1
  • 15fc1d401462bef72251bd8ce58e898b.jpg
    15fc1d401462bef72251bd8ce58e898b.jpg
    712.8 KB · Views: 1
  • 1c88547320843a0faa2ee9083e683468.jpg
    1c88547320843a0faa2ee9083e683468.jpg
    681.6 KB · Views: 1
  • 6354ebcdd1aeb0425b7815c7268182d5.jpg
    6354ebcdd1aeb0425b7815c7268182d5.jpg
    496.7 KB · Views: 0
  • 8f4a8a92ba6c341dc840758059cd666e.jpg
    8f4a8a92ba6c341dc840758059cd666e.jpg
    565.1 KB · Views: 0
  • 1b350fbe195d9f003b134685257b159b.jpg
    1b350fbe195d9f003b134685257b159b.jpg
    415.8 KB · Views: 0
  • 4d33f16a4505582dc3fc179d9e2b2a29.jpg
    4d33f16a4505582dc3fc179d9e2b2a29.jpg
    448.7 KB · Views: 0
  • 27bbcab5fac98461323d51402e58348a.jpg
    27bbcab5fac98461323d51402e58348a.jpg
    506.6 KB · Views: 0
OP
S

slodat

ALLIANCE MEMBER
Joined
Feb 6, 2010
Messages
3,679
Location
Central-ish, WA
I plan to put a cord on it here in few minutes and put it to work! It's a really nice machine. At some point, I may go down the rabbit hole of completely restoring several tools. In the mean time, I will use and enjoy them with the bumps and bruises.
 
OP
S

slodat

ALLIANCE MEMBER
Joined
Feb 6, 2010
Messages
3,679
Location
Central-ish, WA
Finally ran the MaxLine to the laser. It went it well. I really like the way it goes mounting to unistrut. Air runs through a separator, pressure regulator and Motorguard filter. I also hung the last air hose reel.

07ec39739484a4f451b603d78adde3f4.jpg

50d0099707fa86d7400b0d33ca9f8474.jpg

Paint was a bit soft. I’ll touch it up.

3a3b27f6523e6ed639f38adf72ccf48b.jpg
 

Attachments

  • 07ec39739484a4f451b603d78adde3f4.jpg
    07ec39739484a4f451b603d78adde3f4.jpg
    743.1 KB · Views: 0
  • 50d0099707fa86d7400b0d33ca9f8474.jpg
    50d0099707fa86d7400b0d33ca9f8474.jpg
    643.5 KB · Views: 0
  • 3a3b27f6523e6ed639f38adf72ccf48b.jpg
    3a3b27f6523e6ed639f38adf72ccf48b.jpg
    626.4 KB · Views: 0
OP
S

slodat

ALLIANCE MEMBER
Joined
Feb 6, 2010
Messages
3,679
Location
Central-ish, WA
Finish room air drop is coming together.

9bce22bfa472be5ecde60d9846e24cb9.jpg

Waiting on a couple parts and it will be up.
 

Attachments

  • 9bce22bfa472be5ecde60d9846e24cb9.jpg
    9bce22bfa472be5ecde60d9846e24cb9.jpg
    695 KB · Views: 0
OP
S

slodat

ALLIANCE MEMBER
Joined
Feb 6, 2010
Messages
3,679
Location
Central-ish, WA
Air drop in the finish room is in.

cd87b9ecfb0d0298634a8b62866a2650.jpg

Valve down stream of the regulator makes pressure adjustment a bit easier. Found a 0-60 psi gauge for a low price on the auction site.

19aa222c6734f2b350f8f0754511f43a.jpg
 

Attachments

  • cd87b9ecfb0d0298634a8b62866a2650.jpg
    cd87b9ecfb0d0298634a8b62866a2650.jpg
    505 KB · Views: 0
  • 19aa222c6734f2b350f8f0754511f43a.jpg
    19aa222c6734f2b350f8f0754511f43a.jpg
    318.9 KB · Views: 1
OP
S

slodat

ALLIANCE MEMBER
Joined
Feb 6, 2010
Messages
3,679
Location
Central-ish, WA
Question was asked about why the point of use regulators.. then the post disappeared while I was working on a reply. Reason for these two point of use setups.. the laser air pressure is changed based upon what it's doing. The finish room air pressure for most HVLP guns is ~20psi. The Motorguard filters at both locations is to get the driest air I can. Similarly I will have a drop at the CNC router with a regulator to drop the pressure down for air on the cutter. This is used for plastics and aluminum to clear chips away. That is the last air system project I have planned.

The entire system is Pex-Al-Pex (Maxline) and aluminum (FastPipe) tubing. Fittings are a mix of brass, stainless and copper. No steel to rust. Out of the compressor there's a full pressure tap, main regulator, soft start valve and lower pressure tap. Then it heads out to the shop.

0967faa220e6a6710eb2e21bcf405312.jpg
c882a3eb40f0c1c45b6c5734e04ccc89.jpg
 

Attachments

  • c882a3eb40f0c1c45b6c5734e04ccc89.jpg
    c882a3eb40f0c1c45b6c5734e04ccc89.jpg
    63.7 KB · Views: 1
  • 0967faa220e6a6710eb2e21bcf405312.jpg
    0967faa220e6a6710eb2e21bcf405312.jpg
    122 KB · Views: 0

Binrat

Well-known member
Joined
Nov 30, 2011
Messages
186
Location
Hurst, TX
shouldnt all your regulators and filters be before the output fitting? or am i missing something?
 
OP
S

slodat

ALLIANCE MEMBER
Joined
Feb 6, 2010
Messages
3,679
Location
Central-ish, WA
shouldnt all your regulators and filters be before the output fitting? or am i missing something?


They are, with the exception of the single full pressure tap upstream of the main regulator. I put that there if I ever want full tank pressure. I have an old pneumatic hoist that needs 150 psi. I rarely use it, and that’s why I did the full pressure tap.
 
Last edited:
OP
S

slodat

ALLIANCE MEMBER
Joined
Feb 6, 2010
Messages
3,679
Location
Central-ish, WA
I’ll admit these 4-1/2” gauges are not needed, but they are cool, easy to read and didn’t cost much at all. Industrial surplus.

ea8a2f2a4108ea024cc466a6b203a37f.jpg
 

Attachments

  • ea8a2f2a4108ea024cc466a6b203a37f.jpg
    ea8a2f2a4108ea024cc466a6b203a37f.jpg
    595 KB · Views: 0
To avoid these ads, REGISTER NOW!
Top Bottom