OP

You are using an out of date browser. It may not display this or other websites correctly.
You should upgrade or use an alternative browser.
You should upgrade or use an alternative browser.
Above 1200 Sq/FT Finally build my, long needed, shop
- Thread starter Michael B.
- Start date
Wokspaces above 1200 squarefeet.
captain14
Well-known member
Will you be doing a build thread on on the ‘56? There’s another member that will be putting his ‘56 Dodge body on his Dakota after he retires soon. He hasn’t started the work yet, but posted his plans. I’ll have to find the thread and post it here.Thanks @Jayman17 ! The 55' GMC sitting in the shop is just sheet metal I am using for test fit purposes. I have a 56' GMC sitting under the shed behind the shop that will eventually be fitted to the 76' 3/4 ton 4wd chassis under the 55'.
OP
Michael B.
Well-known member
Cap’ I will have a build thread once that project gets started. I have seen the build thread on the 56’ Dodge. I’m eagerly waiting for him to get busy with that one!
SilverJimmy
Well-known member
Nice shop, I’ve read your whole build. On your GMC build with the 76 3/4 ton chassis I’m sure you know about the General’s philosophy on axle widths. On the 1/2 and 3/4 tons, the rear axle is narrower than the front. I’m a 1 Ton fan because they have the rear axle width the same as the front. I just think it looks better with the tires in the same place/plane. A cool trick is to find a 3/4 van rear axle as they are the same width as a GM 4x4 front axle. A poor man’s 1 ton without having a Dana 60 front. Trick works with 1/2 tons too. Your chassis is probably a 3.73:1 so a matching 14 bolt rear should be an easy find if you wanted to go this route. Looking forward to your build on the truck, if you do it 1/2 as nice as your shop it should be stunning!
OP
Michael B.
Well-known member
@SilverJimmy Thanks for the kudos and advice. I was aware of the axel width differences in 1/2 & 3/4 ton trucks. Supposedly GM intentionally did this for off road tracking offset. I did not realize 1 tons were different. I'm not too concerned about it with my build as the Task Master truck series has wider front fenders than rear. I actually need the narrower rear axle for tire tuck in the rear fenders.
racer-john
Well-known member
Best of the season to All.
OP
Michael B.
Well-known member
Thanks RJ! I hope you and your family will have a blessed Christmas and New Year!
Toolfool
Well-known member
Merry Christmas Michael.
OP
Michael B.
Well-known member
Thank you John! I hope you and your family will have a very blessed Christmas season.Merry Christmas Michael.
OP
Michael B.
Well-known member
I have a situation in the shop I have never dealt with before. The walk through door has a hollow aluminum frame. During this unusual cold weather the door frame has grown ice crystals all the way around the door on the inside. I had noticed condensation in this area previous to the extreme cold. So the ice is no surprise. My question is how can I prevent this in the future? Will heating the space immediately adjacent to the door make this better or worse? Should I attempt to install spray foam into the door frame for insulation? Feedback will be greatly appreciated!

OP
Michael B.
Well-known member
Merry Christmas to all of my GJ brothers and sisters!
BORING HOP YARD
Well-known member
Michael B, can you get a better picture of the overall problem, I need more information on the situation for possible help.
Thank you.
Thank you.
OP
Michael B.
Well-known member
Sorry but the temperature has risen sufficient to melt the ice crystals. It basically frosted the inside portion of the door casing on all 3 sides.Michael B, can you get a better picture of the overall problem, I need more information on the situation for possible help.
Thank you.
OP
Michael B.
Well-known member
After being with my family for 5 days and no shop time, I got back to work yesterday. I started the mezzanine wall and finished it today. With the remaining materials I finished the stairwell walls inside and out. There are only 5 boards remaining from the last truck load of salvaged wood.


OP
Michael B.
Well-known member
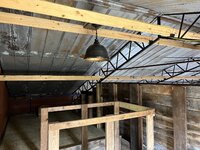
Nothing picture worthy happened yesterday. I cleaned around the work area and hauled about 15 gallons of sawdust out from under the bench. Then I hung the electrical boxes for the lights under the mezzanine and in the cave. After that I drilled the holes for the wiring run to those boxes. I was in the shop early yesterday and was greeted with this view.

OP
Michael B.
Well-known member
I drilled more holes and then pulled wire. The two corners are 6x6’s with one or more 2x6’s attached to them, that I drilled for the 90 degree angle. Lucky me they both needed two wires run through them! That was fun. But now the work area, mezzanine and man cave are ready to have their devices installed.


This is all that is left of my second 250’ roll of wire. About 3’

This is all that is left of my second 250’ roll of wire. About 3’
OP
Michael B.
Well-known member
At least I had help today!

Then it was nap time.

Then it was nap time.
OP
Michael B.
Well-known member
Happy New Year my GJ brothers and sisters! I hope your 2023 will be blessed with family, friends, love, joy and peace.
Kevkx125
Well-known member
Happy New Year Michael B , I like your help, now you have a mouse free zone!!!
OP
Michael B.
Well-known member
Thanks Kev! They do a good job of keeping the shop secure from unwanted visitors. 
Happy New Year Michael B , I like your help, now you have a mouse free zone!!!
OP
Michael B.
Well-known member
Thanks J! I usually don’t leave anything on the ladder unless I’m actively using it.The siding came out great on the inside wall. Do you ever worry your cat helpers are going to knock something off the ladder? Be careful working under them")
Jayman17
Well-known member
Enjoy the new year in your awesome shop!
Jay
Jay
Mr_P
Well-known member
Well, that was a wonderful read over the last couple of days. Great job!
jarhead
Well-known member
Nice shop, COOL trucks 
OP
Michael B.
Well-known member
Thank you Jay!Enjoy the new year in your awesome shop!
Jay
I’m glad you enjoyed it Mr_P!Well, that was a wonderful read over the last couple of days. Great job!
Thanks Jarhead!Nice shop, COOL trucks
OP
Michael B.
Well-known member
Today I installed all of the sheet metal in the ceiling of the work are under the mezzanine. Then I hung three 8’ led fixtures.


My helpers assume more of a supervisory roll today.

My helpers assume more of a supervisory roll today.
captain14
Well-known member
Are either of the helpers qualified as a safety specialist also? Last week when I was out doing yard work, one of the neighbors cats came over to chase the orange extension cord. While this was going on, she was getting the evil eye from Dakota inside the house.
Attachments

jbrentd
Well-known member
Everything is looking awesome, Michael! Happy New Year!
OP
Michael B.
Well-known member
Cap’ they think they are!Are either of the helpers qualified as a safety specialist also? Last week when I was out doing yard work, one of the neighbors cats came over to chase the orange extension cord. While this was going on, she was getting the evil eye from Dakota inside the house.
Thanks Brent!Everything is looking awesome, Michael! Happy New Year!
OP
Michael B.
Well-known member
Yesterday I returned home in time to visit my local lumberyard for some more trim material. I needed 1x4’s and 1x6’s. Today I stained all of that material. Then I hung the new light fixture in the mezzanine. After that I finished trimming the work area under the mezzanine. Then it was time to start moving items into place.


Attachments
OP
Michael B.
Well-known member
My birthday present arrived early 


jbrentd
Well-known member
Very cool! Happy early birthday!
OP
Michael B.
Well-known member
Thanks Brent!
Toolfool
Well-known member
Congrats. Happy Birthday. That has some great detail.
OP
Michael B.
Well-known member
Thanks John! For the price point it has excellent details. The doors, hood and tailgate open. The top is removable and the windshield lays down, just like the real truck. It has a metal frame with functional leaf springs and shocks. It also has a Hi/Lo transfer case with functioning Hi/Lo beam headlights, FR turn signals, brake lights, tail lights and reverse lights. The shipping case has a handle and latches, so it doubles as a carrying case. With a price of about $250.00 shipped. It’s not a perfect replica by any means but it is very close.
Toolfool
Well-known member
Sounds like an unnecessary extra, it should be on display, and never leave the shop.The shipping case has a handle and latches, so it doubles as a carrying case.
OP
Michael B.
Well-known member
If I take it somewhere, it will be very necessary.
OP
Michael B.
Well-known member
I have started moving the furniture and junk around. I emptied two shelving units in preparation of relocation to the mezzanine. I knew they were too heavy for me to handle by myself, so I enlisted the help of my neighbor. They’re too heavy for the two of us. These units are 6’x4’x18” and weigh about 140 lbs. So now we go to plan B. Disassemble move and reassemble each unit. There are 80 nuts and bolts on each unit. There are 5 shelving units. So 400 nuts and bolts removed and then reinstalled!  That’s a whole lot of screwing around!! So far I have two units disassembled and relocated upstairs awaiting reassembly.

Today the yard was dry enough to move the bench from the house garage to the shop. So I loaded the bench along with everything on and around it into the 68’. Currently it’s waiting to be unloaded and setup in the new work area.

That’s a whole lot of screwing around!! So far I have two units disassembled and relocated upstairs awaiting reassembly. Today the yard was dry enough to move the bench from the house garage to the shop. So I loaded the bench along with everything on and around it into the 68’. Currently it’s waiting to be unloaded and setup in the new work area.
OP
Michael B.
Well-known member
I spent a few days moving shelves, parts and tools upstairs. I emptied 4 pallets and started putting some organization to the mess that has been the shop area for months. The bench is unloaded and set up. It was immediately covered up in miscellaneous items I took the time to weigh the parts of a shelving unit I had disassembled. It weighs in at 150 lbs per unit. I also setup a metal cabinet and the buffing station at the front of the lift bay.
Before

After

I took the time to weigh the parts of a shelving unit I had disassembled. It weighs in at 150 lbs per unit. I also setup a metal cabinet and the buffing station at the front of the lift bay. Before
After
