To avoid these ads, REGISTER NOW!

Above 1200 Sq/FT Finally building the shop!!

Wokspaces above 1200 squarefeet.

booch

Active member
Joined
Dec 14, 2014
Messages
41
Location
CT Shoreline
Looking great, amigo! When the world is a little more normal we'll have to take a ride up and check this baby out in person, I am sure our kids will have fun together while the big kids check out the barn :D
I am 'blessed' with ledge all over my property, too, so it's nice to see how it's dealt with. There is one spot in my woods that would support a barn nicely, but it's all ledge and I had been reluctant to put something there... but you're giving me hope!
- Sandy Clam
 
To avoid these ads, REGISTER NOW!
OP
J

Juiced06GTO

Well-known member
Joined
Jun 1, 2014
Messages
356
Location
Sutton, MA
Welcome to the thread brother! Who knows, maybe I'll get to prep the car in the garage this year before race season starts...I'll have no money left so I'll be running around on 3 year old frozen hoosiers, but at least it'll be fun! Wait until the weather warms up, or I at least have walls up before ya head up....its cold and drafty in there right now haha!
 
OP
J

Juiced06GTO

Well-known member
Joined
Jun 1, 2014
Messages
356
Location
Sutton, MA
The guys are making some more progress. I am working on getting the electrical company to put a separate meter on building so I can start moving forward with that. I think I am going to do ship lap on the interior and surface mount the electrical in EMT. Anyhow, some more progress pics and some more out of order pictures I forgot to post!!
 

Attachments

  • Gable end 2.jpg
    Gable end 2.jpg
    149.9 KB · Views: 282
  • Gable end prep.jpg
    Gable end prep.jpg
    167.1 KB · Views: 265
  • Trusses going up.jpg
    Trusses going up.jpg
    144.4 KB · Views: 245
  • Back wall siding.jpg
    Back wall siding.jpg
    57.4 KB · Views: 255
  • Roofand Siding on.jpg
    Roofand Siding on.jpg
    51.4 KB · Views: 277
OP
J

Juiced06GTO

Well-known member
Joined
Jun 1, 2014
Messages
356
Location
Sutton, MA
Alright, time for some more updates. We have been hit with some good snow storms, COVID delays, and borderline mental breakdowns due to all being home together for way to long with absolutely no way to get out and do anything, but the show moves on!

The guys have all of the ship lap siding up, they installed the front man door and all the windows. They need to trim everything out and build the hay loft door and their part will be pretty much done until I get the floor poured and they can come back and build the stairs.

I am wrestling with the decision of whether or not to bite the bullet and insulate under the slab and put the pex tubing in or just heat the place with a big propane Modine heater. My gut says to put it in so I don't regret not having done it later, at any rate i have a few more months before the floor goes in to decide on that. On to some pictures to get this thread caught up. I'll snag some more in the daylight today
 

Attachments

  • IMG_6116.jpg
    IMG_6116.jpg
    148.1 KB · Views: 280
  • IMG_6119.jpg
    IMG_6119.jpg
    159.6 KB · Views: 251
  • IMG_6152.jpg
    IMG_6152.jpg
    124.9 KB · Views: 254
  • IMG_6140.jpg
    IMG_6140.jpg
    98.5 KB · Views: 256
  • IMG_6118.jpg
    IMG_6118.jpg
    147.3 KB · Views: 267
  • IMG_6115.jpg
    IMG_6115.jpg
    147.5 KB · Views: 258
  • IMG_6114.jpg
    IMG_6114.jpg
    159.1 KB · Views: 275

Evilcactuar

Well-known member
Joined
May 31, 2013
Messages
94
Location
Connecticut
I'd insulate the floor either way, and if you're going that far the cost of pex is pretty trivial. You can do reclaimed foam and save a bundle on that as well. I bought mine from green insulation group, they are around springfield.
 
OP
J

Juiced06GTO

Well-known member
Joined
Jun 1, 2014
Messages
356
Location
Sutton, MA
Thanks for the heads up, it says there office is 10 Pullman St in Worcester, which is exactly 1 street overfrom my work and I never knew they were there!!
 

booch

Active member
Joined
Dec 14, 2014
Messages
41
Location
CT Shoreline
Do it! Better the have it there and not use it, then want it later on and not be able to add it in. We're happy to help you spend your money :D
 

Evilcactuar

Well-known member
Joined
May 31, 2013
Messages
94
Location
Connecticut
No sweat brother. When you pull in it's down the back side to the right, took me a while to find it. They had a ton of 2.5" 40psi foam (it was covered in dirt, I ended up power washing it), but it was pretty reasonable.
 
OP
J

Juiced06GTO

Well-known member
Joined
Jun 1, 2014
Messages
356
Location
Sutton, MA
Do it! Better the have it there and not use it, then want it later on and not be able to add it in. We're happy to help you spend your money :D

Between you and Matt, you guys have spent my money on in floor heat, a quality lift and a miata.....

I'm also now going to be living in the barn...
 
OP
J

Juiced06GTO

Well-known member
Joined
Jun 1, 2014
Messages
356
Location
Sutton, MA
Hey man, I never told you a Miata was a good idea. I'd have built an exocet.

Haha, a buddy that Booch and I race with has been suggesting I buy a Miata for road racing for years now and give up on racing the GTO. I just can't ever seem to do the simple thing...
 
OP
J

Juiced06GTO

Well-known member
Joined
Jun 1, 2014
Messages
356
Location
Sutton, MA
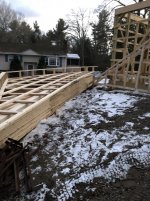
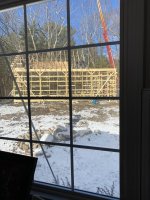
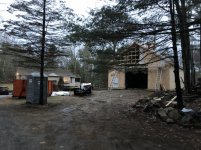
So the last month has been fun between weather, mud season, crazy work and ever changing family schedules. The contractor did finish up *most* of the items they are responsible for, other than the transom window, loft door, and stairs to the second floor. That is until I started taking some measurements to insulate the skirt boards...

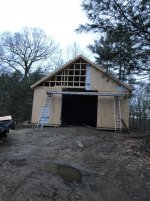
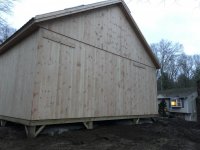
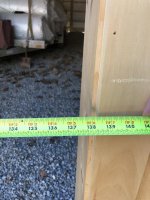
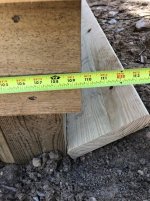
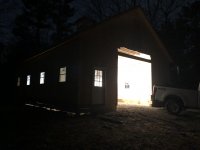
For some reason the left and right walls on either side of the front door didn't seem to measure the same. At first I thought it may have been the beers I drank while grilling dinner, or the cheap Kobalt tape measure I was using, but even after 4 or 5 more beers and about as many tape measures, I kept ending up at the same result. Right wall - 109.5" to the opening. Left wall - 114" to the opening. Garage door opening - 11'6".

After a few more beers I finally accepted that the left side post for the garage door was not where it should be. The crazy part was the skirt board on that side was cut to the correct length as was the box beam above, they just didn't land on the 6x6 at the right spot.

Ensue lots of swearing, a few more beers, and (at this point its probably 1130 at night) a stomping walk back to the house to sleep on the situation. The thing that put me over the edge was that they could clearly see it was wrong and it didn't match the plans and could have been corrected before I ever back filled the posts! At this point I was ready for a battle with the contractor about how to fix things, but thought it better to just go to bed!

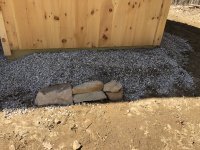
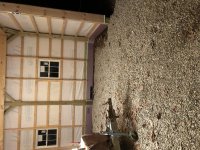
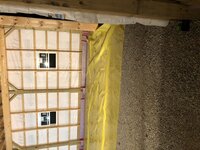
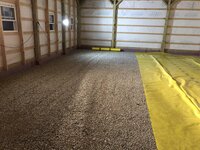
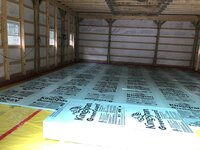
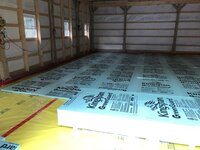
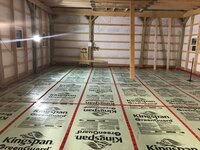
Aside from this, I made some decent scores over the past month, including 20 - 6'x92' rolls of insulation for free, all the second hand guys seem to be out of 2" rigid foam to put under the slab though, still waiting to score something there! Hopeful to start making progress again soon!
 

Attachments

  • Post off Meas.jpg
    Post off Meas.jpg
    128.4 KB · Views: 212
  • Garage door open meas.jpg
    Garage door open meas.jpg
    87 KB · Views: 199
  • Skirt Board Meas 1.jpg
    Skirt Board Meas 1.jpg
    148.1 KB · Views: 212
OP
J

Juiced06GTO

Well-known member
Joined
Jun 1, 2014
Messages
356
Location
Sutton, MA
So the front door is fixed! After some discussion about what was supposed to be built and what was actually built, we agreed that the post needed to be moved. I fired up the kubota and dug out around the post down to the footing. They came in the following day and moved the post and resided the front wall on that side. There were a few things they could have done differently, but all in all I'm happy and the door is a true 12' opening now. It is amazing how noticeable 6 inches is....

Anyhow, them fixing that has allowed me to make some more progress. I added a second row of skirt boards all the way around the building so I had something to attach the foam board to below grade. They left all the 2x6 studs too long so I had to trim them all by 2.5" so they wouldn't end up buried in the concrete so that took a little time. The dewalt oscillating tool was a life saver there! All the foam is up on the skirts now, so I can start grading the rest of the stone and compacting.

All that is left after that is the vapor barrier, foam board, pex tubing, and rebar! Planning for a 5" slab with #6 rebar through out. I am hoping to find a nice used Mohawk lift to install and that is what they recommend. There is also a good chance I may have a heavier piece of equipment in there from time to time so rather safe than sorry!

I ordered everything needed to get the pex in the floor and up to a manifold, the rest of the system will wait a while. Tomorrow I am shooting to get the rebar and vapor barrier ordered along with some more stone and fill for around the outside of the barn. I think I have enough inside to get everything leveled off correctly. Feeling good to have this thing moving again!! Also had to throw a pic in of my insulation haul, should have me pretty well covered!
 

Attachments

  • Trailer load of Insul.jpg
    Trailer load of Insul.jpg
    108.2 KB · Views: 224
  • Skirt boards and 2 bys.jpg
    Skirt boards and 2 bys.jpg
    124.9 KB · Views: 210
  • Slab Insul Starting.jpg
    Slab Insul Starting.jpg
    106.3 KB · Views: 228

booch

Active member
Joined
Dec 14, 2014
Messages
41
Location
CT Shoreline
Coming along nicely! That was a good score on the insulation, too. Glad your contractor was able to get the door remediated, it would have really sucked to find out later on.
You going to make the NHMS opener in May? I still need a wing and tires, and figure out what class I'm running in. I got 'reward points' for winning T70 next year, so I can either duke it out in T80 or maybe move to Super C... I'd do ok in 80 at the short tracks but get walloped at the Glen.
 
OP
J

Juiced06GTO

Well-known member
Joined
Jun 1, 2014
Messages
356
Location
Sutton, MA
I'd like to make Saturday for the opener, both days is out for me. It is Mother's day weekend and between me being buried at work, building the barn, and my wife being home with the kids for school a majority of the time I don't think it would be in my best interest to disappear for the weekend to go racing...

I am going to sneak a tire order in with all the stuff I'm ordering for the barn though :)
 

OOBER

Well-known member
Joined
Dec 2, 2012
Messages
153
Location
Kansas City
Looking good! I really like the woodwork.

Good luck with the heated floor install! Take your time, you only get one shot make sure everything is exactly where you want it.

Make sure your concrete contractor knows you are doing a heated floor. I had to pay extra for a pump truck since they cant mud buggy over the foam and tubes.
 
To avoid these ads, REGISTER NOW!

ZRX61

Well-known member
Joined
Aug 15, 2006
Messages
28,716
Location
Solar Blight Valley, SoCal
So the front door is fixed! After some discussion about what was supposed to be built and what was actually built, we agreed that the post needed to be moved. I fired up the kubota and dug out around the post down to the footing. They came in the following day and moved the post and resided the front wall on that side. There were a few things they could have done differently, but all in all I'm happy and the door is a true 12' opening now. It is amazing how noticeable 6 inches is....

Anyhow, them fixing that has allowed me to make some more progress. I added a second row of skirt boards all the way around the building so I had something to attach the foam board to below grade. They left all the 2x6 studs too long so I had to trim them all by 2.5" so they wouldn't end up buried in the concrete so that took a little time. The dewalt oscillating tool was a life saver there! All the foam is up on the skirts now, so I can start grading the rest of the stone and compacting.

All that is left after that is the vapor barrier, foam board, pex tubing, and rebar! Planning for a 5" slab with #6 rebar through out. I am hoping to find a nice used Mohawk lift to install and that is what they recommend. There is also a good chance I may have a heavier piece of equipment in there from time to time so rather safe than sorry!

I ordered everything needed to get the pex in the floor and up to a manifold, the rest of the system will wait a while. Tomorrow I am shooting to get the rebar and vapor barrier ordered along with some more stone and fill for around the outside of the barn. I think I have enough inside to get everything leveled off correctly. Feeling good to have this thing moving again!! Also had to throw a pic in of my insulation haul, should have me pretty well covered!


There are so many things I could say here...:evil:
 
OP
J

Juiced06GTO

Well-known member
Joined
Jun 1, 2014
Messages
356
Location
Sutton, MA
Alright I come seeking advice now.....

I've run the layout through my mind a million times. My thought is the lift going in the upper right corner on this drawing. My original thought was to make it parallel with the back wall, but have seen a bunch kicked at an angle to the back corner. What gives you more usable space? This 30x40 is not giving me nearly as much room inside as I thought it would! I've got my car trailer and Kubota in there now and realizing how much space they take up...

I attached a blank floor plan if anyone has any ideas they want to draw in!

Thanks as always!
Anthony
 

Attachments

  • Floor Plan.jpg
    Floor Plan.jpg
    31.5 KB · Views: 266

jblnut

ALLIANCE MEMBER
Joined
Jan 17, 2015
Messages
6,965
Location
In the Middle of MN
Most shops I've been in that have a lift that are not full blown auto shops have them pointed into the corner a bit for some reason. I think I read that you already purchased a lift but if you're heart isn't set just yet maybe something like a Maxjax system may fit the bill ?? Put them in place when you need them and up against a well when you don't. A guy I work with purchased a Maxjax system last summer and he built a steel plate that he bolts down when the jacks aren't in place. He built a much heavier in floor base for the system than what they recommend as a couple little anchors in the floor to hold it all doesn't seem quite right ....

The shop looks really nice and you sure will like that in floor heat. I wobbled a bit when we were pricing the farm shop heating system and am super happy we decided to do in floor heat. It is everything that everyone says it is !! Nice, quiet, consistent and a really fast recovery after the doors are open.

Building on top of stone is wild to me. I don't know how far down we have to go to get to solid rock but it's never been something we've had to deal with so far !!
 

jollygreengiant

Well-known member
Joined
Nov 10, 2013
Messages
2,354
Location
Ontario, Canada
Alright I come seeking advice now.....

I've run the layout through my mind a million times. My thought is the lift going in the upper right corner on this drawing. My original thought was to make it parallel with the back wall, but have seen a bunch kicked at an angle to the back corner. What gives you more usable space? This 30x40 is not giving me nearly as much room inside as I thought it would! I've got my car trailer and Kubota in there now and realizing how much space they take up...

I attached a blank floor plan if anyone has any ideas they want to draw in!

Thanks as always!
Anthony

Most shops I've been in that have a lift that are not full blown auto shops have them pointed into the corner a bit for some reason. I think I read that you already purchased a lift but if you're heart isn't set just yet maybe something like a Maxjax system may fit the bill ?? Put them in place when you need them and up against a well when you don't. A guy I work with purchased a Maxjax system last summer and he built a steel plate that he bolts down when the jacks aren't in place. He built a much heavier in floor base for the system than what they recommend as a couple little anchors in the floor to hold it all doesn't seem quite right ....

The shop looks really nice and you sure will like that in floor heat. I wobbled a bit when we were pricing the farm shop heating system and am super happy we decided to do in floor heat. It is everything that everyone says it is !! Nice, quiet, consistent and a really fast recovery after the doors are open.

Building on top of stone is wild to me. I don't know how far down we have to go to get to solid rock but it's never been something we've had to deal with so far !!

Unless your going to be using the lift a lot I would do a portable one like what jblnut suggests. That way you can move it out of the way when you don't need it. I remember seeing someone's build thread on here and they had a portable 4 post lift. That would be the best way to go IMO; you can use it anywhere in the shop and then put it off to the side when you don't need it.

If your wanting a permanent lift then I'd almost consider putting it in front of the staircase. The floor area leading to the stairs will be dead space anyways to keep that path clear, might as well utilize that same space for working around a vehicle.

And I'd put it on an angle facing the door. I have a 30x40 building as well and if you only have one door it turns into a lot of maneuvering to get a vehicle in parallel to the walls. Putting the lift on an angle will eat up a bit more space when there is a vehicle inside but it is so much easier to just drive straight in.
 

Evilcactuar

Well-known member
Joined
May 31, 2013
Messages
94
Location
Connecticut
I had the same layout issue with mine, I ended up sliding my door over and adding a dedicated door for the lift so I could drive straight into it. Obviously not gonna work here, so If it was me I'd do it at an angle on the left past the door, so you've got the right side clear all the way back. I'm assuming we're talking about a 2 post? A 4 post will eat a ton of space while you're not using it, the 2 post won't be as bad. You'd have to play with angle and placement based on how far up your ceiling track is and how big of equipment you need to lift.
 
OP
J

Juiced06GTO

Well-known member
Joined
Jun 1, 2014
Messages
356
Location
Sutton, MA
I do a decent amount of work on my own vehicles so it will be used quite a bit. I never thought to put it on the left in front of the stair area, not a bad idea and would give full depth on the right side...

I considered a 4 post, but don't really like the idea of eating up all that real estate. I'd like to be able to lift everything from my GTO to a 3/4 ton pick up so it will need some room around it.

I'll have to go out and mock it up on the left side, I haven't even looked there, but now I am thinking maybe a symmetrical at an angle on the left in front of the stair area. I could back the vehicles into the lift to facilitate engine work and pull them in straight when working on the rear to maximize space. I'll have to see how far out it protrudes into the center aisle that way. The idea of having full depth on the right is really appealing. Thanks guys!
 
OP
J

Juiced06GTO

Well-known member
Joined
Jun 1, 2014
Messages
356
Location
Sutton, MA
Alright, lots of progress over the past few weeks! I'll have pictures to post here at some point. The concrete is scheduled to go in next week some time and my garage door is coming in next week. We are going to have a weather tight building with a floor here soon!!!
 
OP
J

Juiced06GTO

Well-known member
Joined
Jun 1, 2014
Messages
356
Location
Sutton, MA
Alright, so I have been crazy busy between work, family life, and trying to keep this thing moving so I could actually get some use out of it this summer so updating this thread had to take a back seat as there was just not enough hours in the day even when I've only been sleeping for about 4 or 5 of them a day!

Quick rundown on what's happened so far since about March/April. After they fixed the front door issue, I went full bore trying to get the place ready for the concrete floor. I also put a deposit down on the garage door to get that coming as I had been hearing of crazy lead times of 8-16 weeks!

I'll let the pictures do most of the talking, but there was some work to be done to get ready for the floor. I brought in 24 more tons of 3/4 crushed stone to backfill around the outside of the barn and bring up some low areas inside. Leveling the inside and compacting it took a lot more time/effort than I was expecting. My goal was to have a 5" thick concrete pour minimum for the entire floor. Everything is at least 5", but I definitely have some areas tat are closer to 6/7", oh well thicker is better right?!?

Once the grade was set it was time for vapor barrier and insulation. My boss is a military vet and offered to grab the insulation at lowes to save me a bit of money and I had the great idea of buying it in sales tax free NH to save another 6.25%. Well that turned into a 5 hour disaster as we drove all the way up there only to find that the Lowes inventory system is garbage. No store we went to actually had anywhere close to the amount of boards they said they did! In the end I wasted a bunch of time and driving around to not come up with what I needed. He ended up ordering it at the Lowes near his house and we waited a few days for a pallet to come in.

My boss and I have pretty much been trading labor to each other, he's been doing grunt work at my place on the barn and I've been helping him build a monster deck and outdoor bar area in his back yard. It has been nice to have somebody to help out occasionally and kick me in the *** when I am standing around over analyzing everything I am doing!
 

Attachments

  • getting ready to set final grade 1.jpg
    getting ready to set final grade 1.jpg
    2.4 MB · Views: 234
  • grading 1.jpg
    grading 1.jpg
    3.2 MB · Views: 211
  • compacting.jpg
    compacting.jpg
    2.8 MB · Views: 201
  • low spot.JPG
    low spot.JPG
    3.5 MB · Views: 190
  • leveling stone.jpg
    leveling stone.jpg
    3.4 MB · Views: 192
  • getting close to grade.jpg
    getting close to grade.jpg
    3.2 MB · Views: 196
  • Possible retaining wall.jpg
    Possible retaining wall.jpg
    3.9 MB · Views: 196
  • Kids helping 2.jpg
    Kids helping 2.jpg
    4 MB · Views: 196
  • Kids helping 1.jpg
    Kids helping 1.jpg
    4.3 MB · Views: 187
  • int before grade set.jpg
    int before grade set.jpg
    3.4 MB · Views: 182
OP
J

Juiced06GTO

Well-known member
Joined
Jun 1, 2014
Messages
356
Location
Sutton, MA
More pictures of the progress on getting the interior done.
 

Attachments

  • getting closer.jpg
    getting closer.jpg
    4.5 MB · Views: 169
  • still off again.jpg
    still off again.jpg
    4.3 MB · Views: 151
  • still not there.jpg
    still not there.jpg
    4.1 MB · Views: 138
  • how far off am i.jpg
    how far off am i.jpg
    4.5 MB · Views: 145
  • grading 1.jpg
    grading 1.jpg
    3.2 MB · Views: 138
  • setting up the laser.jpg
    setting up the laser.jpg
    2.8 MB · Views: 137
  • Night Work again.jpg
    Night Work again.jpg
    1.6 MB · Views: 163
OP
J

Juiced06GTO

Well-known member
Joined
Jun 1, 2014
Messages
356
Location
Sutton, MA
Just as I was thinking the weather would be breaking and spring was coming, it did this again.....

I'll get the rest of the updates and pictures up later. For now the wife is calling and I need to get the house ready for people coming over for Memorial Day in another hour or two!

Tomorrow morning I am going to look at a new toy to add to the garage too! It is a little out of sequence for how I wanted to do things, but when a deal pops up you have to jump on it!
 

Attachments

  • it snowed again!.jpg
    it snowed again!.jpg
    4 MB · Views: 230

booch

Active member
Joined
Dec 14, 2014
Messages
41
Location
CT Shoreline
Jeez, I can't believe you got snow! We have rain here but it was brisk... I think snow would send me over the edge. The only thing worse than snow is you saying that deal is a Miata.
 
OP
J

Juiced06GTO

Well-known member
Joined
Jun 1, 2014
Messages
356
Location
Sutton, MA
Ha, this snow was from late April, not today thankfully! I have more progress pictures to post, trying to keep it somewhat chronological. It is cheaper for me to buy this new toy than to really prep my car for Palmer in a few weeks so......

I mean the nice thing is once the garage is built I'll have space to ls swap the thing....
 

jollygreengiant

Well-known member
Joined
Nov 10, 2013
Messages
2,354
Location
Ontario, Canada
I can believe the snow. There was snow on Friday in places a couple hours north of here. And to think we had the central air running less than a week before!

What are your plans for outside finish on your building? Paint? Leave it as-is?
 
OP
J

Juiced06GTO

Well-known member
Joined
Jun 1, 2014
Messages
356
Location
Sutton, MA
I am going with a bluish/grey stain with white stain on the trim. The door will be a carriage style overhead door with white trim and a sandstone inlay. I am hoping the colors compliment the house which is a tan vinyl siding with blue shutters. Trying to tie it all in so it doesn't stand out so much, but its tough when you plop a 30x40 building pretty much in your front yard haha!
 

Riley

Well-known member
Joined
Feb 18, 2007
Messages
398
Great project! Seeing your helpers, I can understand how they might keep you busy. Fun following along!
 
OP
J

Juiced06GTO

Well-known member
Joined
Jun 1, 2014
Messages
356
Location
Sutton, MA
Alright so back to the updates...

I left off with leveling the inside of the barn, which took way longer than I thought it would! Once I got it all leveled out and my insulation finally came in from Lowes it was time to lay out the vapor barrier and get the foam down.....this also took way longer than I thought it would! The kids had some fun making forts out of my pile of insulation boards, so I guess that was a plus! It also kept them out of the wife's hair for a bit.

Everything else went pretty smooth, just tedious and time consuming. VB, foam board and lots of tape.
 

Attachments

  • insulation fort.jpg
    insulation fort.jpg
    875.9 KB · Views: 211
  • kids in the insulation fort.jpg
    kids in the insulation fort.jpg
    568.2 KB · Views: 183
  • laying vapor barrier.jpg
    laying vapor barrier.jpg
    590.9 KB · Views: 174
  • laying vapor barrier 2.jpg
    laying vapor barrier 2.jpg
    748 KB · Views: 169
  • more vapor barrier.jpg
    more vapor barrier.jpg
    691.2 KB · Views: 170
  • still more vapor barrier.jpg
    still more vapor barrier.jpg
    741.1 KB · Views: 171
  • getting close to sinishing the vb.jpg
    getting close to sinishing the vb.jpg
    382.3 KB · Views: 168
  • more insul.jpg
    more insul.jpg
    494.7 KB · Views: 166
OP
J

Juiced06GTO

Well-known member
Joined
Jun 1, 2014
Messages
356
Location
Sutton, MA
The dewalt oscillating tool I picked up made cutting out around the post quick and easy. The foam board went down pretty quickly, followed by lots of seams to tape.
 

Attachments

  • More insulation.jpg
    More insulation.jpg
    493.6 KB · Views: 167
  • and more.jpg
    and more.jpg
    483 KB · Views: 160
  • and more insulation.jpg
    and more insulation.jpg
    460.7 KB · Views: 157
  • where is the lift going.jpg
    where is the lift going.jpg
    600.5 KB · Views: 164
  • insulation down taped.jpg
    insulation down taped.jpg
    619.8 KB · Views: 187
OP
J

Juiced06GTO

Well-known member
Joined
Jun 1, 2014
Messages
356
Location
Sutton, MA
I then went to the local HD to pick up some supplies. This is what $200 bucks looks like at the local home depot now!pex and strut.jpg200 bucks at HD.jpg

Then it was off my basement to layout the pex manifold and elbows. I utilized the free trial of loop CAD to figure out the layout for the radiant runs. I left two 4'x6' squares open and also cut out the foam in those two spots so I would have at least 7" of concrete in that area to handle any lift that I might decide to put in there. I guess I never saved the layout I actually used, I was toying with putting the lift at an angle, but axed it once I played with mocking it up in the actual space.

laying out the manifold in the basement.jpg
Loop layout.jpg
where is the lift going.jpg
 
To avoid these ads, REGISTER NOW!
Top Bottom