bagged89s10
Well-known member
Well my e-tank is frozen. I had 2 vises in there cooking but the below 0 degrees Fahrenheit is just too cold for it.

I filled the tank (~5 gallons) with water and about a cup (maybe a little more) of washing soda.


BA I'm not so sure you are in any issues other than the size of the anode for the tanks. you have a lot of tank surface areas vs, the small surface of the rebar.
Even with more equitable surface areas my charger drops to maybe 1 amp and just keeps chugging.
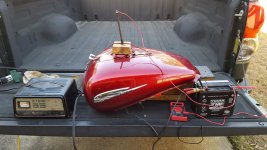
Fretters he's working inside a Motorcycle tank, so hard to get a lot of metal inside as an anode.
 That crappy modern, (obviously don't trash an old one), cast iron garden furniture comes in handy for breaking up for stuff like that. They usually tend to have lattice work patterns and such on table tops, spindly legs etc, so can provide some nice small pieces after a quick session with a sledgehammer.
Thanks for at least letting me know I'm not crazy. So often I see gleaming steel and I thought maybe I wasn't finishing the process right. I'll try a brush and see if that improves my results.Yuo can switch to Graphite and that should reduce the finished mess, but keep in mind, it is a conversion process, the black is what the rust converts to.
I can normally get it off with a nylon brush. if you have some left, you may need round 2 to get it all.
Thanks for at least letting me know I'm not crazy. So often I see gleaming steel and I thought maybe I wasn't finishing the process right. I'll try a brush and see if that improves my results.
Thanks!
Looking like it just came off the factory floor is not something you'll generally get without further finishing, after electrolysis.
My preference is a soft bristle brass brush, (suede brushes seem to fit the bill best). A soft stainless bristle at a push. Nylon pan/kitchen scourers usually do most of the cleaning work though, for me, and if you get the odd patch of rust or paint which is truly stuck on there, either scrape it off with a coin or a blunt knife edge.
You'll oft have to put something back in the vat after you've cleaned it up first time. You won't always get everything off in the first session, so just whip it out of the vat, scrub and/or brush and then pop it back into the vat.
Thank you. This is the first post I have seen that mentioned optimum current. With a variable supply I can vary the voltage to optimize the current. Does varying the amount of washing soda or increasing the anode area vary the conductivity? I would think this would affect the voltage needed to push the desired current.That's about right. Some types of paint will literally flake off in the vat, whilst others seem to resist at all costs. I've found applying a little brake fluid or paint stripper several hours before popping something in the vat helps for paint.
Regarding grease, you're better off trying to remove that beforehand. White spirit, (mineral spirit), or paraffin, (kerosene), which is my favourite degreaser.
Don't use a metallic container btw, even if it is enamelled. It only needs one pin ***** in the enamel and it will start to corrode at a rate of knots from there on in. Tested it out last year with a metallic container. It only managed a few days before it tripped out the relay I'd put on it for the specific purpose of disconnecting the supply if there was leakage.
I personally use Sodium Bicarbonate for the solution. Sodium Carbonate seems to be the most recommended option though. Both work fine. About one tablespoon to a gallon of water is all you need. You don't need to chuck shedloads of current at the process either. You'll just degrade your anodes more quickly for little to no gain. Even with large stuff, 1.5A is ample. I normally vary current between 500mA to 1.5A max.
Yes you should optimize the current. What that is depends on the subject size (area). A little experimentation is in order. Also as you presume the amount of soda or whatever you are using does make a difference in conductivity. Pure water does not conduct but as you add soda, and dissolve it the conductivity increases. I find that about 2 cups for approximately 30 gall tank is more than enough. I can achieve my usual current of about 1/2 to 1 amp with a regular 12v power supply or charger. In fact I usually put a bulb in series to limit the current.Thank you. This is the first post I have seen that mentioned optimum current. With a variable supply I can vary the voltage to optimize the current. Does varying the amount of washing soda or increasing the anode area vary the conductivity? I would think this would affect the voltage needed to push the desired current.
Sent from my SM-G900V using Tapatalk
Electrolysis results! I used a plastic paint bucket for a container and steel rebar that has some kind of black coating on it for an anode. My electrolyte was washing soda added to tap water. I probably should have used deionized water because I got a lot of carbon-like buildup on the tool. 3M makes a scotchbrite pad that has aluminum oxide in it specifically for finishing metals. It removes the carbon quite well without doing any noticeable (to me) damage to the metal underneath.
One of my wrenches came out jet black and left black residue on anything it touched until i cleaned it. It looked cool but a wrench that leaves black marks on things isn't a very good wrench.
If you are not going to use the tool or part for a while, consider leaving the black stuff alone, just as shopdogsam does.
That's ^^ what I've been doing and my experience also.Not so sure that's a good idea. My experience is that parts start to rust almost immediately if not cleaned and oiled or primed.