To avoid these ads, REGISTER NOW!

Jake's Projects ...... or, .... How I waste my time

OP
J

jakemac

Well-known member
Joined
May 21, 2013
Messages
9,035
Location
New England
A couple of BluePoint hammers and a dolly. A 48oz BP, a 4oz BP, and a body hammer. One of the hammers had to have the peen end re-shaped, can you guess which one ? Two of the hammers were painted with the handles on, the other was handle off.

The dolly was originally blue, but since it wasn't marked with a label, I went with my go-to black to match the others that I've done. The faces were cratered from use, so I had to sand and polish to make it useful again.
 

Attachments

  • 100_1449.jpg
    100_1449.jpg
    143.7 KB · Views: 301
Last edited:
To avoid these ads, REGISTER NOW!

nine4gmc

Well-known member
Joined
Mar 24, 2012
Messages
14,357
Location
Dallas
I think you were telepathically telling me this the other night. I was out in the shop cleaning up rusted parts on my grinder and temporarily ran out of things to wheel on. The first thing to come to mind was my hammers, then I thought about how many and decided another time would be better :lol_hitti

Looks great, now I wish I had started them...
 

Fretters

Well-known member
Joined
Jan 25, 2014
Messages
4,217
Location
South Yorkshire, England
I was expecting Fretters to chime in since he's not far from a good comment about the subject we moved to, so hopefully that DP he had sitting in his shop didn't fall on him. :D

Bit late to the ball, but the others were doing such a good job with the comments, there was little I could add. :D The drill hasn't killed me as yet. :D

Those hammers look nice and shiny Jake. Sounds like there's a few of us with a pile of hammers to sort. :D
 
OP
J

jakemac

Well-known member
Joined
May 21, 2013
Messages
9,035
Location
New England
Two more Walworth Stillsons for the wall done. Now I only need to find a 36" and a 48" to complete the set.

I keep having flashbacks to a barn sale last April. I was so busy trying to load a parts washer I got for $20 and get out of there that I didn't think about the two long pipe wrenches on the wall between the studs. In my nightmares, I'm pretty sure that one of them was a Walworth 48" that I walked away from.

Ohhhhhhh the ones that get away always come back to haunt you. :sad:
 

Attachments

  • 100_1466.jpg
    100_1466.jpg
    137.5 KB · Views: 113

nine4gmc

Well-known member
Joined
Mar 24, 2012
Messages
14,357
Location
Dallas
That's a nice set, great job! There was a 48" Walworth on CL a while back for $100, I didn't even call...
 

drivesitfar

Well-known member
Joined
Oct 23, 2013
Messages
36,037
Location
Pacific Northwest
Jake: i finally remembered to check out my Rock Island vise that has a damaged static to see if it might work for your Reed vise and my Rock Island is only a 3 footer. i seem to remember you already have a Reed 3 footer and would really like a 4 footer for it. i'll keep looking on this side of the US for one, but we don't have a lot of Reed vises out here.

what's next on the shop's agenda??
 
OP
J

jakemac

Well-known member
Joined
May 21, 2013
Messages
9,035
Location
New England
Nothing immediate. I've been plugging away on the Reed, but haven't been posting on it. I've been lazy about working on it. A bit here, a bit there. I know that I'll have to make my own locking bolts to make the 204 base work on the 204-1/2. I got a pair of clamp handles from KMScott, so at least I know that those will look good. Right now, I'm just trying to get everything else nekkid before I tackle the bolts.

I'm trying to take pictures of each step so I can put it together into one long post on your vise 101 thread. Don't expect it anytime soon though. I've really been procrastinating on the bolts, which is holding things up.
 

drivesitfar

Well-known member
Joined
Oct 23, 2013
Messages
36,037
Location
Pacific Northwest
Jake: your next project is only a garage or estate sale away so best of luck on this week's sales and looking forward to what you find to restore.

cheers
 

nine4gmc

Well-known member
Joined
Mar 24, 2012
Messages
14,357
Location
Dallas
We need to bump this thread to a new page, I keep seeing those nice hammers and remember the drawer full I need to get to one day
:lol_hitti
 

drivesitfar

Well-known member
Joined
Oct 23, 2013
Messages
36,037
Location
Pacific Northwest
I just bumped it. what hammers?? i should take a couple pictures of my hammers if you want to see a few in one place (if i could get them all in one place).

cheers Jake (and Nines)
 
OP
J

jakemac

Well-known member
Joined
May 21, 2013
Messages
9,035
Location
New England
Well, it turns I did have a project to keep me busy in the shop today ------- Housekeeping !

It's been about 2 months since I filtered my bucket of Simple Green, so I decided that it needed to be cleaned out before I needed it again. This batch of SG has degreased and de-painted a vise, an arbor press, a few pipe wrenches, and assorted hand tools. It was starting to get just a tad murky.

- The first picture are my chosen tools for the job. A plastic funnel, a plastic mason jar funnel, a plastic ladle (purpose bought, not from the kitchen), and coffee filters. I like the Bunn filters because they're larger than normal filters (2-3/4" x 3"). Normal filters tend to slip through the funnel and spill the dirty liquid. I bought a full case of Bunn filters off ebay for cheap, so I should be good for a while.

- Pic #2 is how I stack them to keep the filter from falling through the funnel.

- Pic #3 is the murky bucket (halfway done)

- Pic #4 is several funnels clamped to a 5 gal bucket to filter more material in one shot.

- Pic #5 is the dregs that need to be dumped

- Pic #6 is what the middle set of filters look like used. I went through 9 filters for 4.5 gallons of SG. The first three lasted 2/3 of the way. The next six were needed to filter the thicker liquid after the dregs had been stirred up.

- Pic #7 is a picture of the tools I use to scrub grease and paint off the tools after they've soaked enough to soften up. A cut-off nylon brush, a fine wire brush, a brass brush, and a parts brush.

Some projects leave more filth, some leave less. YMMV.

I do the same thing with my bucket of EvapoRust when it needs to be cleaned. It helps the liquids last longer by pulling out some of the material that dilutes it and weakens the mix. I figure that I lost about 1-1/2 cups out of the 4.5 gallons due to spillage and filter saturation. Over time, I loose more from evaporation. Some of this mixture may be from the original gallon I started with over a year ago. I just add fresh liquid as needed to refresh and top off the tub.
 

Attachments

  • 100_1482.jpg
    100_1482.jpg
    140.7 KB · Views: 141
  • 100_1483.jpg
    100_1483.jpg
    133.1 KB · Views: 139
  • 100_1481.jpg
    100_1481.jpg
    132.6 KB · Views: 146
  • 100_1477.jpg
    100_1477.jpg
    129.9 KB · Views: 157
  • 100_1475.jpg
    100_1475.jpg
    132.1 KB · Views: 141
  • 100_1480.jpg
    100_1480.jpg
    131.2 KB · Views: 139
  • 100_1478.jpg
    100_1478.jpg
    137 KB · Views: 146
Last edited:

NJ Marty

Well-known member
Joined
Oct 20, 2014
Messages
1,157
Just a quick little project today.
I picked up a rusty Eklind hex key set this morning. I spent a little time on the wire wheel and rubbing with Nevr-Dull this evening and cleaned it up.

before and after

These came out real nice like your other products. What kind of wire wheel do you use? Was wondering the best brand out there for minimal wires flying off into face. I just got a 6" from home depot, of course made in china that is loosing wires faster than I have seen before.
 
OP
J

jakemac

Well-known member
Joined
May 21, 2013
Messages
9,035
Location
New England
Unfortunately, everything in the stores seems to be made in china. The 8" Fine wheel I'm using now is a chinese Craftsman.

I've been dodging wire shrapnel or picking it out of my skin since the 80's. I barely notice it anymore, unless one works it's way through the sole of my sneakers, or into the small of my back. How they get into my back, I'll never know. But those little bastards manage to get there anyway. :dunno:
 

drivesitfar

Well-known member
Joined
Oct 23, 2013
Messages
36,037
Location
Pacific Northwest
NJ: i'm surprised with your estate sales skills you haven't picked up a 50 plus year old grinder like a Craftsman block or a Baldor. keep looking for one to replace yours when you do.

the knotted wire wheels seem to not shed as many wires when using them and some guys say putting 2 of those wheels on one end works great. only thing is those kind of wheels take off material fairly quickly so you need to use them wisely.

Jake: great tips with the coffee filtering of your cleaning tanks.
 

nine4gmc

Well-known member
Joined
Mar 24, 2012
Messages
14,357
Location
Dallas
Unfortunately, everything in the stores seems to be made in china. The 8" Fine wheel I'm using now is a chinese Craftsman.

I've been dodging wire shrapnel or picking it out of my skin since the 80's. I barely notice it anymore, unless one works it's way through the sole of my sneakers, or into the small of my back. How they get into my back, I'll never know. But those little bastards manage to get there anyway. :dunno:

Wait til you get a wire straight to the balls :shocking: :shocking: :willy_nil
 
OP
J

jakemac

Well-known member
Joined
May 21, 2013
Messages
9,035
Location
New England
Not much time to work on any projects lately. Just a bit of puttering here and there. I've got a 26" wrench soaking in the ER tote, but won't be able to deal with it until next week.

However, the bent locking handles on my Columbian 206 were bugging me bigtime. So I made a little time to straighten them out today. Each were bent in 3 different directions. The first picture doesn't really show how bad they were.

To straighten the handles, I used a very technical process called Cold Forging. I'll explain it as simply as I can.

Cold Forging :
1 - I placed a 4" piece of RR track on the concrete floor of the shop.
2 - Then, strategically placed the handle on the RR track with the "hump" facing up.
3 - Next, I lovingly beat the living daylights out of the handle with a 48oz ballpein hammer (my pretty blue one).
4 - Lastly, I rotated/repositioned as necessary until the handle resembled something that no longer annoys me. :D

Yes, this method will leave hammer marks on the handle. Considering the "as used" condition of the rest of the vise, I'm ok with history marks.

Any later restoration will leave the marks to prove that this was a working vise at one time.
 

Attachments

  • 100_1537.jpg
    100_1537.jpg
    132.9 KB · Views: 128
  • 100_1533.jpg
    100_1533.jpg
    129 KB · Views: 128
  • 100_1532.jpg
    100_1532.jpg
    131.6 KB · Views: 136
  • 100_1512.jpg
    100_1512.jpg
    136.4 KB · Views: 144
To avoid these ads, REGISTER NOW!

drivesitfar

Well-known member
Joined
Oct 23, 2013
Messages
36,037
Location
Pacific Northwest
Jake: awesome job and better explanation of the process to do so. you are still in great form so all the big steel really agrees with you.

i do have a question did you remove the swivel pins with their holder and beat on the pins from each end because it doesn't look like yours have screws on one end of them to remove them from the nut? also since the pins were bent by a previous user with a different idea for his hammer did the teeth of the swivel jaw's gears survive?

I might have picked up a wrench yesterday almost as big as the one you are cooking in the Evaporust. mine only has one working end but it sticks out of a 5 gallon bucket. not sure if i'll ever use it, but it's mine now.
 
OP
J

jakemac

Well-known member
Joined
May 21, 2013
Messages
9,035
Location
New England
Drives - I left the nut on and slid it out of the way and hanging off the RR track while I hammered. The threads of the pins were fine.

I want to see pictures of your wrench. :bounce:
 

drivesitfar

Well-known member
Joined
Oct 23, 2013
Messages
36,037
Location
Pacific Northwest
Jake: i'll take a few pictures. i actually found a few that stick out of the 5 gallon bucket i might add to the portrait. I stopped in the guy's shop to buy a 200 pound vise and since he had welded it a few times i opted for a few of his "little" wrenches. i'm flexible that way.
 

drivesitfar

Well-known member
Joined
Oct 23, 2013
Messages
36,037
Location
Pacific Northwest
Jake: here's my "little" end wrench. it might be close to the size of yours, but not sure. the squares on the rubber are 1 foot squares to give you some reference. also it wasn't all the way touching the bottom of the bucket, but the wrenches in the other bucket are and there are a few Big Uns over in that one i'll have to clean up and find a home in my tool boxes for. these were bought with repairing 6 and 8 inch 150 plus pound vises, but eventually maybe some tractor or truck if we ever move to a little acreage.

I couldn't see any writing on the wrench so maybe i will when i clean it up. or do you happen to know who made these?

Happy Thanksgiving to you Jake and also Nines, Fretters Outlaw and all the guys (and gals) on GJ.
 

Attachments

  • WP_20141127_001.jpg
    WP_20141127_001.jpg
    136.7 KB · Views: 107
  • WP_20141127_008.jpg
    WP_20141127_008.jpg
    142.8 KB · Views: 78
  • WP_20141127_007.jpg
    WP_20141127_007.jpg
    131.9 KB · Views: 78
  • WP_20141127_006.jpg
    WP_20141127_006.jpg
    99 KB · Views: 82
  • WP_20141127_004.jpg
    WP_20141127_004.jpg
    91.5 KB · Views: 85
  • WP_20141127_003.jpg
    WP_20141127_003.jpg
    141.1 KB · Views: 85
  • WP_20141127_002.jpg
    WP_20141127_002.jpg
    147.3 KB · Views: 103

nine4gmc

Well-known member
Joined
Mar 24, 2012
Messages
14,357
Location
Dallas
That's pretty big Drives, here are a couple of the big ones I have left. Happy Thanksgiving guys!
01730.jpg
 
OP
J

jakemac

Well-known member
Joined
May 21, 2013
Messages
9,035
Location
New England
I couldn't see any writing on the wrench so maybe i will when i clean it up. or do you happen to know who made these?

Billings/Billings & Spencer and Williams seem to be the two big players in large industrial wrenches, but there may be other brands that I'm not familiar with.

Yours seems to have a Williams feel to it, but I'm not sure. :dunno:
 

drivesitfar

Well-known member
Joined
Oct 23, 2013
Messages
36,037
Location
Pacific Northwest
Jake: those would be the companies that i'd guess to, but i have some pretty stout Vlchek and a couple others that are same quality. usually my other Billings and Williams are stamped pretty decently and deep so they would be hard to miss. we'll see.

Nines: looks like you got a couple good ones too. by the way on one of your other threads you did some Caddy's leather or imitation leather interior and you are very talented even if you were not super fond of the color. i'd have you redo some of my high end gym benches if I get more that need it and maybe a pallet of them might have to be shipped down your way. or get you the measurements so only need to ship one direction. find a gross of black or other quality fairly durable material so you'll be ready for mine or others. of course if you would like to do something so simple compared to a car's interior or other things I've seen you do.

cheers
 
OP
J

jakemac

Well-known member
Joined
May 21, 2013
Messages
9,035
Location
New England
More puttering.

As mentioned earlier, I've been cleaning up the wrench on the bottom of the first picture a bit at a time here and there. Like many things strewn about my shop, it's still a work in progress. So far, I've soaked it in ER with a few bouts of light wire wheeling to get it down to bare metal. That phase is done. Now I'm cleaning up the faces to a mirror polish a bit at a time when I can get down into the shop. I started with a little time on the belt sander to reduce the pitting (I like my 4x36 sander, but a 6" would have been better for this large size). Then the DA palm sander with 60 then 100 grit paper to even things out. Now I'm going through stages of rotolocs to remove swirls and scratches. 100 grit disk, then 180 grit. Next will be scotchbright disks. Brown, Red, then Blue. The hardest part is waiting for my small compressor to recycle every 20 seconds on the die grinder. Once that's done, I'll take it over to the polishing wheel and do the Red and White rouge. The final stage will be masking and painting.
Here's where I'm at for now.
 

Attachments

  • 100_1531.jpg
    100_1531.jpg
    131.9 KB · Views: 120
  • 100_1540.jpg
    100_1540.jpg
    139.6 KB · Views: 172

drivesitfar

Well-known member
Joined
Oct 23, 2013
Messages
36,037
Location
Pacific Northwest
Jake: when you got the rust off that big wrench is that Billings that showed up or what make is it. how long are those wrenches? 2 foot?

and what size bolts will they turn once you own the machine that has some on it?? :D

thanks for posting your wrenches and big columbian vise on the new HUGE tool thread and i'm hoping to see a few more from you and others on it.

those big wrenches look better than framed art in my opinion. :thumbup:
 
OP
J

jakemac

Well-known member
Joined
May 21, 2013
Messages
9,035
Location
New England
Both are Billings (w/triangle B logo). My OCD won't let me buy Billings and Spencer's because the logo's wouldn't match. :lol:

#47 __ 2" - 2 3/16" __ 24 1/4" long __ 11lbs

#50 (#1160 CAT number) __ 2 3/16" - 2 9/16" __ 26 1/8" long __ 14lbs

More ! I need more ! View media item 38282
 
OP
J

jakemac

Well-known member
Joined
May 21, 2013
Messages
9,035
Location
New England
:shocking::shocking: WORK STOPPAGE IN EFFECT :shocking::shocking:

Yesterday evening I was working in the shop, while sitting on a stool with my feet up on the rails I was wondering why I kept hearing the sump pump when the compressor wasn't running. I stepped off the stool and SPLASH, my foot was wet.

:willy_nil:willy_nil ATTENTION ! : ALL HANDS MAN THE BILGE PUMPS ! :willy_nil:willy_nil

I was only working for 30min. When I started, the shop was dry. It seems that the heavy rains in the northeast were too much for the yard to drain (my house sits in a hollow). So the water decided to come inside to get out of the nasty weather.

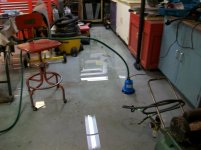
We're not talking "gather the animals two-by-two" kind of flooding. Just "SOAB" kind of flooding. My shop is in an add-on part of the house, 12" below basement level. So it gets the water before the mancave (which now has some seepage). As long as the float switch on the sump pump doesn't hang up (again), the water will stay under 1". The concrete floor isn't level (it has more humps than a herd of camels) so there are a few dry spots here and there. I try to keep everything on composite blocks, so there shouldn't be too much water damage if I can dry the shop out. The water will keep seeping in for another day, until the water table drops, so I just have to keep moving it towards the sump. But, until then all work has to stop. It just isn't a good idea to use electric tools while standing in a pool of water (not even if I wear my Bean Boots). :sad:

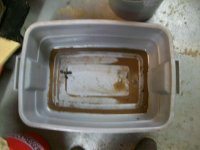
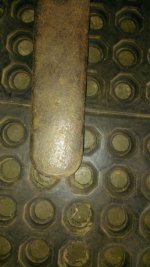
To keep the puddles down, I use a submersible pump with a garden hose draining into the sump pump. You'll notice some blue plastic tape on the base of the pump in the second picture. The tape is there to cover inlet holes on the base, so I can drain the water lower than 1/2" deep.

Just a note for those of you who need to use this kind of pump to drain your shops or basements -
Submersible pumps cool themselves by conducting heat into the water they're submersed in. If you use them on the surface, you need to keep an eye on the pump to make sure it doesn't shut down from over-heating. Metal cased pumps work better as a heat sink than plastic cased pumps. Spend the extra money for a better pump.

Hopefully I'll be working in the shop again by the weekend. :dunno:
 

Attachments

  • 100_1553.jpg
    100_1553.jpg
    133.5 KB · Views: 127
  • 100_1551.jpg
    100_1551.jpg
    131.3 KB · Views: 139
  • 100_1550.jpg
    100_1550.jpg
    132.5 KB · Views: 161
Last edited:

drivesitfar

Well-known member
Joined
Oct 23, 2013
Messages
36,037
Location
Pacific Northwest
Jake: Sending my well wishes and happy that you were and are prepared for this. I hope you can keep everything from rusting where the water has touched the metal casters and legs of all your metal.

i'm guessing this might have happened before so do you spray the base of your cabinets, stands and casters with anything or just try to dry everything off?

Hope all is back to normal again soon and maybe a little less rain might help.

good luck and i do like that safety tip warning so at least you should be alive to see the machines run again when all is dry.
 
OP
J

jakemac

Well-known member
Joined
May 21, 2013
Messages
9,035
Location
New England
I cut up a piece of composite decking to act as feet under my benches. My boxes are on wheels. I picked up all my mats to keep them out of the water, and other pieces have composite scraps under them to keep them dry. The only things that are wet are plastic totes, my grinder stands (I haven't built a platform for them yet) and a rotted metal storage cabinet that I plan on scrapping when I have something else to store things in.

Only 1 of the grinder stands have been restored so far, so a little water shouldn't hurt it if I can dry it out fast enough. The others can rust for now and I won't worry about it until I get around to restoring them.

The 70% humidity is a little worrisome, but what can you do ? :dunno:
Hopefully, the humidifier that I keep running in the shop will deal with it quickly enough. If not, well, it won't be the first time I've had to drag everything out and deal with it. This shop is definitely better on my tools than my last one, so it shouldn't be so bad.
 
Last edited:

drivesitfar

Well-known member
Joined
Oct 23, 2013
Messages
36,037
Location
Pacific Northwest
Jake: sounds like you have most everything back in order. do you have a few sales to go to tomorrow or are you going wire wheel your huge Columbian and get a coat of boiled linseed oil on it.

i'm planning on taking apart my Reed 2C this weekend and actually bolting it to my bench in my garage. it's been missing a bolted down vise for a while now and I've been just using my baby bullet on that bench because it's shoved back in the corner of my wife's side of the garage. maybe i'll get to my side that is in transition before new years. it was my gym, but i move that into my old office inside the house so morning workouts weren't so cold. now i have a 9 x 16 space that is gym/storage that i'm turning into a workshop. I don't have running water at the shop i lease and i have a few rusty vises and tools to clean up and more than a couple grinders and vises to use in it.

keep smiling and i hope you find what you are looking for this weekend so Christmas can come a bit early for you.
 

drivesitfar

Well-known member
Joined
Oct 23, 2013
Messages
36,037
Location
Pacific Northwest
Jake: we have storms here today and i'm hearing your side of the US has them too. are you high and dry or still hoping the rain will stop soon?

good luck and best wishes

i posted this on the vise repair 101 thread so wondering if you or the others on this thread have wisdom to share. i think i found the steel stand for my "little" Reed 4C. it is a 6 foot wide steel bench with a 1/4 inch steel top that i'm guessing weighs close to 1000 pounds. since i don't own a new mag tite drill like some of you do any suggestions on how to drill through the 1/4 inch? i also have 3/4 inch plate to drill through later so any tips or tricks or tools to use just let me know. I have some powerful hand drill and probably some huge new sharp drill bits somewhere. small hole first for a guide an then the big one or how would you do this??
 

Attachments

  • P1030396%20(Large).jpg
    P1030396%20(Large).jpg
    119 KB · Views: 117
  • workbench.jpg
    workbench.jpg
    144.6 KB · Views: 125
  • WB 1.jpg
    WB 1.jpg
    147.1 KB · Views: 118
  • WB 3.jpg
    WB 3.jpg
    143.7 KB · Views: 127
Last edited:
OP
J

jakemac

Well-known member
Joined
May 21, 2013
Messages
9,035
Location
New England
No rain today - snowflakes.
The water stopped rising last night, I'm down to just mopping up the puddles now. I wish I had a mop. ;)

I read your post on the original thread. If your neighbor really does have a Mag Drill, then I go with the borrowing or "trade for labor" option to drill the holes in that table.

I wouldn't have that option if I was in that situation, so I'd probably spin the head around and lower it on my DP and and clamp the base to the table. Then use multiple bits to step up to the hole size I needed. Good luck.
 

catsteve

Well-known member
Joined
Jan 20, 2010
Messages
195
Location
Australia
Jake:

I couldn't see any writing on the wrench so maybe i will when i clean it up. or do you happen to know who made these?

Commonly, this is a track wrench. Used for turning the track adjuster nut (tightens tracks) on a dozer or crawler tractor.
Serveral companies made them for Caterpillar and other tractors.
Mine are made by armstrong.

You need a dozer now to go with it. you NEED one.
 

22george

Well-known member
Joined
Jan 26, 2011
Messages
1,637
Location
SW Ohio
Start with an 1/8 in drill bit and work your way up to the size you need. Slow speed on the drill and heavy pressure. Also use lubrication
 
To avoid these ads, REGISTER NOW!
Top Bottom