To avoid these ads, REGISTER NOW!

Lift modifications Thread- Lets see them!

Shortbuscandid8

Active member
Joined
Nov 29, 2013
Messages
37
Not a modification so much as an accessory. I have a Direct Lift 4-post with a couple of rolling bridge jacks. The bridge jacks came came with a pair of 1 1/4" and 5" spacers for the pads, but there have been times I needed more extension height than that, which usually wound up being a chunk of 4x4 or 4x6. I contacted the local Rotary dealer (aka Direct Lift) about getting another pair of extensions and they quoted me $42 each for the 1 1/4" and $67 each for the 5". So I made my own instead. Ordered four 6" chunks of 2" DOM and four 1 1/2" rods off of Amazon for a total of $95 in materials & shipping.
Great idea! I've run into that same problem and want to do the same thing. Were the pieces a slip fit or did you have to ream them out? Looks like you drilled a hole in the pipe... for welding? Any extra info would be appreciated. Thanks!
 
To avoid these ads, REGISTER NOW!

BruceMc

Well-known member
Joined
Jan 17, 2015
Messages
2,163
Location
Fairbanks, AK
Great idea! I've run into that same problem and want to do the same thing. Were the pieces a slip fit or did you have to ream them out? Looks like you drilled a hole in the pipe... for welding? Any extra info would be appreciated. Thanks!
The fit was very close, but I did have to take a little material off to get the rod into the DOM. A combination of reaming the DOM with the die grinder and running the rod on a belt sander. In hindsight, I may have been able to fit them by freezing the rod (shrinking it) and heating the DOM (expanding it), but didn't try that. I used the top pad to get the proper position, and did a couple of plug welds in the holes to hold the two pieces in position. Since all the weight is transferred through the rod, the DOM is just acting as a collar. No need for any real structural connection between the two pieces.
 

Shortbuscandid8

Active member
Joined
Nov 29, 2013
Messages
37
Awesome! Thanks for the quick reply. I've got my order in. I'll try the heat and freeze, maybe with a side order of 20ton press? Thanks again!
 

Homewrecker

Well-known member
Joined
Sep 19, 2013
Messages
159
Location
Toronto, Ontario, Canada
Posted this in a separate thread but figured I'd keep this one going too lol.

Another kill switch install. Ceiling is 11' high which will let me lift my Kia Stinger all the way up but the SUV we have not so. Instead of risking it ending up in the bedroom above I decided to play it safe. The installers told me they've had a few runaway lifts over the years. The $70 or so in parts and wire was well worth it IMO.

Pic 1.png

Pic 2.jpg

Not really a mod but I also had base extensions installed. Being that it's a floor plate lift I wanted the extra security. Can never have enough steel IMO.

20230509_145007.jpg


I want to hang my work light and extension cord reels on each post as well close to the top. Going to try and use some self tapping screws and make sure it doesn't interfere with the carriages.
 
Last edited:
OP
N

ndm

Well-known member
Joined
Jun 12, 2013
Messages
242
It is crazy how long this thread has stayed alive!
 

Earp69

Well-known member
Joined
Sep 20, 2016
Messages
859
I don't have any pics and it may have already been posted in this thread, I added a 10 ft corded remote to my lift so I can raise it from the original button, or from the remote. It works great for trucks or stuff that you can crawl under and position your arms exactly where you want them and keep bumping the lift up until they are spot on without making 5 trips back and forth to each side.
 

CAMMShaft

Well-known member
Joined
Oct 9, 2012
Messages
202
Location
Layton, Utah, USA
I don't have any pics and it may have already been posted in this thread, I added a 10 ft corded remote to my lift so I can raise it from the original button, or from the remote. It works great for trucks or stuff that you can crawl under and position your arms exactly where you want them and keep bumping the lift up until they are spot on without making 5 trips back and forth to each side.
Love this idea. Do you have a link for the remote?
 
OP
N

ndm

Well-known member
Joined
Jun 12, 2013
Messages
242
Because just about everyone on this forum either wants or has a lift.
Funny thing is, I am the original starter of this thread and do not even have one yet. Every time that I am in a position to get one, something comes up preventing it. At least I can enjoy seeing other mods by everyone else and keep dreaming.
 
OP
N

ndm

Well-known member
Joined
Jun 12, 2013
Messages
242
I don't have any pics and it may have already been posted in this thread, I added a 10 ft corded remote to my lift so I can raise it from the original button, or from the remote. It works great for trucks or stuff that you can crawl under and position your arms exactly where you want them and keep bumping the lift up until they are spot on without making 5 trips back and forth to each side.
I would definitely like to see this. You should snap a few pics and add them here. This whole thread is like a gold mine of great ideas.
 

Earp69

Well-known member
Joined
Sep 20, 2016
Messages
859
okay guys, ill just pile all I have here. the "remote" is nothing fancy,just stuff i had laying around, all you need is some SO cord and a momentary switch of your liking. wire from the normally open contacts on your momentary switch to the normally open contacts on your factory installed lift button, push either button an the lift goes up! Two more things i like about this, i like to be able to stand back 10 foot and watch the vehicle raise off the ground to see how even it is. you can do this with the factory button but you have a whole lot better field of vision standing back. also on cars that are low, ill set the driver side pads where i think they need to be, pitch the remote to the passenger side and set those pads while bumping the lift with the remote until im about an inch away from lifting but i know theyre exactly where i want them,then go back to the drivers side and double check the pads are where i want them and keep bumping the lift up with the remote. once your lift points make contact i then get up and stand back 10 foot and make sure my weight distribuition is how i want it. raise the vehicle about 2 foot, double check my pads are where i want them,give it the shake test and up she goes. its nice being ground level watching the pads come up instead of going up down up down etc. this way you can set your pads safely in half the time.
20231008_172059.jpg
20231008_172112.jpg
dont mind the snapped off screw, or nameplate i took off of a decommissioned transformer i thought was cool.
20231008_172352.jpg
this is the factory contact block,bottom two wires are factory and the top black and white are what i added for my remote
20231008_172020.jpg
power for the lift comes down through the ceiling into the junction box. i have terminal blocks in there and the cord reel is fused in there also. it then drops down into the disconnect for the lift which is also fused. i installed the disconnect after having a real bad oh **** moment. i have ADD pretty bad and am usually thinking about the next task instead of what im currently doing, in this case i had my truck all the way up in the air with an under rack jack under the hitch. i went to lower the lift forgetting the jack was under the hitch and lowered the truck about a foot before i caught it. now if the jack goes under the vehicle the disconnect gets thrown so if i go to raise the lift off the locks i have no power,reminding me my jacks still under there. On the other side you can see my hose reel, i like it BUT im going to make it so that the reel can pivot 180 side to side as now if i want to get a bunch of hose out i have to pull towards the garage doors and then the direction i actaully wanted to be heading,whereas if the reel pivoted i wouldnt have that dilemma.
20231008_171909.jpg
idk where i came up with this idea, but as your locks click ratfink goes for a aride and bounces around.
20231008_172138.jpg
cheat sheet because i cant ever remember what vehicles take what
20231008_172500.jpg
i know this doesnt go here but oh well. i hate any inflators ive found, they all feel cheap and the hose is short(i hate bending over or kneeling down) so i built this guy. i really like it for big tires like my jeep when we air down,when airing back up you just clip it on the valve stem and set the gauge etc on top of the tire and let er fill. if you over fill you crack the 2nd valve to drop pressure. made a couple of these up for my buddies when i made them and they really like them. the one buddy has a bunch of dump trucks that always need aired up and he uses the heck out of it. only thing i would do differant is put a digital gauge on it which i plan on doing
 

gizardlizard

Well-known member
Joined
Aug 29, 2019
Messages
725
Location
Madison, WI
LOVE the remote pendant idea. I’m going to wire one in this week as well but I’m adding an E stop on mine because I can put SUV’S and pickups into the ceiling if the contacts in the switch hang up or stay closed. I only have an 11’7” ceiling
 

Relax

Well-known member
Joined
Nov 22, 2011
Messages
434
Location
GTA, Ontario
The Race Ramps and 2x12’s that I use as extensions to get lowered cars onto the lift are currently just being stored on top of the lift or leaned against the wall. I had some 12” shelving boards leftover from another project and cut them into 18” lengths to use as supports for storing them and/or other things underneath the offside runway. Here’s a pic just after cutting up 4 shelves:

IMG_5932.jpeg
 
OP
N

ndm

Well-known member
Joined
Jun 12, 2013
Messages
242
As the originator of this thread, I am still stunned that even after 8 years this thread is still going. Even more stunning is that I still do not have my own lift to modify:(. I was withing striking distance of the $3300 that the model of advance lift cost a few years ago and then the price jumped by almost double. Now, I will be lucky to even be able to afford a lower end brand. I also got laid off from my job in DEC so there is that.

Keep adding to this thread though. While it seems that I will never own my own lift :dunno:, I can at least enjoy seeing all of your modifications posted here :beer:. I am currently trying to take advantage of a new program to allow retired Veterans to re-enter the Military to serve 4 more years🪖. Maybe a reboot will help me get to that lift!!! LOL!!!
 

gizardlizard

Well-known member
Joined
Aug 29, 2019
Messages
725
Location
Madison, WI
Those are pretty cool but it looks like they work on rims from 15”-17”. Those are pretty small wheels. Modern sport type cars are 20”
 
To avoid these ads, REGISTER NOW!

65’Comet5.0

Active member
Joined
Oct 14, 2023
Messages
42
Place I bought them from list they are okay for 14-18” wheels. Comet is 15” and daily’s are 18” so they work for me.
 

65’Comet5.0

Active member
Joined
Oct 14, 2023
Messages
42
What is the point of them? Just So you don’t have to bend over? Seems like it would be more work taking them off and on.
If doing work that requires the suspension to be loaded. I need to weld in sub frame connectors they say to do them with the suspension loaded so this allows it to be while not having to lay on the floor.
 

gregs

Well-known member
Joined
Mar 16, 2007
Messages
1,578
I can see a few benefits. One would be getting the vehicle higher in the air if you want to park under it. I'll admit $600 isnt cheap, but its not that bad if you have an existing 2 post. I am going to do some measuring and arm position checks to see if they would work on my Eagle lift.
 

Old Man Roger

Well-known member
Joined
Apr 6, 2017
Messages
17,390
Location
Palm Coast Florida
I can see a few benefits. One would be getting the vehicle higher in the air if you want to park under it. I'll admit $600 isnt cheap, but its not that bad if you have an existing 2 post. I am going to do some measuring and arm position checks to see if they would work on my Eagle lift.
Ok, clearance is another legit use.

I guess if the lift is mostly used for storage and wheels on maintenance, you would leave the attachments on most of the time. You would only remove them for wheel off work.
 

gregs

Well-known member
Joined
Mar 16, 2007
Messages
1,578
Not really a mod but got some new accessories for my amgo lift, wheel support adapters and adj lifting pads IMG_3748.jpeg IMG_3747.jpeg
Let us know how well they work when you get a chance to try them out. Do you have a symmetrical or asymmetrical lift?
 

rodnok1

Well-known member
Joined
Jan 27, 2005
Messages
853
Location
NC
Worth 12k extended 4 post lift mods
Wiring outlet, spring cord is for LED lights. Air hose reel is just above on ceiling.
Ramps get chained up when lift is up when empty. Didn't take many times of crushing the skull on them to modify them. I may switch to spring setup like someone did here.
Wheel chock stays on lift and paint marks it's usual postion.
Painted a fluorescent stripe along left edge, also have a large convex mirror off to left side.
Made U bolts to hold ramps in one spot as added bridge jacks.
Bridge jacks add a whole new level of usefulness.
Lastly LED lights with magnets so can move them around when moving jacks. I used 8 lights as an extended lift.
I had the roll of LED stick on lights, they faded extremely quickly even with almost zero exposure to chemicals.
Not really a mod but I leveled the lift ramps to within 1/16 of an inch as I do alignments on it. Wasn't easy as quality of design isn't job one it seems. It actually made the ramps further off when the uprights were leveled to each other. Had to make spacers for chain attachments and shorten one chain half a link.

Great thread BTW, alot of inspiration here.
lift2.jpg
lift1.jpg
lift4.jpg
lift3.jpg
20240429_180218.jpg
lift5lights.jpg
 

firebirdparts

Well-known member
Joined
Jun 8, 2016
Messages
10,574
Location
Kingsport, TN
Not really a mod but got some new accessories for my amgo lift, wheel support adapters and adj lifting pads IMG_3747.jpeg

Those are really reasonable in price. What is the diameter of that pin? I think any of us who want a set would be thinking about the fit. I would need to make some mods to get that to work on mine.
 

Doozer75

Well-known member
Joined
Oct 24, 2009
Messages
260
Location
Buffalo NY
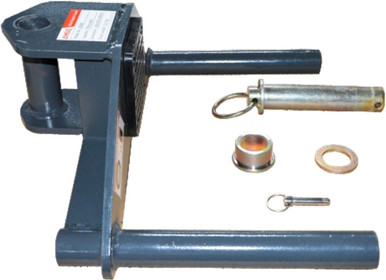
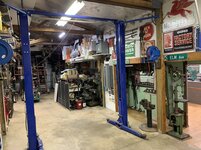
I have a #10000 Quality lift by Challenger. Pops my Diesel PU right up and is stout enough but I never felt super confident in the small footprint of a two post lift especially when the weight is never perfectly balanced. The bay I put it in is only 15' wide and that allowed me to build in a solid anchor point at the top of the lift for a bar on each upright to add a little extra bracing. Here are a couple pics. Nothing special but even with near capacity loads all the way up the lift feels absolutely rock solid now. Ed.


Lift%20Bracing_zpsfdhkp8xh.jpg
1714649102098.png
I know this Pic is from a post on page #1, and this thread is 12 pages right now.
But I was reading, and there was some controversy about the guy adding the
gusset arms to brace the columns to the wall. You hear that a lot on this forum.
Sayers of nay.
I don't usually tell people my credentials, but in this case I will.
I am a mechanical engineer, and I think adding these brace arms
IS AN EXCELLENT IDEA !
No, I would not consider the lift to be able to lift more weight
(although maybe it could), but it is just added safety factor
when lifting an offset load, like asymmetric lifts almost always have.
The people who are afraid of seeing modifications like this
just DO NOT KNOW about forces and directions (vectors)
and rely on taking comfort in a litigious pathway to blame others
for a problem, like the manufacturer. Or to say, they prefer to take
the path of blame instead of taking responsibility to create a path
to prevention of a problem. They want to rely on laws to protect
them from the wrongs of the world, instead of being an active
participant in life, and protecting themselves by being proactive
with their intelligent decisions. Belief in the collective verses belief
in one's self. Follower verses leader. This message board is one giant
collective. Lots of followers come here to seek validation for their
passive participation in society. I am not that way. I am proactive
and make my decisions to guide the path of my life, and do not look
to point blame for the shortcomings that happen to me in life.
I view the forum to try and get a window of how the collective of men
out there in society think and act. Normal is a conglomeration of the
actions of the masses. And normal is being perpetuated as how
everyone should be and act. Sounds like a snake eating it's tail to me.
Just like if people misuse a word, it still will get added to the dictionary,
even though it should be dismissed as bad grammar. An echo chamber
of validation. The more I understand about the collective, the better
I can navigate the faulty logic that exists in the collective. Thank you.
So keep posting here and I will keep gathering data on you.
Have a nice day.

--Doozer
 

Oregon rock crusher

Well-known member
Joined
Jun 28, 2016
Messages
1,899
Location
West of Salem
Old topic but FWIW after years of use the lift is still standing strong as ever, as is the shop. Now getting more use than ever as my sons and son in laws frequently make use of the facilities. The grandkids aren't that many years away from their own projects. Braces, and training, offer me peace of mind knowing they will be safe using it. Ed.
 

Attachments

  • IMG_4467.jpg
    IMG_4467.jpg
    868 KB · Views: 113
  • IMG_4466.jpg
    IMG_4466.jpg
    814.9 KB · Views: 112

ronr80

Well-known member
Joined
Feb 13, 2013
Messages
504
Location
ontario
Excavator Post 11 , how do you raise the back "lift" do you use a bottle jack, I want to do the same but not sure how to lift this set up SAFELY , Ron
 

grabeb

Well-known member
Joined
May 28, 2021
Messages
197
Not a modification really, but I've been known to store stuff up on my 4post. Grease guns, grease, funnels, etc.... stuff I use frequently when working on cars. Ihave a tub most is in. I tend to also hoard cardboard as it's great for drips and keeping my drip trays cleaner. If I order parts they get tossed up there as well until I can get to them. Been cleaning my garage for a gathering and my college age daughter came out to harass me, I went to set something up out of way and tossed it above some cardboard spread across drip trays and her comment was your just like a little kid cleaning their room shoving stuff under the bed!!!

Ughhh..... can't say she's wrong I guess!!
 

914forme

Well-known member
Joined
Mar 19, 2006
Messages
106
Location
North of Dayton, Ohio
I got my 12K lift installed and did a few mods based on all the suggestions found here. I work on a lot of German cars, and they all have special lifting adapters. And yes none of them are the same. I did the remote idea with a twist, I made the remote cable out of extension cords. Currently have a 10 foot one, but can add as much as I need. Have an outlet on the lift, and the male counterpart on the end of the controller. Added a rubber coated magnet to keep it out of harms way. I need to label that so other know it is not an electrical outlet. I also thought about painting it, most likely will stay that way, I tend just to start working once I have the modifications done, cosmetic details are not really my thing.
.IMG_0419.jpeg
Also added the e-stop, and off topic electrical mods. I have a couple other mods to go, larger door bumpers, and maybe a tank support. Might add a light so I know when the lift has power. I could see that in the camera system and know it is safe (unpowered) from smaller hands operating the lift when I am not present.

IMG_0421.jpeg

The e-stop is mounted to a single gang mud ring on a 4 inch box, box spacer holds in the proper location. But that moved the box off the column 3/8 inch, so I used the same rubber coated magnets to fill the void and add stability. All other items are mounted via drill and taping into the column.

Look closely at the far side you can see a small M12 light, I have 2 of them, and just stick them on the arms to light up the underside.

Also realized the angle of the last picture was taken gives the illusion the panel was mounted off center, it was not.
 

Relax

Well-known member
Joined
Nov 22, 2011
Messages
434
Location
GTA, Ontario
IMG_0421.jpeg

The e-stop is mounted to a single gang mud ring on a 4 inch box, box spacer holds in the proper location. But that moved the box off the column 3/8 inch, so I used the same rubber coated magnets to fill the void and add stability. All other items are mounted via drill and taping into the column.

Hmmm, never though to mount a panel and welder outlet on the lift post - that would put it in a much more centralized location in my garage compared to one of the walls.
 

ArmchairArchitect

Active member
Joined
Nov 15, 2019
Messages
35
Location
Philadelphia, PA
I have an Atlas 4-post lift and my C8 Corvette Z06 fits underneath it just fine, but I haven't put it on top of the actual lift yet because of the width of the car. The runways are fine, even if the tires overhang just a little, but my main concern is when loading the car on the lift, scratching the wheels on the pulley cover areas/brackets given it's like a 1/4" clearance on each side.

Has anyone modified or added anything to their 4 post lift to alleviate this problem? Some ideas I had were adding padding somehow, or adding a wooden block right next to each pulley so that the car drives over that area instead of the wheels coming next to it. But looking for other ideas too.

Lift Width Modification Needed.JPG
 
To avoid these ads, REGISTER NOW!
Top Bottom