Old Man Roger
Well-known member
I would be tripping over those ramps constantly if they were screwed to the floor.


I would be tripping over those ramps constantly if they were screwed to the floor.
I welded a bolt to my lift to mount my air line. Does this make me die?
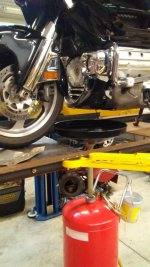
Not a mod really, but I've used this method to get my engine in and out of my bed a couple of times.
I welded a bolt to my lift to mount my air line. Does this make me die?

Next mod was I found a pressure gauge to install on the hydraulics. Mohawk sells one, but it was stupid expensive!
Try:
Northern Tool + Equipment
Tractor Supply
What does your set up look like for lifting your motorcycle?


Yes you can. Just use one leg from your 240v (either the black or the red wire) and the white to create your 120v receptacle.
110/ 220 has been replaced over the years by 120/240.
As long as the circuit is sized properly, meaning your usage isn't going to exceed the amperage of the breaker, and you use the proper gauge wire, I don't see a problem. You should even be able to put both receptacles in the same duplex box. Sometimes finding the cover plate in the right configuration can take a little searching, but it can be done.
")
Yes you can. Just use one leg from your 240v (either the black or the red wire) and the white to create your 120v receptacle.
110/ 220 has been replaced over the years by 120/240.
Thank you! I’m planning to go with 6 gauge wire with 50A breaker. Hopefully it will be possible to feed it through the metal conduit with a lot of turns
Thank you! I’m planning to go with 6 gauge wire with 50A breaker. Hopefully it will be possible to feed it through the metal conduit with a lot of turns
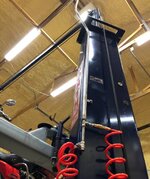
Another motorcycle lift adaptation:
Another motorcycle lift adaptation:
That's nice and certainly heavy duty. I'll bet it's a bear to move around though.
I debated whether to build mine as a drive-on or just lift under the frame. Kind of like deciding between a 2 post or 4 post lift for cars. There's no one right answer as both have their pros and cons.
No sorry needed. Thanks for understanding.New thread over in the electrical section
Lift Modifications - Wiring Related
I've deleted my off topic posts in this thread, if others could do the same that would help clean this up and keep it on topic.
Thanks (and sorry again)
Fix Until Broke
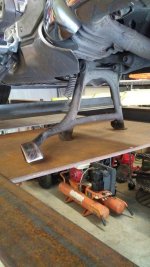
I didn't see an introduction forum, so I'll start here. Long time racer and hotrodder. Been in my 30 x 36 shop for 33 years. We are getting ready to build a new 30 x 40 for my son at his place. My research led me here. I saw this post and figured I'd show what I did with my 4 poster.
I agonized over whether to buy a 2 or 4 post lift because of the advantages and disadvantages of each. I ended up buying a 4 poster. Well the first thing I needed to do was get the wheels off while on the lift. I just couldn't see my way clear to pay that much for those rolling jacks the lift maker offered, so I came up with this and I figured it fit here.
The lift came with a cross beam for jacking, but that was unhandy as hell. I hole sawed 1-1/2" holes in the beam and welded in pieces of 1-1/2" x .095 tube. I used 1-1/4" all thread and welded on short 2"x 2" pieces of angle. The all thread is long enough to be about 3" below the ramps with the angle against the axle. Drive the car on the ramps, raise it up to place the beam and stands under the axle. Lower the lift and the stands catch the car allowing the ramps to drop out from under the car. Run the nuts down and raise the lift back up. Now you can take the wheels off. I liked this trick so well I made another beam for the rear to get all the wheels off. Then I needed to do some suspension work, so I made 2 more beams at different centers to catch the frame. This really made the lift capable of a lot more for me. I hope somebody finds this useful.
Please ignore the plumb bobs. I was doing an alignment.
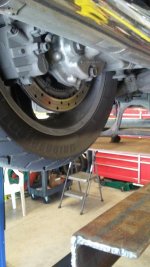
My son has a small airbrush compressor that is almost silent. I borrowed it to try on the Bendpak lift I recently got, to open the air cylinder locks. The thing works perfectly and even has a regulator to dial in the correct psi needed. It builds the pressure needed to release the locks in just a second or two and is QUIET!
Here is a link to the one I bought: Compressor
Go to about 17:00 minutes on this video and you can hear how quiet: Video
Used a 1/4" pipe male elbow to hook the air switch right to the regulator and mounted the unit right above the hydraulic unit on the lift. Easier install and less money than the Bendpak air cylinder kit too.
Figured I'd share a cheap, easy and good solution for those of us that don't have the garage plumbed for air yet. Couldn't be happier with the results.
Jmx,
A better photo you had asked me for.
I'm digging up this old thread because it was referenced in another more recent one. I liked this idea so much I stole a version of it.
I have air in my garage, a big 220V 60gal horiz.
But it's not on all the time. So it's inconvenient (and overkill) to fire it up just to take the car down to go for a spin.
The airbrush compressor is a great idea! But when my wife got wind of what I was planning, she wanted to go bigger, and suggested this: Dewalt 1 gal. trim compressor.

That way she could use it in the house when she needed it for her upholstery stapler or brad nailer instead of having me haul the portable air tank inside.
Finally got it hooked up this weekend and it works great! It's super quiet, it builds pressure in 1 minute, and it's easy to unhook it. Plugged it into a switched outlet so I just flip the switch when I want to get the car down.


Thanks for the inspiration thickhead
edit: updated with finished setup.

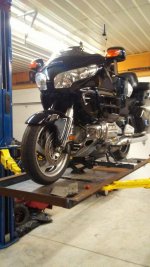
Nailer compressor sits on my spare ramp (double wide lift), plumbed into the lock release, and plugged into a switched socket. Just unplug it from the system when I want to use the compressor elsewhere.
with the exception of bouncing and settling the car, you cant go wrong with the 4 post.
This post has what I think is great info as well as a photo of some jacks being used with a 4 post lift which I have never seen before.
https://www.garagejournal.com/forum/showthread.php?t=439504


I like the "storage" the runways have
There is none with a 2-post.
That IMO is a great benefit of a 4 post. As you are working on a vehicle you have a built in table to place in use tools without having to roll a cart or anything into place.