And nicely done! Did you have to buy another hose? If so where?
Thanks. I picked the hose up locally for around $70. Can't remember the name of the place off hand.


And nicely done! Did you have to buy another hose? If so where?
If I get down your way, I'll definitely want to see your install. Thanx for those links.
I do have a few questions:
1) Should I just buy Epoxy set bolts from the Get-Go?
I would. It sure would have saved me a lot of grief, time and money if I had. I see that the Dannmar folks now provide a kit with epoxy anchors and epoxy for about $110. That's a good price and well worth it, IMHO.
Here is the link for the anchors. These things cost $18 apiece plus the epoxy if you try to buy them through Grainger, etc.
http://phx.corporate-ir.net/phoenix.zhtml?c=107246&p=irol-EventDetails&EventId=4139426
") . So them's my two cents. Pictures to follow when I have some time.
. So them's my two cents. Pictures to follow when I have some time.
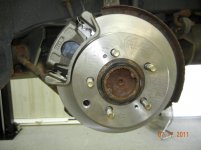
I am in the middle of installing my new MaxJax lift and of course drilling the first hole, I hit Rebar in the concrete floor
So I go to the other post and start drilling with same 1/2" bit as a pilot, followed by the 7/8" bit and drills like going though Butter. No problem.
What do I use to cut through the Rebar in the floor?
I asked the Tool rental place and they didn't have a 7/8" Rebar cutter and no one around has one.
I looked at Amazon.com and found a Bosch RC2144 7/8-Inch by 12-Inch SDS Plus Rebar Cutter $43.00 will this work in the Hilti Hammer drill or do you use a regular drill or a line bore set up as suggested by the rental shop?
http://www.amazon.com/s/ref=nb_sb_noss?url=search-alias=aps&field-keywords=7/8"+Rebar+cutter+bit
There is also a Champion Proline CM95X-7/8x16x18 SDS Plus Concrete/Rebar Rotary Hammer Drill Cross Head Solid Tip, 7/8-Inch by 16-Inch by 18-Inch
for $48.00 (Half way down the same page on the above link)
Also, when drilling throught he rebar is cooling with water while drilling recommended?
Of course this is another job where you by a tool and only need it for one job and then it sits in the back of the Tool box for years
Any help would be appreciated.
Question on length of time on the lift. Of course two post lifts are not recommended for storage , but for servicing cars.
I'm curious the most time you leave a car up on the lift? Of course if it is lifted properly at the right positions the car will be secure, but just curious how long folks have done this?
I'm not planning to try to store anything under the car if that is what your thinking!
Wow! long time!! how's everyone!??; )
I have my '59 apache up on the middle notch and it had been there for about a week until I got two more tall jack stands, now I have 4, then set my truck down the the stands so I could remove the passenger side column to get inside the truck; it's been this way for about a month. Even when I did have it up on the lift, I had two jackstands front and rear to steady the truck.
; )
dne'
Nice truck.
How high are your ceilings?
Can you describe how you drilled the extra holes to make sure they were lined up?
Thanks, Denee
The truck looks great, I'd like an old truck project but other cars have priority right now. Good to know how you were securing the truck at the front and back while on the lift for some time, I was thinking the exact same thing. I may add a few of the tall jack stands to my garage soon.
About the question about additional holes on the MaxJax, it make sense why everyone would like them but I believe someone has checked with the engineering team at Dannmar and it was not recommended for owner to drill holes. Now what I have done on occasion to have more flexibility is I have used jack stands under the 4 arms at the desired height that I wanted for a project, sometimes even the first stop is higher than I want for brake work.
Hey, I heard of people drilling their columns for different levels. I was going to do that too, but just haven't gotten around to getting the correct hole saw, or whatever drillbit adequate for this application. Plus I'm a little worried about metal fillings getting down into the runs despite being careful.
dne'
Hey all, I've spent a lot of time browsing this thread and wanted to say thanks for all the info. I spoke with Joe Vermillion at GESUSA and got a smokin' deal on my maxjax lift. $ 1839 delivered, including a danmar rolling chair and 8 gallon oil drain. A big thanks to Joe, was a pleasure to do business with. I am very excited to do the install in a week or so as I am still sealing the concrete on my garage floor. JJ
 Congratulations!! now, some things you may want to consider to make your MJ experience more enjoyable! I would have posted photos, but my photobucket account seems to have froze up! however:
Hey all, I've spent a lot of time browsing this thread and wanted to say thanks for all the info. I spoke with Joe Vermillion at GESUSA and got a smokin' deal on my maxjax lift. $ 1839 delivered, including a danmar rolling chair and 8 gallon oil drain. A big thanks to Joe, was a pleasure to do business with. I am very excited to do the install in a week or so as I am still sealing the concrete on my garage floor. JJ
:
The hoses that come with the unit are just long enough to get the job done, but you can extend the hydraulic hoses almost as long as you would like! Northern Tools carries the hydraulic hoses already made up in a couple lengths. BUt I believe the various 90, 30 degree ends may have to be purchased at a hydraulic shop/store, then you'd need a coupler(splice) or two(also from NT). I also mounted my pump system on the wall which gets it off of the floor and out of my way. I don't know your circumstance, but these are some things to consider during your install. Use lots of teflon tape on your fittings!
You may want to post a few photos of your before and after~ it's always nice to see what you're up to.
May the force be with you! and good luck!
dne'
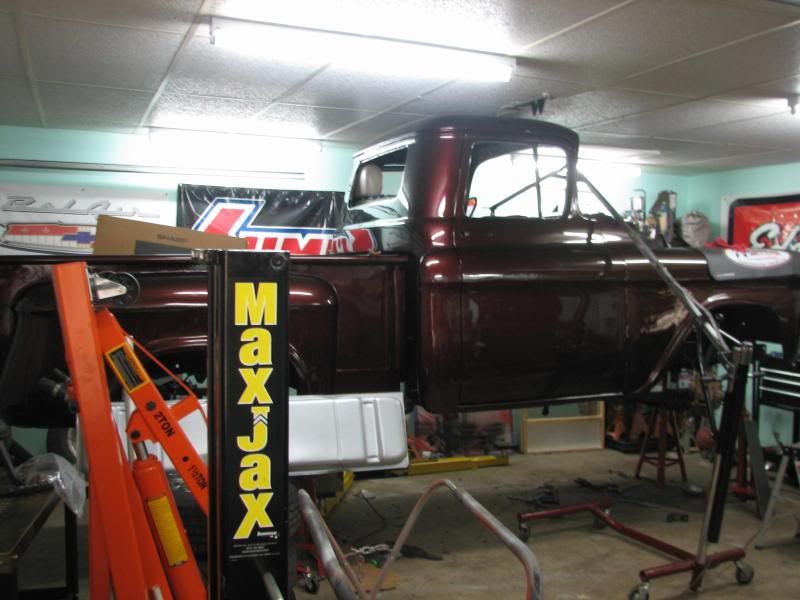
I have my '59 Apache up on those stands and unbolted my Maxjax and moved the column out of the way. Now the truck is just suspended by the jackstands.Dne'
Did you ever buy those GSE stands?
. You can just make out a couple jack stands under the front of my truck. My pump is mounted on the wall in front of the truck and off to the right. My MJ is unbolted and out of the way so I can get into the truck to work on it. ; )


Gosh Dolfan, I hope to have my floor looking as good as yours someday! ; ).
For those who brought theirs home in the back of a trailer...
Is there a way to orient the package that makes it easier to take apart, put the wheels on and take it off the trailer a piece at a time?
I couldn't scare up any help this evening. So I mounted the wheels first then unbolted the base of the posts from the steel frame and lowered the posts to the trailer deck. Then I unbolted the top end of the posts and set them down. I then put moving pads topped with cardboard on the deck of the trailer with some hanging over the edge. The rest of the moving blanket was on the garage floor. My wife held the moving pads and cardboard in place while I rolled the posts over to the edge of the trailer and carefully over the edge. Then I let the posts slide down onto the pad/cardboard on the floor so I could roll them off onto the concrete floor.
The trailer ramps were of the type with steel angles welded between the rails - better suited for loading ATVs and were not suitable for rolling the posts to the ground. So I had to 'punt'. It wasn't ideal but for a one-man solution it worked well with no damage to the borrowed trailer or the posts.