To avoid these ads, REGISTER NOW!

Between 705 & 1200 SQ/FT Quonset Hut Garage Build

Workspaces between 705 and 1200 squarefeet.

bdbecker

ALLIANCE MEMBER
Joined
Nov 18, 2015
Messages
5,577
Location
Iowa
They are a blast to use aren't they, and much easier than the old splitting maul.
JB

I will agree that they make splitting wood faster and easier, but the novelty wears off after the ten millionth log. Growing up, we used wood pretty much exclusively to heat our house and usually tried to have at least 10 cords ready to go each fall, but some years, that wasn't even enough.
 
To avoid these ads, REGISTER NOW!

jbmatth

Well-known member
Joined
Jun 3, 2013
Messages
5,686
Location
Northern Ok.
I was in the same boat bdbecker, we would have family tree cutting parties every year, I looked forward to being old enough to use the splitting maul so I didn't have to use the hatchet to trim off the smaller limbs and haul all of the cut and split logs. I shouldn't have wanted to grow up so fast. I've only gotten to use a log splitter once and it was way more fun. We have used gas for the last 16 years and I actually don't even own a maul.
JB
 
OP
D

dwysywd

Well-known member
Joined
Sep 21, 2014
Messages
892
Location
SE Michigan - Romeo area
I used wood exclusively for 2 years when I lived in VA. It would get almost as cold as MI where I lived in the mountains. I think I went through about 3 cords each year. I was buying not cutting at the time. Now I'm burning wood to heat the barn only. The motivation for this purchase was my neighbor and I cut wood together and this was an easy way to help us both split right onsite where we cut. Reducing the times we needed to move the wood.


Sent from my quanset hut facsimile machine
 
OP
D

dwysywd

Well-known member
Joined
Sep 21, 2014
Messages
892
Location
SE Michigan - Romeo area
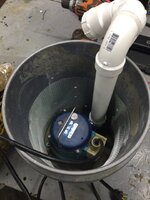
fcc7433142f031d0039bbc8d55329b2d.jpg
There's a story here, I promise. I have a nice little video I will upload tomorrow. This sorta worked and I have more R&D I need to do to pull this off correctly.

Bucket from Lowes....$2
Sump pump from CL ....$35
Pipe & Fittings ... $13
Rocks & Gravel ... already had them
Being able to pump the water from the hut, priceless...too bad it didn't work as well as I wanted it to! Time to improve the concept.

More to come...


Sent from my quanset hut facsimile machine
 

Attachments

  • fcc7433142f031d0039bbc8d55329b2d.jpg
    fcc7433142f031d0039bbc8d55329b2d.jpg
    321.5 KB · Views: 3

jbmatth

Well-known member
Joined
Jun 3, 2013
Messages
5,686
Location
Northern Ok.
Looking forward to seeing this thing keeping your shop dry. Something I found the other day was this thread:
Welcome......To Odd Acres
He had similar leaking issues with a nearly identical building and was able to solve them. Good luck,
JB
 
OP
D

dwysywd

Well-known member
Joined
Sep 21, 2014
Messages
892
Location
SE Michigan - Romeo area
Looking forward to seeing this thing keeping your shop dry. Something I found the other day was this thread:
Welcome......To Odd Acres
He had similar leaking issues with a nearly identical building and was able to solve them. Good luck,
JB


JB that's a great link! I also found this one http://quonsetman.blogspot.com/2012/06/waterproofing-base-plate.html?m=1
I have 5 gallons of waterproofing my buddy gave me and need to buy the material to inlay on top. I'm going to try this. I will read the link you sent before I do anything to make sure I didn't miss something.

The cement I put down did help! I'm going to finish the job today I hope. Got a water pressure tank and healing elements in my house system that I have to do today too.

Update coming.


Sent from my quanset hut facsimile machine
 
OP
D

dwysywd

Well-known member
Joined
Sep 21, 2014
Messages
892
Location
SE Michigan - Romeo area
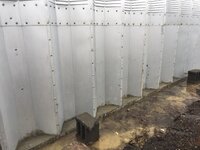
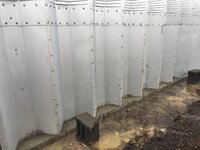
So the outside edge of quanset huts have these troughs where the hoop panels set in and are bolted to the base plate and footer. It is recommended to fill with concrete. I finally finished the concrete. After lots of reading I think my water leaks are limited to these concrete bases. My roof doesn't leak because when I assembled my hut we siliconed every seam. So, next I'm water proofing the concrete troughs per the blog I posted above. And hopefully after that I'm putting in my door threshold concrete so I get a nice seal before spring rains start. Pics coming later today.


Sent from my quanset hut facsimile machine
 

Finallygotit

ALLIANCE MEMBER
Joined
Jul 6, 2013
Messages
4,091
Location
Tucson, AZ
Hello! :hellobye:

Thanks for that link to the blog. I have been following this thread since you started and will continue to follow along here.

Remember, lots of pictures.

:thumbup:
 
OP
D

dwysywd

Well-known member
Joined
Sep 21, 2014
Messages
892
Location
SE Michigan - Romeo area
Yeah. Worked on the hut tonight with some buddies and left my phone in the house. Home all day tomorrow. I promise I will post some good photos. Until then...

d4db33a7e692fa4bd1c8521e57c77327.jpg509c7d47c45bb7882853b53b3a084227.jpg


Sent from my quanset hut facsimile machine
 

Attachments

  • 509c7d47c45bb7882853b53b3a084227.jpg
    509c7d47c45bb7882853b53b3a084227.jpg
    650.5 KB · Views: 0
  • d4db33a7e692fa4bd1c8521e57c77327.jpg
    d4db33a7e692fa4bd1c8521e57c77327.jpg
    622.4 KB · Views: 0

txvwnut

Well-known member
Joined
Jan 1, 2015
Messages
7,646
Location
Bedford, Texas
In your first pic it looks like there are a couple of screws poking from inside to out. Those can be a spot for water penetration as there is nothing sealing those threads.
 
OP
D

dwysywd

Well-known member
Joined
Sep 21, 2014
Messages
892
Location
SE Michigan - Romeo area
Yeah. Those are. Or screws. They are mud or concrete splatter. But all the bolts used had washers.

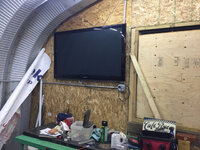
On another note, it's good to have friends with money to burn. My buddy had this 60" plasma. It had a horizontal line. So he bought a new tv. And his old one was gratis to me! ba07062530cf4f2fa133004158433f46.jpg

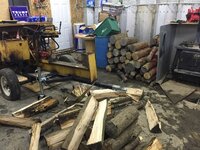
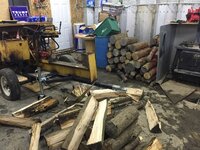
And I split some wood with the new to me wood splitter i built the trailer for.
677be5233c84725652b1b88a959748f8.jpg


Sent from my quanset hut facsimile machine
 

Attachments

  • 677be5233c84725652b1b88a959748f8.jpg
    677be5233c84725652b1b88a959748f8.jpg
    848.5 KB · Views: 0
  • ba07062530cf4f2fa133004158433f46.jpg
    ba07062530cf4f2fa133004158433f46.jpg
    782.5 KB · Views: 0

bdbecker

ALLIANCE MEMBER
Joined
Nov 18, 2015
Messages
5,577
Location
Iowa
I love it... how many guys can say they have a 60" flat screen next to their log splitter?
 
OP
D

dwysywd

Well-known member
Joined
Sep 21, 2014
Messages
892
Location
SE Michigan - Romeo area
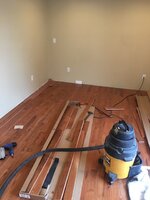
Yeah. It was pretty sweet deal ~ free!. It has a horizontal line across the screen but nbd. Spent all weekend laying wood in my master bedroom. LoL. That sounded funny. But it's true and I have pictures to prove it. Lacking on QBT all weekend. 87922fc9a0b24f9611c92b16ea8c2c79.jpg37990e290b04cc0eb7e02f8a4ef9ada3.jpg


Sent from my quanset hut facsimile machine
 

Attachments

  • 87922fc9a0b24f9611c92b16ea8c2c79.jpg
    87922fc9a0b24f9611c92b16ea8c2c79.jpg
    374.7 KB · Views: 0
  • 37990e290b04cc0eb7e02f8a4ef9ada3.jpg
    37990e290b04cc0eb7e02f8a4ef9ada3.jpg
    323.9 KB · Views: 0
Last edited:
OP
D

dwysywd

Well-known member
Joined
Sep 21, 2014
Messages
892
Location
SE Michigan - Romeo area
Finally, finally, finally!!!! Done with the addition today! 10 pieces stand between me, a cold beer and finished! Plus i have a gift from my buddy that needs to go up in the hut. More pictures to come today. But here is one of the TV mounted. 17c8ef2ae96e5f639984981af5295002.jpg


Sent from my quanset hut facsimile machine
 
OP
D

dwysywd

Well-known member
Joined
Sep 21, 2014
Messages
892
Location
SE Michigan - Romeo area
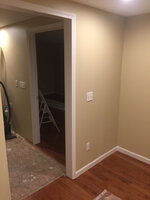
LoL. I thought I was done with the addition. I forgot how much time finish work takes. Here is what I've done. As soon as I am completely done with my addition, I get back to finishing my floor and spray foam the hut. More to come I promise!

3f0d30336e4dbbfb46974206a46fbc5d.jpg49ab0474de0c41dcf6816ef45cc61d9e.jpgc8821d0ee95c65e948a4196d7fd0deb4.jpg


Sent from my iPhone using Tapatalk
 

Attachments

  • c8821d0ee95c65e948a4196d7fd0deb4.jpg
    c8821d0ee95c65e948a4196d7fd0deb4.jpg
    657.8 KB · Views: 0
  • 49ab0474de0c41dcf6816ef45cc61d9e.jpg
    49ab0474de0c41dcf6816ef45cc61d9e.jpg
    719.2 KB · Views: 0
  • 3f0d30336e4dbbfb46974206a46fbc5d.jpg
    3f0d30336e4dbbfb46974206a46fbc5d.jpg
    559.9 KB · Views: 0
OP
D

dwysywd

Well-known member
Joined
Sep 21, 2014
Messages
892
Location
SE Michigan - Romeo area
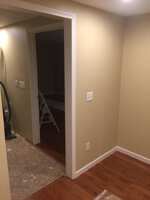
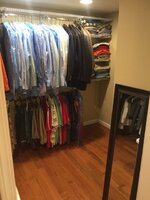
Wow. It's been 3 months and it's been busy. Here are pics of finished addition. 84b36374121f93c1f853ccfbf3c5f06e.jpg1447f3cb18c0365035b0e700b32602f5.jpgd6b807af16e0bfb23714f6e6498461c0.jpg


Sent from my iPhone using Tapatalk
 

Attachments

  • d6b807af16e0bfb23714f6e6498461c0.jpg
    d6b807af16e0bfb23714f6e6498461c0.jpg
    371.1 KB · Views: 0
  • 1447f3cb18c0365035b0e700b32602f5.jpg
    1447f3cb18c0365035b0e700b32602f5.jpg
    365.7 KB · Views: 0
  • 84b36374121f93c1f853ccfbf3c5f06e.jpg
    84b36374121f93c1f853ccfbf3c5f06e.jpg
    54 KB · Views: 1
OP
D

dwysywd

Well-known member
Joined
Sep 21, 2014
Messages
892
Location
SE Michigan - Romeo area
Actually the 2nd house is a vacation spot and it has a 2 bedroom and full bath upstairs that my daughter and friends are renting for college. It's 4 miles from her school about 3 hrs from where we live. And the main floor has a studio 200 sq ft apt with full bath and laundry as well in the same house. So we keep that for vaca. I started my renovations this week and have most of the big ones done.


Sent from my iPhone using Tapatalk
 
To avoid these ads, REGISTER NOW!
OP
D

dwysywd

Well-known member
Joined
Sep 21, 2014
Messages
892
Location
SE Michigan - Romeo area
I will get some pictures posted.

NOW back to the hut! I have started emptying the hut out to start my concrete. I have almost everything out. Hopefully tomorrow it will be empty or close to it. Then I need to pull my rubber membrane off the dirt. Get the dirt to dry up an it and bobcat it out. Next I need to order my pex and Insullation for the floor. I can't wait! And I'm also plumbing a drain rail center hut and a wash sink and urinal. My ultimate goal is in next 5-6!weeks have it poured.


Sent from my iPhone using Tapatalk
 
OP
D

dwysywd

Well-known member
Joined
Sep 21, 2014
Messages
892
Location
SE Michigan - Romeo area
Finally!!! Finally!!!Finally!!!
I have an update on the hut!
Prepping for concrete. Hut has been emptied. Floor is level! Drain, plumbing, Pex and Insullation going in Friday.

05e25b9335840021214149128a9eca5d.jpg


Sent from my iPhone using Tapatalk
 

Attachments

  • 05e25b9335840021214149128a9eca5d.jpg
    05e25b9335840021214149128a9eca5d.jpg
    748.2 KB · Views: 1
Last edited:

BUGTHUG

Well-known member
Joined
Nov 12, 2010
Messages
2,960
Location
Kansas
Its going to make a big difference having something firm to walk on. Especially when you have to use the floor jack on something.
 
OP
D

dwysywd

Well-known member
Joined
Sep 21, 2014
Messages
892
Location
SE Michigan - Romeo area
I can't wait. I splurged and purchased the floor Insullation for the pex that has the groves in it for easy pex install. I get them Thursday. I will post picture

Mine look like these

e108ed34261e67105f97be0e81a91222.jpg

Sent from my bag phone
 

Attachments

  • e108ed34261e67105f97be0e81a91222.jpg
    e108ed34261e67105f97be0e81a91222.jpg
    16.6 KB · Views: 1
Last edited:
OP
D

dwysywd

Well-known member
Joined
Sep 21, 2014
Messages
892
Location
SE Michigan - Romeo area
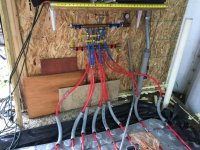
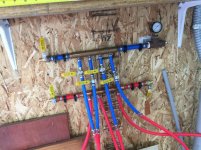
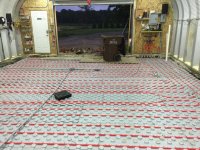
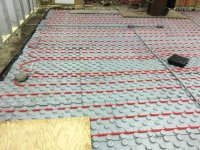
So floor is prepped for concrete. Pex pipe and Insullation is laid. I installed a floor and sink drain. They are under the Insullation. And I put 4 junction boxes in the floor for some LeD lights. Finally, just need to add a few floor anchors. 3-4" steel pipe section with chain in them as an anchor point.
 

Attachments

  • IMG_3606.jpg
    IMG_3606.jpg
    147.2 KB · Views: 157
  • IMG_3615.jpg
    IMG_3615.jpg
    149.1 KB · Views: 195
Last edited:

txvwnut

Well-known member
Joined
Jan 1, 2015
Messages
7,646
Location
Bedford, Texas
For you anchor pots make a drawing of where you want them then put them in the concrete after you pour while they are finishing it. I put mine in first and some of them got pushed down during the pour and I had to chip them out.
 
OP
D

dwysywd

Well-known member
Joined
Sep 21, 2014
Messages
892
Location
SE Michigan - Romeo area
JB, I think it was you that put LED in your floor. It was my inspiration. So, my plan was to wire the boxes for LED lights in them and then put a frosted plexiglass cover on them to diffuse the light.

TX, thanks for the recommendation on the anchor pots
 

jbmatth

Well-known member
Joined
Jun 3, 2013
Messages
5,686
Location
Northern Ok.
Woo Hoo I was an inspiration to someone, that is kinda scary to think about. LOL If you plan to have a 2 post lift I would make sure the pex isn't where the pads will be, if you have a 4 post that isn't bolted down it won't be an issue. Excited to see how they come out.
JB
 

Growlertdi

Well-known member
Joined
May 17, 2016
Messages
410
Location
Millersport, Ohio
looking great. I bet the concrete adds a lot of value to the hut. do you plan to add a lift in the future?

make sure you do a very detailed drawing of where you have your PEX lines so that you dont hit one when you put the lift in .
 
OP
D

dwysywd

Well-known member
Joined
Sep 21, 2014
Messages
892
Location
SE Michigan - Romeo area
So, I have not decided on the lift yet, but I have found one that will work. Both Triumph and Autolift offer 9000 lb lifts for hobby use. I have decided to reroute the pex around the drains to accommodate a future lift. This way I know I have 18' wide area where there is absolutely NO PEX. Then I can always decide to add one at a later date.

This is the link for the lift I was considering.
https://smile.amazon.com/TRIUMPH-NT-9-9000Lbs-Floor-Plate/dp/B00QHEUULM/ref=sr_1_1?ie=UTF8&qid=1500215485&sr=8-1&keywords=9000+lift

I will post some final prep pictures tonight. I have to finish cleaning up the footer edges... we were a little sloppy when pouring the footers and now it is creating extra work. We do it nice cause we do it twice!

Here is some video footage in time-lapse:
 

Attachments

  • IMG_3634.jpg
    IMG_3634.jpg
    150.9 KB · Views: 122
  • IMG_3640.jpg
    IMG_3640.jpg
    150.2 KB · Views: 103
  • IMG_3633.jpg
    IMG_3633.jpg
    150.5 KB · Views: 103
  • IMG_3637.jpg
    IMG_3637.jpg
    150.2 KB · Views: 122
Last edited:

jbmatth

Well-known member
Joined
Jun 3, 2013
Messages
5,686
Location
Northern Ok.
Something to consider about the floor plate lift is the trouble rolling non-running vehicles over it, that and too boxes, jacks, trans jacks, etc. can get annoying but should be easily figured out.

JB
 
OP
D

dwysywd

Well-known member
Joined
Sep 21, 2014
Messages
892
Location
SE Michigan - Romeo area
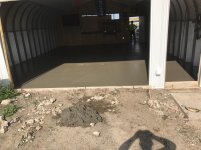
poured and power troweled. I will post more pics tomorrow. Floor is between 6"- 7" thick with a 3"-4" slope to the drain. long story but it had to do with my footings again. so if you have read this far, you know I did the footing with the help of a few buddies. nothing like saving a buck... that has now cost me $1700. $1200 for the footing mistake and another $500 to bring the thickness up to cover the footing mistake and keep my concrete floor from being too thin in fringe edge areas. So, I have 4000 psi concrete with fiberglass mesh. I rerouted the heated floor pex to accommodate the future possibility of a lift. I realized I cannot put a floor plate lift in because of my slop to the drain and the fact that it would have to go directly over the drain. So I am back to measuring the height of my ceiling to see if I can fit one with a top bar. Unfortunately, the free standing MAXJACK which was what I really want, is not strong enough to lift my Super Duty.
 

Attachments

  • IMG_3670.jpg
    IMG_3670.jpg
    144.6 KB · Views: 146
  • IMG_3646.jpg
    IMG_3646.jpg
    150.1 KB · Views: 125
  • IMG_3645.jpg
    IMG_3645.jpg
    147.9 KB · Views: 104
  • IMG_3648.jpg
    IMG_3648.jpg
    133.4 KB · Views: 121

BUGTHUG

Well-known member
Joined
Nov 12, 2010
Messages
2,960
Location
Kansas
Well never the less, its still exciting once you have a floor that's all solid and can now be swept. Start spending big money to cover the floor with all the expensive tools, like lifts, tool boxes and shelves. Looks good, happy for ya.
 

jbmatth

Well-known member
Joined
Jun 3, 2013
Messages
5,686
Location
Northern Ok.
I used these Lights I used 6 and love the color but in reality they just don't quite put out enough light compared to working on top in my shop, but are much better than nothing. I'd probably replace them with 20w or so if I had to.
JB

EDIT: I went with 120v so I wouldn't have to have a transformer to convert to low voltage wiring.
 
Last edited:
To avoid these ads, REGISTER NOW!
Top Bottom