To avoid these ads, REGISTER NOW!

Raising the Rat Shack

FMC1959

Well-known member
Joined
Feb 9, 2014
Messages
2,305
Location
Montreal, Canada / Upstate NY
First, I commend you on all the work you have done so far, very admirable and also well done.

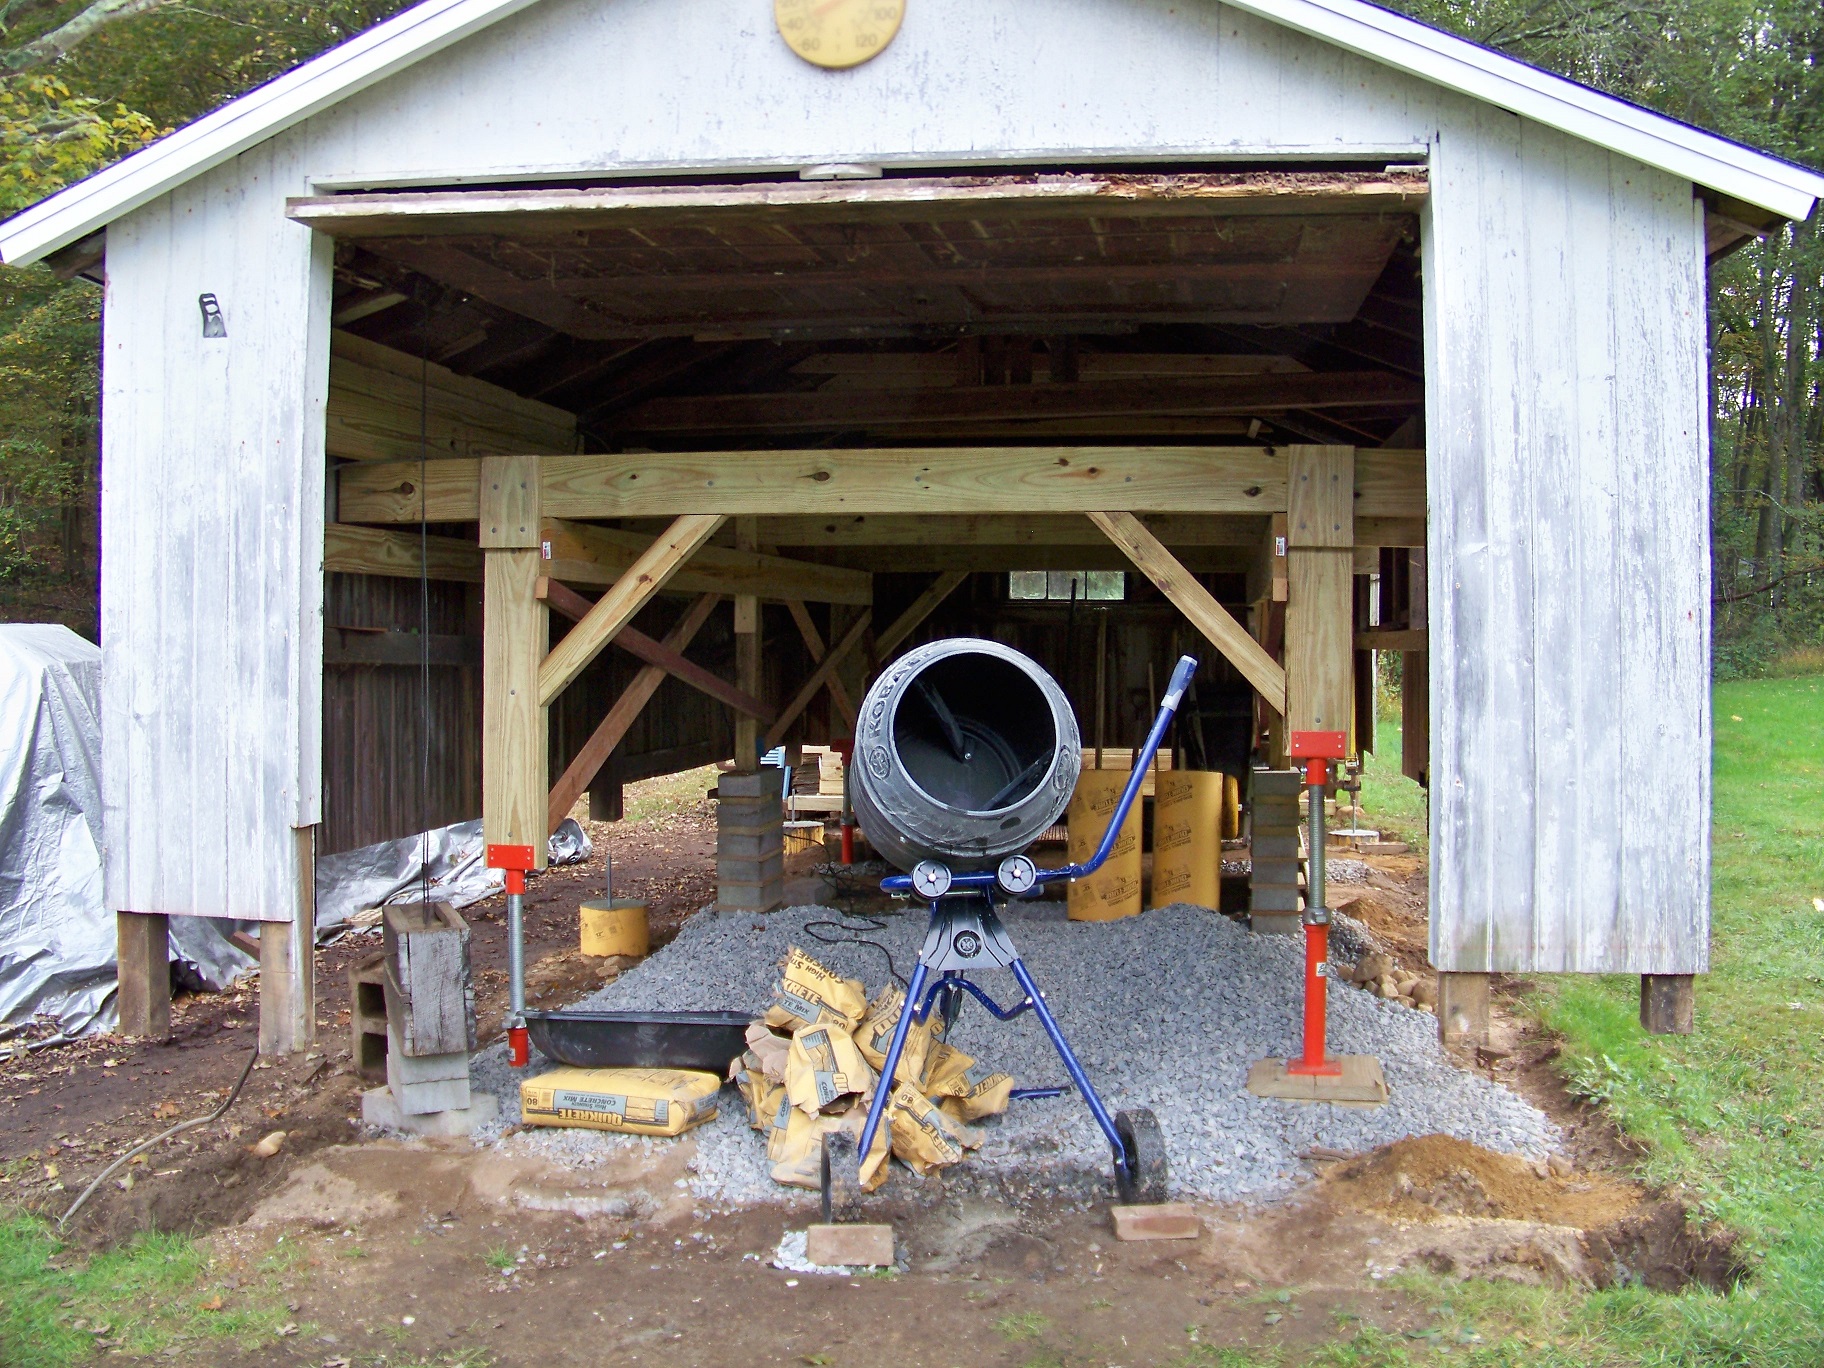
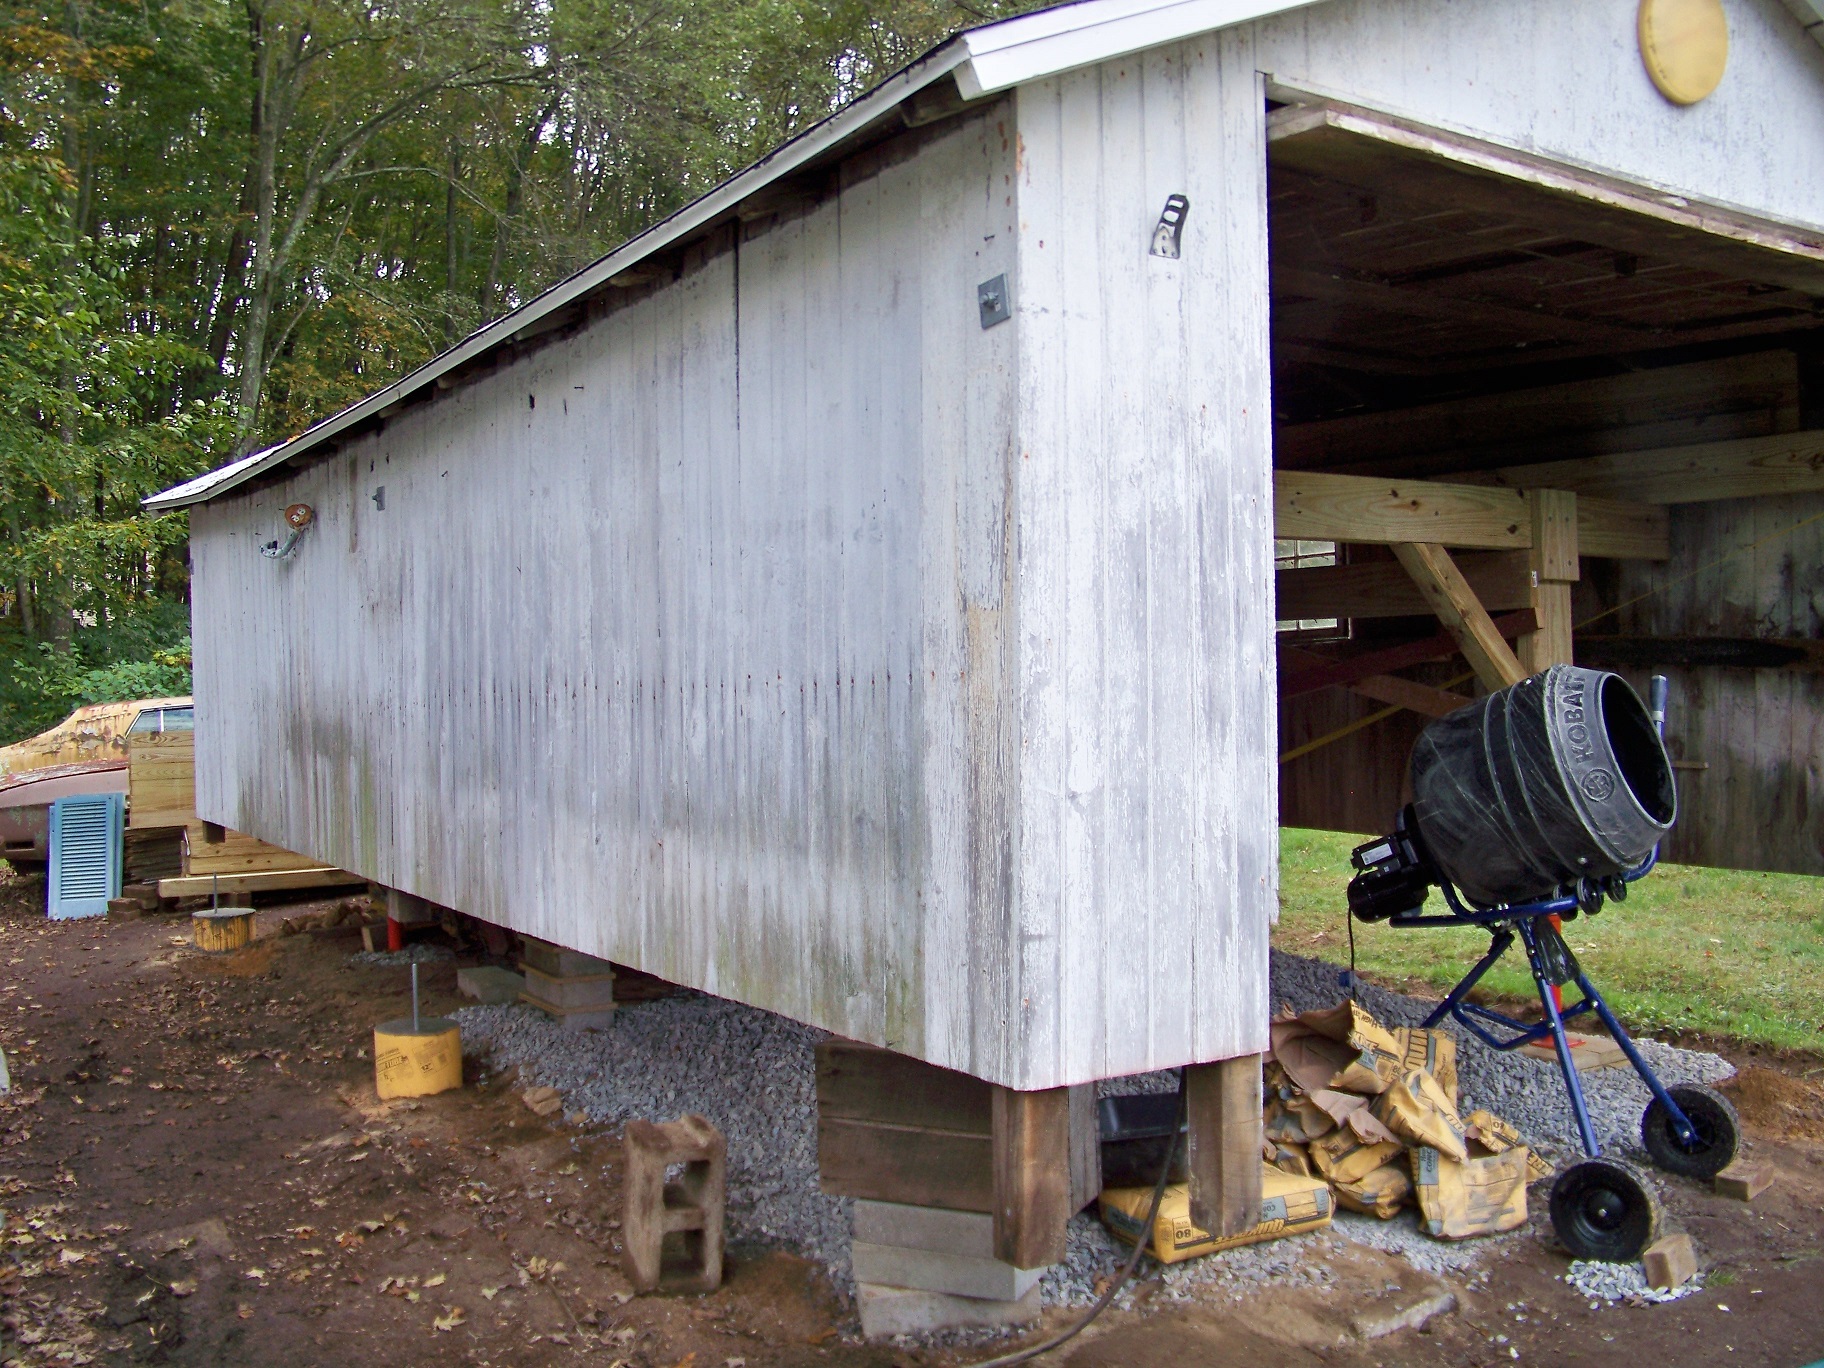
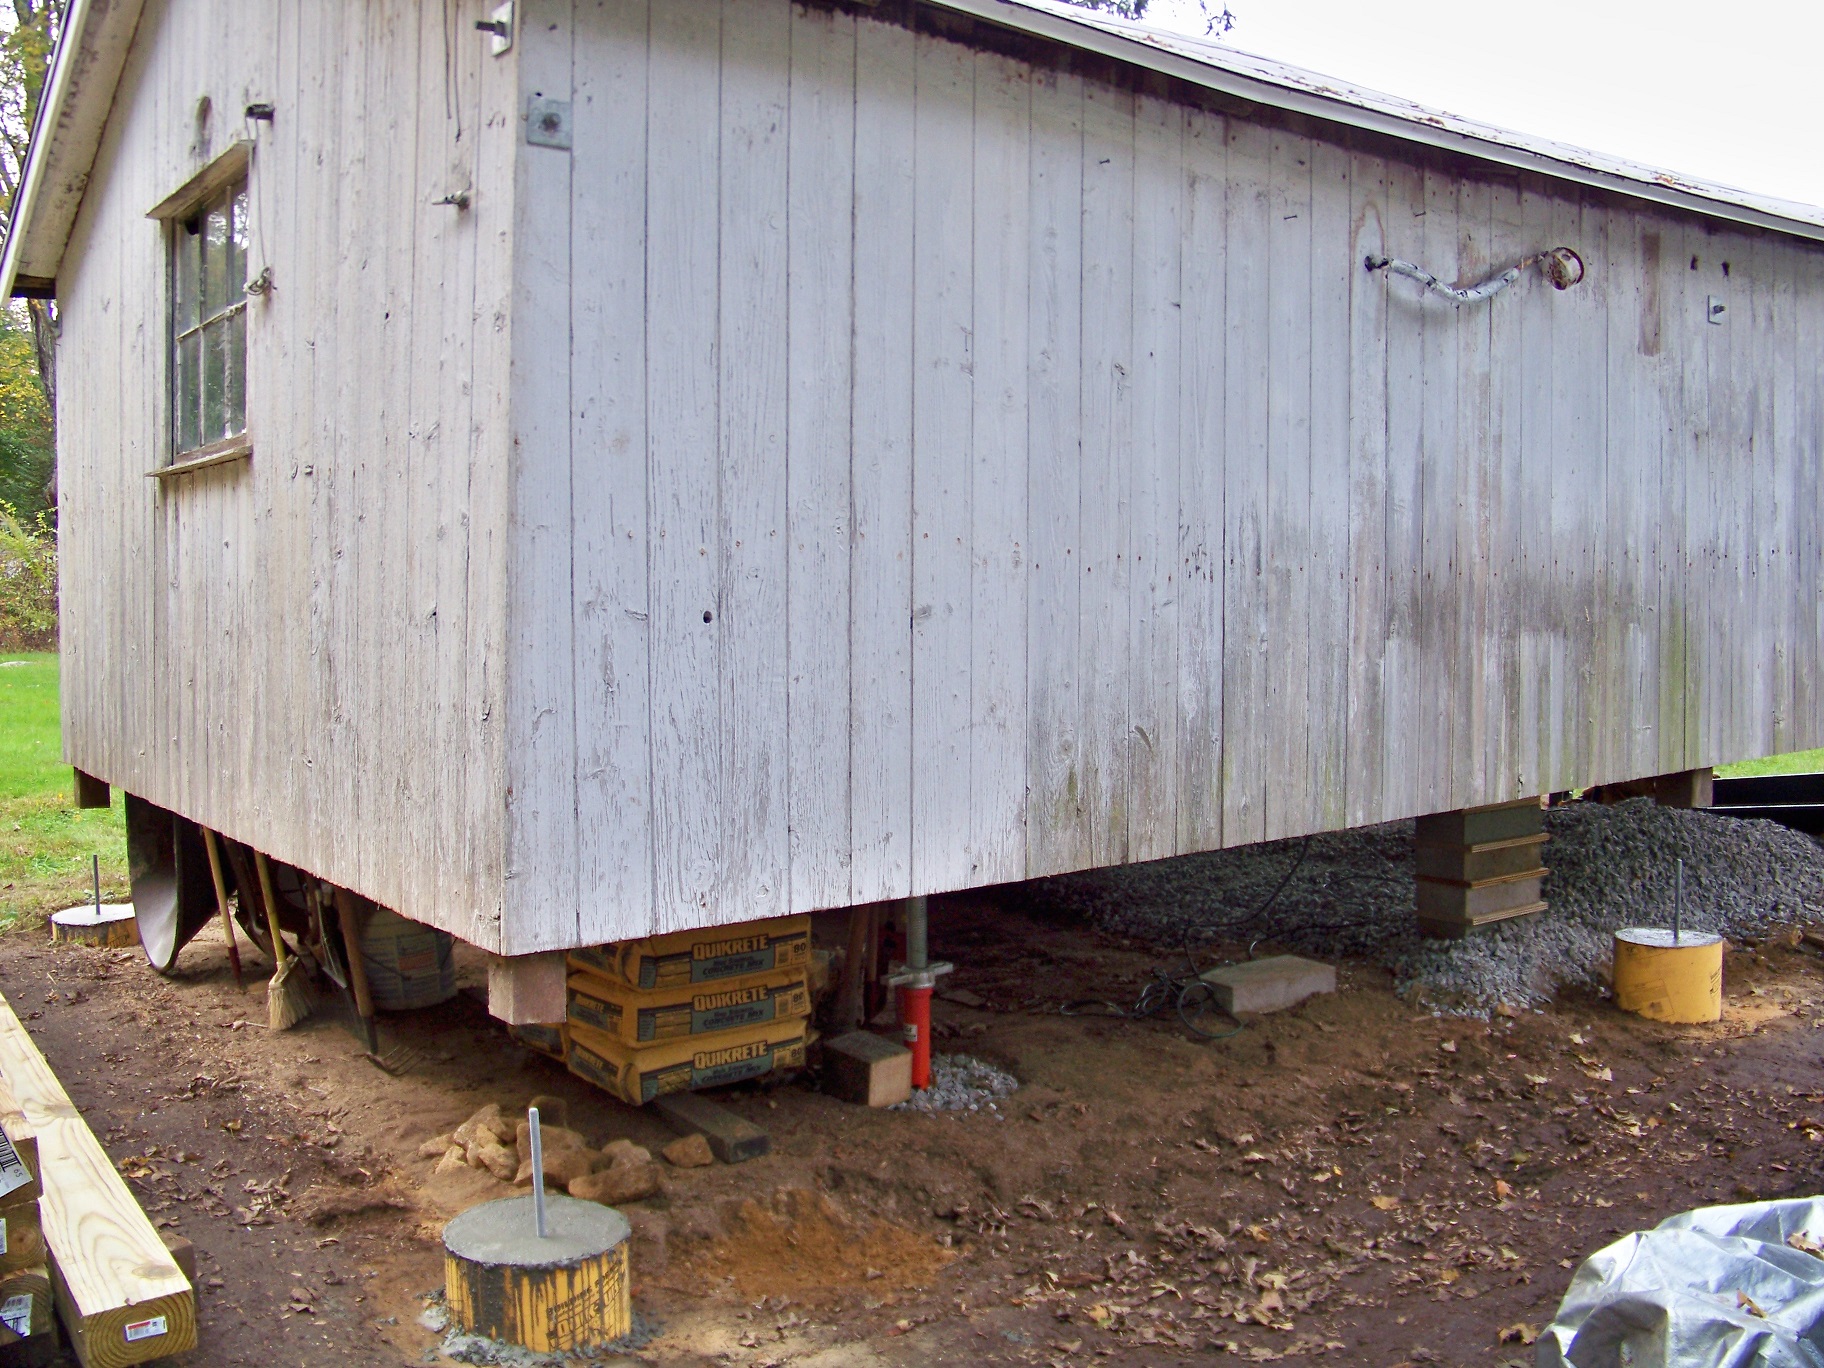
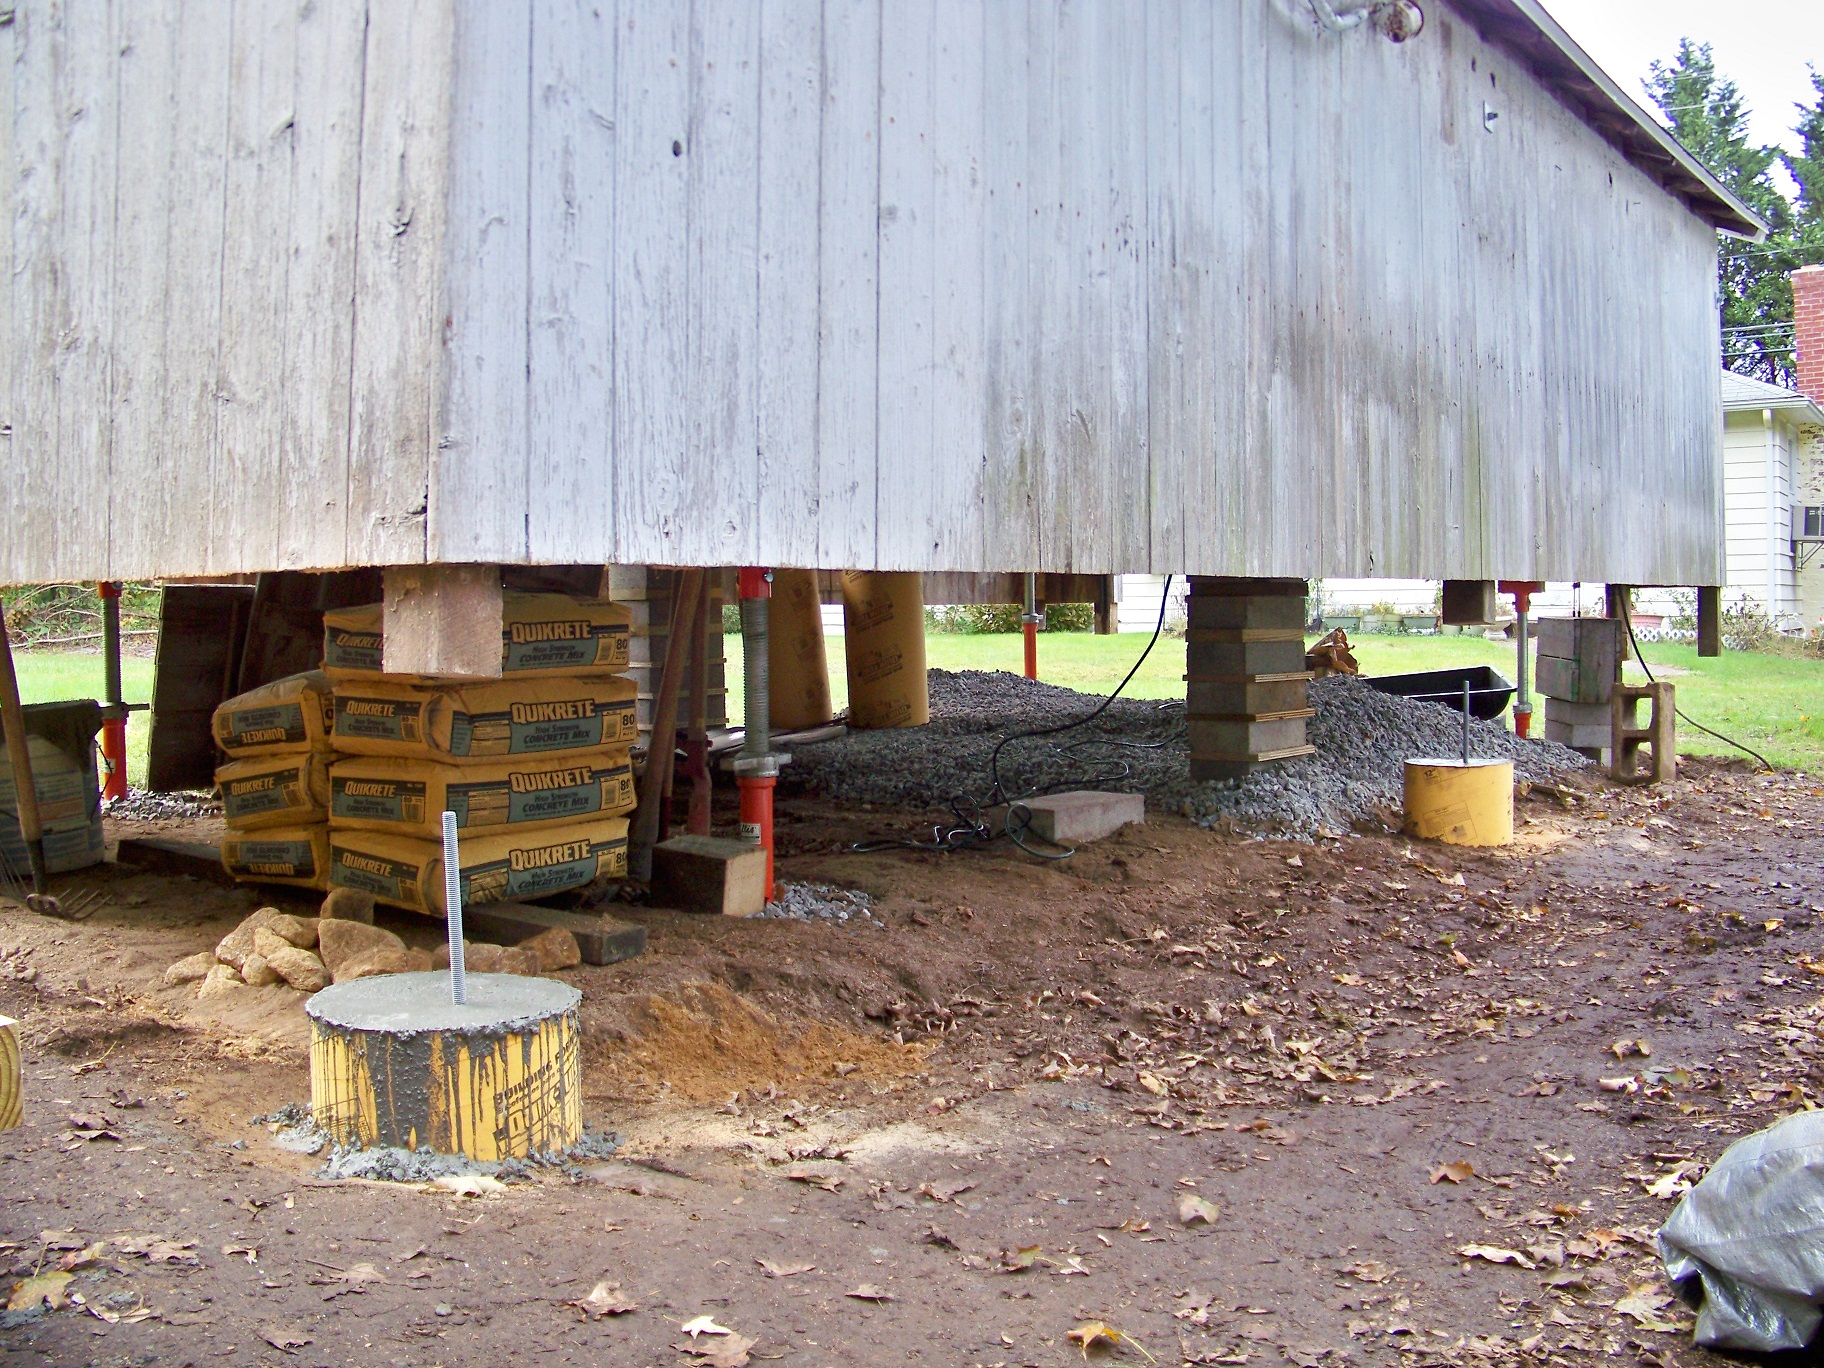
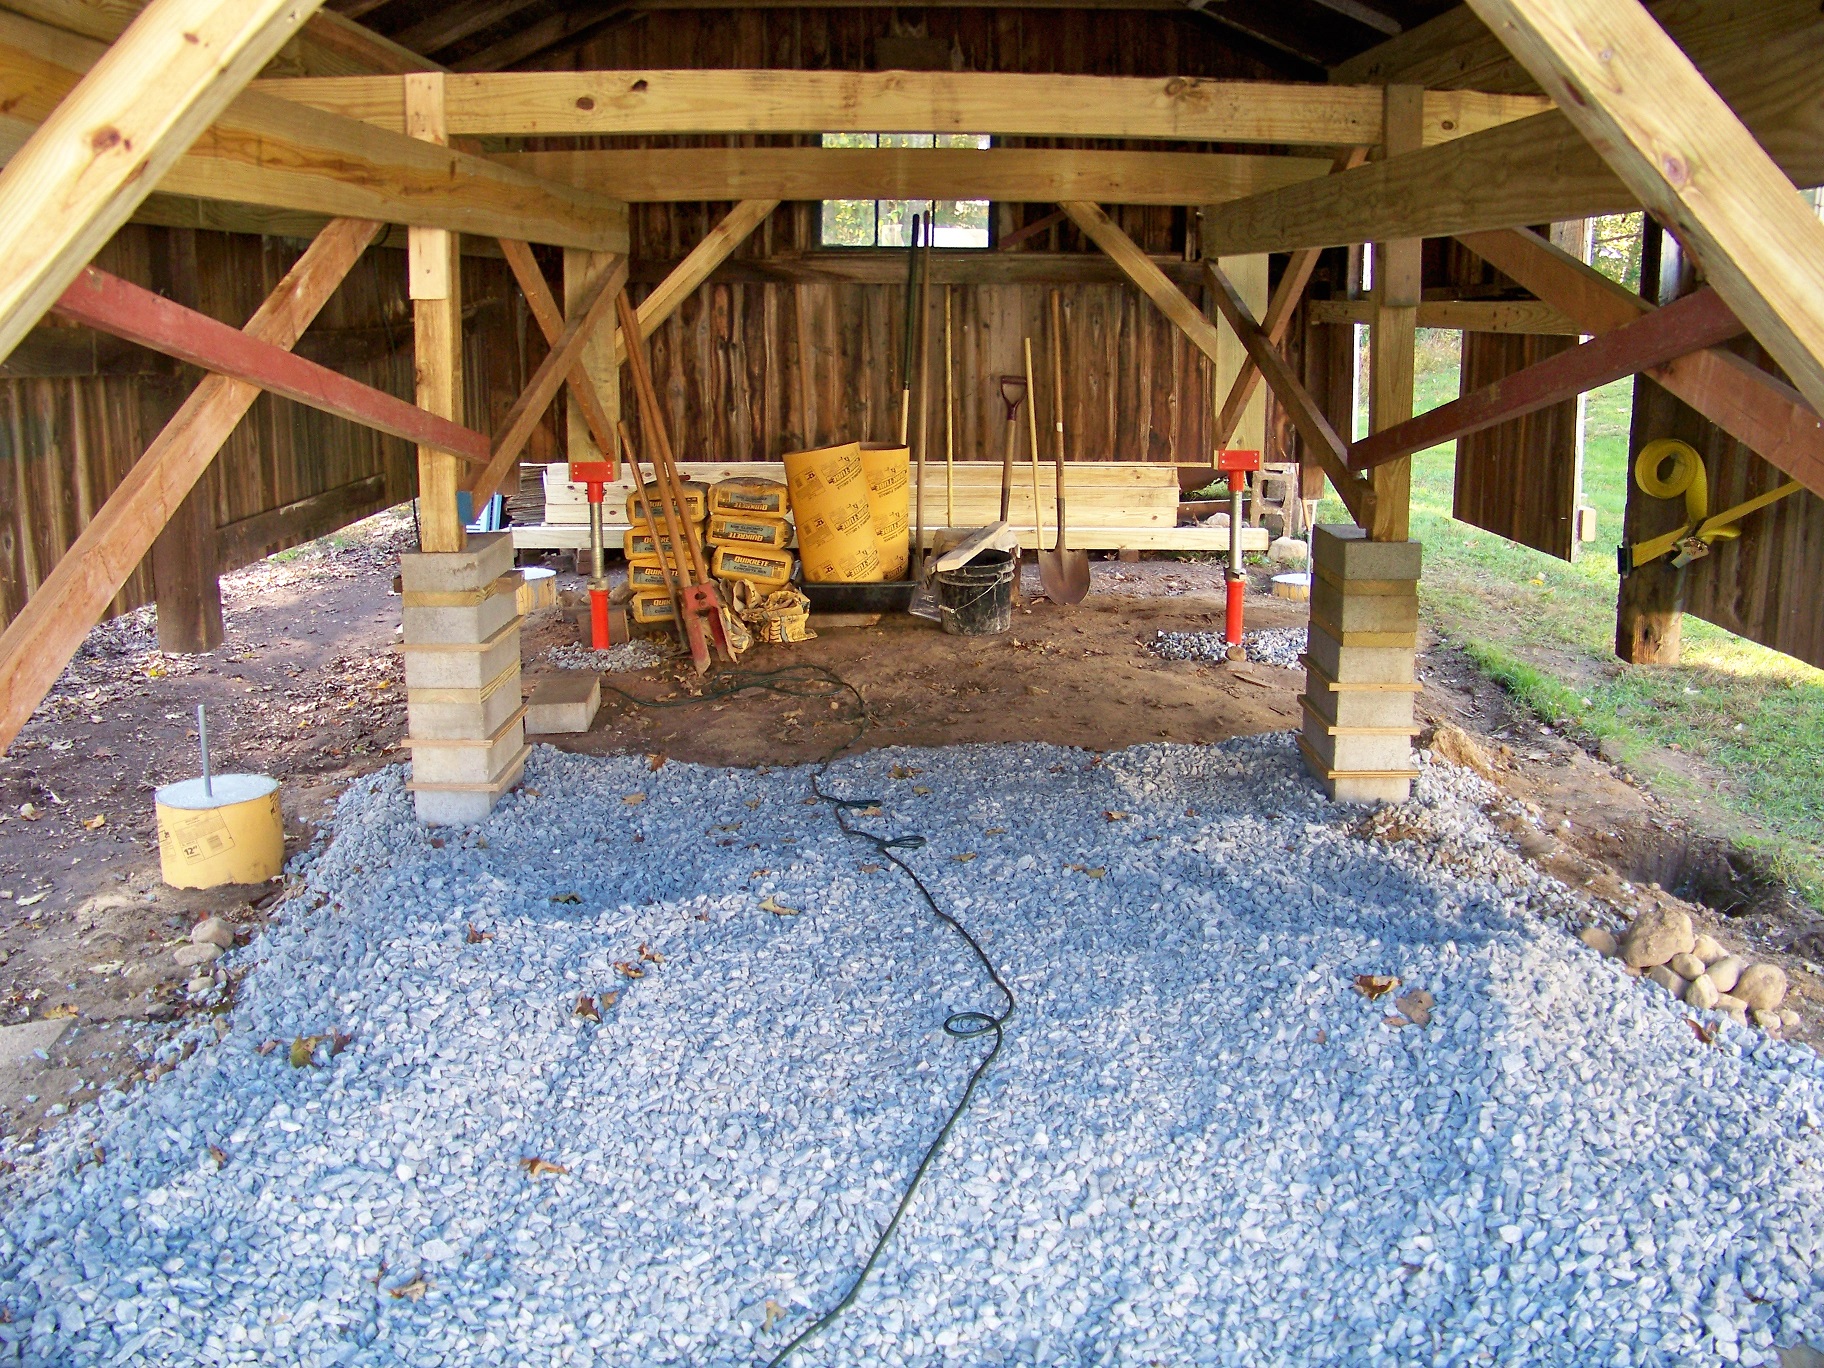
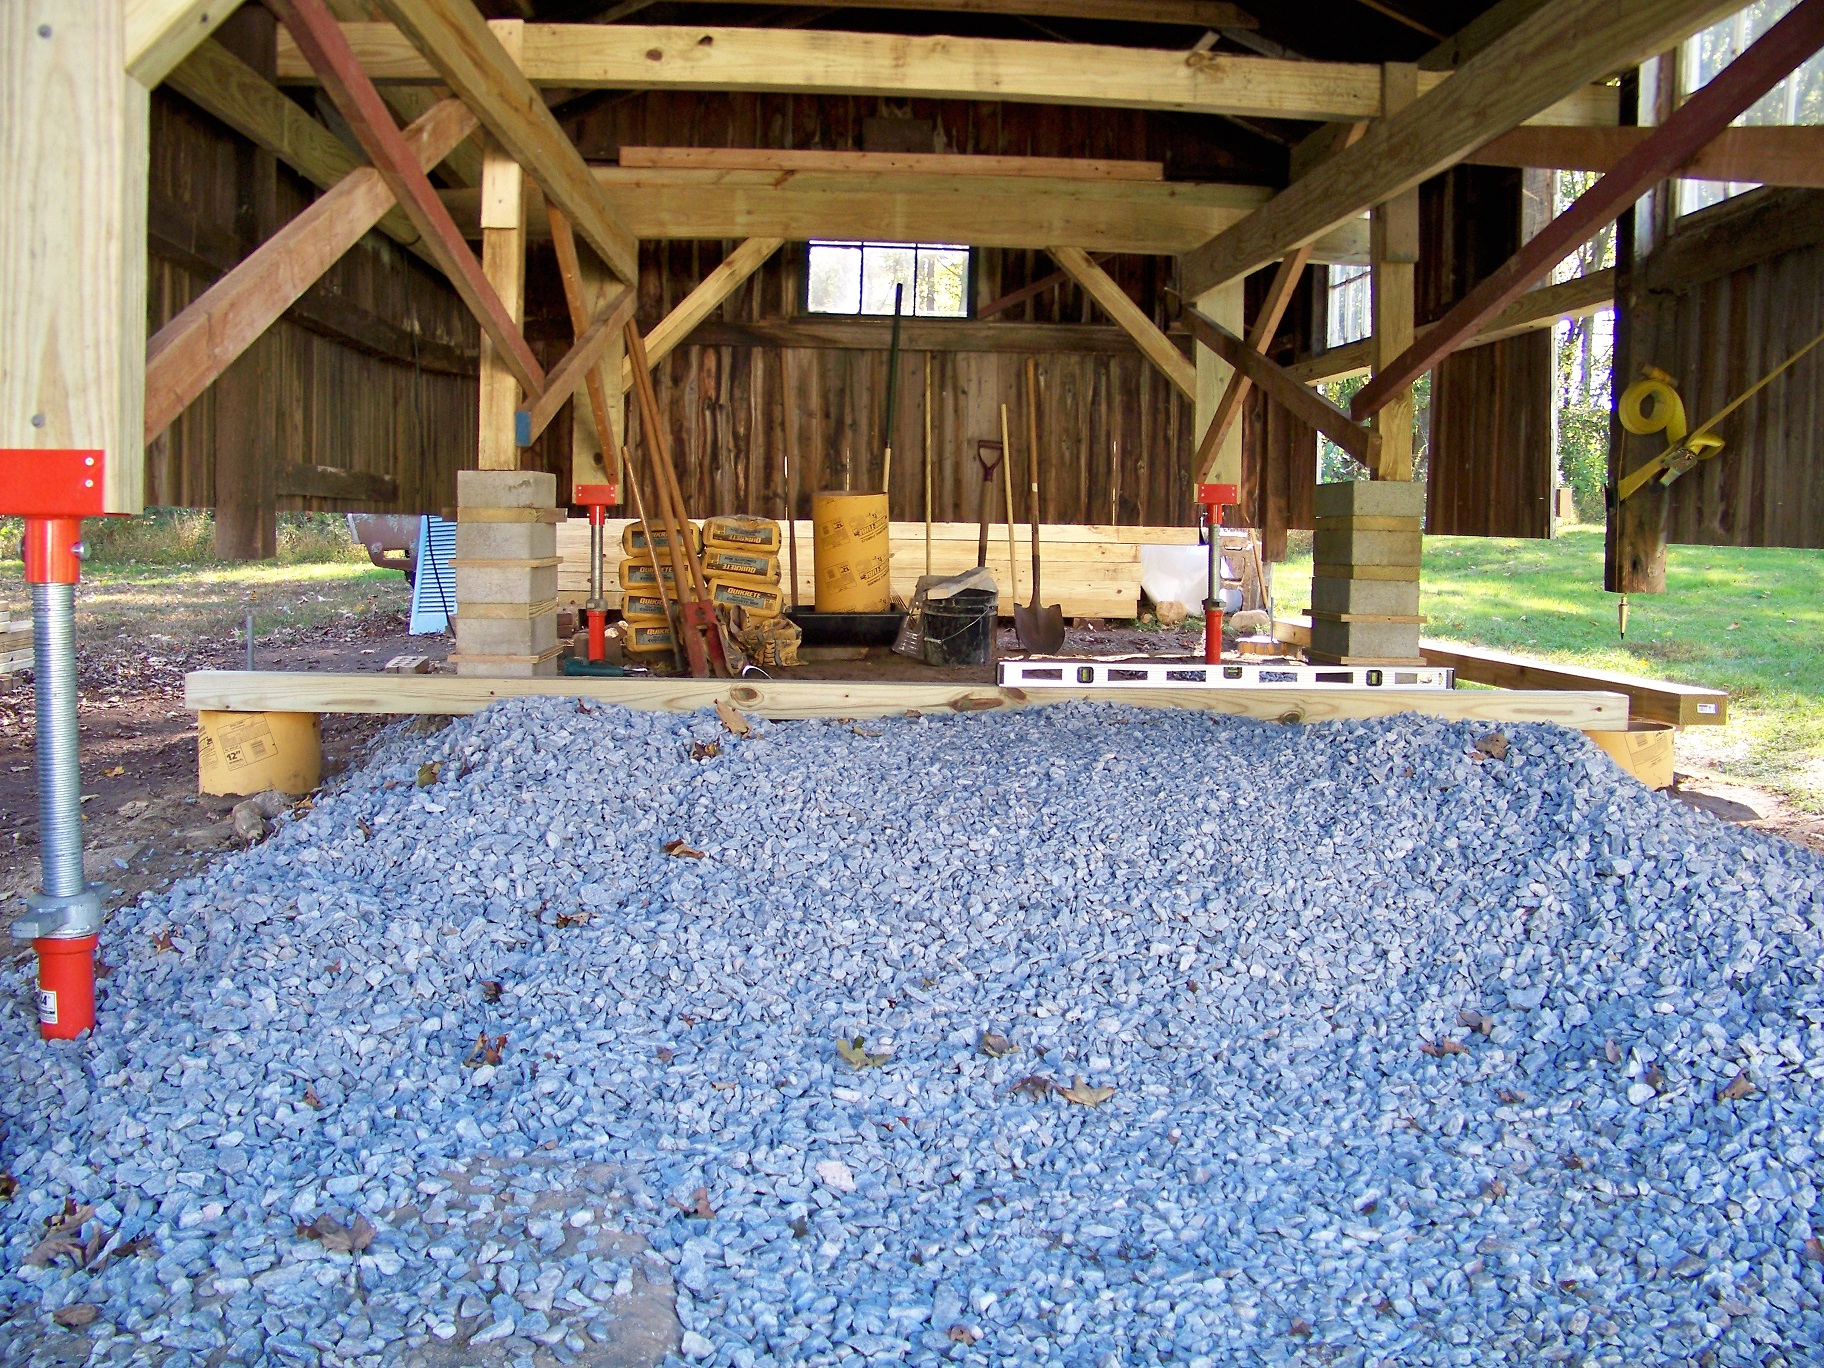
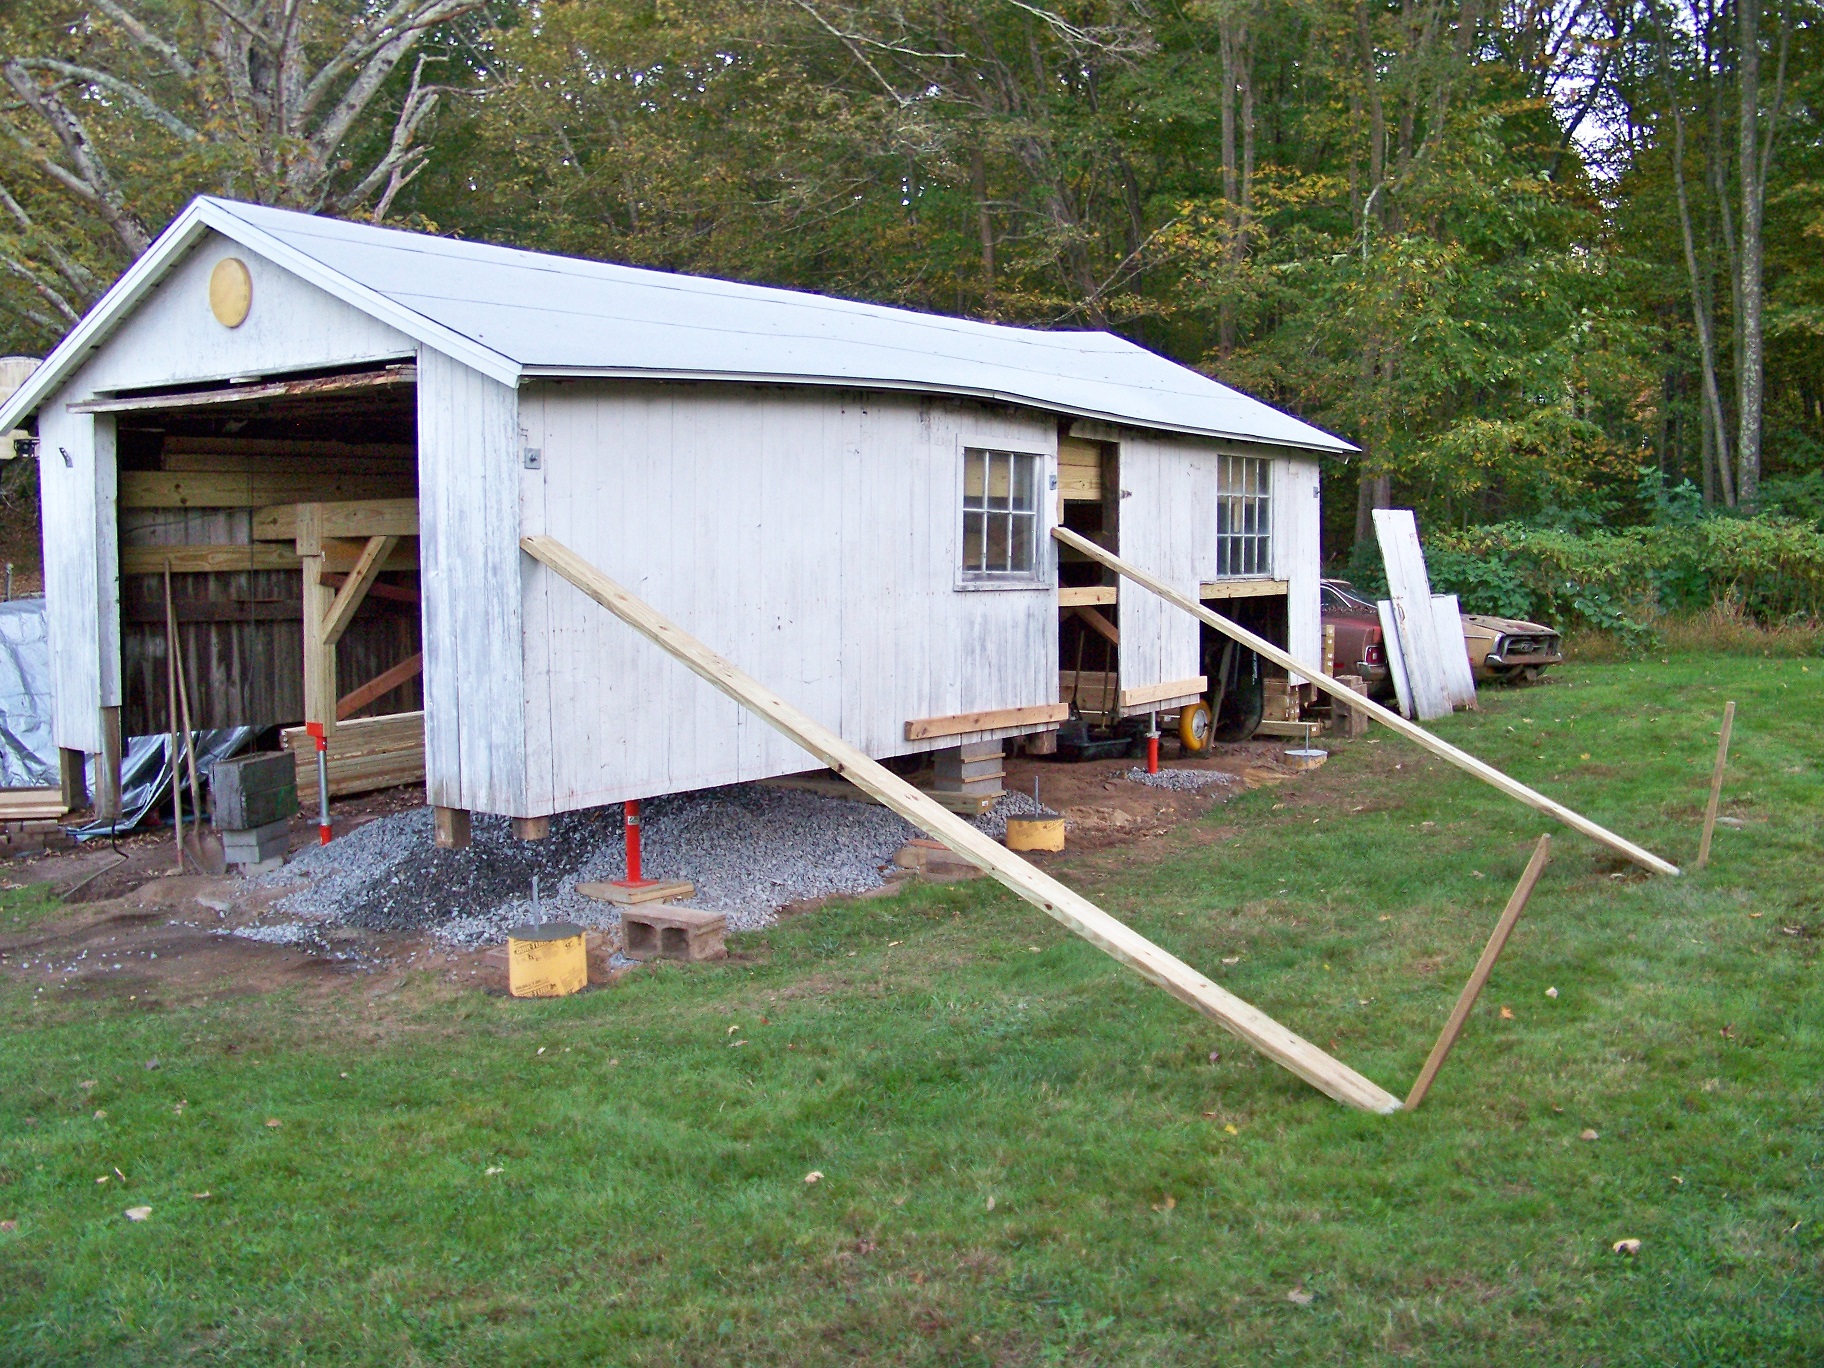
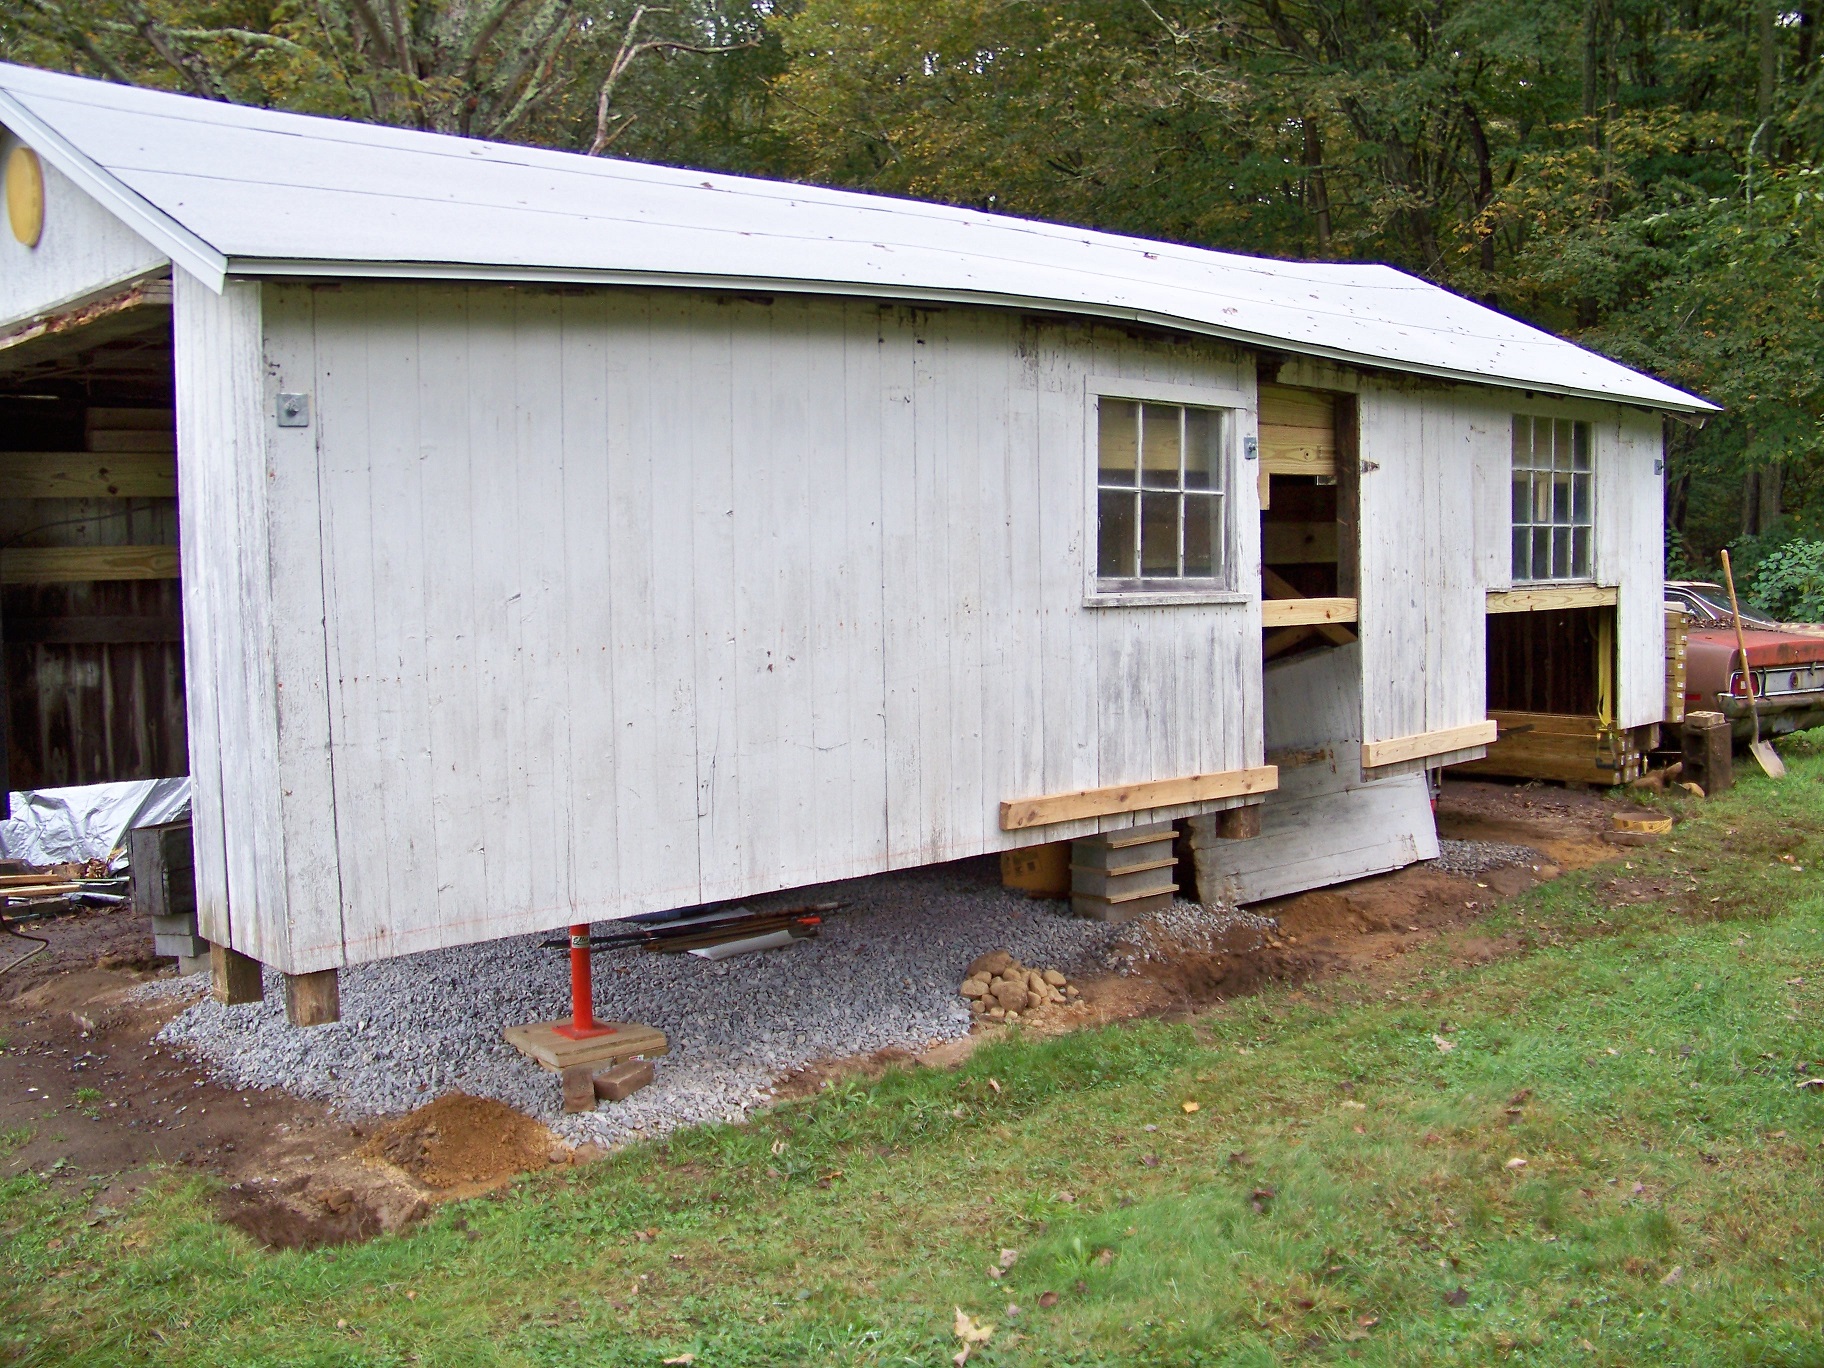
I have built 6 sheds over the years, each with improvements I learned from the previous build. If the ground below your rat shack is mainly undisturbed soil, then leave it be and just level it off with 3 inches of 3/4 gravel, or 0-3/4 gravel if you are able to tamp it.

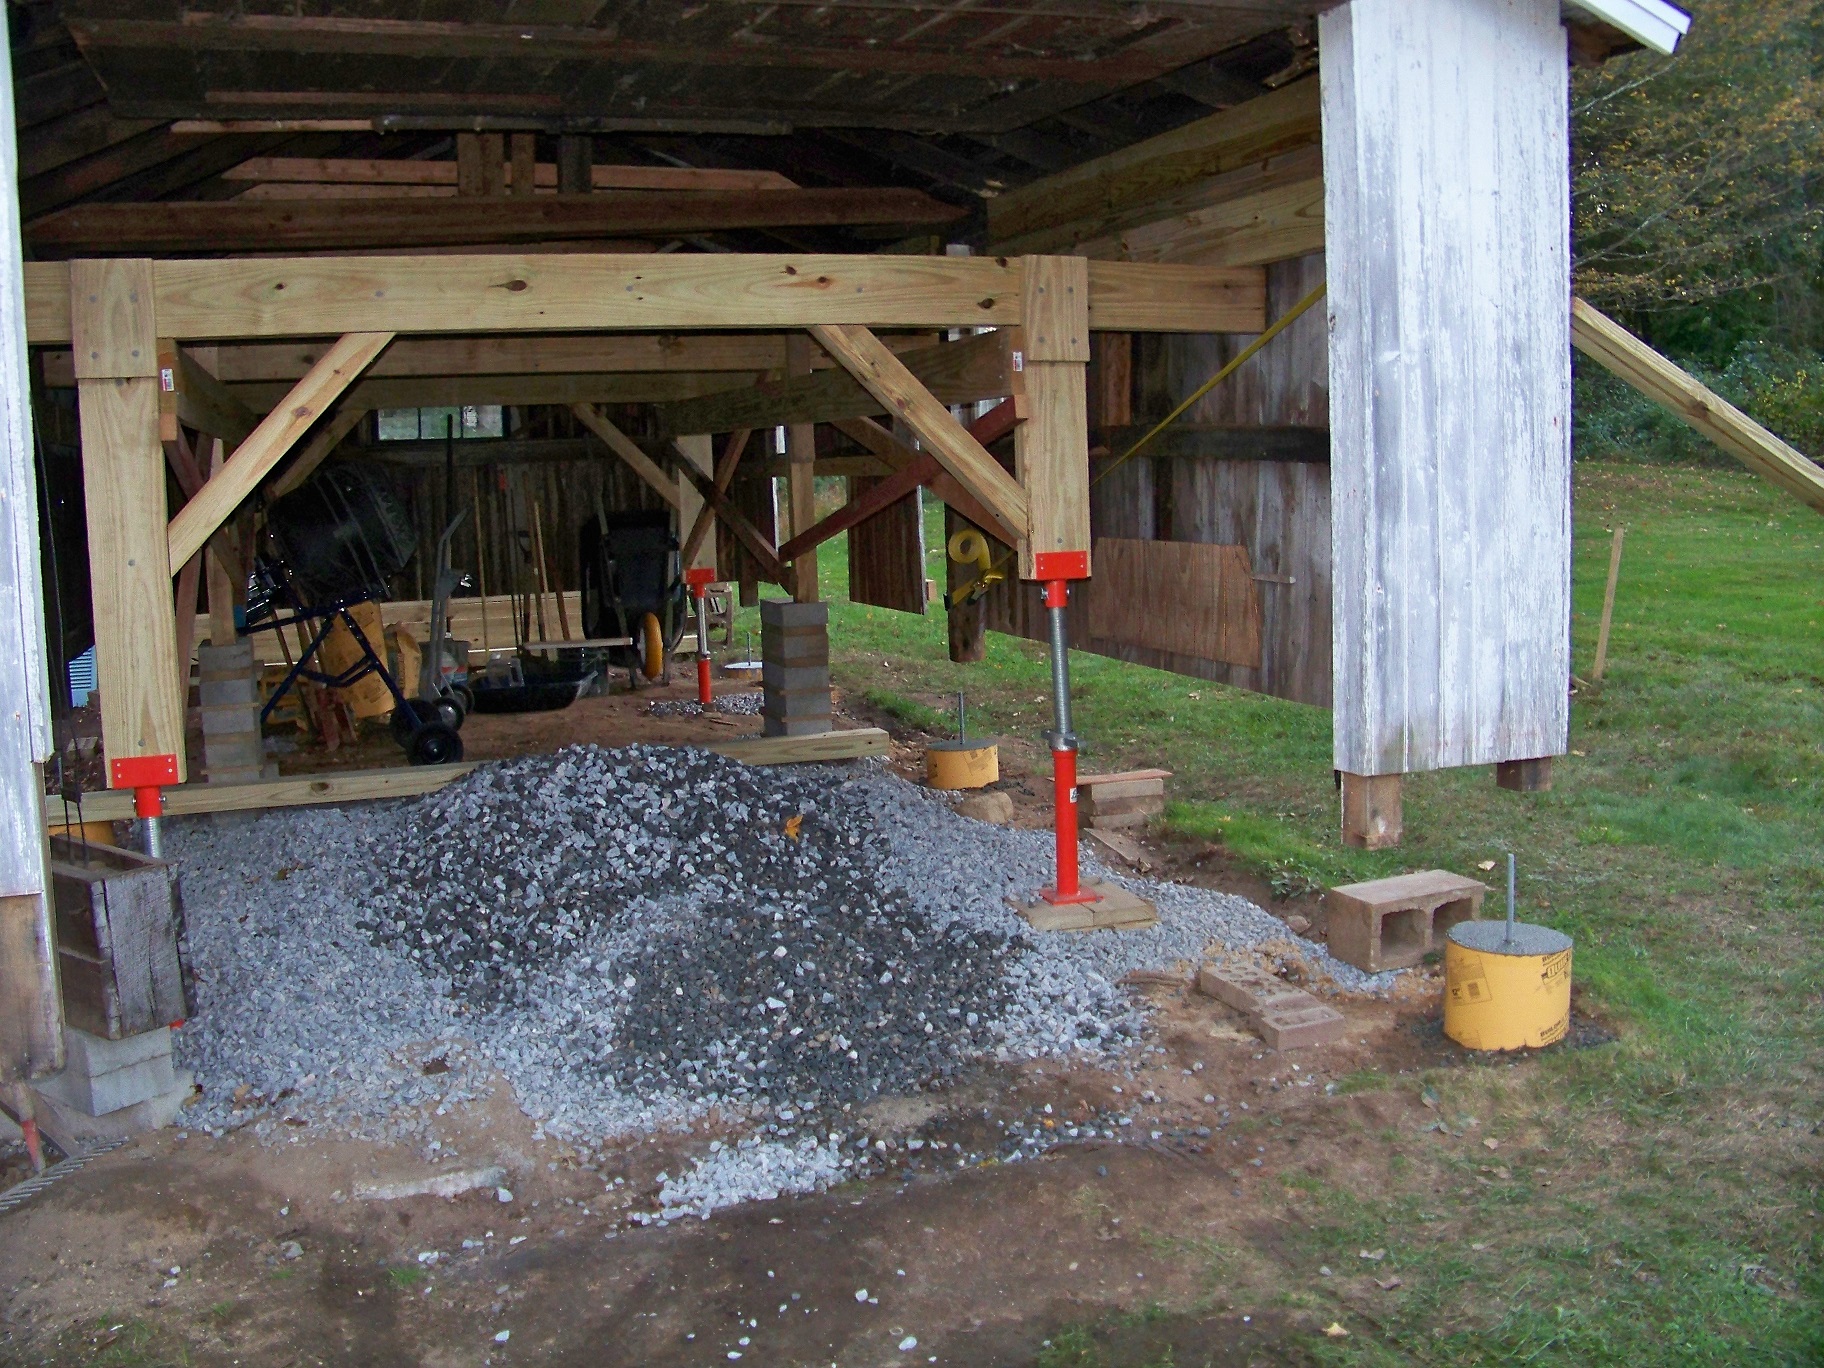
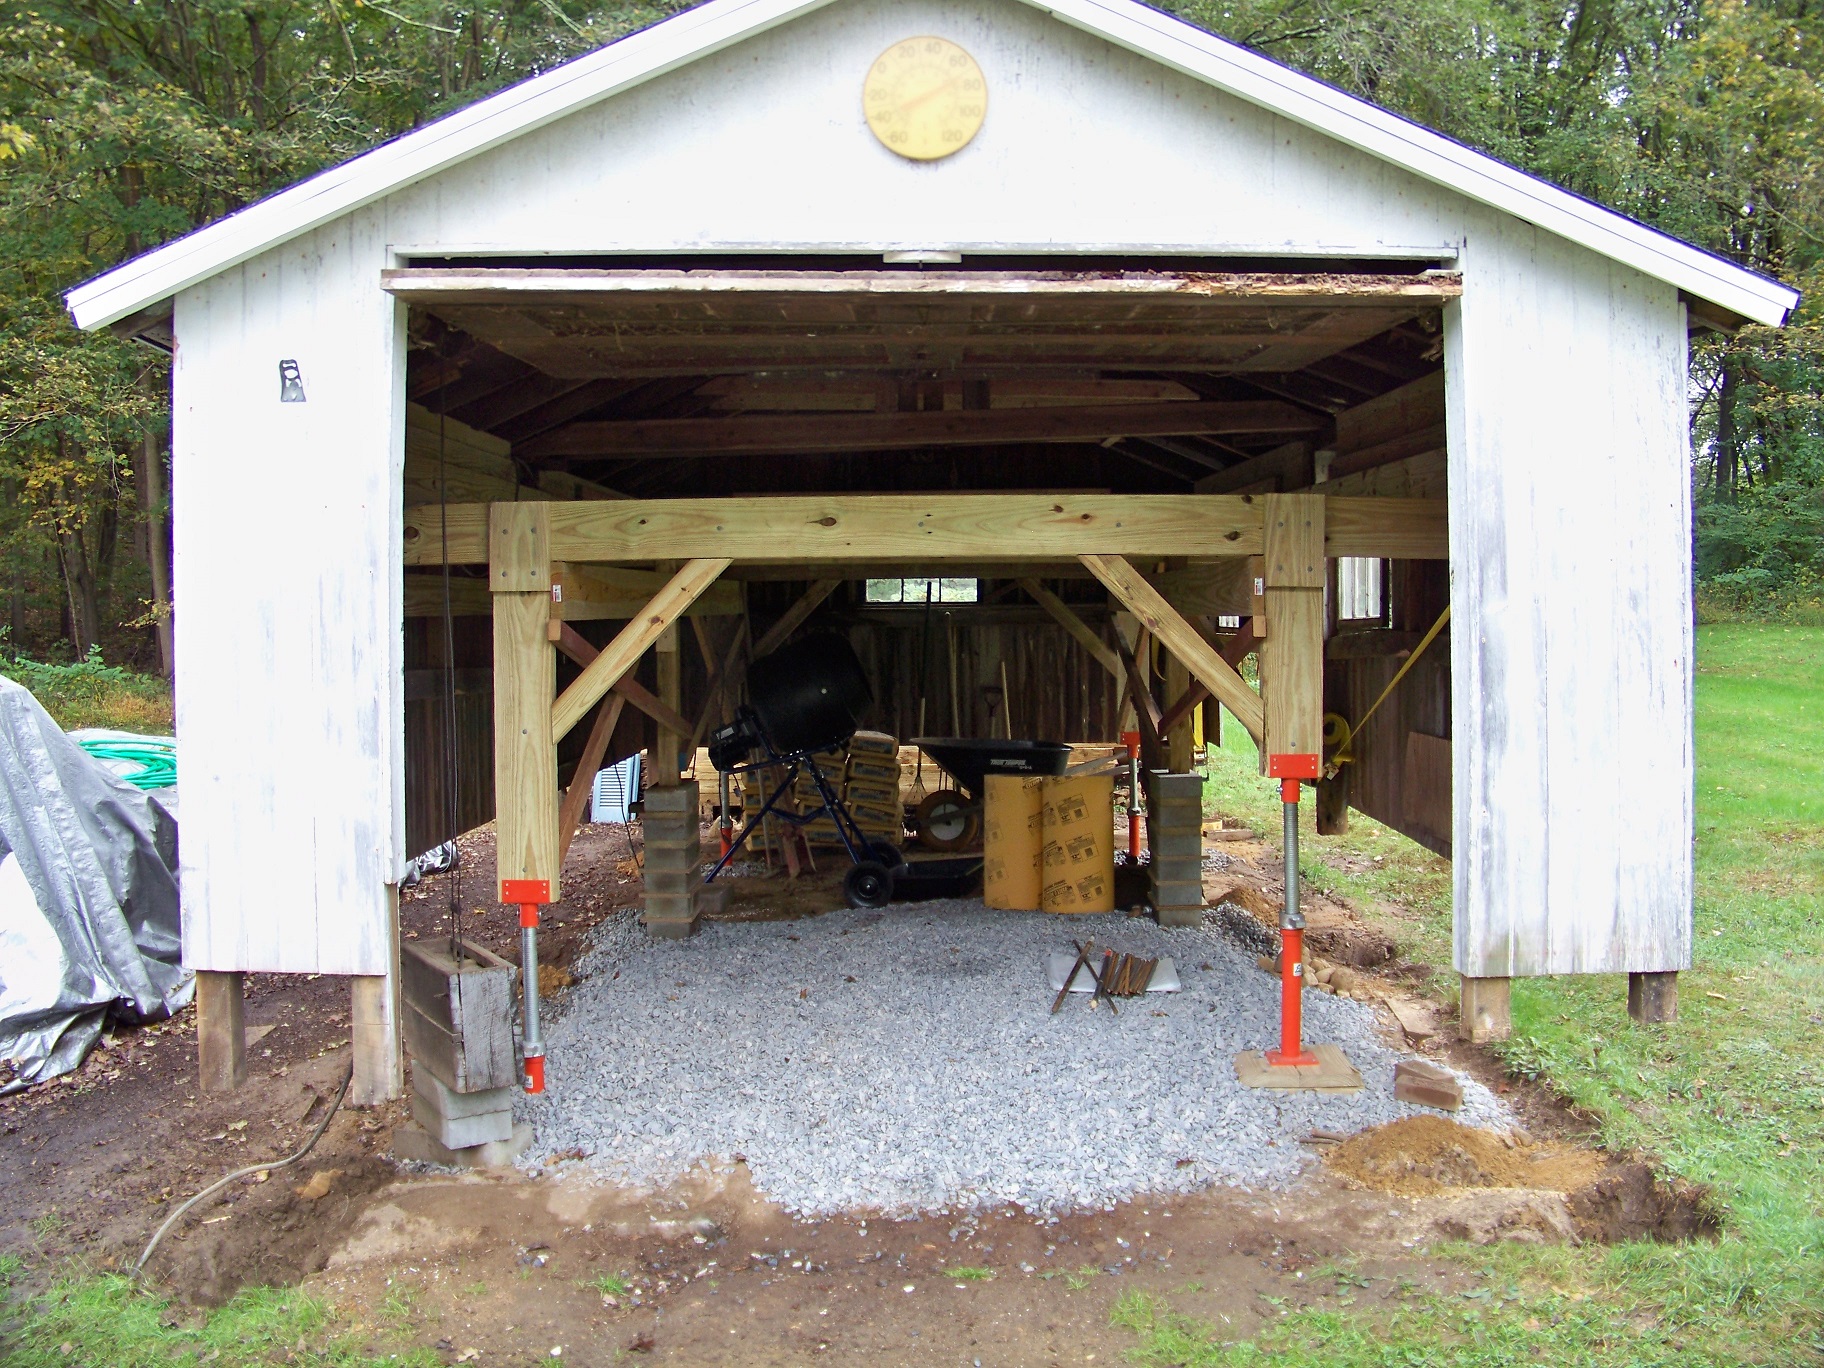
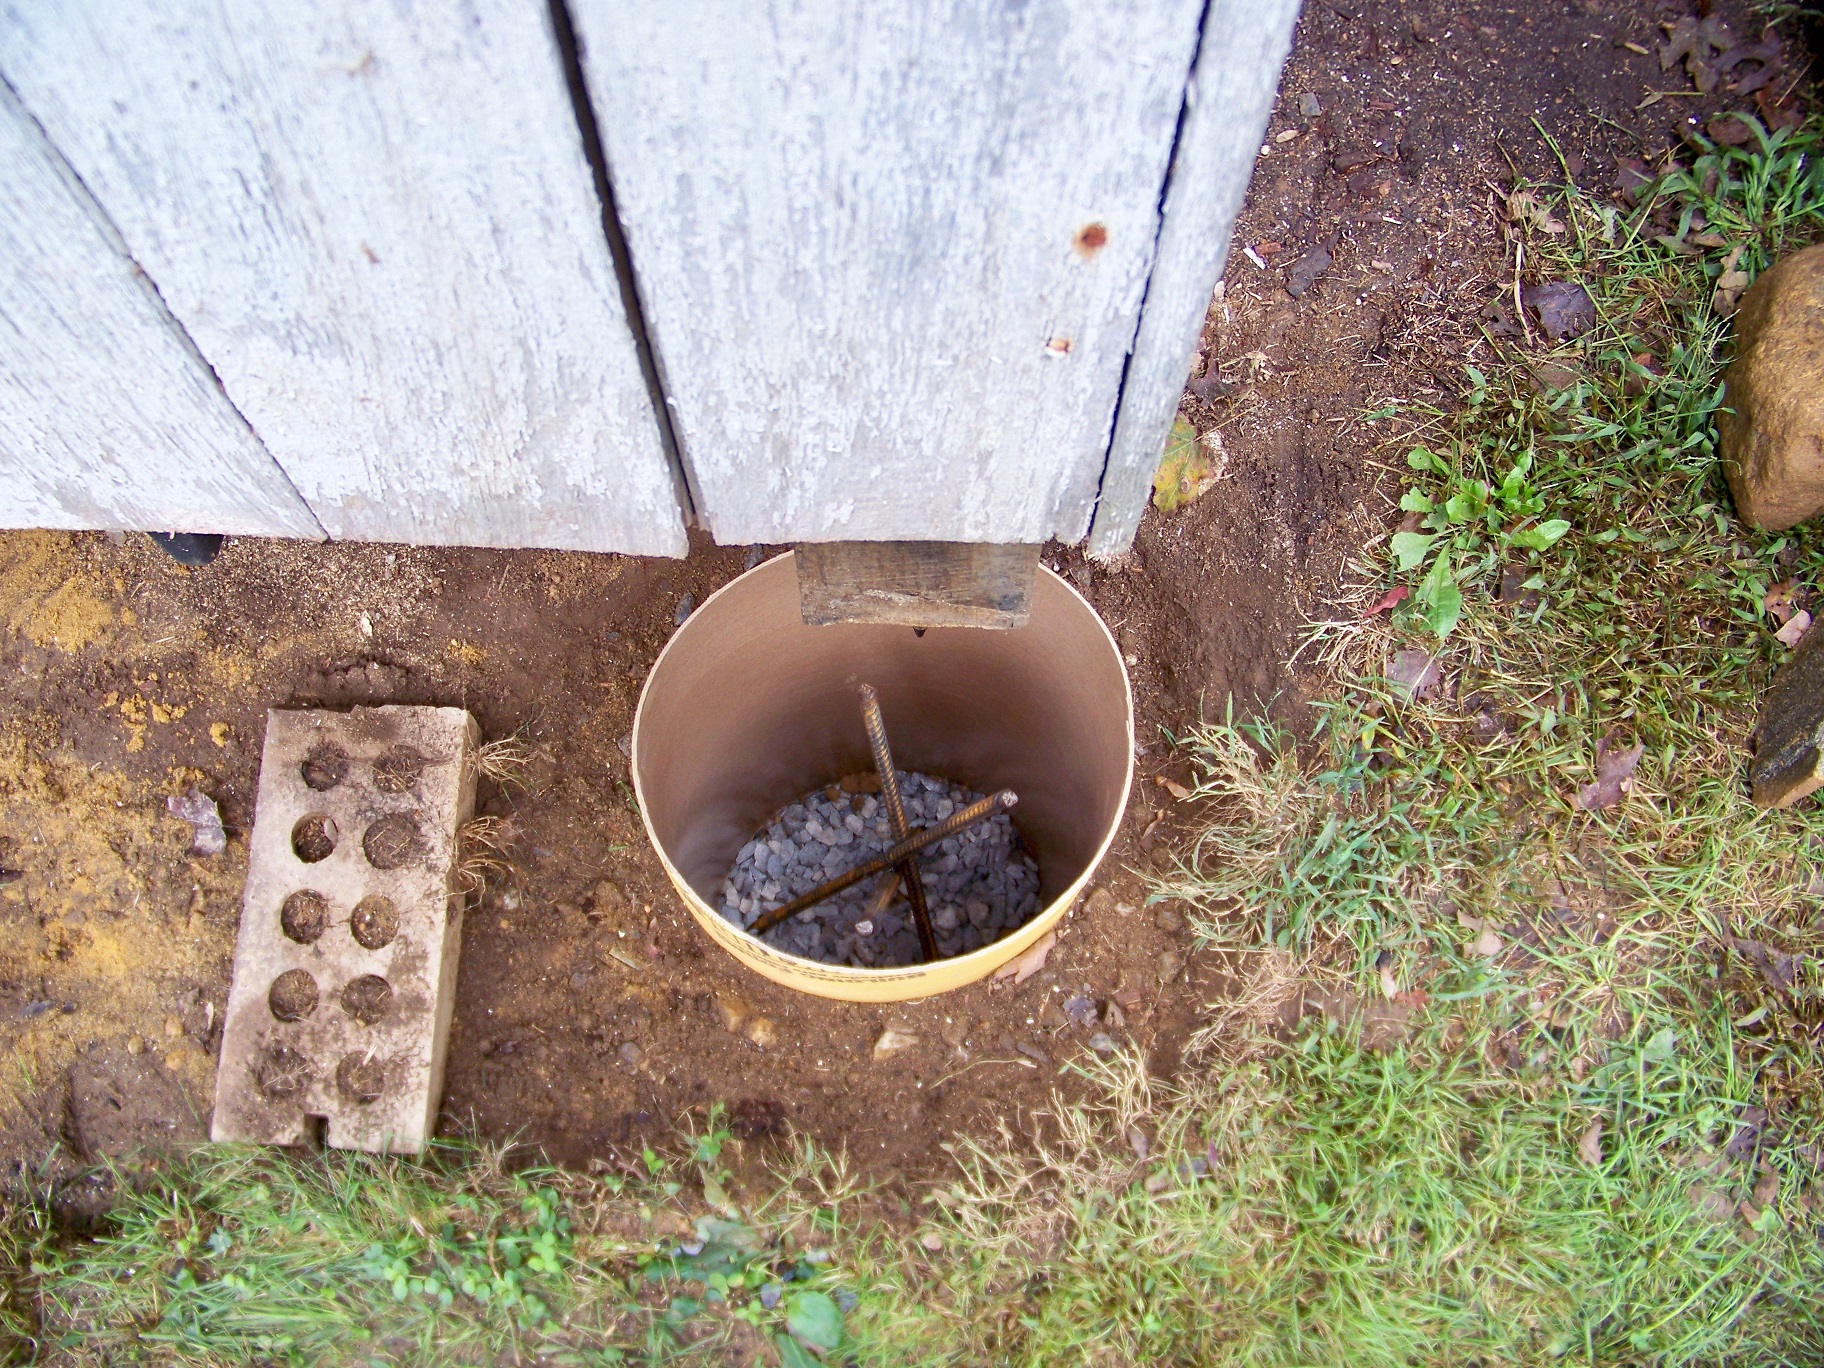
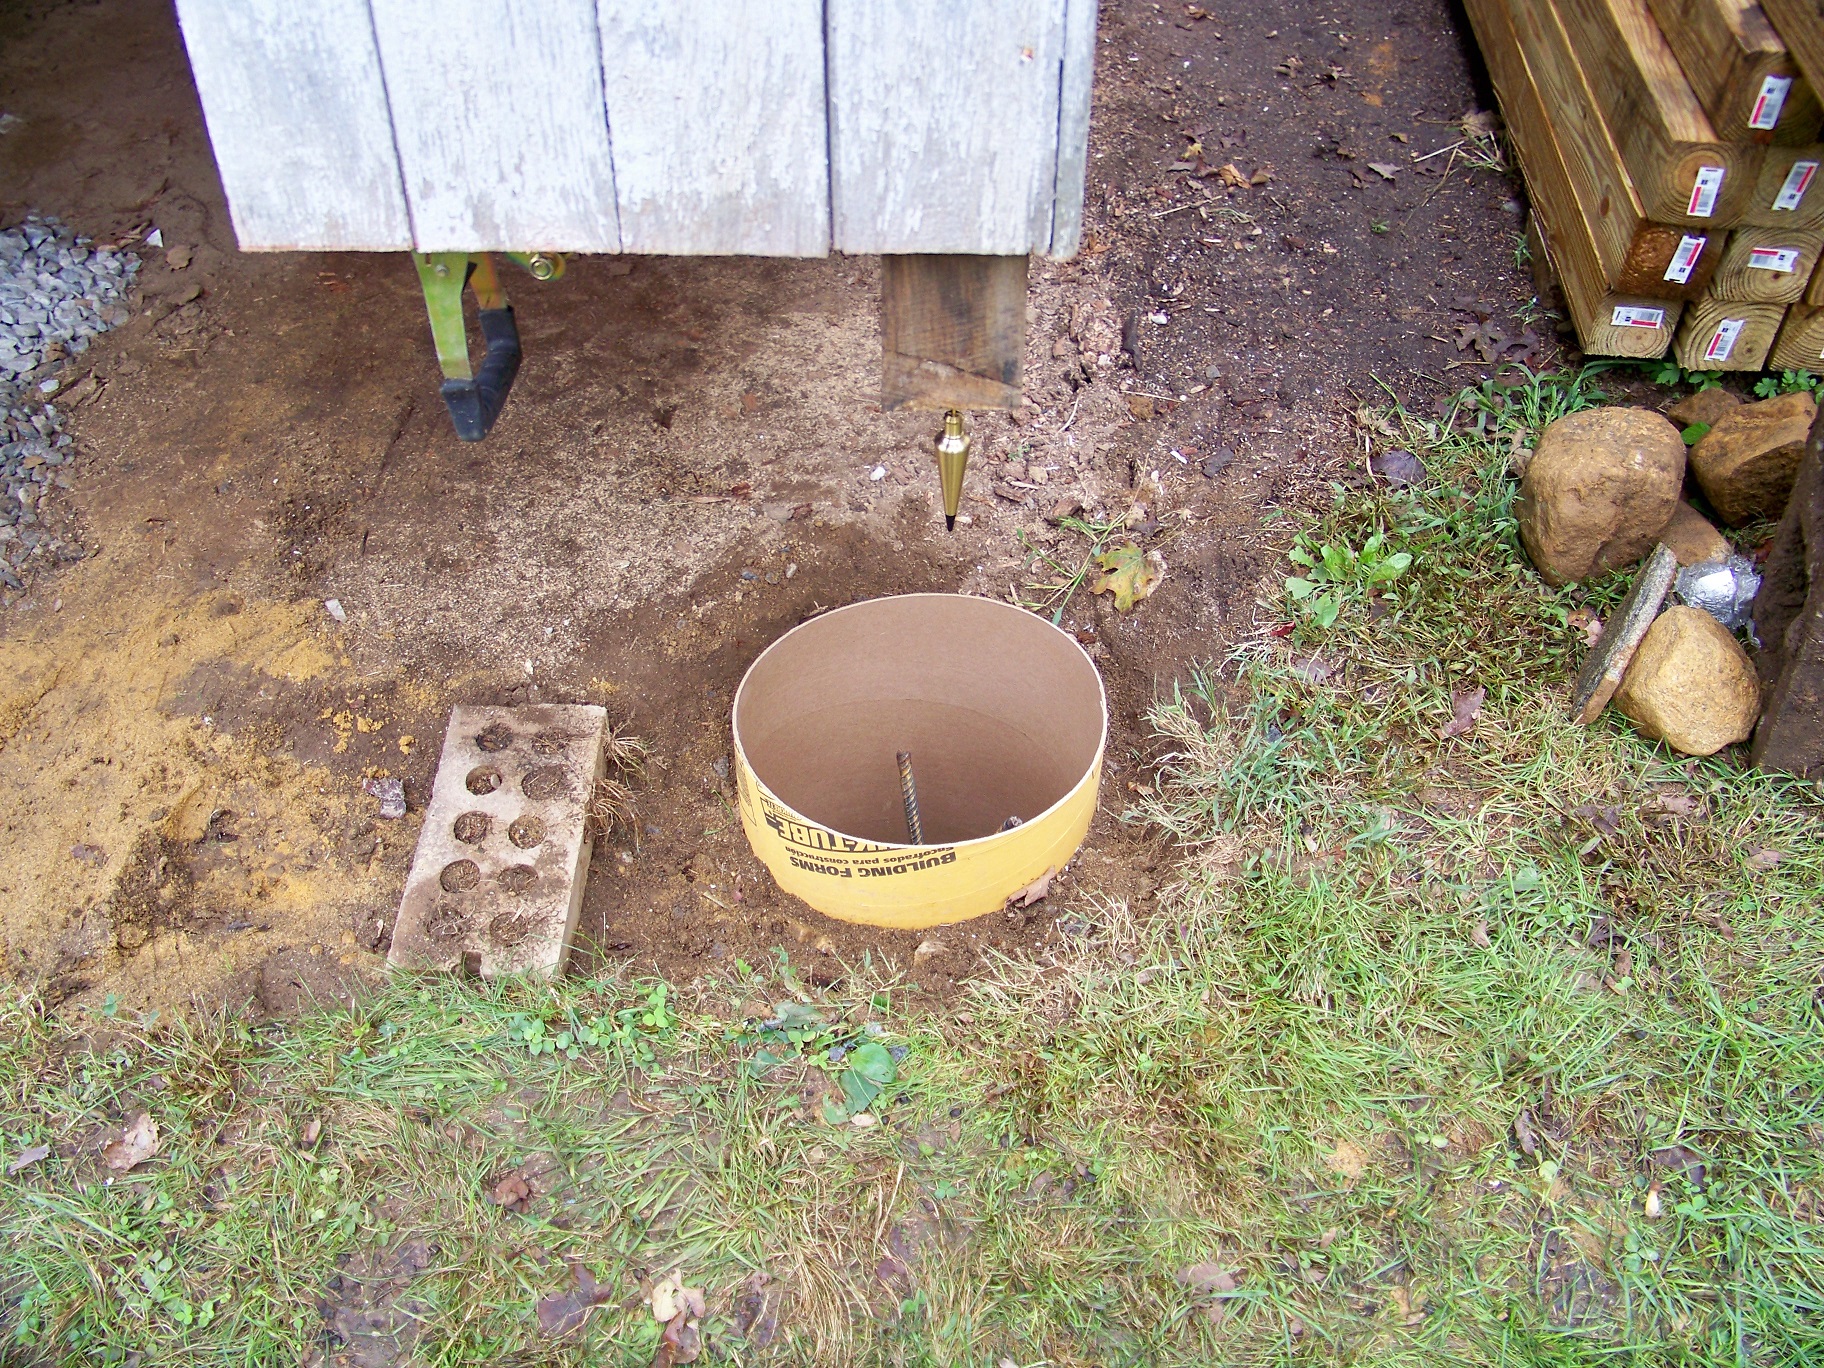
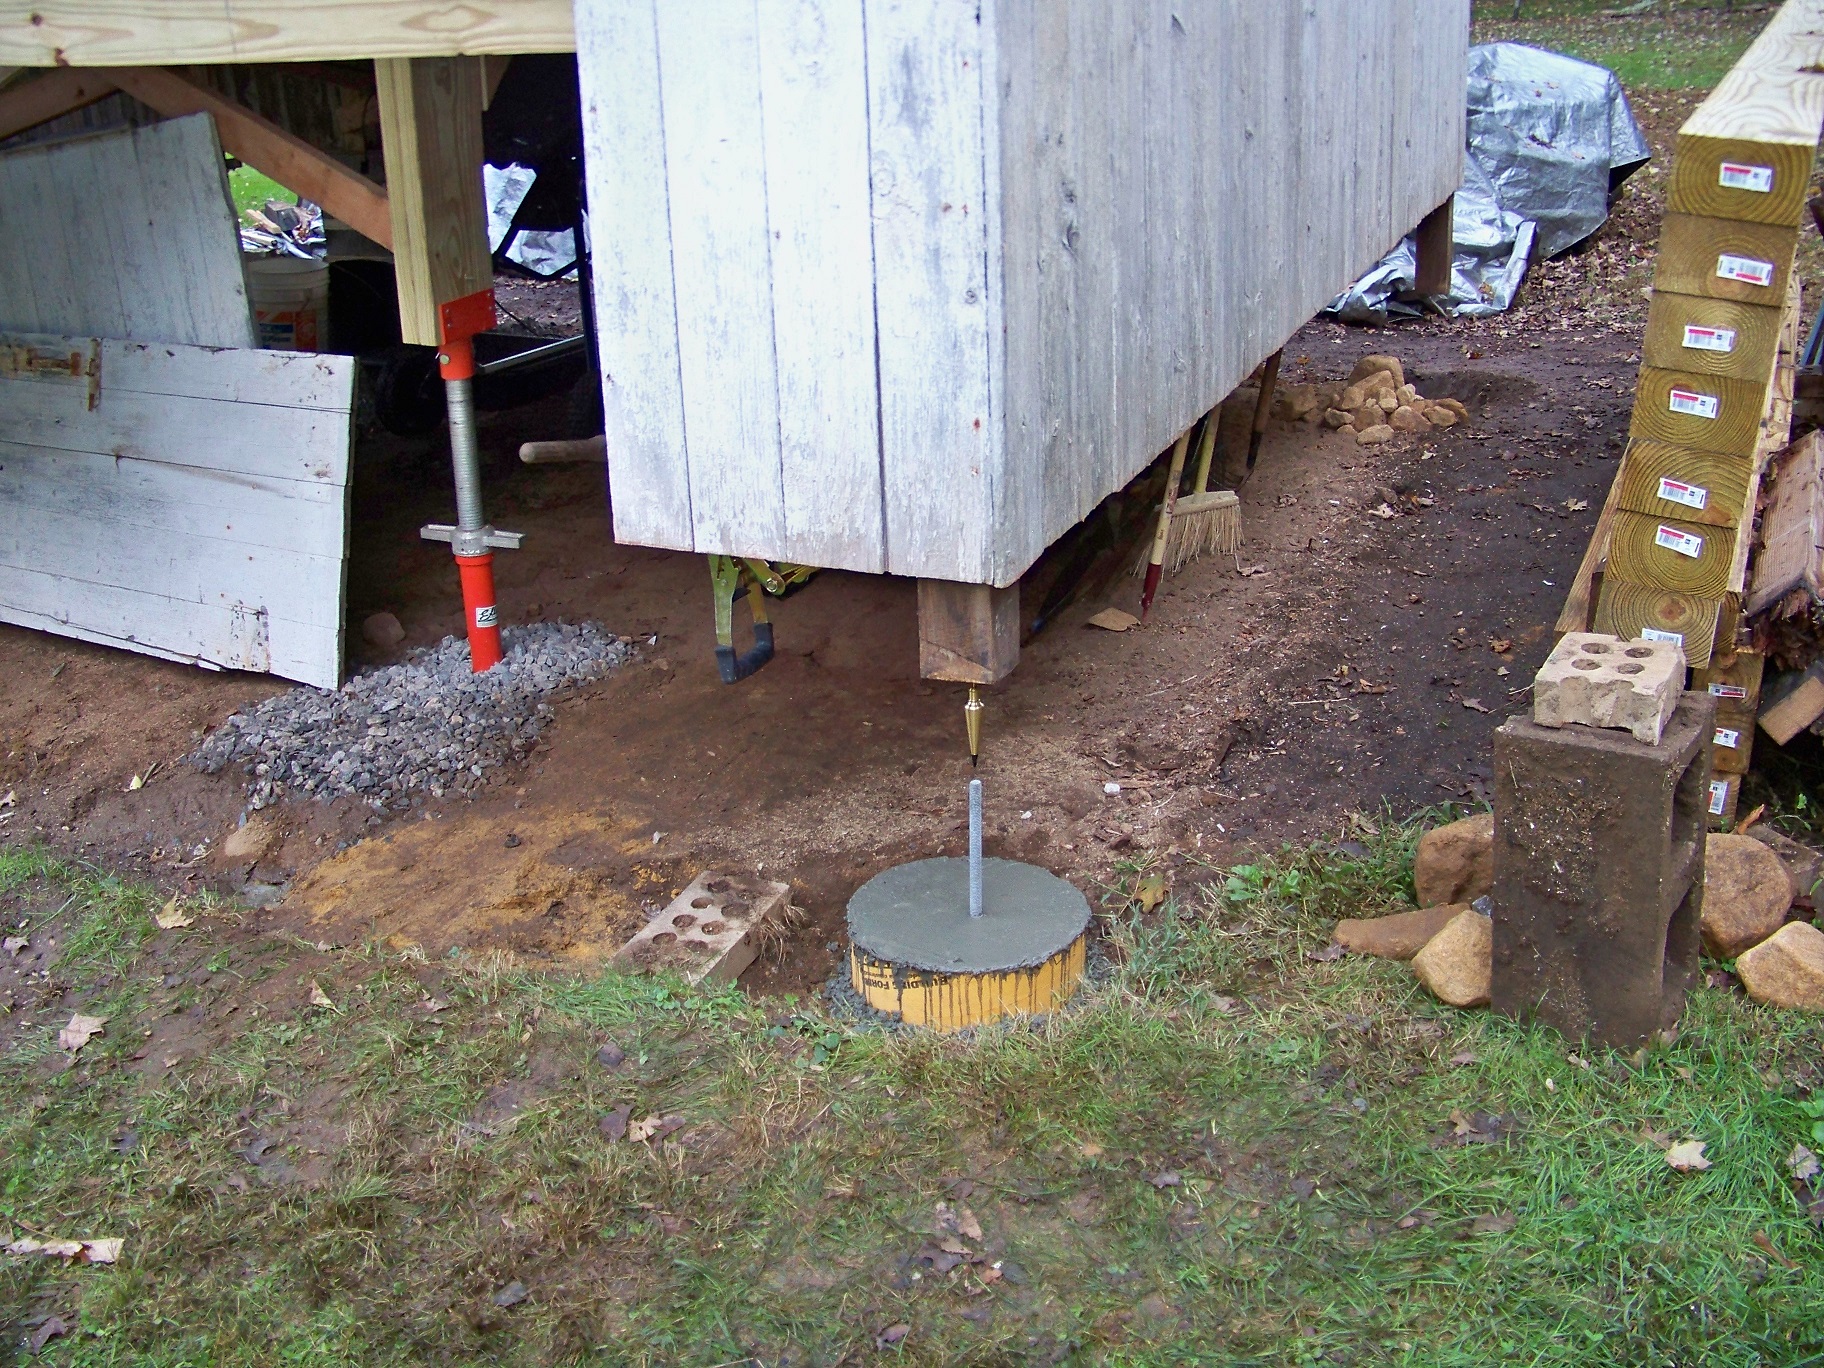
Once done, the best and most solid foundation for a shed I have found (aside from a concrete slab) is to lay down PT 4x4 that go the full width of your shed, at a distance of 2 feet apart. Between the gravel and the 4x4, lay down PT 2x8 the same length as the 4x4 flat on the gravel, with the 4x4 going down the middle of the 2x8 (about 2" of the 2x8 exposed on each side).

What this does is similar to a cement footing on a poured cement foundation on a home. The 2x8's every 2 feet on center with a 4x4 on top distribute the weight so well that any movements over the years of the soil and gravel base would not affect the shed.

Because the 4x4 / 2x8 "footings" are at every 2 feet, a pretty simple 2x4 framed flooring on top cover by T&G 1/2" plywood makes for a very solid floor. Then you could lower the whole structure to this floor base.

As with most structures, you could place the footings at every 3 feet or 5 feet or whatever, but you would lose some stability on the ground, and then you would need a floor with 2x6 or 2x8 framing to keep it solid, depending on how far apart the footings are. I personally find the few extra footings at every 2 feet is more solid and overall costs less because the 2x4 floor saves money to the alternative 2x6 or 2x8.

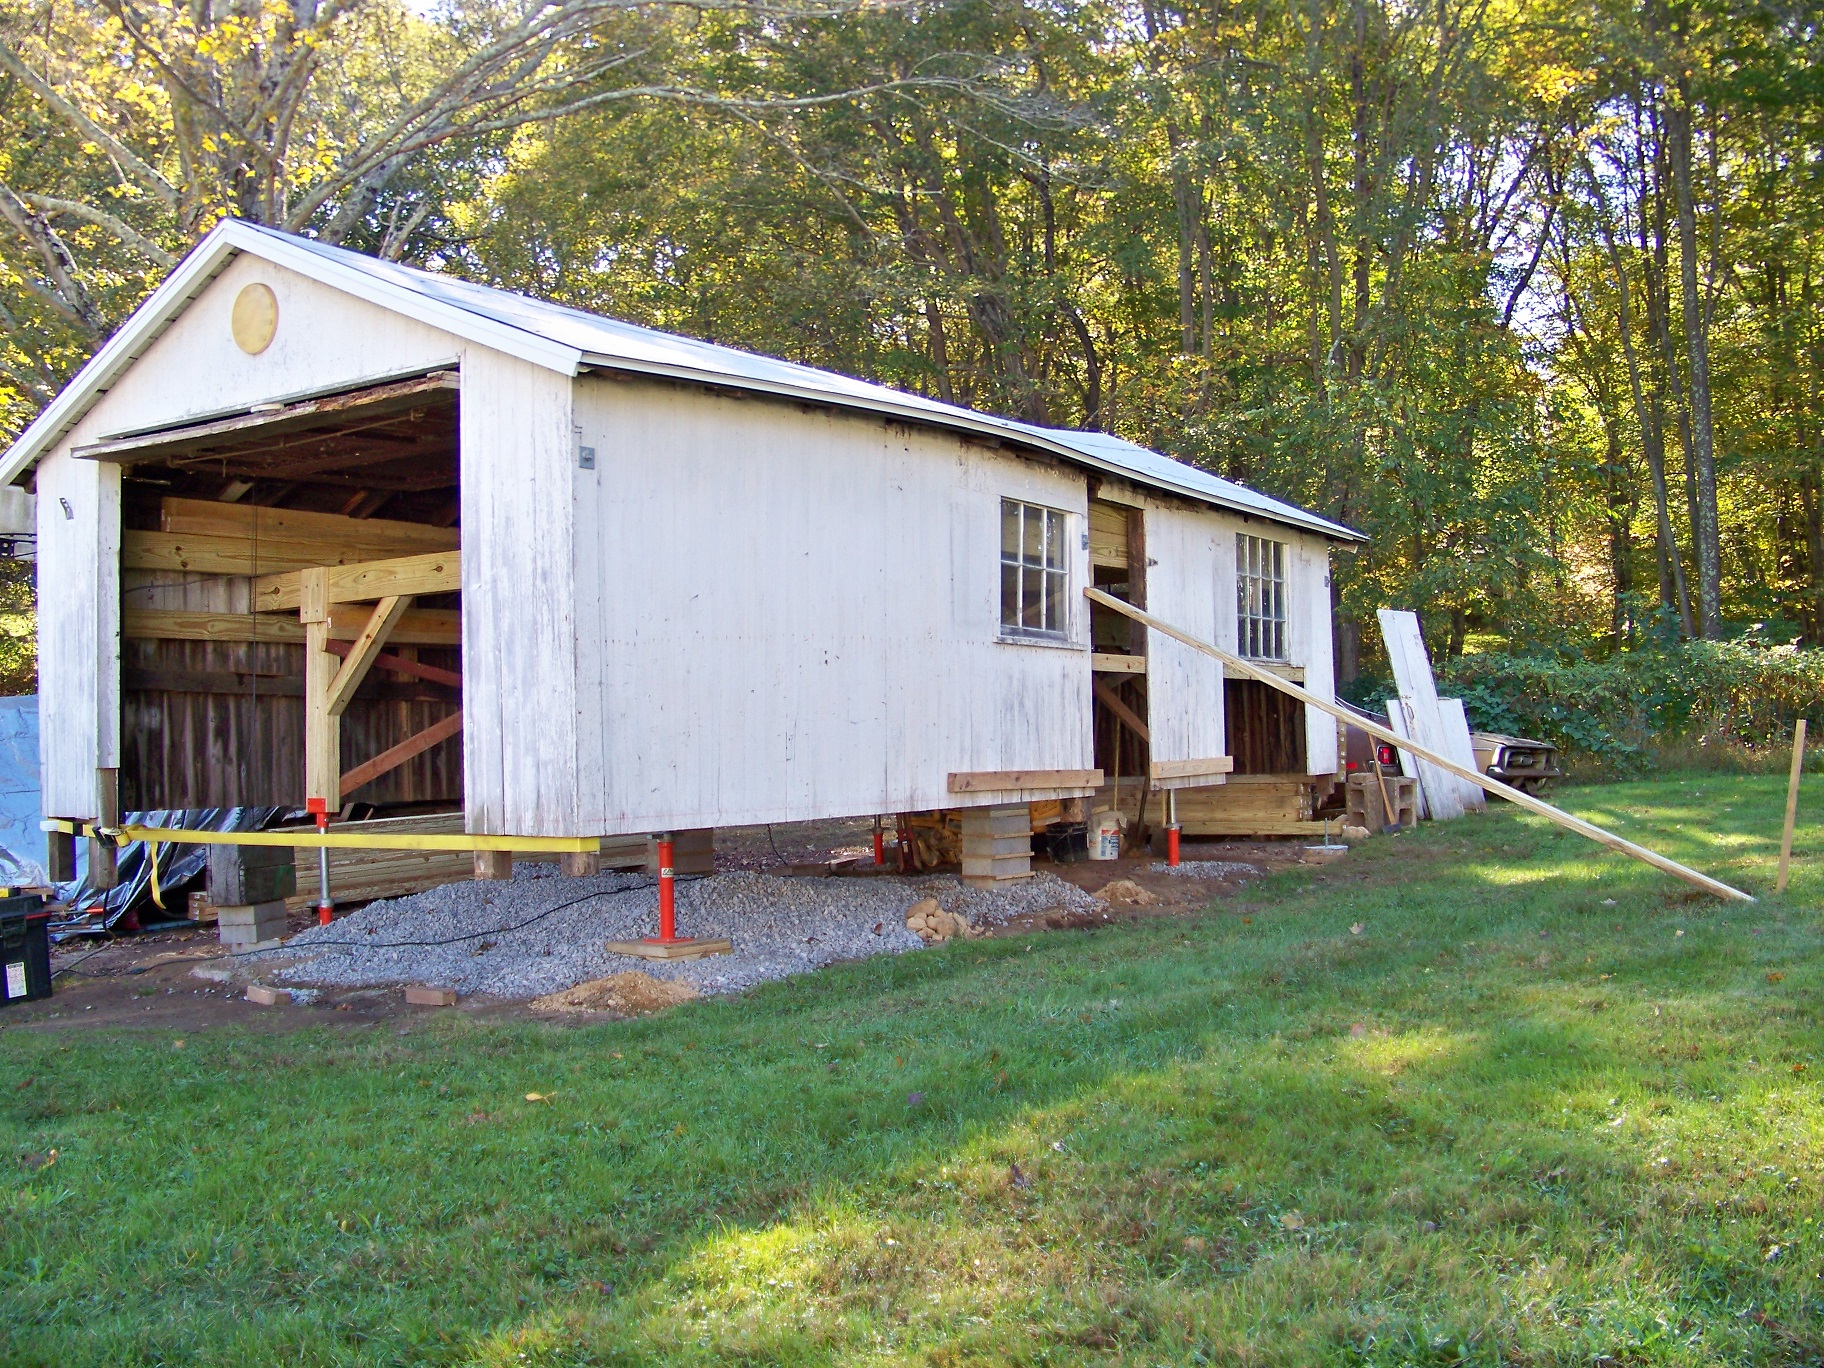
The whole base with plywood would raise the structure about 9". In my case I put PVC lattice, the one with the smallest holes or "privacy lattice" as it is called. This allows for aeration and the whole base should last 50 to 100 years. It also prevents skunks, groundhogs and all but the smallest animals from going under. Small mice or voles should stay away because the 3 inches of gravel would be too much of an obstacle to dig down through. In my case, I put about 24 inches of patio tiles around the exterior base, this was to prevent gophers or ground hogs from burrowing under the lattice barrier.

If the end result of the shed raised 9" is not what you care for, then I would suggest digging down about 1 foot, adding 3" of gravel and then the bas, the whole shed would appear to be at ground level.

Of all the shed bases I have seen and tried, with the exception of a poured concrete slab, this is effective, strong and not all that expensive, as well it is relatively easy to do.

Hope this helps, good luck.
 
To avoid these ads, REGISTER NOW!

RickP

Well-known member
Joined
Jan 15, 2013
Messages
1,547
Location
Annapolis, MD
I just looked back through your photos and I noticed the old thermometer above the door. When you're finished with this job, I hope you decide to keep it mounted there -- it adds a bit of class to the shack!
 

F451

Well-known member
Joined
Jul 18, 2010
Messages
991
Location
WA State, USA
Change of plans! Cause nothing is really set in stone until it's actually set in stone. I purchased a cement mixer this morning. Looked at the HF one, but the reviews were so bad I opted for this $300 one at Lowes:


Oh man, that mixer brings back some memories. When we were kids my father wanted a concrete driveway to replace our dirt driveway. Me and my 3 brother's were always doing some type of manual labor with my dad as we weren't exactly wealthy.

We didn't know all the details, but even at our young we definitely weren't thrilled with digging a 100' driveway, spreading the gravel, and mixing the concrete 3 cubic feet at a time. I think at the beginning of this epic home improvement project I was 8 or so, my younger brother would have been 6, the other two would have been 10 and 12.

My dad was pretty good about understanding our reluctance to do this project so he sweetened the deal by promising to widen out the driveway back by the garage end of it and putting in a nice basketball hoop including lighting if we would help him out. One of my crafty brother's counter proposed that since we were building the driveway in sections that we build the basketball court part of it first and work our way out to the street.

My dad countered with we'll do it one section at a time, street side first, then a basketball section, then back and forth. We agreed on that plan and proceeded to build the driveway. It took us a few years but we finally finished it and our basketball court was killer. Complete with lighting we used to be out there to all hours of the night. Bong, bong, bong, dribbling the ball and yelling, arguing and laughing.

Looking back I think of our poor neighbors having to put up with that. I had the chance to mention it to one of our elderly neighbors after I grew up and she said she was happy to hear us playing basketball to all hours of the night (and all the other noisy things we did there) as she then knew we weren't out getting in trouble.

Every time I get back east I cruise the old neighborhood and check out the old driveway and basketball hoop, they are still there and looking good!

3 yards at a time! Holy cow my old man was crazy tough.

CIMG4481-S.jpg
 

MikeF2316

Well-known member
Joined
Dec 29, 2012
Messages
9,605
Location
Thornhill, ON
ambenz mentioned putting ammonia soaked rags in the holes. I suppose pouring it directly in the hole achieves the same result. I'll deal with that after I'm done. OT - I used to design blue print machines which use high strength ammonia. I remember hooking up the ammonia pump check valves backwards on a machine which created an amazing ammonia waterfall in the engineering lab.

The sonotubes are out. The holes would have to be huge to get the sonotube past the hanging walls above.

Not sure exactly which way to go. Here are the options as I see it: (I could be missing something.) FWIW, the holes are 15" diameter and 32" deep (still have 2 more holes to dig).

A. Put 4" gravel in hole - then pour 6"-8" concrete footer - place post - finish pour around post. (rebar?)
B. Same as "A" except skip gravel.
C. Don't put post in hole - put rebar in hole - fill hole with concrete - attach galvanized post base bracket.

In my research I learned that you're supposed to vibrate the concrete. That's not going to happen here, as I'm not spending another $300 for a ********.

I'd put the gravel in. That gives a place for water that drains down the concrete to be "stored" before it drains away. I don't know if that is actually how it works, but it always makes me feel better.

Have you hit something solid at 32"? You're 2/3 - 3/4 of the way to being below the frost line.
 
OP
P

Platonic Solid

Well-known member
Joined
Nov 29, 2014
Messages
3,587
Location
CT-USA
Wow, I wish I had access to the forum while I was working on the shed. Some great advice, instructions (most that I can't follow at this stage) and stories.

Contrary to my previous post I realized that if I keep the cement tubes short, then I can easily angle them in place. I already purchased the cement mixer so I'm going to use it, (yes, I have other projects I will use it for. Wait.. I have a huge gravel driveway - lol) though after lugging 16 80lb bags of concrete from store to truck and then from truck to shed, my love of concrete is fading fast. I could barely move the 1300lb cart through the store. Naturally, no HD employees offered assistance.

I also decided that I'm not willing to deal with 130lb. 12ft 6x6s, so I went for 12ft 4x6s. Had I seen RickP's and FMC1959's post before shopping I'd have done this differently, but it is what it is. My fault for posting my questions too late.

The Sakrete form tubes state not to use a ******** (unlike the Sonotube website), so that works for me since I had no intention of using a ******** anyway. The instructions (link) do state: "Rodding may be needed to eliminate air voids during concrete placement."

I haven't poured any concrete yet. I only placed one concrete form so far and stuck a 3 legged rebar teepee in it. I decided against using the Simpson post base due to price ($21 x 6 = $126). I have six 18" galvanized 5/8 threaded rods left over from when I was buying lifting frame supplies (not sure why I bought so many). I'll stick them in the concrete to hold the 3 side to side 4x6s. Guess I'll have to make a clearance hole for the nut and washer in the 4x6s that will be mounted along the walls - or I could go through both beams. Still thinking ...

I still intend on using gravel for support. I just thought having something solid at the 6 posts was a good plan.

Have you hit something solid at 32"? You're 2/3 - 3/4 of the way to being below the frost line.

Nothing major, just getting to be too much of a pain. All the holes, except 1 have roots and rocks. The 1 hole (front right) which is close to the septic tank has no roots or rocks and is mostly sand. No surprise that is the corner that sank most.

Forecast currently says rain for tomorrow. Might not get anything real done till Sunday. Most of today was lost to shopping.

RickP - Yes, the thermometer stays. I'll have to see if I can buff the yellow out of it.
 
Last edited:

theoldwizard1

Well-known member
Joined
Feb 22, 2011
Messages
43,072
Location
SE MI
The Sakrete form tubes state not to use a ******** (unlike the Sonotube website), so that works for me since I had no intention of using a ******** anyway. The instructions (link) do state: "Rodding may be needed to eliminate air voids during concrete placement."
Don't fill the tube to the very top. Use a 2-3' 1x3 and plungit in and out of the wet concrete. You will understand what they mean when they say the "cream comes to the top". Then add the required amount to finish.
 
OP
P

Platonic Solid

Well-known member
Joined
Nov 29, 2014
Messages
3,587
Location
CT-USA
theoldwizard1 - Everything I can find online says 5/8" rod for 12" column. I was just going to use 1/2" rebar.
 

lakeroadster

Well-known member
Joined
Jan 19, 2015
Messages
5,166
Location
Central Colorado

Attachments

  • ZMAX 18-Gauge Galvanized Mudsill Anchor.jpg
    ZMAX 18-Gauge Galvanized Mudsill Anchor.jpg
    69.9 KB · Views: 124
Last edited:
OP
P

Platonic Solid

Well-known member
Joined
Nov 29, 2014
Messages
3,587
Location
CT-USA
lakeroadster - That is a good idea. Must be why not a single HD in the state has any.

theoldwizard1 - I did understand you. See this video. I thought I needed to put rebar in the tube.
 
OP
P

Platonic Solid

Well-known member
Joined
Nov 29, 2014
Messages
3,587
Location
CT-USA
Progress pics.

Rained until early afternoon, but still managed to get the first tube filled. I lost way too much time shopping yesterday. I really should keep shopping as a night time task so it doesn't impede progress so much.

Concrete tubes are 12" diameter, 2ft long (4ft cut in half). Top of tube is at grade in an attempt to keep the resulting floor as low as possible. Rebar is 2ft, 3 pieces tied together in a teepee. Threaded rod is 5/8" x 18" sunk in cement 9". Bottom of threaded rod has nut + washer + nut. It only comes with 1 nut, which seems odd to me as there's no way to know if the washer made it all the way to the bottom. Getting the threaded rod in + on center of plumb bob and square was more of a pain than I expected. Cement mixer worked great. I followed the instructions of a mixer reviewer (linked) (see the review: "Misleadingly good value - ready for hard work" if you're interested).


lakeroadster

Well-known member
Joined
Jan 19, 2015
Messages
5,166
Location
Central Colorado
Nice.. you do good work. :thumbup:

That photo with the plumb bob and the threaded rod is suitable for framing.

lakeroadster - That is a good idea. Must be why not a single HD in the state has any.

Well ****!

You know getting the hole in the 4x6 to correspond with the threaded rod will be tedious...

Hell... make your own straps. The strap doesn't even need to have holes in it. You can bend a piece of flat bar steel back onto itself, bend the lower end of it into an L-shape, place it in the concrete and then drill the holes once your ready to screw it to the 4x6...

I'd be inclined to abandon the wood floor concept now that you are using the concrete piers and use some compacted stone with rubber horse barn mats for the floor.
 
Last edited:
OP
P

Platonic Solid

Well-known member
Joined
Nov 29, 2014
Messages
3,587
Location
CT-USA
You know getting the hole in the 4x6 to correspond with the threaded rod will be tedious...

Agreed, getting everything to line up just right will require some precision measuring, cutting and drilling. Worst case scenario, I drill the holes a little bigger and use the same big *** square washers I used to raise the structure with. That would be using those washers for their intended purpose and I have plenty of them already in hand.

Hell... make your own straps. The strap doesn't even need to have holes in it. You can bend a piece of flat bar steel back onto itself, bend the lower end of it into an L-shape, place it in the concrete and then drill the holes once your ready to screw it to the 4x6...

I'm going to use the threaded rods cause I have them here and now. Too much time is being lost to shopping. Apparently these rods are intended to be installed after the fact in drilled holes with adhesive. I have no doubt the way I'm doing it is stronger than necessary.

I'd be inclined to abandon the wood floor concept now that you are using the concrete piers and use some compacted stone with rubber horse barn mats for the floor.
Why? Price is about the same either way.
 
OP
P

Platonic Solid

Well-known member
Joined
Nov 29, 2014
Messages
3,587
Location
CT-USA
Mavawreck - There's a little play between the threaded rod and the ID of the pipe. The resulting angle of that clearance increases with height. These lifting shores are designed to extend a full 38". The one in the picture isn't fully extended. The only one that is fully extended is the front right corner. It isn't actually possible to overextend these as the giant wing nut stops at it's max design extension. Additionally the wingnut is a 2 piece welded design that can not be removed = you cannot separate the threaded rod from the tube. The whole lifting apparatus is amazingly stable. (Also, I think you're right. It's the angle of the photo)
 

TractorJeff

Well-known member
Joined
Dec 8, 2013
Messages
3,309
Location
Elkhorn, WI
GEEZZ!
You are doing a way to awesome job of trying to make it last another 100 years!
LOL!
Keep it up, you're doing fine!
Old Barns were very often only set on Field stone. I'm sure there were no guidelines as to how deep to start the stone piers.
 

couch67

Well-known member
Joined
Mar 18, 2016
Messages
1,398
Location
Ontario Canada
Platonic, great progress! After just finishing the raise on my much smaller (9x12) shed, I can only imagine the amount of work this has taken you.

I know what you mean about trying to be prepared for weekends and doing the shopping / planning during the week. I try to do this whenever possible. Besides maximizing daylight hours on the weekend, the stores are much quieter on a weeknight compared to the weekend :)

couch
 
OP
P

Platonic Solid

Well-known member
Joined
Nov 29, 2014
Messages
3,587
Location
CT-USA
Progress pics:

Nothing exceptionally exciting. Feels like a lot of work, but I only got 2 more tubes done. I used a 4x6x12' beam as a level to get the heights right. I lucked out on the last (middle) tube - just barely had enough concrete to fill it. That works perfectly: I purchased 16 80lb bags and I used 8 so far to fill 3 2ft tubes. I enjoy working with wood, concrete - not so much. Also had to shorten the shed posts so I have a fighting chance of getting the sills on there. The corner rod looks crooked in the picture. I know it was straight when I set it.

 
To avoid these ads, REGISTER NOW!
OP
P

Platonic Solid

Well-known member
Joined
Nov 29, 2014
Messages
3,587
Location
CT-USA
lakeroadster - It's an outdoor electrical outlet. Been there since I purchased the house in 1994 and it still works.
 
OP
P

Platonic Solid

Well-known member
Joined
Nov 29, 2014
Messages
3,587
Location
CT-USA
It’s important to note that the first concrete tube was placed as low as possible at the highest grade elevation as that determines the height of the all the rest. I didn’t know how much the grade really sloped until installing yesterday’s tubes. The resulting floor will be 4.25” above the top of the tubes.


Now I’m debating between retaining walls, bringing in fill to reduce grade, or both. There is an old broken up concrete slab between the tree and the shed. The tree is responsible for that. I do like the current convenience of being able to back my truck to the back woods.


couch67

Well-known member
Joined
Mar 18, 2016
Messages
1,398
Location
Ontario Canada
Platonic, judging by the height of your sono tubes, you wont have a whole lot of grading to do, assuming you wont go higher than the tubes. I'd bring in enough fill to make a slight slope away from the shed. Shouldn't impact the space between the tree and the shed too much...

couch
 
OP
P

Platonic Solid

Well-known member
Joined
Nov 29, 2014
Messages
3,587
Location
CT-USA
Weather's getting colder (frost on the car windows this morning) and I have some major projects at work that I can't delay any longer. So it will be a busy upcoming weekend pouring concrete. I may have to move the cement block cribbing back about 6 inches on the center lifting frame supports so I can check level from center left to right pier. Not sure how long I have to let the concrete harden before I can mount the 12ft 4x6s to them.
 

Thumper68

Well-known member
Joined
May 16, 2013
Messages
5,134
Location
Duluth MN
Wow great job so far!! I just read through the entire thing.

On the concrete 24 hours should be plenty to start with the beams. I have started on light stuff in 6 or 8 hours after pouring.
 
OP
P

Platonic Solid

Well-known member
Joined
Nov 29, 2014
Messages
3,587
Location
CT-USA
24hrs. for concrete hardening works. Thanks Thumper. So what do I do with the nasty orange tubes? Cut them, leave them or maybe spray paint them so they're not nasty orange?

sean Buick 76 - I'm seeing fewer and fewer signs of moles/voles as this project progresses. They seem to like to make their homes and tunnels under heavy items. When I moved the lumber that was stacked inside on the ground for a few weeks there were paths and tunnels in the surface of the dirt. I'll wait till I'm done, then try the ammonia trick on any holes that I find.
 

Sparkynutz

Well-known member
Joined
Jul 16, 2017
Messages
409
Location
Wisconsin
Hmm. I was told 3-5 days for concrete. Grading that small amount shouldn't be too bad. I'd use some big gravel as base so the critters have a harder time digging in it.

Sent from my SM-G900V using Tapatalk
 
OP
P

Platonic Solid

Well-known member
Joined
Nov 29, 2014
Messages
3,587
Location
CT-USA
...So what do I do with the nasty orange tubes? Cut them, leave them or maybe spray paint them so they're not nasty orange?
Found the instructions (link) which state: "If forms are to be removed, do so within 24 hours. Cut the QUIK-TUBE™ with a sharp knife or power saw set to the correct cutting depth. Simply peel the form away from the concrete.". Wonder what happens long after 24 hrs = like 7-10 days. I'm leaning towards grey spray paint until they disintegrate on their own.
 

couch67

Well-known member
Joined
Mar 18, 2016
Messages
1,398
Location
Ontario Canada
I think the inside coating starts to break down and will stick to the concrete which is why they say to peel earlier if you are going to...

The tubes are still on my deck after 15 years, but are covered by deck skirt boards.
 
OP
P

Platonic Solid

Well-known member
Joined
Nov 29, 2014
Messages
3,587
Location
CT-USA
couch67 - So the tubes will likely outlive me. I'll just spray paint them grey rather than risk making an ugly mess of things. It does make me question why the heck these things are orange. A neutral grey would make more sense. It's not like these things need to "pop" on the store shelf. I really doubt concrete tubes are an impulse buy item.
 

cash68

Keeper Of Rotor Hill
Joined
Feb 2, 2011
Messages
979
Location
Milwaukee, WI
They're probably a color for branding for the company. No branding = it's a commodity, and will command commodity pricing. It's important for every brand to try to differentiate, and they can probably use some sort of ******** like 'allows curing conrete to breathe but waterproofs the tubes enough that they won't turn into garbage if it rains before you get them set up", or something along those lines.
 
OP
P

Platonic Solid

Well-known member
Joined
Nov 29, 2014
Messages
3,587
Location
CT-USA
Progress Pics:

Moved the center cribbing so I could put a 4x6 from pier to pier and confirm level. Looks precarious, but the whole thing would stay up just fine without any center support.


Straightening the walls. Attempt #1.
After straightening:
The rear width exterior post to exterior post dimension = 12ft (144 inches)
Center = 147 inches
Front = 146.5 inches
When I bring the center and front dimensions to 144 inches, the walls are then angling inward and the garage door opening will not be big enough for the door to close.


With the center wall plumb, I see my pier hole needs to move. I should have predicted that.


Determining the height level of the center pier.


OP
P

Platonic Solid

Well-known member
Joined
Nov 29, 2014
Messages
3,587
Location
CT-USA
Progress Pics Continued:

I made a jig to help install the threaded rod at the proper height and so I can put the rod in before the concrete. Inserting the rod after the fact is a PIA.


Seemed like a good idea until after I put the concrete in when I went to remove the PVC spacer the post above it was in my way. Still made it easier, but tool needs improvement. With only one pier left to go as I write this, I'll just use the PVC as an unattached guide.


Abandoned the ratchet strap in front in favor of another 12' 2x6 to plumb the front. I moved the threaded rods in towards the center of the garage (away for post center) since I need to make sure I have enough engagement with ends of the 12' 4x6s and I'm not sure I can solve the 147" post issues without messing with the top plate.


Another ton of gravel shoveled from the pickup. That makes 4 tons so far.


TractorJeff

Well-known member
Joined
Dec 8, 2013
Messages
3,309
Location
Elkhorn, WI
Being 3 inches wider at one end maybe the way it always was? I wouldn't dwell on it too much, just get it functionally straight and leave it be. After all, its not a Church!
 
To avoid these ads, REGISTER NOW!
Top Bottom