To avoid these ads, REGISTER NOW!

Raising the Rat Shack

OP
P

Platonic Solid

Well-known member
Joined
Nov 29, 2014
Messages
3,587
Location
CT-USA
It's not a matter of dwelling on imperfection, (heck I'd never finish this project if that was the issue), it's that I purchased 12' 4x6s and they measure exactly 144". I'll probably have to attach 2x4s to the ends of the 4x6s to make them long enough.
 
To avoid these ads, REGISTER NOW!

Thumper68

Well-known member
Joined
May 16, 2013
Messages
5,134
Location
Duluth MN
Hmm. I was told 3-5 days for concrete. Grading that small amount shouldn't be too bad. I'd use some big gravel as base so the critters have a harder time digging in it.

Sent from my SM-G900V using Tapatalk

He is setting a few beams you are setting an entire garage, by the time he is ready to set the shed down on the beams the concrete will be well set.
 

oldironfarmer

Well-known member
Joined
Jun 25, 2016
Messages
6,664
Location
Terlton, Oklahoma
Interesting thread! It is great to see someone tackle a project like this and plow through it. You're over the hump now, and against my nature, I'm not going to offer any advice, you're getting there. I will comment that if you're only adding a couple of inches to the 4x6's scabbing on the ends will work, you might screw and glue the scabs.

Also had a question about the bottle jacks. I assume they held well when you used them. Did you unscrew the extension when you measured the full height? In all the pictures it seems the extension is down.

Cool project :)
 
OP
P

Platonic Solid

Well-known member
Joined
Nov 29, 2014
Messages
3,587
Location
CT-USA
... You're over the hump now, and against my nature, I'm not going to offer any advice, you're getting there.
All advice is welcome. This isn't exactly my field of expertise.

... Did you unscrew the extension when you measured the full height? In all the pictures it seems the extension is down.
I don't understand the question.
 
Last edited:

RickP

Well-known member
Joined
Jan 15, 2013
Messages
1,547
Location
Annapolis, MD
Probably have to hit a real lumber yard for that. HD doesn't carry 4x6 longer than 12ft.
Are you using 24' long beams under the walls? Is the 147" measured from the inside face of those beams? You could pin the beams together with structural lag screws.

I don't think you need big beams across the width - using regular joists would be better. Either on top of the side beams or in joist hangers, depending on what height you want the finished floor.
 

TractorJeff

Well-known member
Joined
Dec 8, 2013
Messages
3,309
Location
Elkhorn, WI
Quote: This isn't exactly my field of expertise.
It maybe "not your field" but you have well documented the project and mistakes which puts you in the ranks of a small select Group who have done it!
This now makes you an Expert!
 
OP
P

Platonic Solid

Well-known member
Joined
Nov 29, 2014
Messages
3,587
Location
CT-USA
Are you using 24' long beams under the walls? Is the 147" measured from the inside face of those beams? You could pin the beams together with structural lag screws.

I don't think you need big beams across the width - using regular joists would be better. Either on top of the side beams or in joist hangers, depending on what height you want the finished floor.
All the 4x6s I have are 12ft which is what I intend to use under the walls. 147" would be to the outside beams. I kept second-guessing myself today, so without a clear plan I chose to take lots of measurements and make an inventory list of lumber.
 

oldironfarmer

Well-known member
Joined
Jun 25, 2016
Messages
6,664
Location
Terlton, Oklahoma
I don't understand the question.

The load button on top of the ram is generally on an acme screw. When you put the jack under a load you can unscrew the extension to make the jack taller so you don't have to pump the ram out as far. I've never seen one without it, so you might try unscrewing the very top of the jack.
 
OP
P

Platonic Solid

Well-known member
Joined
Nov 29, 2014
Messages
3,587
Location
CT-USA
Well heck. Now I can answer your question: The reason I never unscrewed the extension is I didn't know it existed.

I've never owned a bottle jack before and now I have 4 of them. oldironfarmer, if you hadn't said something I never would have known the top could screw out further. Now I understand why I couldn't get full advertised height out of them. The only place it makes any mention of that in the manual is this tiny pic:

bigred.JPG


:thumbup:Thank you :thumbup:
 

RickP

Well-known member
Joined
Jan 15, 2013
Messages
1,547
Location
Annapolis, MD
All the 4x6s I have are 12ft which is what I intend to use under the walls. 147" would be to the outside beams. I kept second-guessing myself today, so without a clear plan I chose to take lots of measurements and make an inventory list of lumber.
Okay, I understand the issue with the width that you're trying to fix. Your design has the cross beams on top of the side beams, but you can easily change your plan to accommodate the extra width. If you're committed to using the cross beams, you could just add a "rim joist" on each end of them, made from 2x6 lumber.

Or you could shorten the cross beams and drop them down to the same height as the side beams, then attach them together with structural lag screws.

The cheapest option would be to return the cross beams to the store and buy 12' joists to span the width of the shed, on top of the side beams. With the rim joists on the ends, these joists will be 147" long.
 
OP
P

Platonic Solid

Well-known member
Joined
Nov 29, 2014
Messages
3,587
Location
CT-USA
The rear is 144". The front is 147". So I'll have to fudge a bit to prevent support from sticking out beyond siding in rear.

How about this:
2x6 sill plate all 4 sides
4x6 rim joist all 4 sides (I need something to attach new 4x4 posts to)
2x6 joists on 16" or 12" centers for floor
3/4" PT plywood flooring
 

RickP

Well-known member
Joined
Jan 15, 2013
Messages
1,547
Location
Annapolis, MD
The rear is 144". The front is 147". So I'll have to fudge a bit to prevent support from sticking out beyond siding in rear.

How about this:
2x6 sill plate all 4 sides
4x6 rim joist all 4 sides (I need something to attach new 4x4 posts to)
2x6 joists on 16" or 12" centers for floor
3/4" PT plywood flooring

Gotcha -- that might be a problem for your joists. It will be too long a span for 2x6s -- they'll only span about 11' if you space them on 12" centers. You might be okay if you can get douglas fir, because that will span 11'4", but even that's about 4" too short at the door (where you'll have a 140" span to the inside face of the 4x6 rim joists).

Even without doug fir, you could use the 2x6s for joists anyway, but your floor will be very springy, especially if you're planning to store heavy stuff in the shed. I've used too-small joists for light weight attic storage before, and the springiness is really disconcerting to walk on. If one of your 2x6 joists ever fails in the shed, it's not like it will fall very far, but it'd be a real pain to tear up the floor in order to replace it.

I'd really recommend going with 2x8s for your joists -- they will span 13' on 16" centers, so they'll be slightly cheaper overall, because you'll use fewer of them. If that makes your floor too high, just use joist hangers on the inside of your 4x6 beams under each wall (and add a sill plate on top of each beam to bring it up to the top of the joists). Here's the calculator I use:
Joist Span Calculator
 
Last edited:

RickP

Well-known member
Joined
Jan 15, 2013
Messages
1,547
Location
Annapolis, MD
Heck, you could save even more $$ and space the 2x8 joists on 19.2" centers and they'd still span over 12' -- that would be 5 joist spans under an 8' piece of plywood. That will eliminate 3 joists in the length of your shed. Here's what I figured for your joist quantities:
25 2x6s on 12" centers ($263)
19 2x8s on 16" centers ($247)
16 2x8s on 19.2" centers ($208)

You'll also need rim joists on two sides, but those can be 8-footers, so you'd need 6 of them whichever size joists you decide to use. Also, I'd recommend adding 2x4 nailers between the joists for the unsupported edges of your plywood (unless you can find pressure-treated tongue & groove).

Then your 2x6 sill plate can sit on top of the joists and plywood, and it will give you a place to rest the bottom of the new 4x4 posts. That sill plate doesn't need to be pressure treated, unless you're worried about water getting in through the siding. Also, it doesn't need to run the full length of the side walls. I'd say it would only need to be a few feet long under each post. If you'd prefer to run your 4x4 posts all the way down to the bottom of the joists (like a deck railing) then you could just use a scrap of 2x6 or 2x8 laid flat under each post (to keep the post end-grain off the 4x6 beam), but I still don't think you'd need a sill plate running the full length of each wall.

You're almost there -- good luck with finishing it up before the really cold weather hits!
 
OP
P

Platonic Solid

Well-known member
Joined
Nov 29, 2014
Messages
3,587
Location
CT-USA
Wow RickP! You da man! Thank you.
I kind of figured there are a thousand ways to do this. The plan is to use PT for everything since this is still basically a shed sitting on gravel. Saving money is nice, but not the primary concern. A springy floor is not an option. Thanks for the span calc link too.

I realized this weekend that the shed is going to remain at the height that it's currently at to permit enough interior height after the floor is installed. I'm 6'3" so head room matters a lot.

I'll have to make a ramp at the garage door. If I feel really motivated, I'll make it a hinged ramp that folds into the shed (though that could be more of an annoyance than a functional feature).

Before I do the floor framing, I need to settle on what to do with the space under the floor on the exterior from top of pier to ground level. I don't want there to be critter access. I'm debating whether to fill it all with gravel, which will take roughly 5 more tons. I could build PT retaining walls between the piers directly under the sill, thus providing additional support. I prefer not to rely solely on the 6 piers as they're not very deep.

(painted concrete form tubes with some old rattle can auto primer I had laying around)


OP
P

Platonic Solid

Well-known member
Joined
Nov 29, 2014
Messages
3,587
Location
CT-USA
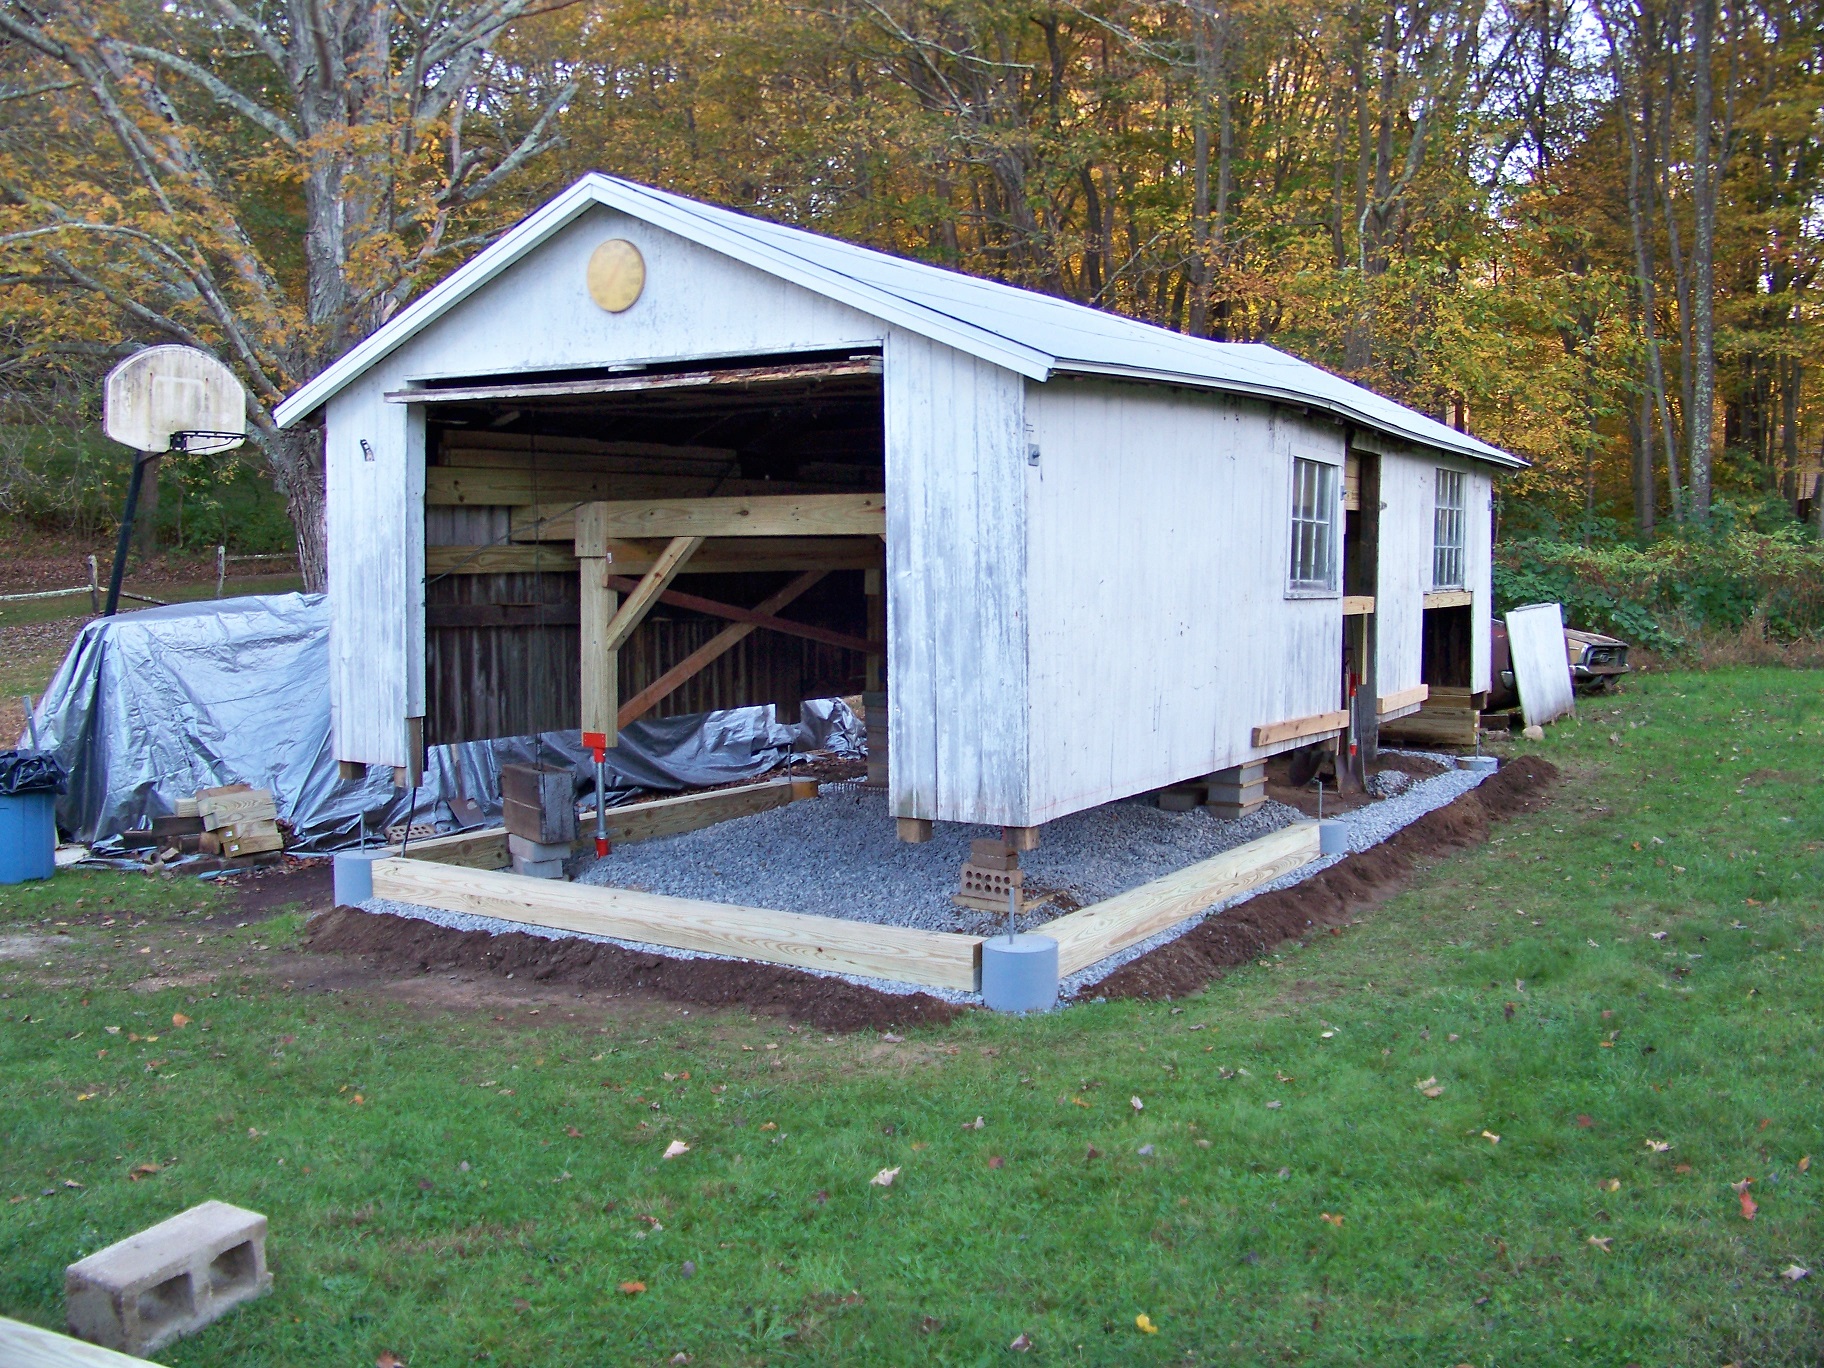
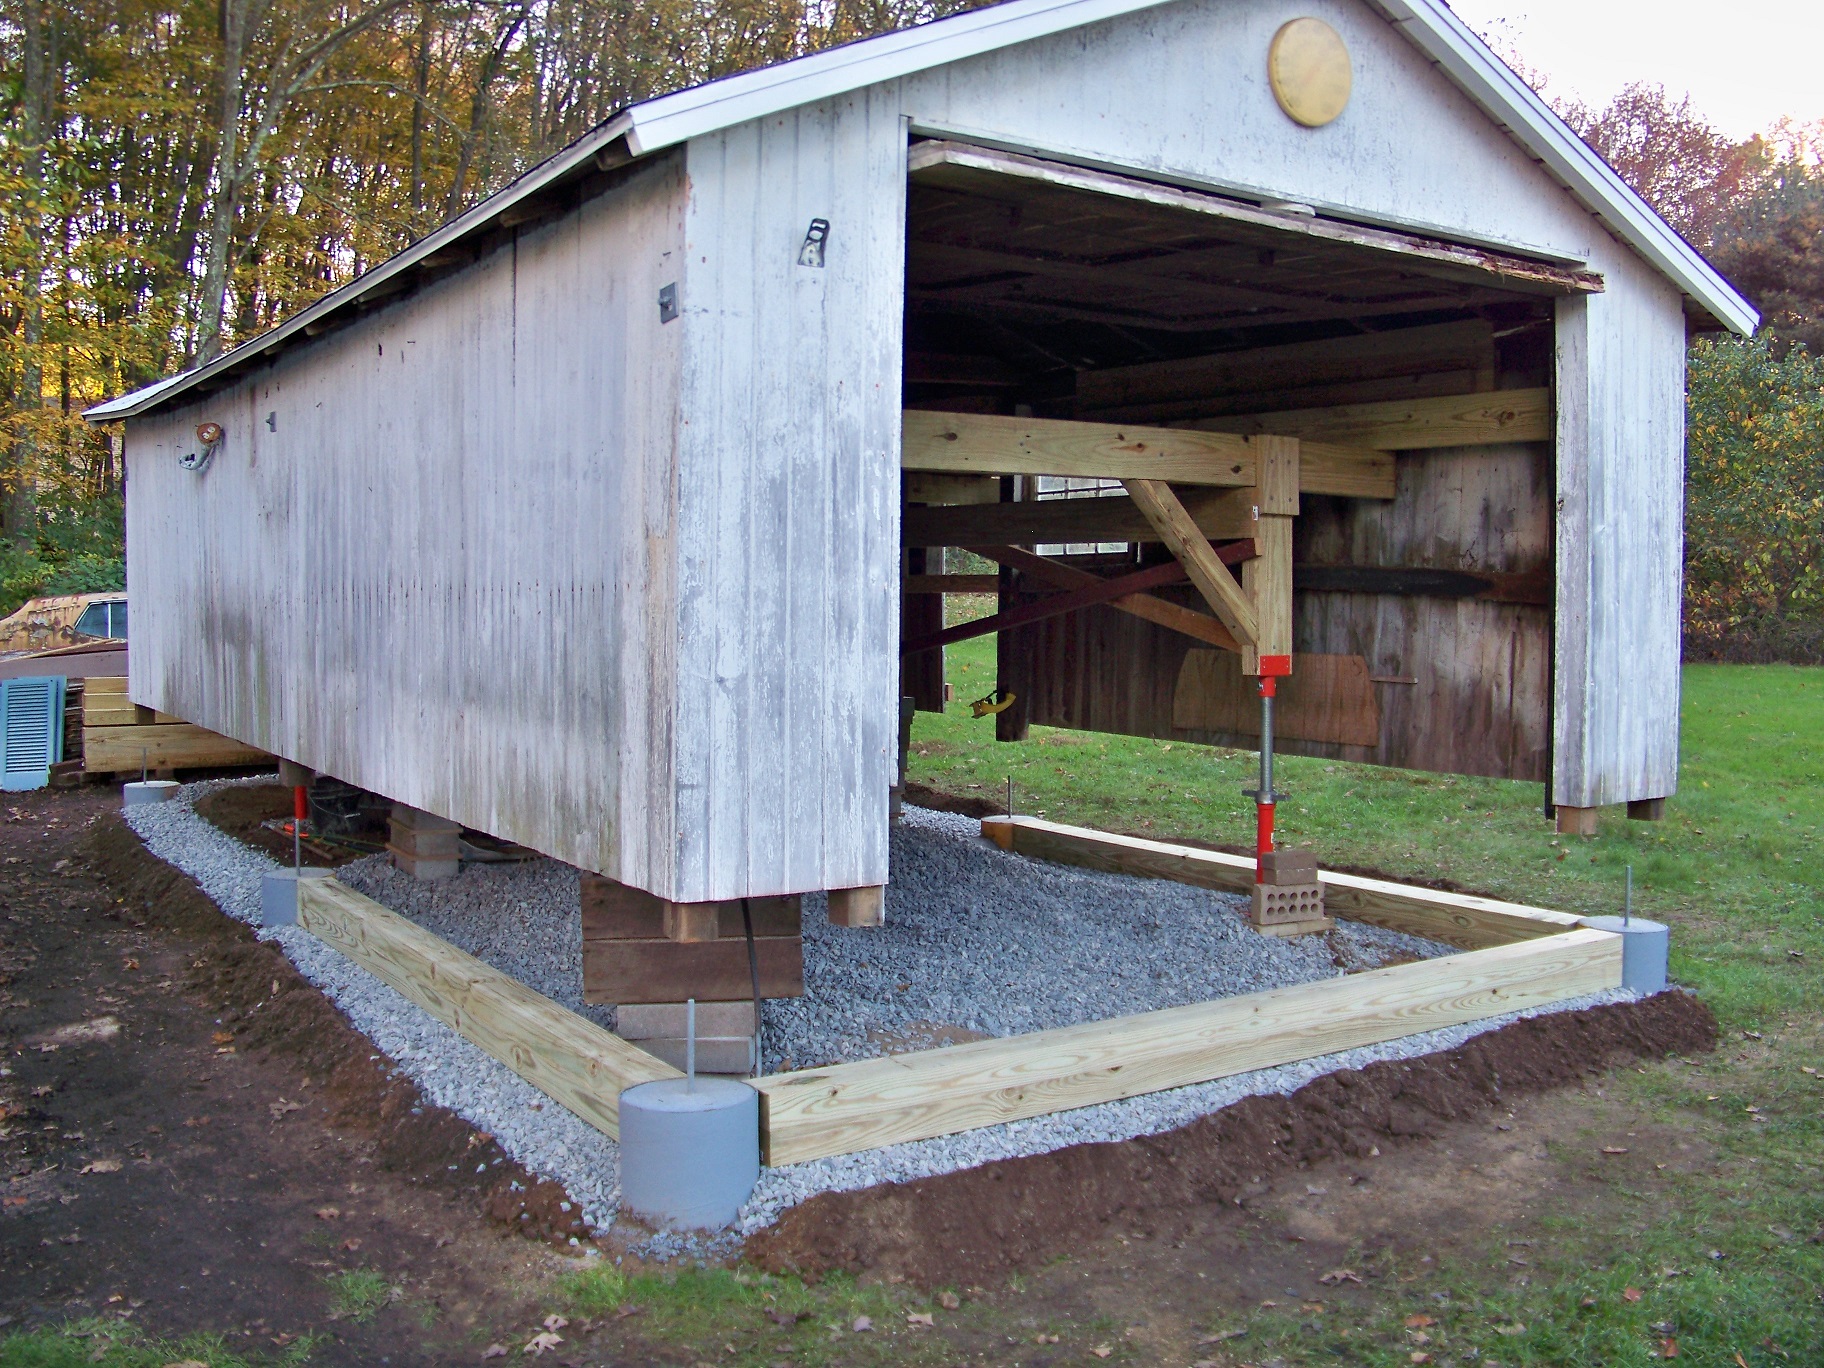
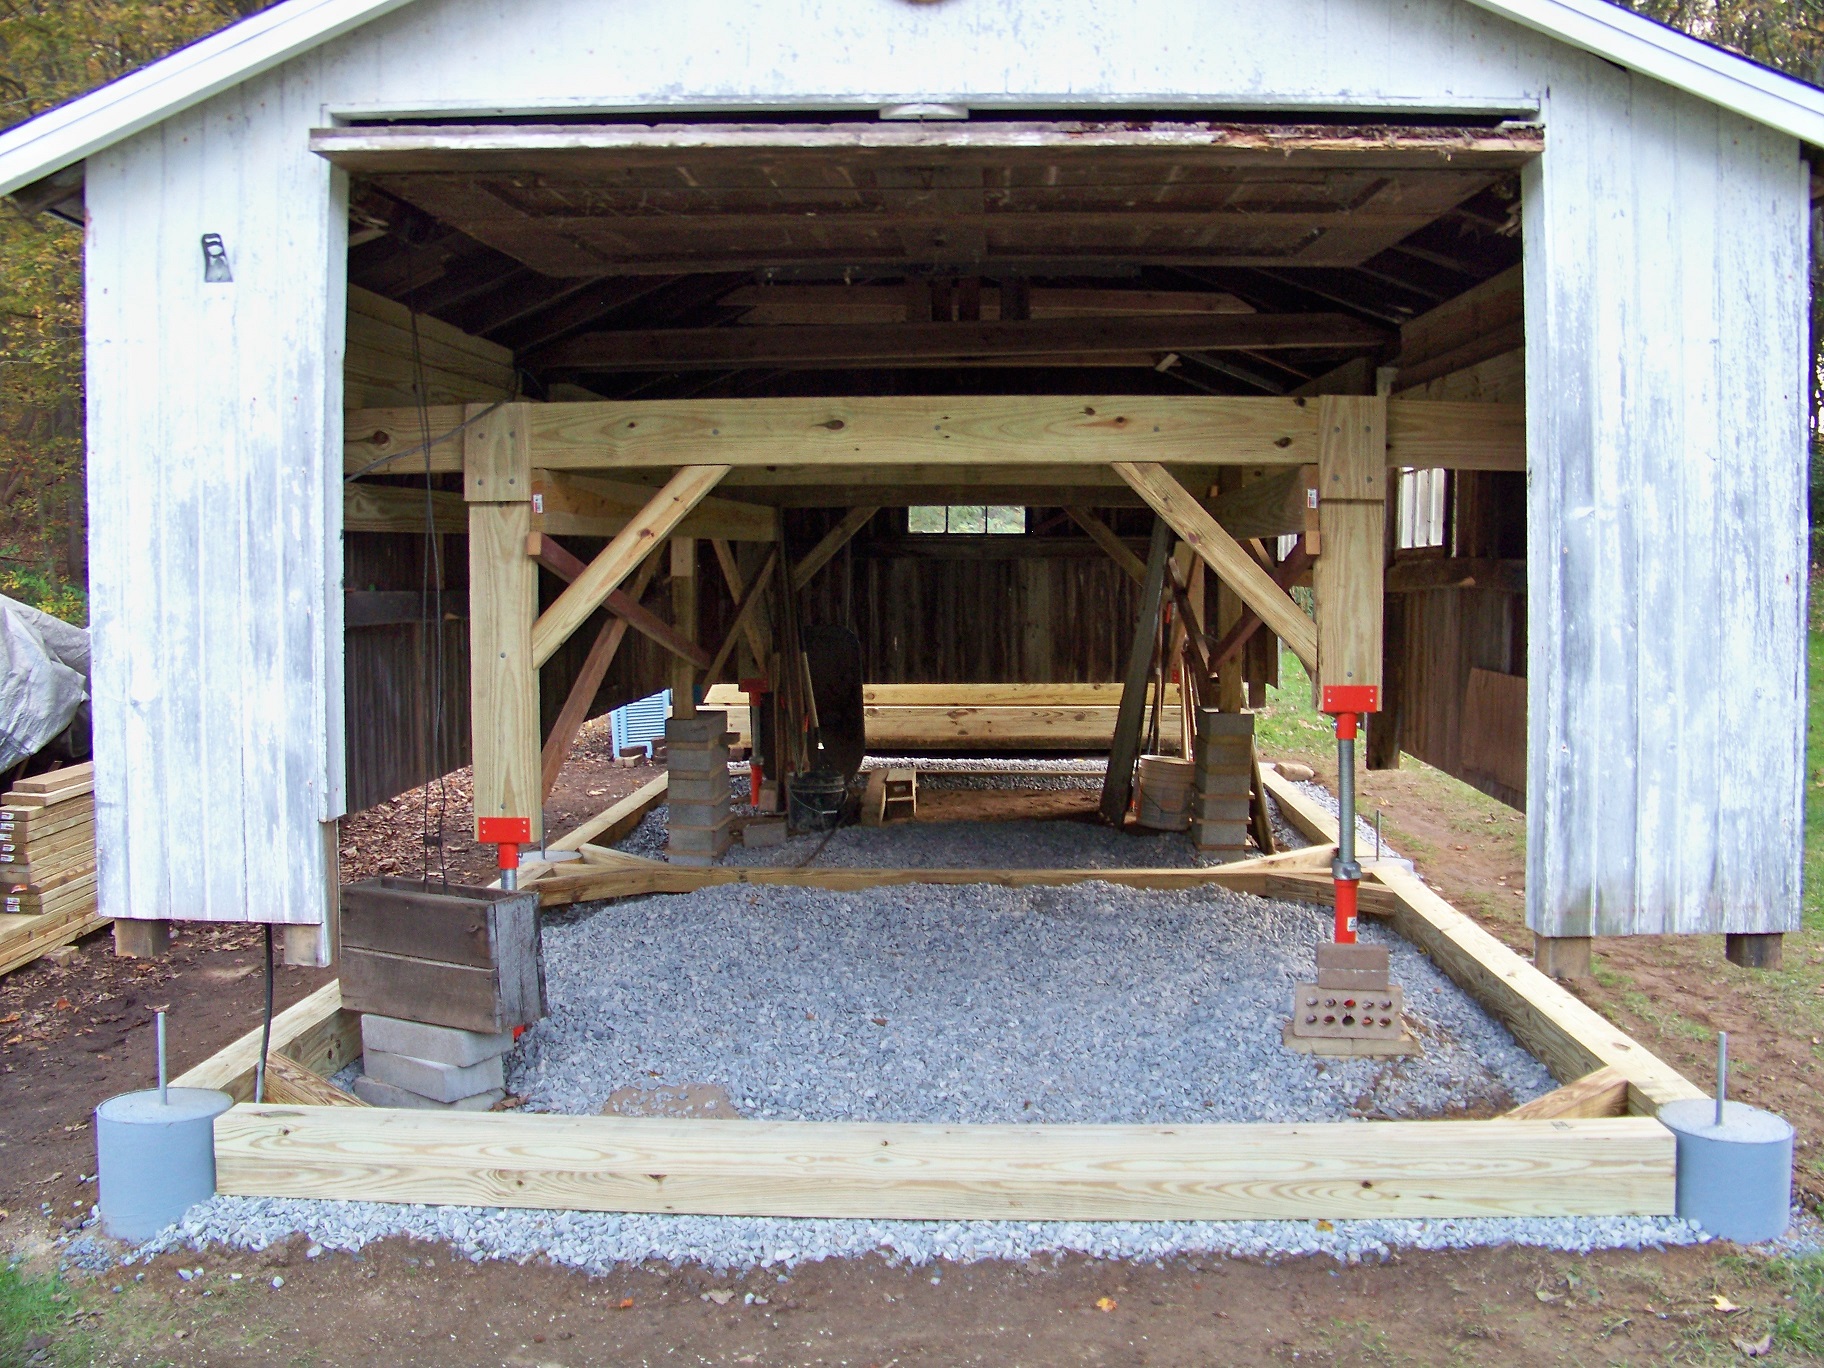
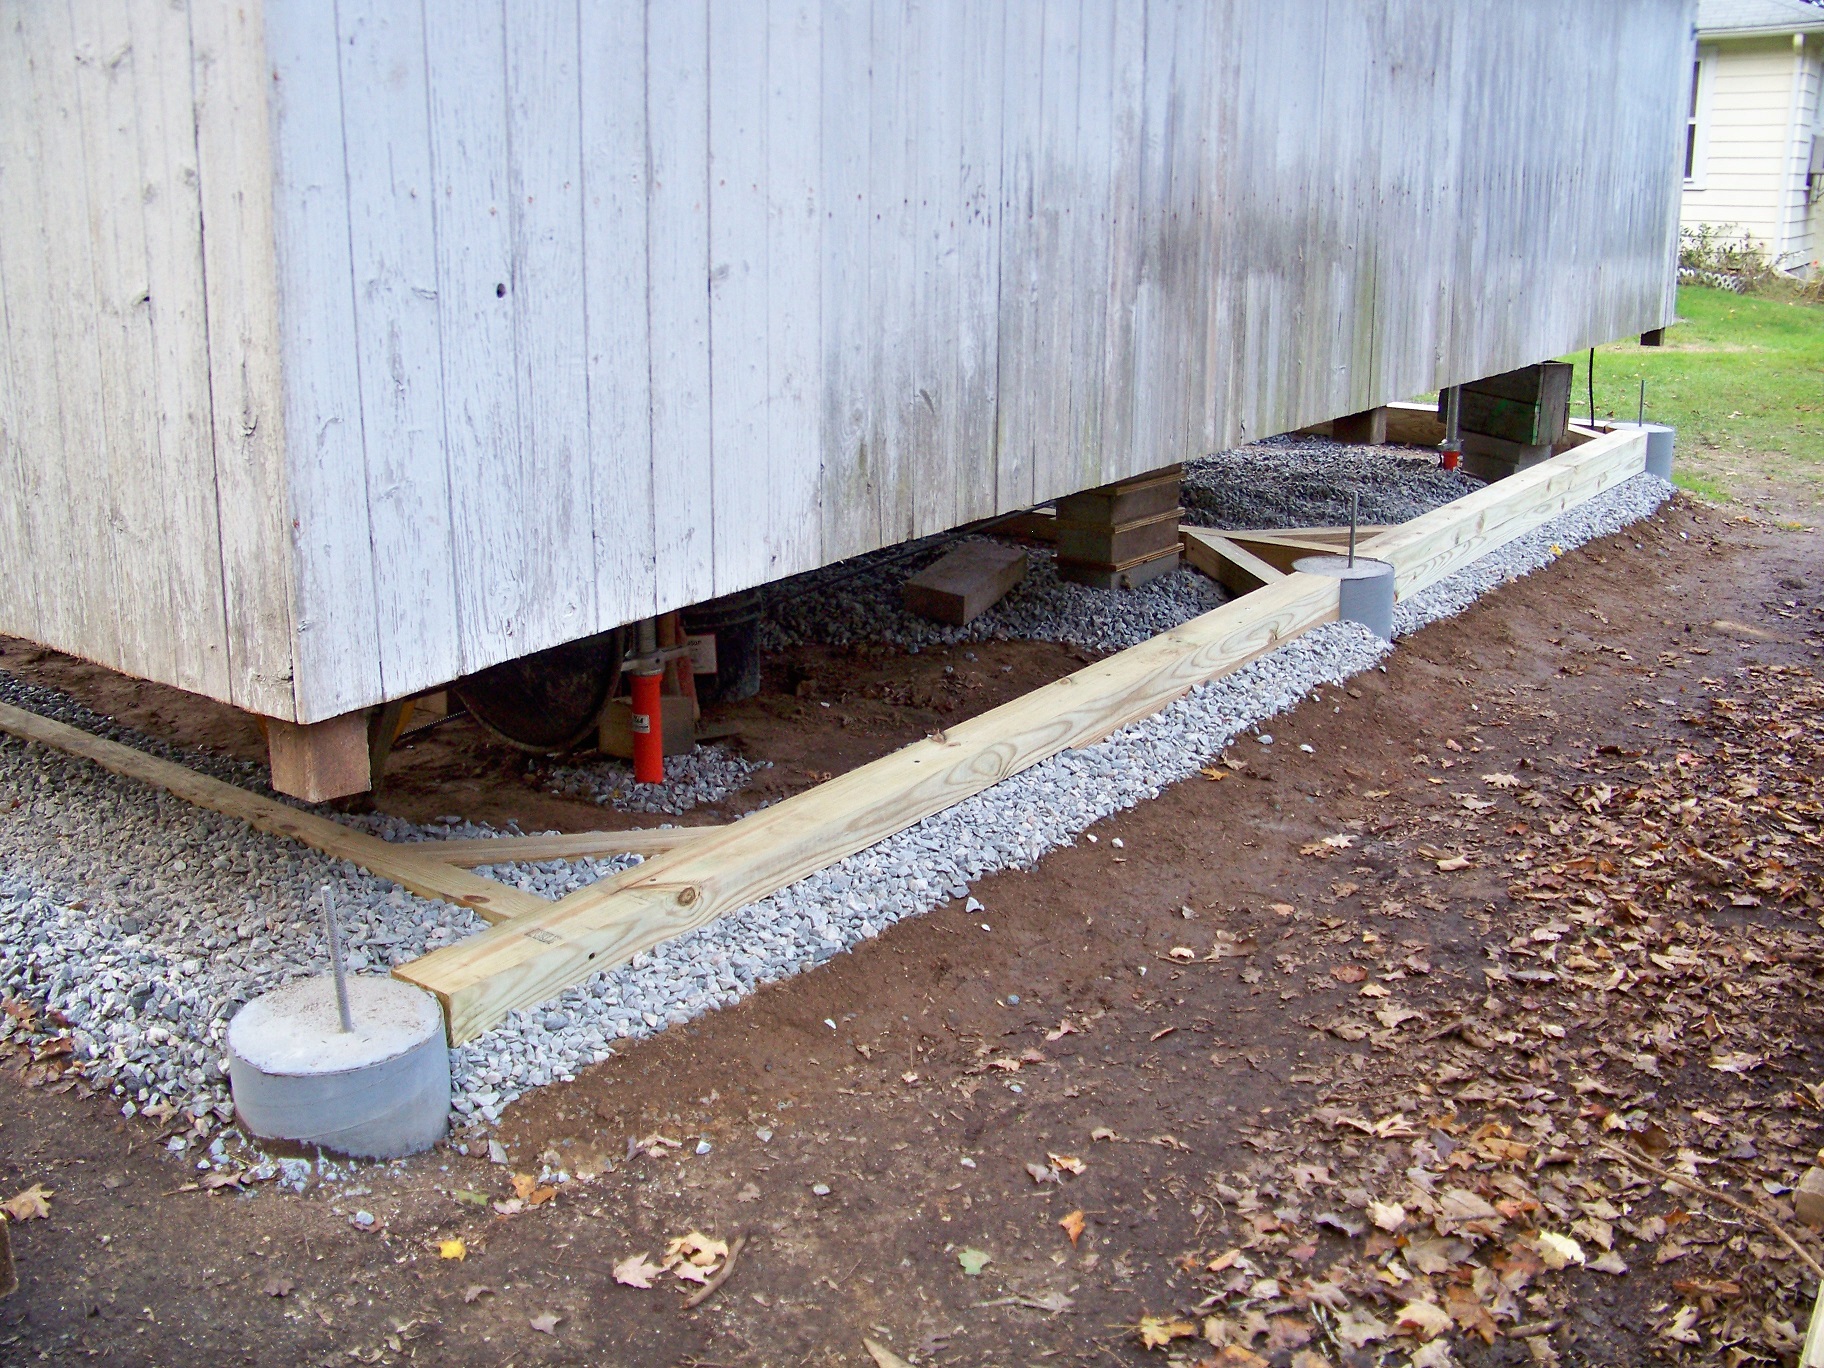
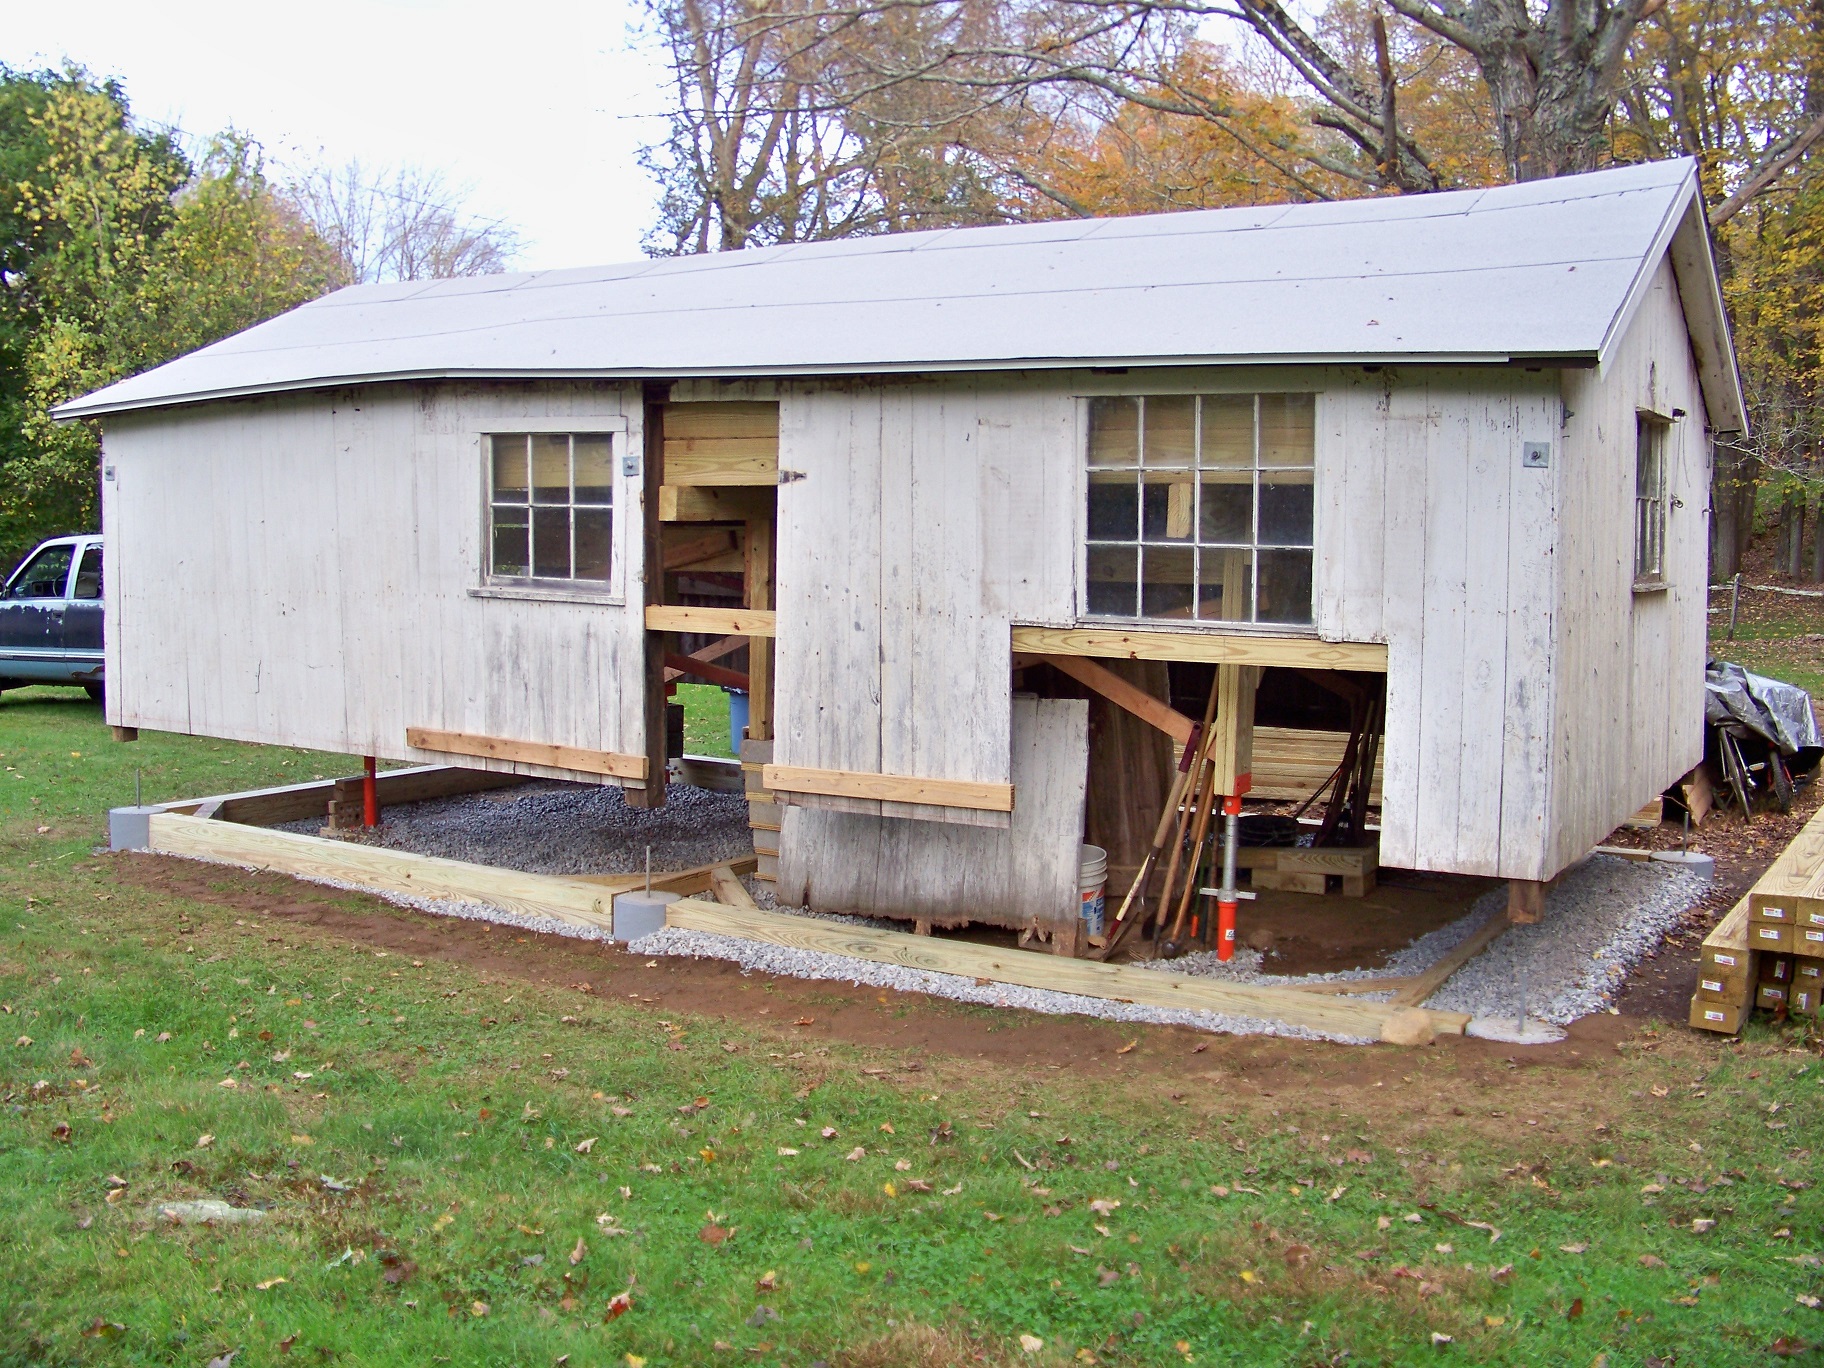
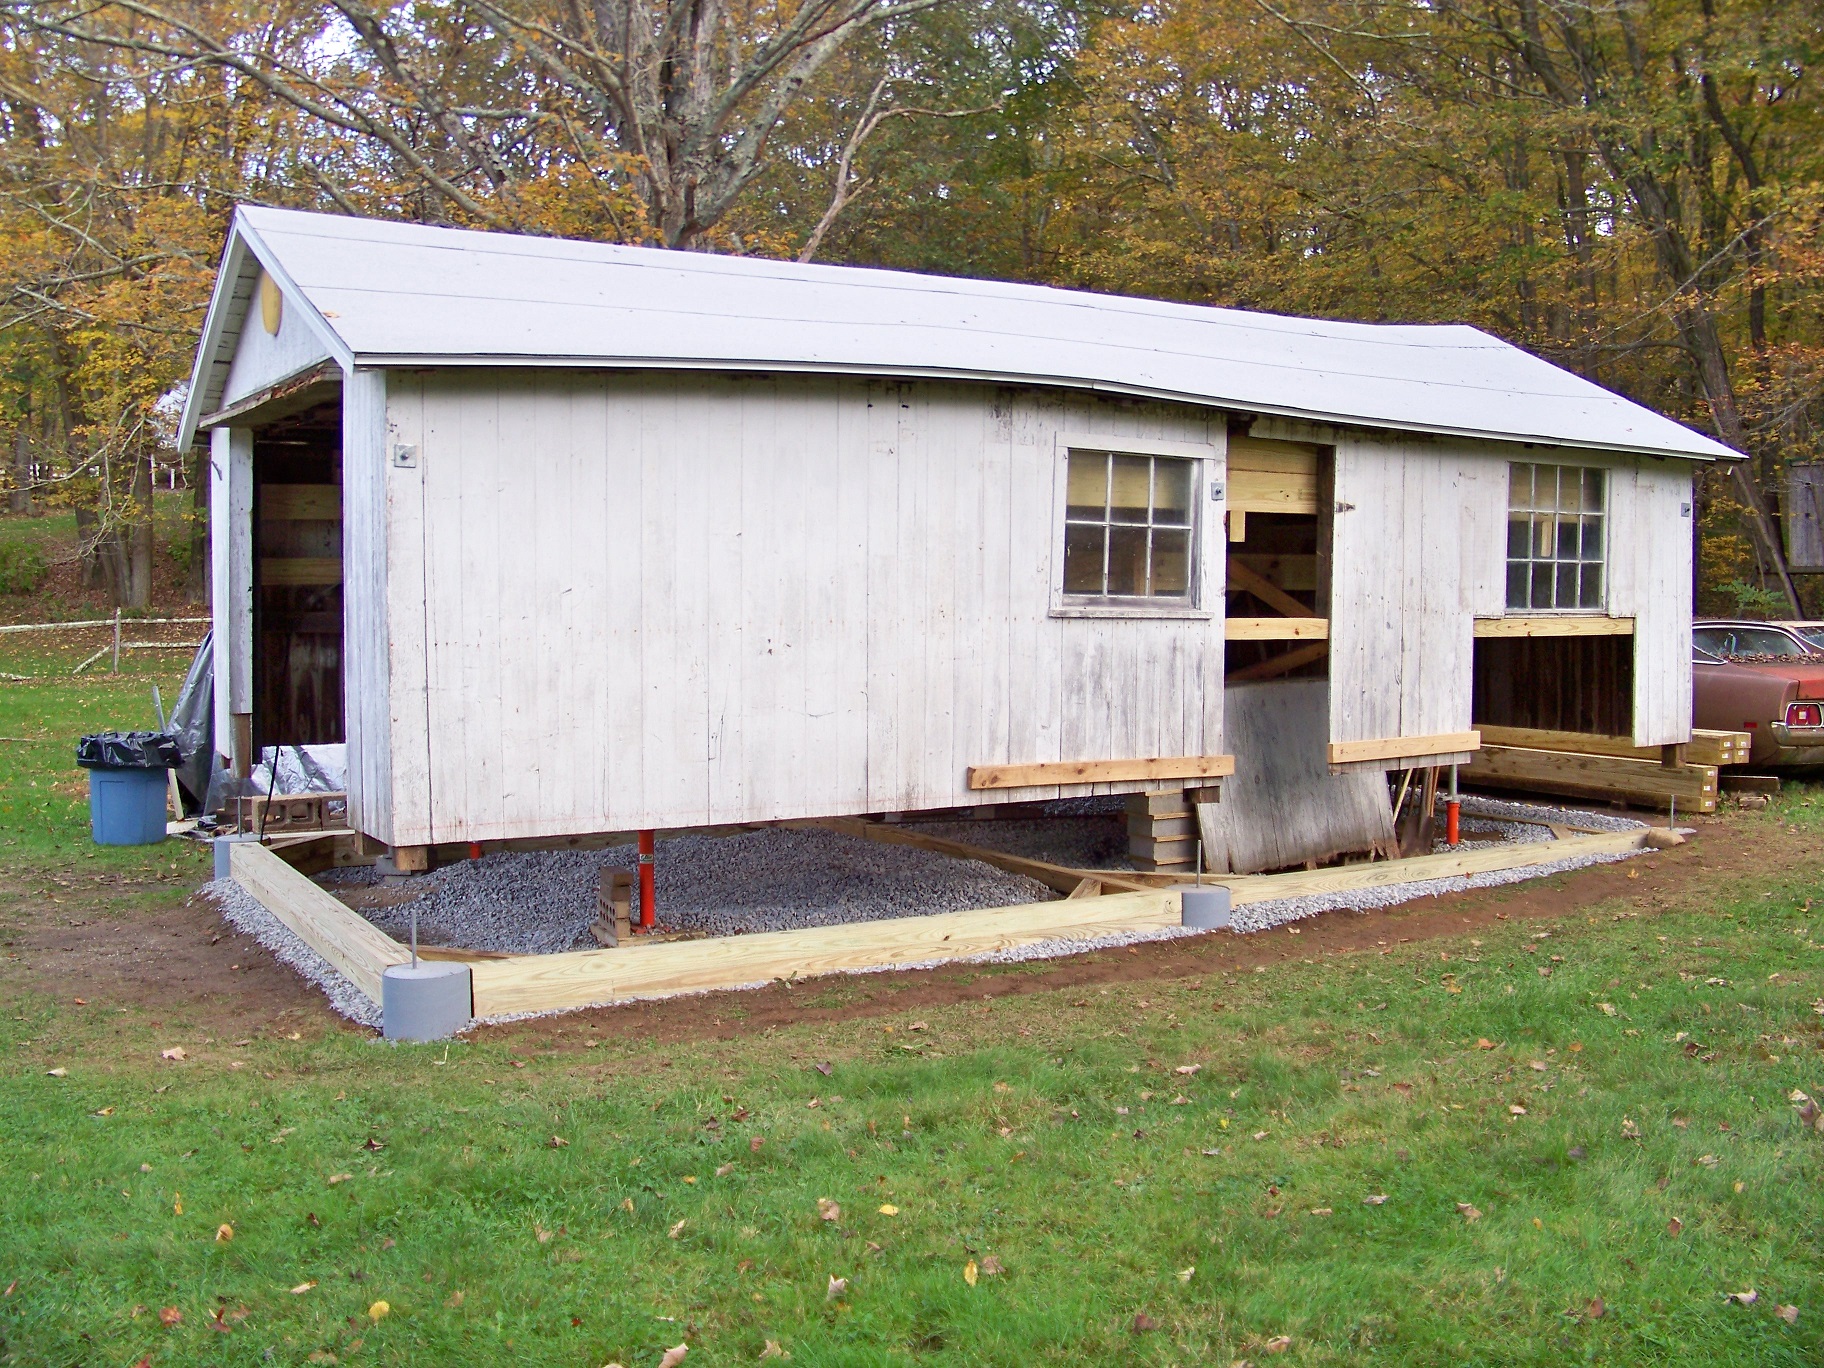
I think I've decided what I'm doing:

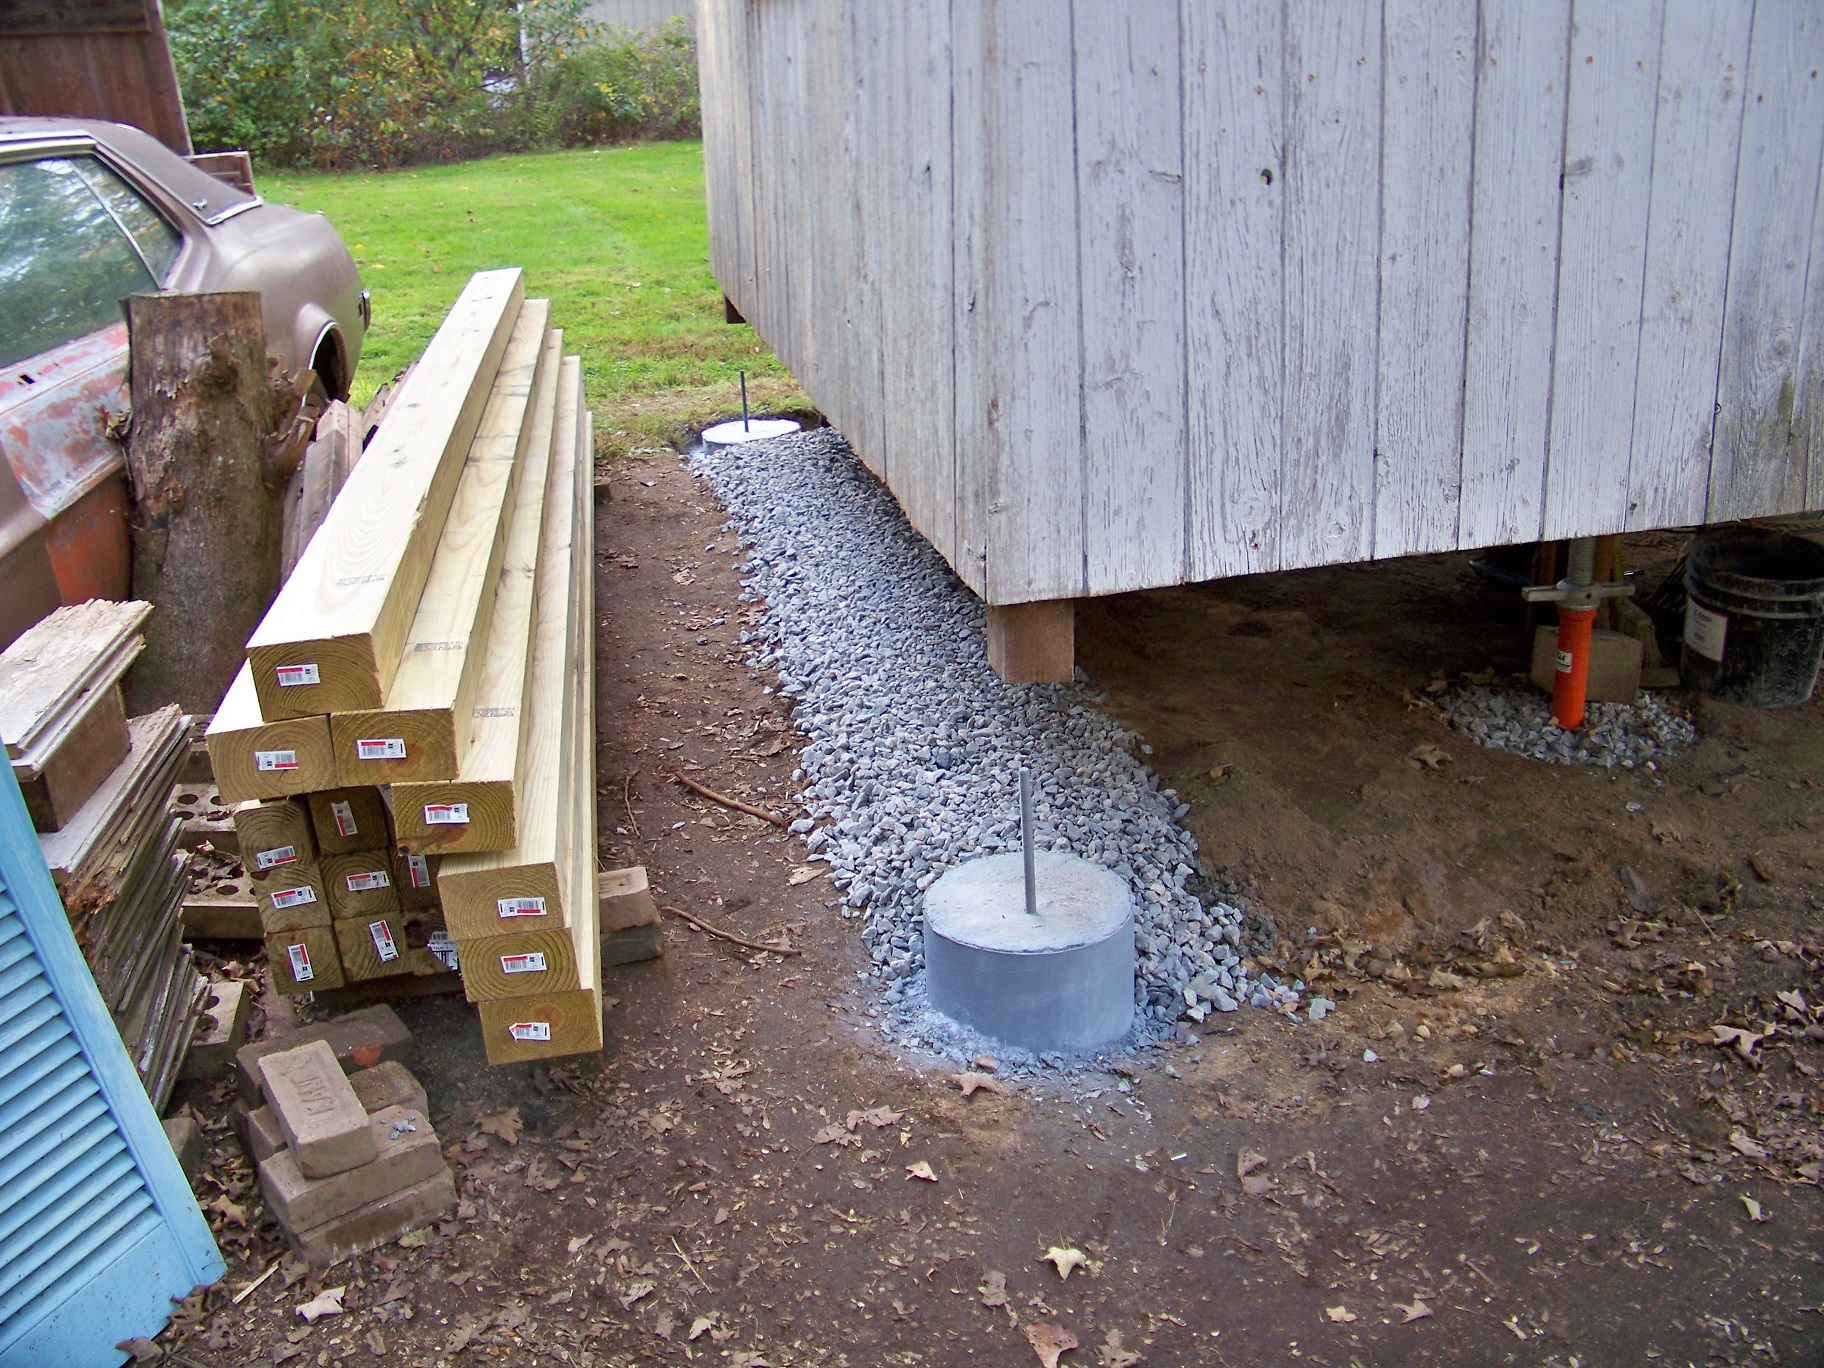
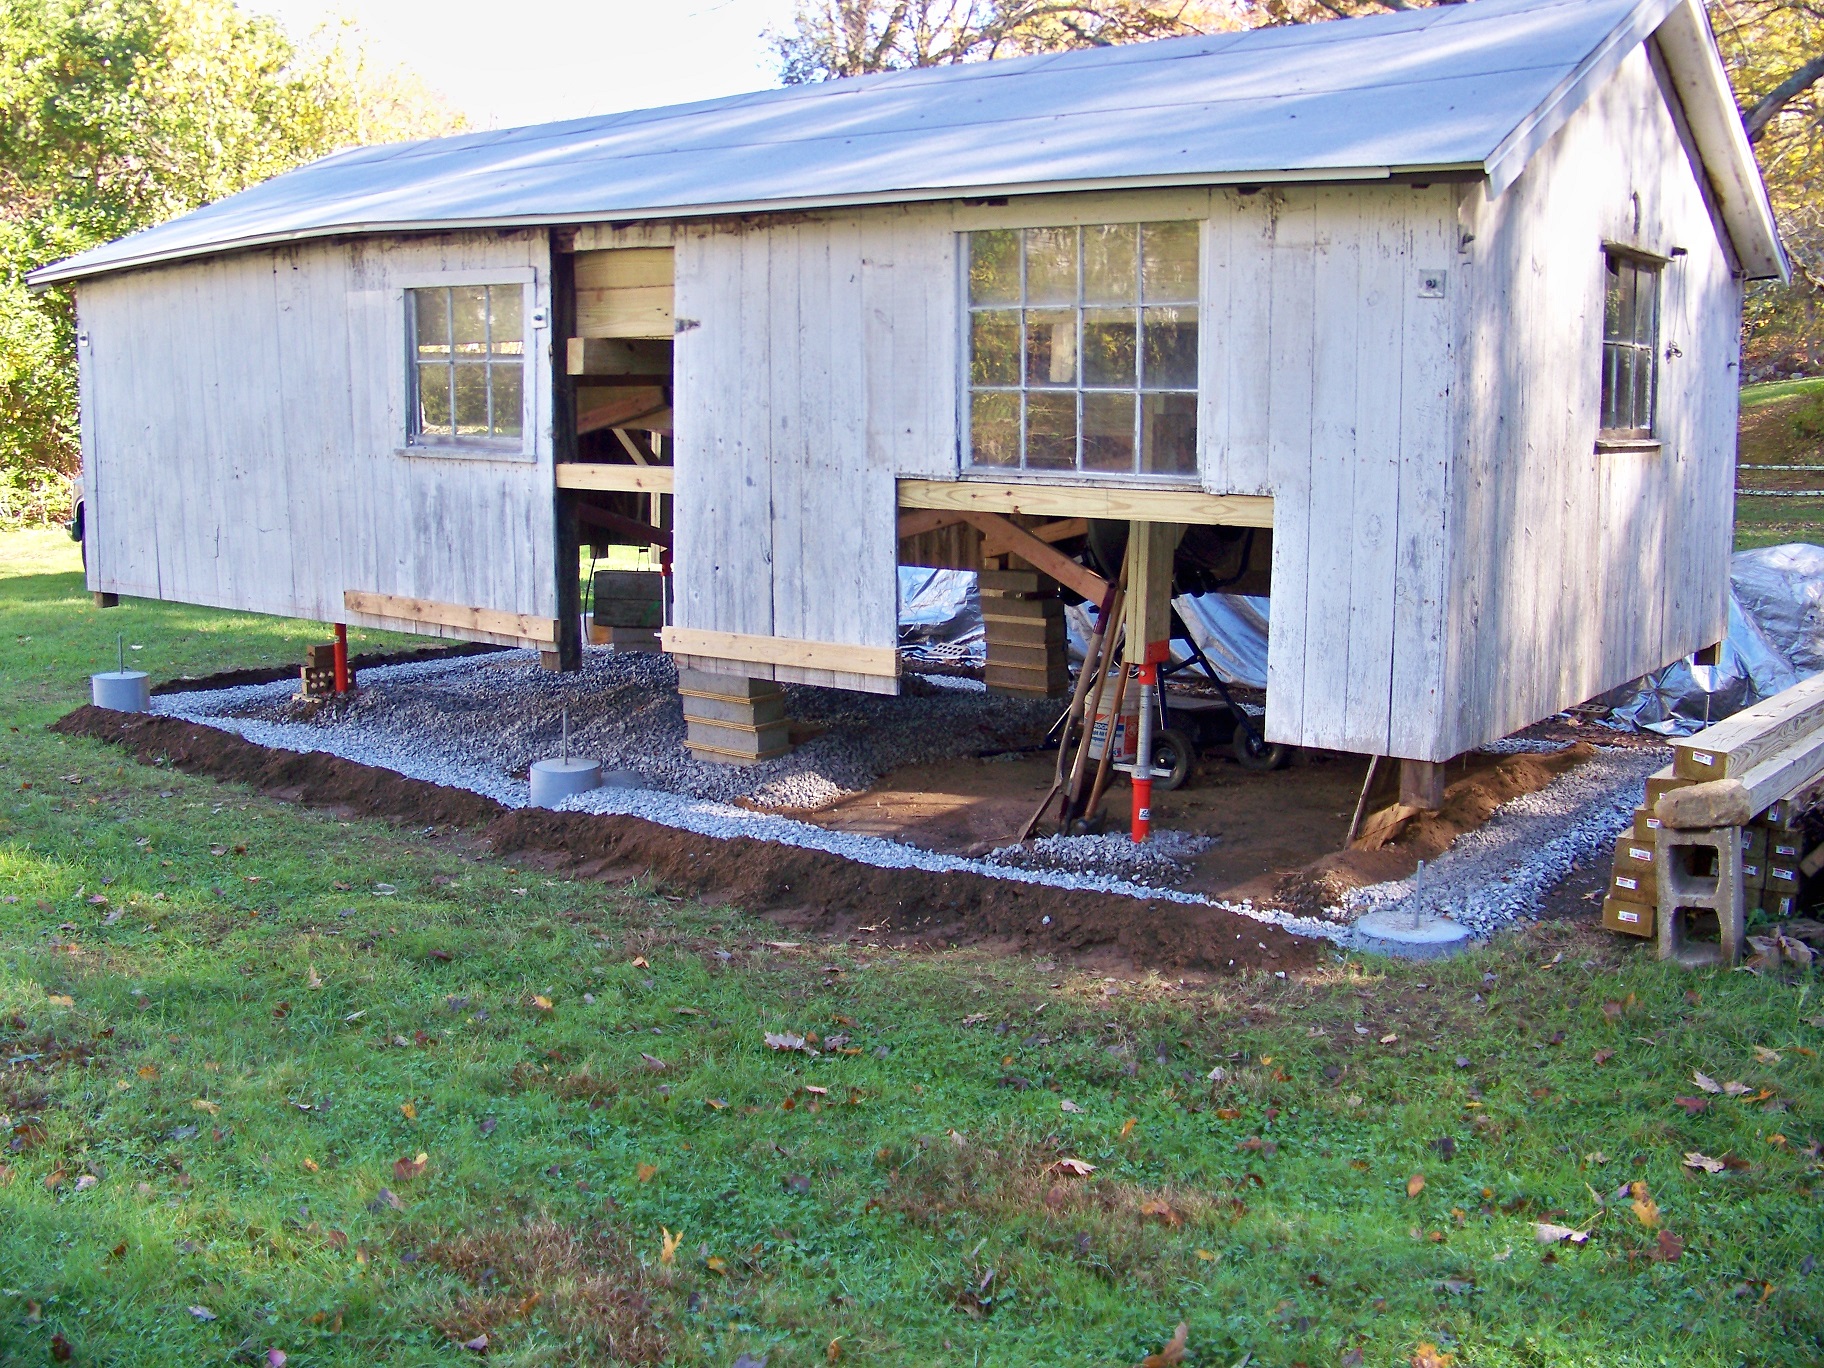
4x6 PT retaining wall between piers (laying on 6" side) with gravel base and rebar every 4 ft. None of the PT will be below grade.
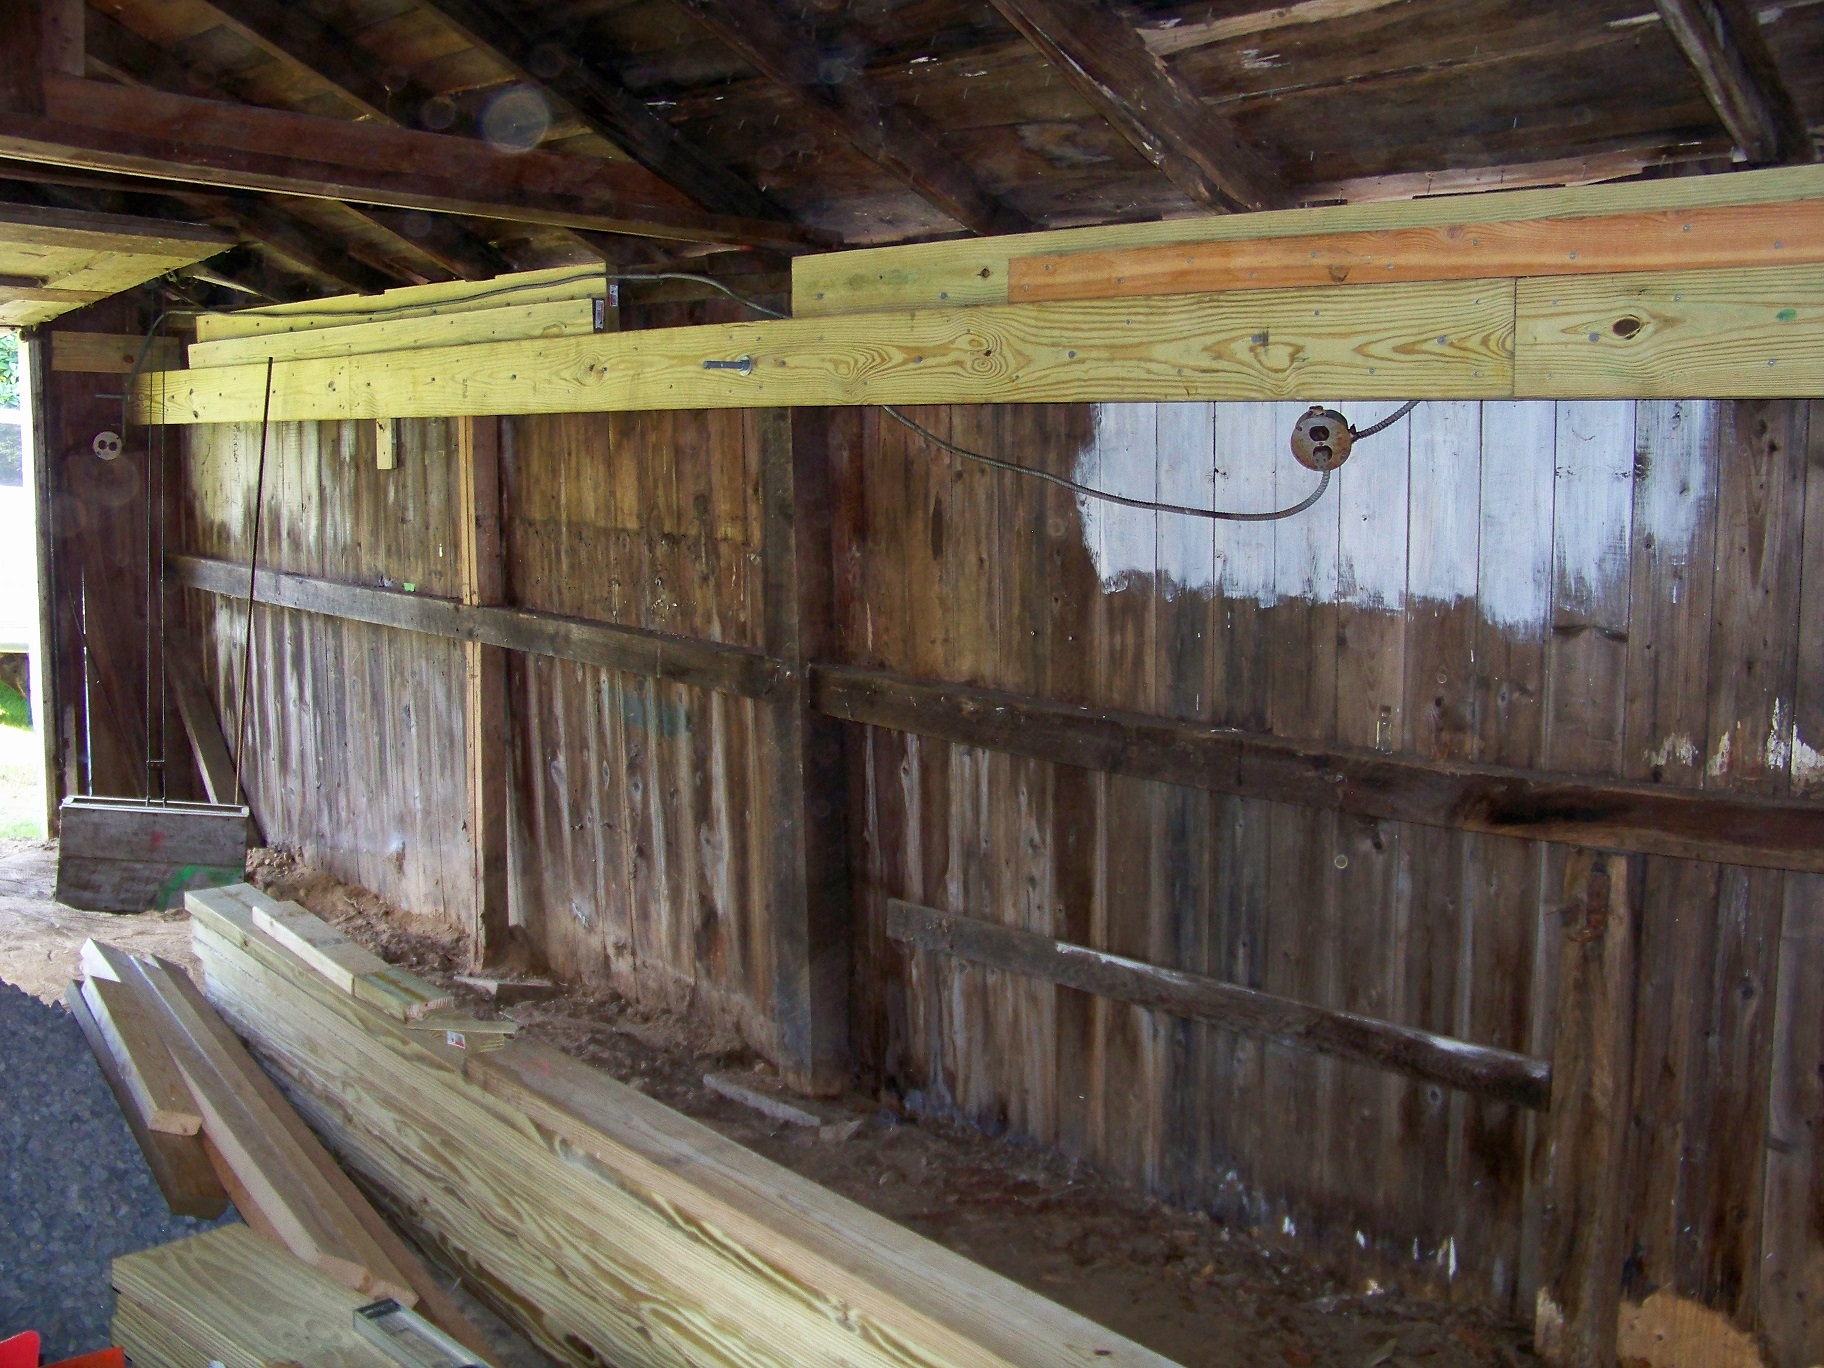
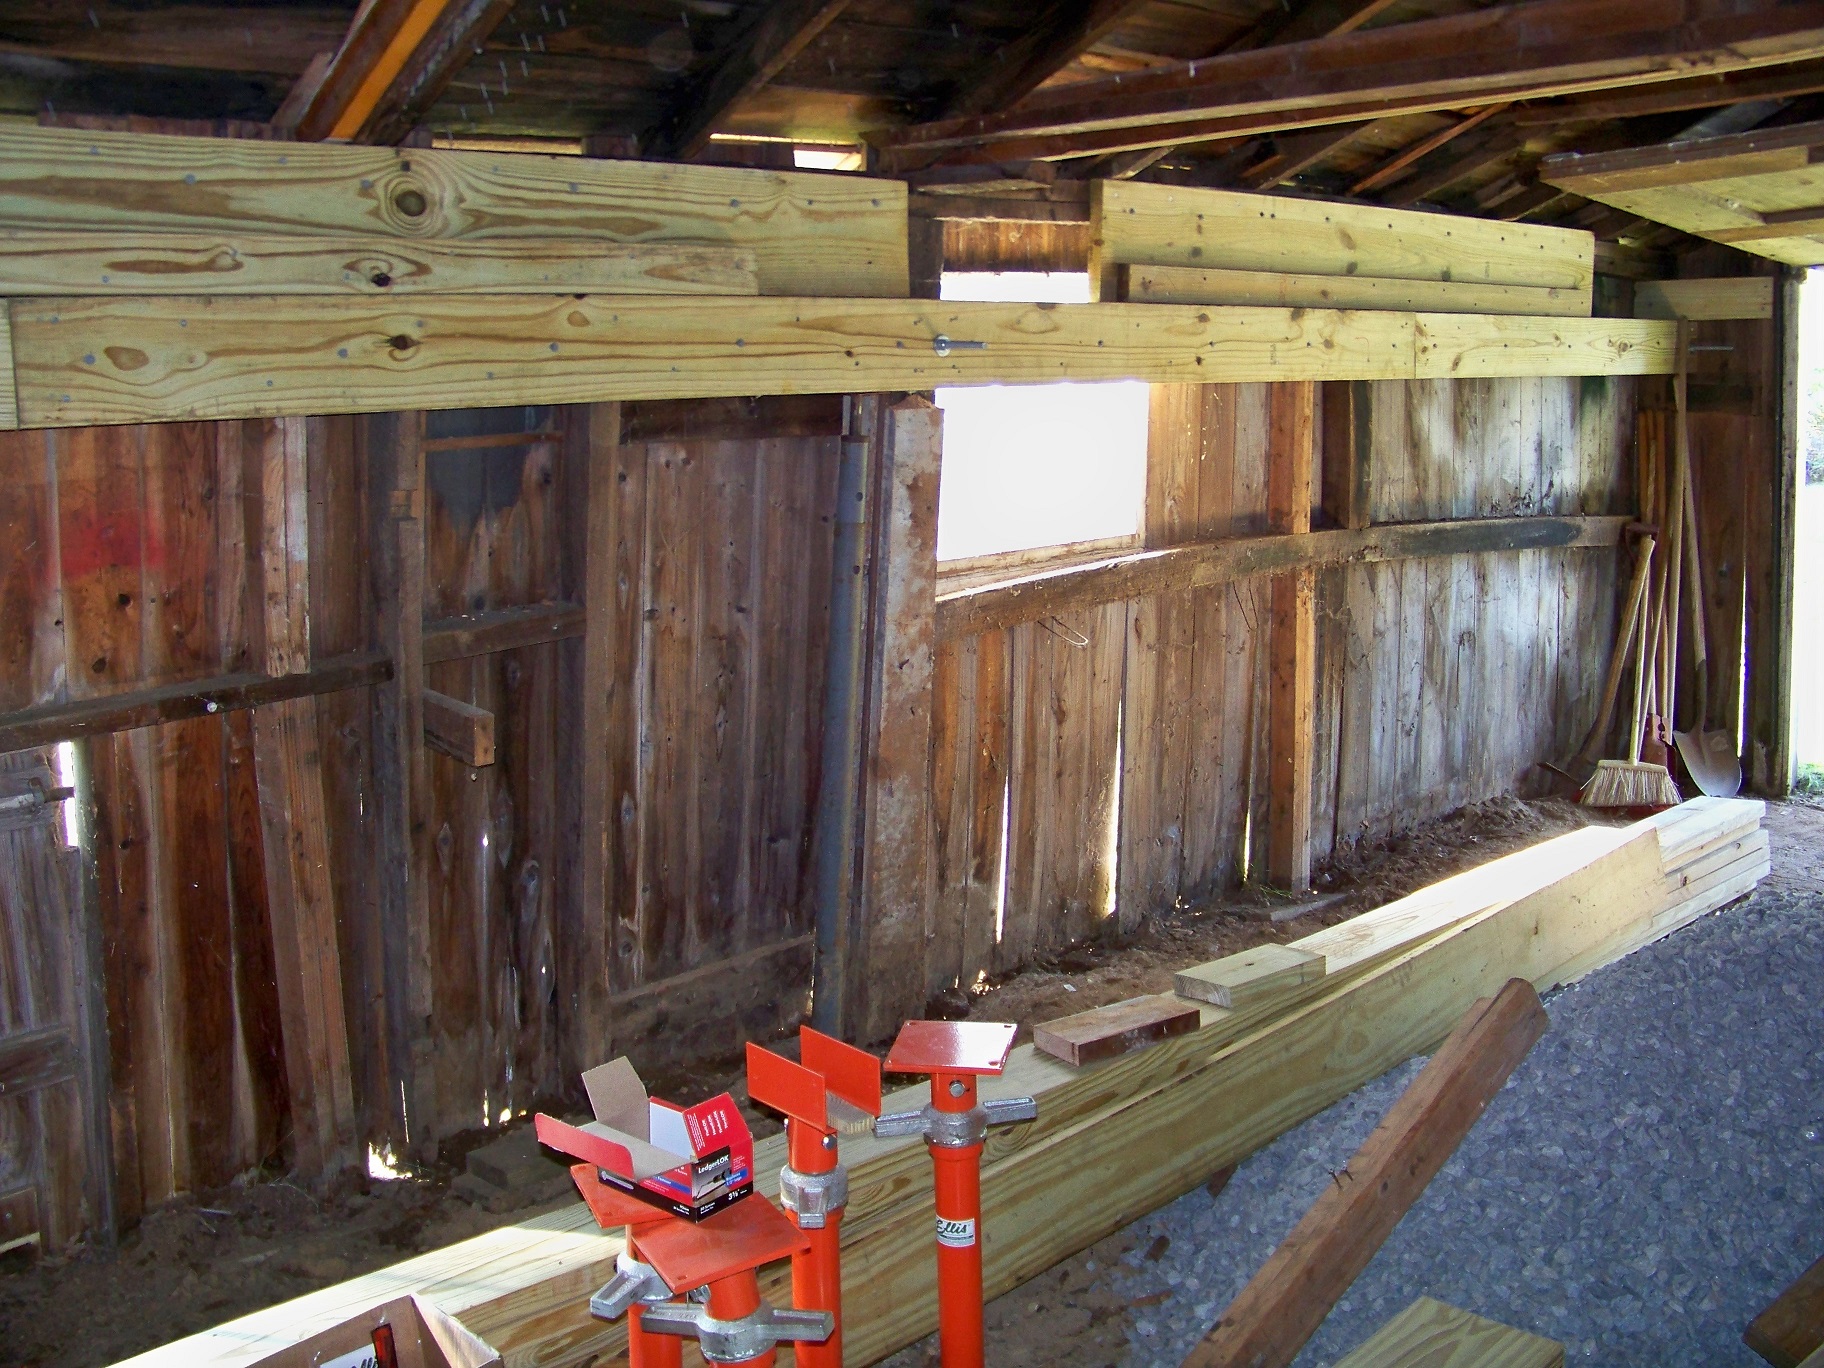
2x6 sill plate all 4 sides.
4x6 rim joist all 4 sides.
Fill with gravel and tamp.
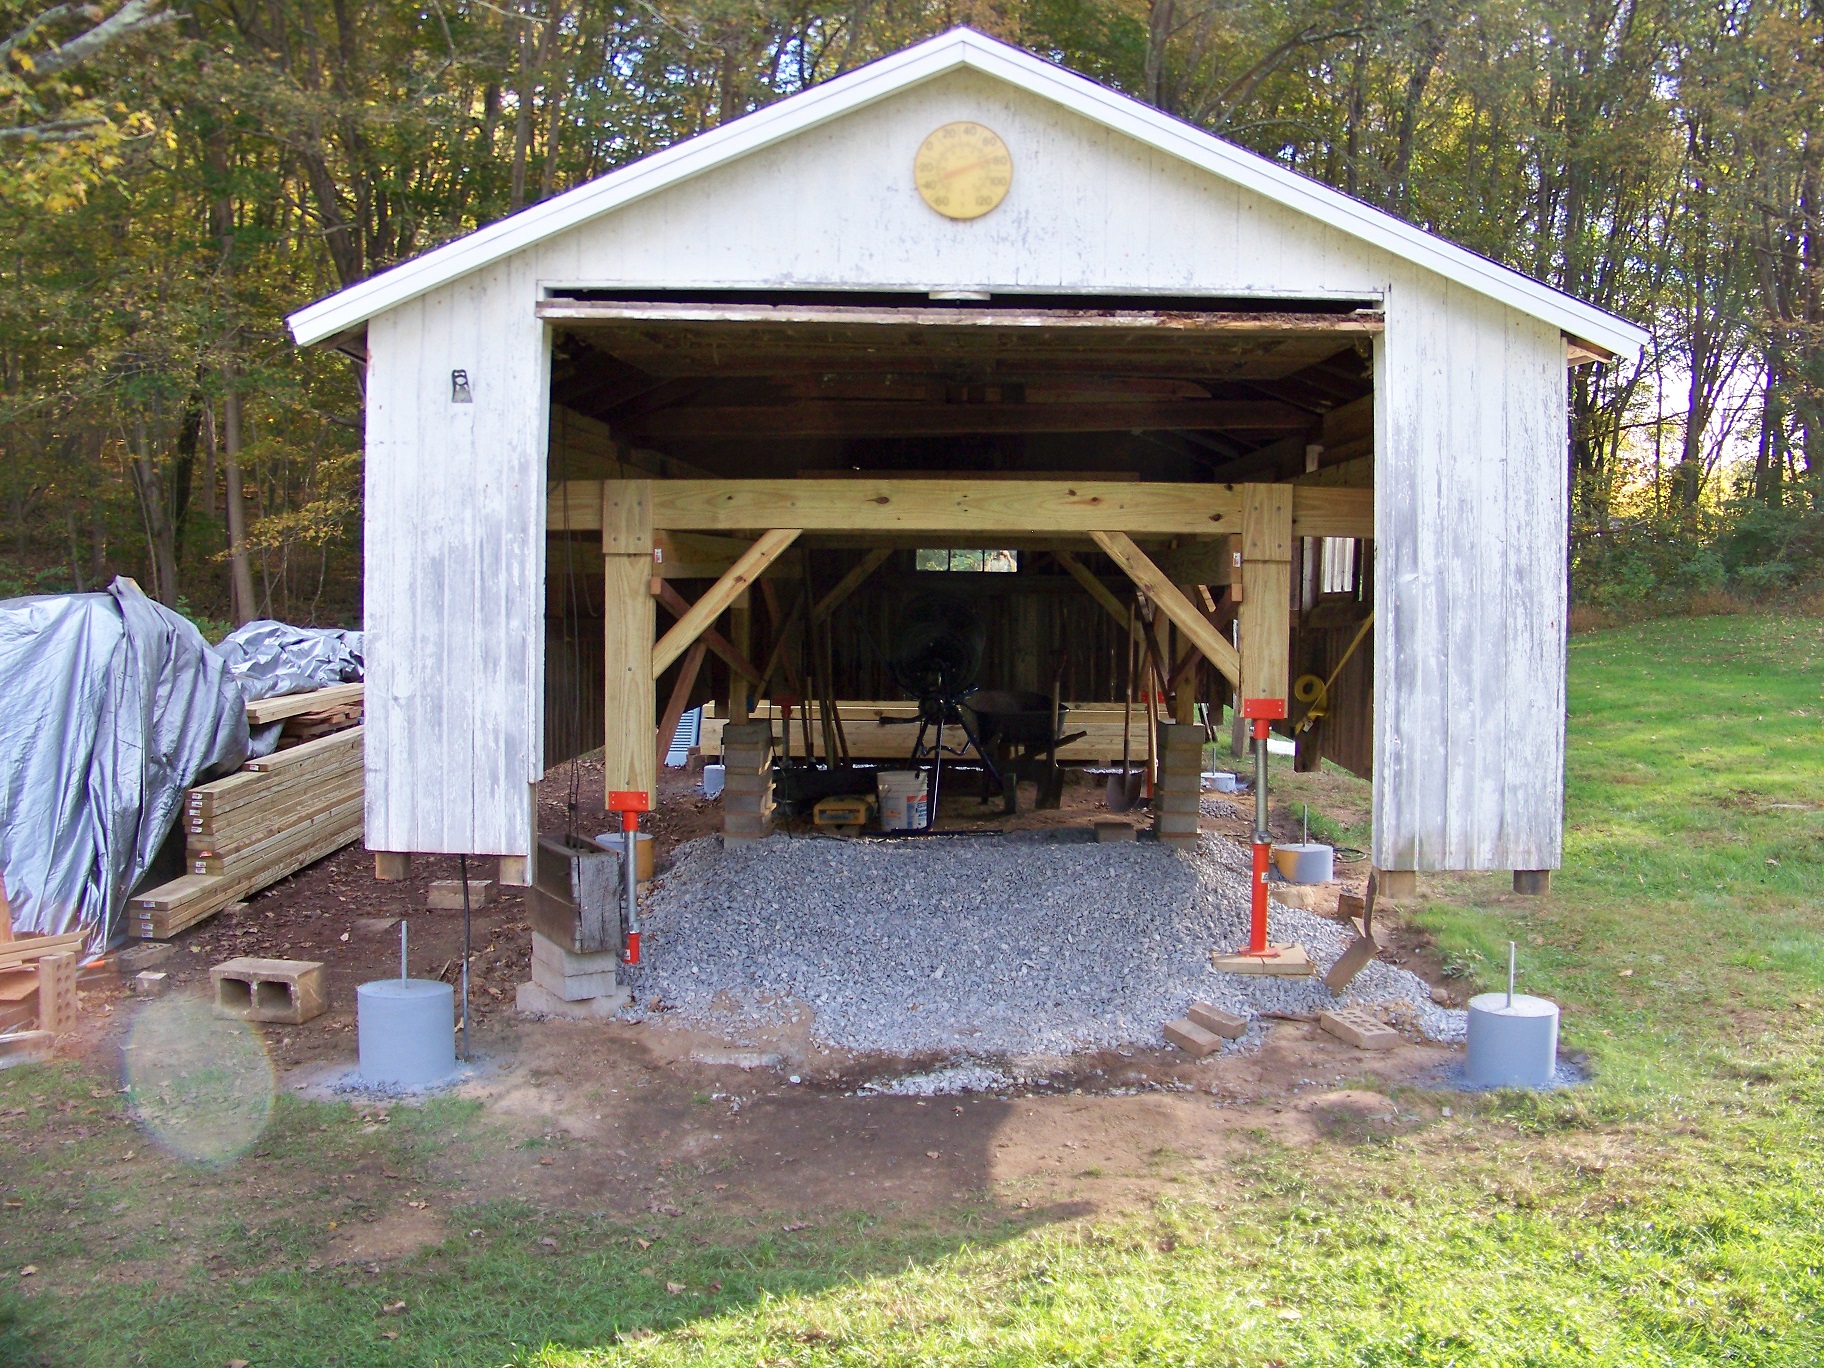
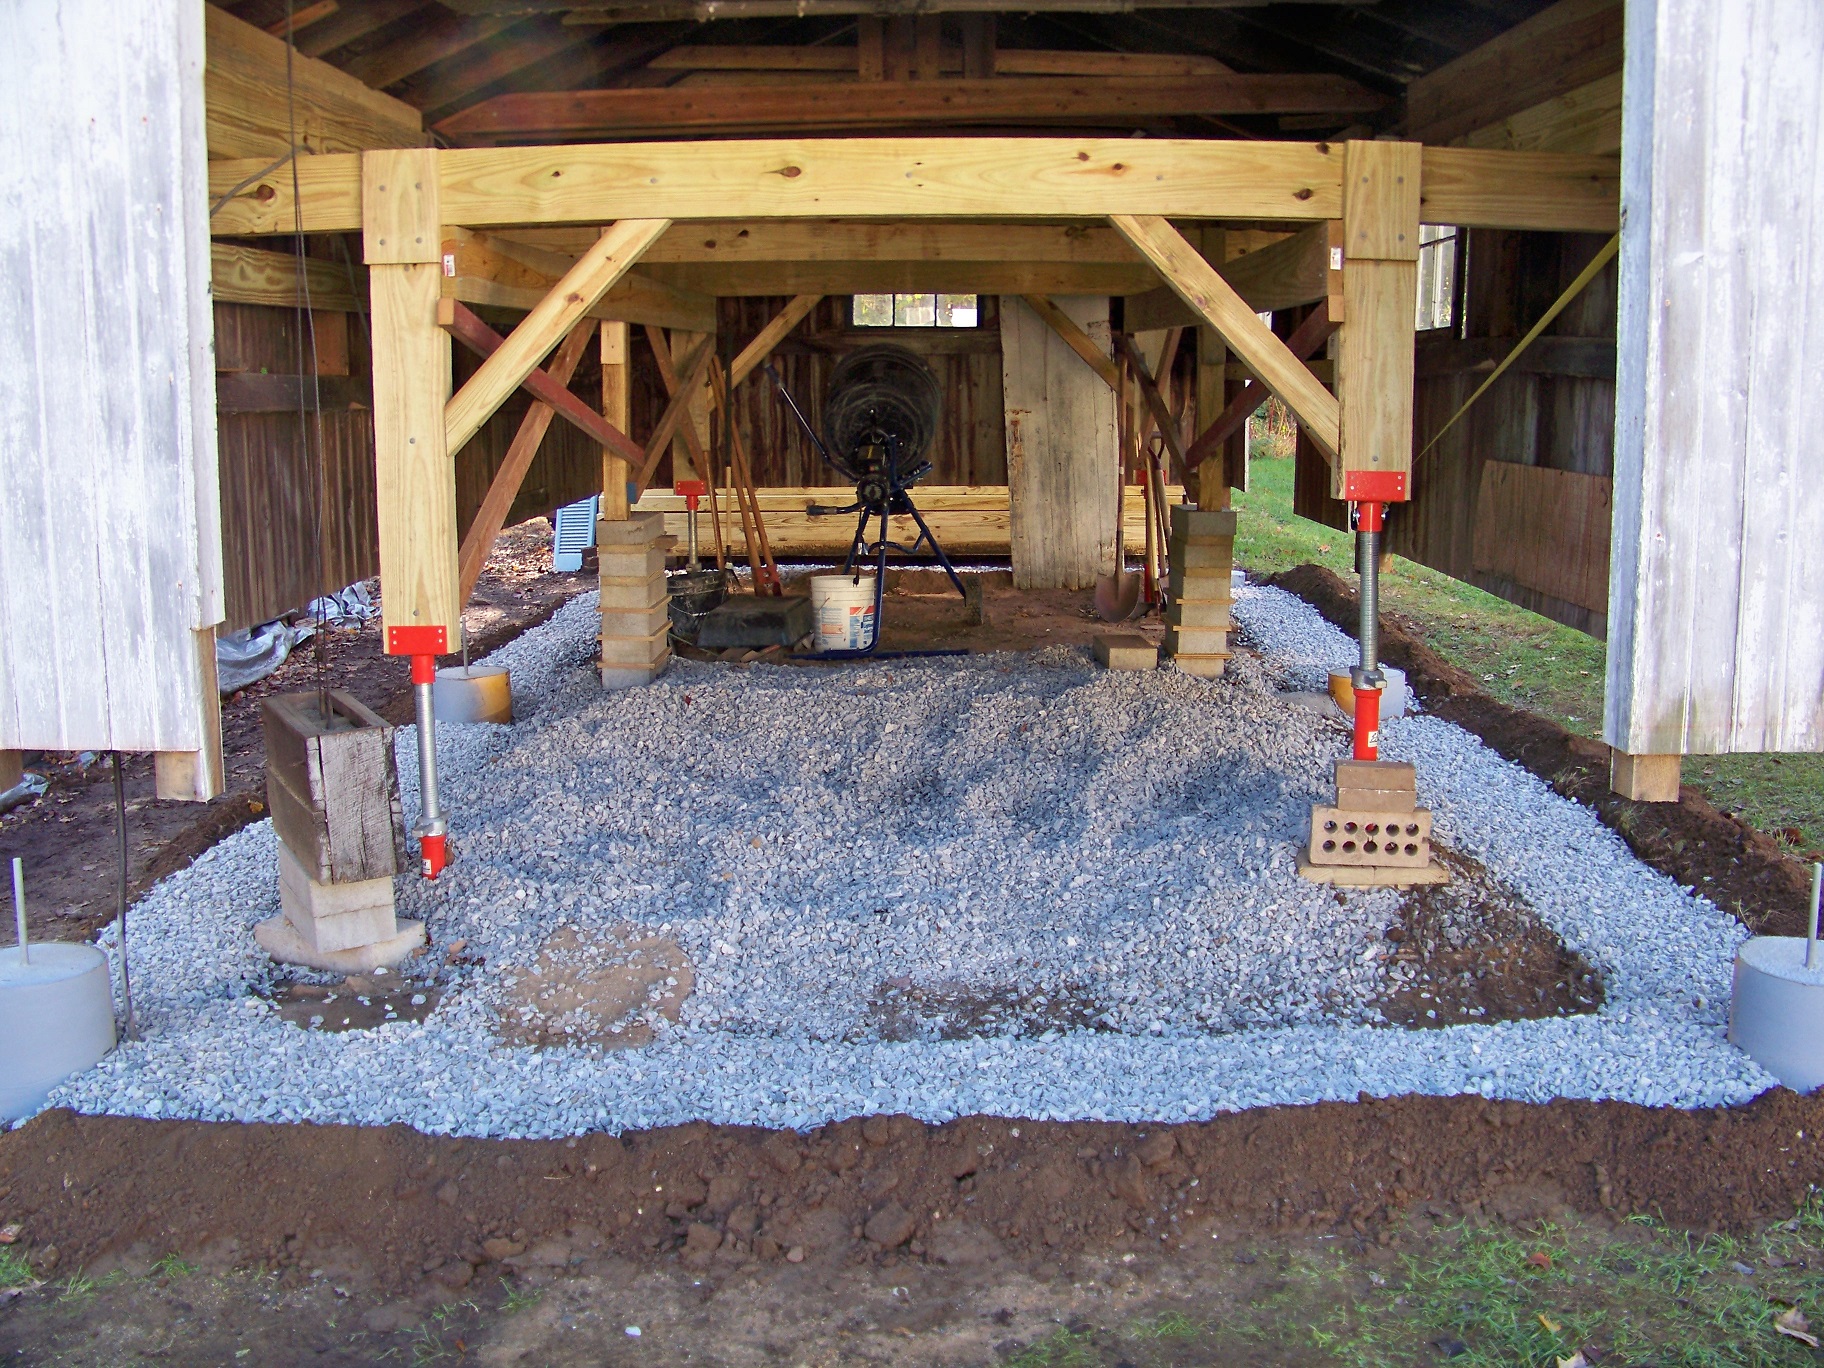
(2)4x6 beams with 2x8 footings (similar to what FMC1959 describes in post #161) dividing floor into three 8' x 12' sections for easy plywood install.
2x6 8' floor joists 16" OC parallel to walls.
3/4" PT plywood flooring.

RickP - Your Joist Span Calculator link is useful for someone with the experience to use it (not me). Is 92" an acceptable span for 2x6 joists at 16" OC?

I figured it out. 2x6 is no problem at 8ft.
 
Last edited:
OP
P

Platonic Solid

Well-known member
Joined
Nov 29, 2014
Messages
3,587
Location
CT-USA
Progress Pics:


Trenches dug and gravel tamped.


Each bottom 4x6 secured with 30" long 1/2" rebar, 4 each. Each 4x6 on top fastened with five 6" Timberloks.

 
To avoid these ads, REGISTER NOW!

m32825

Well-known member
Joined
Jul 26, 2015
Messages
1,009
Location
Central FL
I've been following this thread with interest since it started. Not because I'll ever do this, but because it inspires me. Thanks for sharing your project and keep up the good work!

-- Carl
 

sean Buick 76

Well-known member
Joined
May 7, 2013
Messages
3,221
Location
Edmonton Alberta
Fantastic! If you are going to drive a light vehicle on it then 16 inch on center would be OK but personally if it is just for walking around and no heavy equipment then I would do 24 on center. I have a shed with 3/4 inch plywood and 2x4 joists with 24 inch on center and it is fine.
 

bandlaw

Well-known member
Joined
Nov 23, 2016
Messages
48
Location
mid-North Carolina
Looking good!!! Love that you are pulling this off... I grew up on a large family dairy farm and this reminds me of one of our storage barns. Farm is still going and in the family, too. Good memories!


Sent from my iPad using Tapatalk
 

theoldwizard1

Well-known member
Joined
Feb 22, 2011
Messages
43,072
Location
SE MI
Looking back at some of the pics, there are some pretty good dips in the roof and along the top plate. Are those going to be resolved ?
 
OP
P

Platonic Solid

Well-known member
Joined
Nov 29, 2014
Messages
3,587
Location
CT-USA
theoldwizard1 - No, the dips are being preserved. Looking back at
Progress Pics: Post 67
you see above the full length sistered 2x8s where I attached various width 2xs to the top plate to keep the roof from moving. Note that each section required a different width board. From left to right & top to bottom: 2x8, 2x6, 2x10, 2x12.


I really want to be done with this project this year. Unfortunately, I'll likely have to wait till next spring to paint the exterior.
 
OP
P

Platonic Solid

Well-known member
Joined
Nov 29, 2014
Messages
3,587
Location
CT-USA
apollo11 - OMG No! I'll try to sum up the building supplies actually used at the end. As for hours, between travel time, shopping, R&D planning and actually building something = so far at least 240 hours. There's going to be a fair amount of lumber left once I disassemble the lifting frame and supports. Fortunately I have several projects at home that will use that up. I'm well over $2K in new toys/tools (Dewalt 12" cordless Miter saw w/stand, Cement mixer, Lifting Shores, ...), but that doesn’t count.
 
OP
P

Platonic Solid

Well-known member
Joined
Nov 29, 2014
Messages
3,587
Location
CT-USA
Last tool I purchased for this job was a last minute $20 Harbor Freight angle grinder. I must be missing some adapter for my old Craftsman as I couldn't get the Rigid 4.5 Metal Cutting Diamond blade to fit. Cutting rebar was a breeze with this blade.

 
OP
P

Platonic Solid

Well-known member
Joined
Nov 29, 2014
Messages
3,587
Location
CT-USA
DieselNut88 - That makes sense now. I found a small ring on the ground later that day that I wasn't sure where it came from. Thanks.

Stressing out a little at the moment. 4" of rain and winds up to 70MPH over the next 6 hours. I guess I'll find out how sturdy my lifting frame is.
 
OP
P

Platonic Solid

Well-known member
Joined
Nov 29, 2014
Messages
3,587
Location
CT-USA
Original plan was to throw some roll roofing on and call it done. I laugh at myself now, when I look back at my original roofing thread with statement like: “If I wanted to spend real money on it, I’d bring in a dumpster and replace the whole thing.” and “I'm looking to get in and out quickly.”


80 Year old 12x24 detached garage roof repair

(image linked to larger image)

I didn't decide to go this route until I figured out why the garage door wouldn't open all the way: due to the relationship between the sinking garage - the free floating wood floor - and the counter weight. I kept hitting my head on the garage door and I didn't want to undo all the work I'd already done to fix the roof.

Currently much of the state has no power with lots of road closures due to last nights storm. I'm running on a generator waiting for a little daylight to see what things look like. I won't know about the status of the garage at the other property until I go there this afternoon to look.
 
Last edited:

Williamtell

Banned
Joined
Aug 4, 2016
Messages
555
Location
OKC Area
Interesting project.

With the amount of time, effort and energy I can't help but wonder why you didnt take apart the shed, move the usable panels and lumber to the side, put down rock, build new frame, and reuse usable panels / wood?

I get the novelty of raising it as all one piece, but it just seems like added complexity in something that has a rock floor and 4 sides.

No disrespect intended.
 
OP
P

Platonic Solid

Well-known member
Joined
Nov 29, 2014
Messages
3,587
Location
CT-USA
Williamtell - It will have a plywood floor. The gravel is there as a better base for the structure and to keep critters out. This will still be quite a bit cheaper than building new and my property taxes won't go up, plus there's the challenge factor.

All - Should I have put plastic sheeting or some kind of moisture barrier under the gravel?
 

bandlaw

Well-known member
Joined
Nov 23, 2016
Messages
48
Location
mid-North Carolina
Definitely no on plastic sheeting - otherwise you would have a gravel pool of water gets in. Water (what little bit may get in) should drain nicely under the gravel helping keep it dry. Sorry to hear about the power and such ... glad you and ours are safe and we’ll be thinking of y’all as you assess. Part of my neck of the woods has been closed for a week due to some pretty ugly tornadoes that came through my hometown area. Nasty stuff and a lot of damage done. Fortunately very few fatalities though.


Sent from my iPhone using Tapatalk
 
OP
P

Platonic Solid

Well-known member
Joined
Nov 29, 2014
Messages
3,587
Location
CT-USA
Thank you bandlaw. Tornadoes, now there's a nasty weather item to deal with. I just got an email from my tenant letting me know that there is no property damage and everything is as I left it. That's a relief.

I can always drill some ventilation holes if need be. Naturally that would need to be critter-resistant.
 
Last edited:

ahazi

Well-known member
Joined
Jan 4, 2015
Messages
55
Location
Los Angeles, CA
All - Should I have put plastic sheeting or some kind of moisture barrier under the gravel?

In a typical poured concrete floor the moisture barrier is on top of the gravel to insulate from water/vapour coming from underneath and block capillary absorption into the concrete. The material used is heavy 15 mil roll (expensive) that is puncture resistant from the sharp gravel.

I used this material

And here is another source

I think that even if you don't have concrete floor you need to block/control the moisture coming from below.

Ariel
 
To avoid these ads, REGISTER NOW!
Top Bottom