To avoid these ads, REGISTER NOW!

Saylor-Beall Rebuild

Todd.Brock

Well-known member
Joined
Jul 15, 2008
Messages
4,250
Location
Cincinnati
Impatiently waiting to see what the machine shop did! I love this thread !! The paint in the tank looked pretty good, I would get all the grime off gently and see what you have to work with before scuffing and shooting the tank. That is Pandora's box at that point. If 99% of the tank looks that good, just leave it. Unless you really want to paint it. The front of my Champion is nicked and scratched, but its not enough to make me do anything about it. Looks awesome though!!!
 
To avoid these ads, REGISTER NOW!

rodm1

Well-known member
Joined
Feb 17, 2008
Messages
2,270
I wonder where the paint code originated from?

That is the code from a can of touch up directly from SB. I'm probable the originator or one of them? My auto paint store has no listing for that and must scan a sample. I believe there are a total of 3 paint codes to date. RAABE won't even sell me any I've tried.

That sample has flake in it and very hard to spray out of a rattle can.

If anyone has a mix for Rust-Oleum that is close or a how to I'm interested.
 
OP
J

jonathan75

Well-known member
Joined
Mar 27, 2013
Messages
1,451
Location
NC
If you talk to your local auto paint store they might be able to mix paint and put it in rattle cans for you, I know they do it here. It will take alot of cans and probably would be cheaper to just take it to a body shop when it's prepped and have them spray it for you.

I was thinking about getting it painted after I prep it but it is so heavy and hard to move. I wonder if there is a mobile paint guy that comes to you?

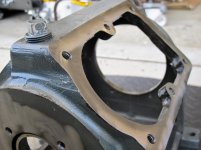
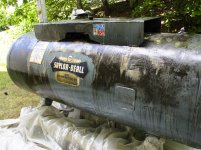
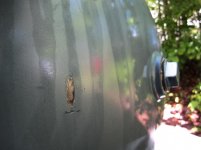
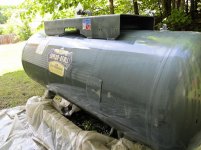
From the paint you have exposed the unit doesn't look scratched up, the sticker doesn't look like it is pealing or all nicked up...

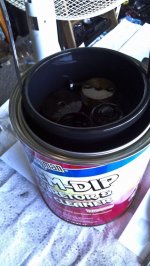
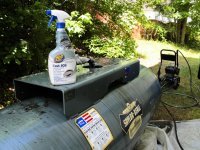
I would take care when I pressure wash not to spray any stickers. Honestly I would roll it out back, soak it down with some purple power or simple green real good, use a microfiber towel or soft brush to agitate it rinse, and repeat.

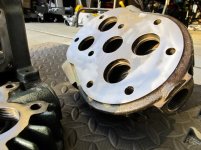
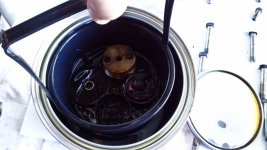
Don't repaint everything unless it is really that bad, original paint and stickers on old stuff is way more cool then new paint and new stickers. Honestly all the oil all over it currently is a blessing because it has preserved everything well from what I can see.

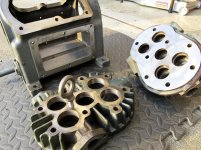
I say clean everything really really good, and maybe paint only the pump. Also if you have automotive paint mixed figure out a way to bring a part with good factory paint on it even if that means loading up the whole tank and bringing it with you. Any person good a mixing paint can match that paint perfect with out the need of a sample or anything. That way your newly rebuilt pump will look like it was never repainted....

One more thing, if you do end up repainting which it is yours so that's up to you. Please don't use rattle cans, rattle can paint is not very good quality it won't last and will be more crappy looking then the paint that is on it. Go to an auto paint supplier and get it mixed, there are cheap lines out there like Nason that are still very good quality paints. If you take my advise and just paint the pump, you can have them mix the paint and put it in spray cans or buy refillable spray cans online, but for large objects such as the tank they won't work very well because the paint will flash to quickly.

Wow my short comment turned into a book, maybe I feel stronger about all of this then I thought :)

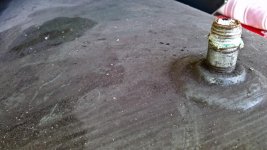
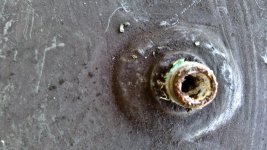
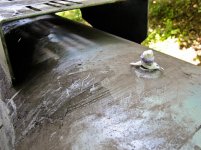
Edit: Also if you do have minor scratches on the tank you could polish them out most likely keeping it original but look new just take your time so you don't wear through the paint.

Some parts I cleaned some oil dripped down and etched the paint with streaks that won't come out. I think the posts with those pictures are on the third page or so. Also there are some big scratches on the sides and some with a little rust. The stickers faded and the instruction sticker is coming up. But I will see how everything looks after I wash it down. I hope to do that tomorrow.

Heres one of the pump,I mixed and matched the paint myself. I will put up more next week,gotta hit the road now.

Good job matching it. Looks great!

^^^ I have to agree... Try cleaning the tank off first and see how it looks, from the spots you cleaned it looks almost brand new. A little age gives it character, so long as there aren't any rust spots.

If you pressure wash it, like mayday said, be careful around the stickers. I would also recommend just use some simple green and wipe clean around the stickers.

I pulled my dad's old Quincy out from under his workbench last year, it was probably sitting there for 30+ years and was covered with so much gunk I couldn't tell what color it was. After pressure washing the whole thing the tank and pump looked brand spanking new. Only casualty was the stickers broke up into little pieces. But since you can't see them anyhow under the workbench not a big deal. Also got its first oil & belt change in 30+ years... lol... Thank god it was a pressure lube model, still had some oil in it.... One of these days I'm going to give it a complete rebuild.... It's on my to-do list...

I do have a few rust spots. Looking forward to seeing your rebuild.

Personally I'd take some Goo-Gone to the sticker and dissolve the adhesive, then scan it in high resolution and restore the original decal,. Pretty simple, hell you could even do it on paint.NET, don't even need Photoshop. I restore my CD covers that way when I rip them all to digital.

What do I do with it after I scan it? Take it locally to be made or is there someplace online you recommend?
 
OP
J

jonathan75

Well-known member
Joined
Mar 27, 2013
Messages
1,451
Location
NC
That is the code from a can of touch up directly from SB. I'm probable the originator or one of them? My auto paint store has no listing for that and must scan a sample. I believe there are a total of 3 paint codes to date. RAABE won't even sell me any I've tried.

That sample has flake in it and very hard to spray out of a rattle can.

If anyone has a mix for Rust-Oleum that is close or a how to I'm interested.

I think I am going to get the gallon from Saylor Beall and use that. The paint they use is very good quality.
 
OP
J

jonathan75

Well-known member
Joined
Mar 27, 2013
Messages
1,451
Location
NC
Impatiently waiting to see what the machine shop did! I love this thread !! The paint in the tank looked pretty good, I would get all the grime off gently and see what you have to work with before scuffing and shooting the tank. That is Pandora's box at that point. If 99% of the tank looks that good, just leave it. Unless you really want to paint it. The front of my Champion is nicked and scratched, but its not enough to make me do anything about it. Looks awesome though!!!

Wait no longer, here is the trip back from the machine shop. They did a great job. I loaded up the trunk but the crankshaft got a special smooth ride in the back seat.
 

Attachments

  • DSC_1528-1.jpg
    DSC_1528-1.jpg
    75.5 KB · Views: 275
  • DSC_1529-1.jpg
    DSC_1529-1.jpg
    79.6 KB · Views: 317
  • DSC_1530-1.jpg
    DSC_1530-1.jpg
    98.5 KB · Views: 320
  • DSC_1531-1.jpg
    DSC_1531-1.jpg
    98.2 KB · Views: 294
  • DSC_1533-1.jpg
    DSC_1533-1.jpg
    90.7 KB · Views: 298
  • DSC_1534-1.jpg
    DSC_1534-1.jpg
    91 KB · Views: 279
OP
J

jonathan75

Well-known member
Joined
Mar 27, 2013
Messages
1,451
Location
NC
What was the final condition on the parts? specifically the crank?

The crank came out great. Close to perfect for 20 under. Since I can get oversized bearings I asked them to turn it for 20 under the high end of the spec so I have room for wear. It only left one small mark that was deeper then everything else but they got it right exactly at 20 under. They did a great job. They also checked to make sure it was true and checked for cracks by Magnaflux.

The spec is 1.563 and now it is 1.543.
 

Attachments

  • IMG_7035-1.jpg
    IMG_7035-1.jpg
    95.8 KB · Views: 154
  • IMG_7032-1.jpg
    IMG_7032-1.jpg
    114.6 KB · Views: 149
  • IMG_7031-1.jpg
    IMG_7031-1.jpg
    125.8 KB · Views: 172
  • IMG_7027-1.jpg
    IMG_7027-1.jpg
    95.3 KB · Views: 182
  • IMG_7024-1.jpg
    IMG_7024-1.jpg
    87.2 KB · Views: 196
  • IMG_7019-1.jpg
    IMG_7019-1.jpg
    110.7 KB · Views: 192
  • IMG_7018-1.jpg
    IMG_7018-1.jpg
    86.9 KB · Views: 217
OP
J

jonathan75

Well-known member
Joined
Mar 27, 2013
Messages
1,451
Location
NC
Take a look at these jugs. :) They just did a very fine hone. I like how they made all my gasket surfaces so smooth and nice.
 

Attachments

  • IMG_7050-1.jpg
    IMG_7050-1.jpg
    49.4 KB · Views: 132
  • IMG_7046-1.jpg
    IMG_7046-1.jpg
    116.4 KB · Views: 133
  • IMG_7044-1.jpg
    IMG_7044-1.jpg
    50.4 KB · Views: 138
  • IMG_7043-1.jpg
    IMG_7043-1.jpg
    71.9 KB · Views: 164
  • IMG_7041-1.jpg
    IMG_7041-1.jpg
    119.4 KB · Views: 153
  • IMG_7040-1.jpg
    IMG_7040-1.jpg
    68.6 KB · Views: 176
  • IMG_7038-1.jpg
    IMG_7038-1.jpg
    95.4 KB · Views: 185
Last edited:
OP
J

jonathan75

Well-known member
Joined
Mar 27, 2013
Messages
1,451
Location
NC
You can see the lifting eye bolt I picked up from Fastenal. I need to cut the bolt down to fit in all the way.

http://www.fastenal.com/web/product...RpynQ4MP2Wfhf7KdSgkmrP3!1119852750!-399261850

The site glass for the oil level got ruined in the wash. I will need to order a new one. It is too cloudy now to see the oil level. And good thing I can get new serial number stickers because I forgot and left it on and it got ruined as well.
 

Attachments

  • IMG_7072-1.jpg
    IMG_7072-1.jpg
    79.4 KB · Views: 122
  • IMG_7071-1.jpg
    IMG_7071-1.jpg
    94.7 KB · Views: 132
  • IMG_7070-1.jpg
    IMG_7070-1.jpg
    81.5 KB · Views: 117
  • IMG_7063-1.jpg
    IMG_7063-1.jpg
    113.3 KB · Views: 146
  • IMG_7060-1.jpg
    IMG_7060-1.jpg
    114.9 KB · Views: 125
  • IMG_7059-1.jpg
    IMG_7059-1.jpg
    106.6 KB · Views: 110
  • IMG_7058-1.jpg
    IMG_7058-1.jpg
    126.1 KB · Views: 119

arkansawer

Well-known member
Joined
Apr 28, 2013
Messages
51
hi, great site. rebuilding a quincy 308 and wonder if the flywheel 1/8 inch wobble is too much and if you guys think I should get a new crankshaft. also am planning on mounting a 40 gal tank/compressor pump and motor on an 80 gal tank. bad idea?

parts source? ideas? thanks
 
OP
J

jonathan75

Well-known member
Joined
Mar 27, 2013
Messages
1,451
Location
NC
hi, great site. rebuilding a quincy 308 and wonder if the flywheel 1/8 inch wobble is too much and if you guys think I should get a new crankshaft. also am planning on mounting a 40 gal tank/compressor pump and motor on an 80 gal tank. bad idea?

parts source? ideas? thanks

It could be the bearings on the end of the crankshaft or the cups it rides in. Are you sure it is not a flywheel mounting issue?
 

arkansawer

Well-known member
Joined
Apr 28, 2013
Messages
51
thanks for your response. I haven't pulled the crank out yet but did notice some oil leakage there so you are probably right. I better take it to a machine shop to be sure. this is my first rebuild and I want to do it right. hopefully it will come out 1/2 as good as yours.
 
OP
J

jonathan75

Well-known member
Joined
Mar 27, 2013
Messages
1,451
Location
NC
thanks for your response. I haven't pulled the crank out yet but did notice some oil leakage there so you are probably right. I better take it to a machine shop to be sure. this is my first rebuild and I want to do it right. hopefully it will come out 1/2 as good as yours.

If it is wobbling it could be flexing the rubber seal on the end allowing the oil to leak out. I am going to order a kit and it comes with a new bearing seal for the end of the crankshaft.

You didn't waste any time bringing the pump to the machine shop, mines still on the operating table, waiting, waiting.:eek:

Actually I am surprised how fast I am moving on this one. Usually I will let things sit for a while.

oh man, this is going to be one sweet compressor and should last you a lifetime!!

I hope to pass it down to my Son some day. To early to tell what his interests will be but I keep telling my Wife that we need to get him in a welding class!
 

Burgerkong

Well-known member
Joined
Apr 17, 2010
Messages
2,501
Location
Markham, Ontario, Canada
What do I do with it after I scan it? Take it locally to be made or is there someplace online you recommend?

Locally is best for these things in case of screwups, you could also do it yourself. I think the old SB decals were dry transfer, which are the easiest decals to make, just buy the paper, print then apply and clear over top. You can also do wet transfer, just a matter of buying the correct type of paper.
 

EOC_Jason

Well-known member
Joined
Jun 25, 2012
Messages
11,388
Location
Bentonville, AR
How much did the machine work set you back, if you don't mind me asking?

Now besides needing a few small misc parts (fingers crossed) and some paint & decals, you should be on the home stretch...

Did you ever get a motor?
 

metal4130

Well-known member
Joined
Feb 11, 2008
Messages
225
Be sure to keep all the machined surfaced lightly oiled so they don't rust. I want to live where you do. If I got that tool made around here it would be $100 and if I went to the machine shop with those things pieces it would be 3 weeks before I got them back!!
 
OP
J

jonathan75

Well-known member
Joined
Mar 27, 2013
Messages
1,451
Location
NC
Locally is best for these things in case of screwups, you could also do it yourself. I think the old SB decals were dry transfer, which are the easiest decals to make, just buy the paper, print then apply and clear over top. You can also do wet transfer, just a matter of buying the correct type of paper.

Thanks for the tips. I wouldn't mind someday to have the old style decal back but I think I will just use the new factory one for now.

Great thread! Looking forward to seeing the finished product.

Yes, me too!

How much did the machine work set you back, if you don't mind me asking?

Now besides needing a few small misc parts (fingers crossed) and some paint & decals, you should be on the home stretch...

Did you ever get a motor?

I don't mind you asking. Actually I wish more people talked about prices so we have a better idea of how much something like this may cost or to help in negotiations. Out the door was $200.

Crankshaft Turning = $100
Cylinder Honing = $60
All parts washing, gasket removal and surface prep = $40

I will order all most of the parts I need on Monday. I still need a motor and open to suggestions.

Be sure to keep all the machined surfaced lightly oiled so they don't rust. I want to live where you do. If I got that tool made around here it would be $100 and if I went to the machine shop with those things pieces it would be 3 weeks before I got them back!!

I rubbed on some motor oil on everything after I got the parts back but thank you for the reminder.

For my job I have to travel so if I need something done I just bring it with me since often it means staying in a hotel room and it is hard to get anything done when I am not at home. But I often work in small towns for day trips as well which I love because you have good quality places at non big city prices.
 
To avoid these ads, REGISTER NOW!
OP
J

jonathan75

Well-known member
Joined
Mar 27, 2013
Messages
1,451
Location
NC
This morning I picked up some parts cleaner. It even has a little tray to lower the parts in the 1 gallon can. At first I was going to Autozone to get it but then I read a review online that Wal-Mart has it for $10 less! So I got it for only $20. It is slow and small but does the job very well. So I can only do one valve at a time. After it cleans the outside of the valve I will need to take it apart to clean all the parts again on the inside of the valve. So each valve will take two dunks and a final rinse with brake cleaner. But after four hours the first one came out very clean and the valve actually had moving parts again and not just one solid lump of varnish.

So to clean the air compressor tank I need to get my pressure washer running after sitting all winter. I changed the oil and lubed the pump.
 

Attachments

  • DSC_1551-1.jpg
    DSC_1551-1.jpg
    101.9 KB · Views: 169
  • DSC_1546-1.jpg
    DSC_1546-1.jpg
    93.2 KB · Views: 202
  • DSC_1544-1.jpg
    DSC_1544-1.jpg
    82.8 KB · Views: 196
  • DSC_1543-1.jpg
    DSC_1543-1.jpg
    106.1 KB · Views: 196
  • DSC_1539-1.jpg
    DSC_1539-1.jpg
    58.1 KB · Views: 184
  • DSC_1538-1.jpg
    DSC_1538-1.jpg
    66.2 KB · Views: 179
  • DSC_1537-1.jpg
    DSC_1537-1.jpg
    90.9 KB · Views: 203
OP
J

jonathan75

Well-known member
Joined
Mar 27, 2013
Messages
1,451
Location
NC
I took the pressure switch off before washing the tank. It looks like I might need a new pressure gauge since it does not rest on zero. There is also a lot of crude inside the connection pipe. I think I may need to wash out the inside of the tank with water. If anything just to check inside to see how it looks.
 

Attachments

  • DSC_1560-1.jpg
    DSC_1560-1.jpg
    85.1 KB · Views: 111
  • DSC_1559-1.jpg
    DSC_1559-1.jpg
    105 KB · Views: 108
  • DSC_1558-1.jpg
    DSC_1558-1.jpg
    85 KB · Views: 106
  • DSC_1556-1.jpg
    DSC_1556-1.jpg
    110.1 KB · Views: 106
  • DSC_1554-1.jpg
    DSC_1554-1.jpg
    83.2 KB · Views: 104
  • DSC_1552-1.jpg
    DSC_1552-1.jpg
    94.9 KB · Views: 105
OP
J

jonathan75

Well-known member
Joined
Mar 27, 2013
Messages
1,451
Location
NC
Getting ready to wash the tank down. One of my neighbors helped me wheel it to the side of the house.
 

Attachments

  • IMG_7153-1.jpg
    IMG_7153-1.jpg
    106.2 KB · Views: 89
  • IMG_7152-1.jpg
    IMG_7152-1.jpg
    119.7 KB · Views: 87
  • IMG_7151-1.jpg
    IMG_7151-1.jpg
    145.5 KB · Views: 88
  • IMG_7150-1.jpg
    IMG_7150-1.jpg
    123 KB · Views: 90
  • IMG_7149-1.jpg
    IMG_7149-1.jpg
    122.2 KB · Views: 90
  • IMG_7146-1.jpg
    IMG_7146-1.jpg
    132 KB · Views: 94
  • IMG_7145-1.jpg
    IMG_7145-1.jpg
    147.5 KB · Views: 110
OP
J

jonathan75

Well-known member
Joined
Mar 27, 2013
Messages
1,451
Location
NC
Letting the chemical soak for a bit. After the first wash I had to do a second wash to get even more off. You can see how much was left before the second Zep product was used.
 

Attachments

  • IMG_7183-1.jpg
    IMG_7183-1.jpg
    95.7 KB · Views: 176
  • IMG_7181-1.jpg
    IMG_7181-1.jpg
    149.9 KB · Views: 133
  • IMG_7177-1.jpg
    IMG_7177-1.jpg
    125.8 KB · Views: 143
  • IMG_7172-1.jpg
    IMG_7172-1.jpg
    139.5 KB · Views: 125
  • IMG_7171-1.jpg
    IMG_7171-1.jpg
    135.7 KB · Views: 129
  • IMG_7170-1.jpg
    IMG_7170-1.jpg
    127.7 KB · Views: 132
  • IMG_7168-1.jpg
    IMG_7168-1.jpg
    149.2 KB · Views: 168
OP
J

jonathan75

Well-known member
Joined
Mar 27, 2013
Messages
1,451
Location
NC
And here it is after the third wash. I will do another wash in the morning and use a sponge with some hand scrubbing to get any bits that may be left over. After it is cleaned you can see all the scratches and marks.

Tomorrow I will open it up and look inside also. I probably will rinse it out on the inside but just use water.
 

Attachments

  • IMG_7204-1.jpg
    IMG_7204-1.jpg
    72.2 KB · Views: 177
  • IMG_7203-1.jpg
    IMG_7203-1.jpg
    75.9 KB · Views: 179
  • IMG_7195-1.jpg
    IMG_7195-1.jpg
    83 KB · Views: 176
  • IMG_7193-1.jpg
    IMG_7193-1.jpg
    89 KB · Views: 181
  • IMG_7191-1.jpg
    IMG_7191-1.jpg
    114.6 KB · Views: 198
  • IMG_7189-1.jpg
    IMG_7189-1.jpg
    120.2 KB · Views: 211
  • IMG_7207-1.jpg
    IMG_7207-1.jpg
    83.9 KB · Views: 177

EOC_Jason

Well-known member
Joined
Jun 25, 2012
Messages
11,388
Location
Bentonville, AR
Since you've already done all this work with the pump... You *really* should take out that check-valve still threaded in the tank and make sure it's in good working condition. Having to replace the check valve is a pain when you are squeezed between a pump & motor...

Since you are replacing the pressure gauge, I would spend the few extra bucks and get a fluid filled one. ;)
 
OP
J

jonathan75

Well-known member
Joined
Mar 27, 2013
Messages
1,451
Location
NC
Since you've already done all this work with the pump... You *really* should take out that check-valve still threaded in the tank and make sure it's in good working condition. Having to replace the check valve is a pain when you are squeezed between a pump & motor...

Since you are replacing the pressure gauge, I would spend the few extra bucks and get a fluid filled one. ;)

That makes sense to check it. What is the best way to test it? Should I just replace it if the cost is not high? I am not sure if this is a high failure item or not.

Yes I was looking at pressure gauges last night. I had my eye on this one.

http://www.amazon.com/dp/B0080IG2JW/?tag=atomicindus08-20

and this for all the connections:

http://www.amazon.com/dp/B000HBM72Q/?tag=atomicindus08-20
 
OP
J

jonathan75

Well-known member
Joined
Mar 27, 2013
Messages
1,451
Location
NC
I have bought a few things from these guys on flea-bay(air filter,tank valve and pressure switch).Great prices and really good quality. http://www.ebay.com/itm/New-In-tank...565?pt=LH_DefaultDomain_0&hash=item2c615d0ab5 Great thread by the way...I wish I could find an old S-B up here!

Thank you for the link and recommendation. So the right angle connection I have on mine would screw right into the new check valve for my unloader connection?

It took me a while to find my Saylor Beall. You have to keep checking Craigslist. So far it looks like one will pop up every 2-3 months.
 

EOC_Jason

Well-known member
Joined
Jun 25, 2012
Messages
11,388
Location
Bentonville, AR
Yeah the little right angle piece will screw out of your existing one. But you might as well check it before ordering a new one. It might be better quality... Though really all they are is a piece of plastic & a spring to allow air to flow one way...
 

metal4130

Well-known member
Joined
Feb 11, 2008
Messages
225
http://www.ebay.com/itm/CONTROL-DEV...784?pt=LH_DefaultDomain_0&hash=item53ec9cb238

New check valves (3/4" X 3/4") are not very expensive. That 90 degree fitting is somewhat unusual in size so don't loose it. 1/8" NPT male and 5/16" compression. I just had to buy one and it had to be special ordered. I too replaced my check valve because my old one leaked. The one I linked was a direct replacement to what I had and was really good quality. The check that was linked before was steel so I would personally stay away from that (rust). If you want to test the one you have just pull it out, clean it off, then blow into the one end. There should be NO air leakage. If there is it is bad.

For a motor I would buy a 7.5 HP single phase. I bought a Baldor but Leeson is another that is available. Mine cost $600 so it was not cheap.
 
Last edited:

EOC_Jason

Well-known member
Joined
Jun 25, 2012
Messages
11,388
Location
Bentonville, AR
Before buying a motor, consider a few things...

1. Your garage electrical - Do you have an existing run or will you need to pull wire?
2. Your air needs... 7.5HP will give more air, but does come at an additional cost over 5HP motors. Also a 5HP you would run at lower RPM and thus a little quieter and less wear & tear on the pump...
3. The motor mount (measure the holes on the tank or check the manual to figure out the frame size)
4. Motor Rotation! Most motors are reversible, but some aren't... Hehe...

Baldor would be my first choice too, but nothing wrong with a Leeson or AO Smith... Watch CL, you would be surprised how many motors pop-up. Northern Tool has a Leeson 5HP (Not the 5SPL) for like $390 (minus whatever coupon you can find)....
 

Mr onetwo

Well-known member
Joined
Apr 6, 2011
Messages
2,005
Location
Coastal Maine
Thank you for the link and recommendation. So the right angle connection I have on mine would screw right into the new check valve for my unloader connection?

It took me a while to find my Saylor Beall. You have to keep checking Craigslist. So far it looks like one will pop up every 2-3 months.
Yes, on the connection question.:thumbup:
Unfortunately, Maine is a wasteland as far as used industrial equipment is concerned...I am bird dogging a used old Curtiss right now, but I have learned not to get my hopes up too much:sad: On motors...keep in mind that there are huge differences between 56,184 and 213 frame motors.I would look to get a 184T frame 1750RPM 5HP industrial Baldor or Leeson.
 
Last edited:
OP
J

jonathan75

Well-known member
Joined
Mar 27, 2013
Messages
1,451
Location
NC
Yeah the little right angle piece will screw out of your existing one. But you might as well check it before ordering a new one. It might be better quality... Though really all they are is a piece of plastic & a spring to allow air to flow one way...

I took it out when I rinsed the inside of the tank. It was slimy with oil film on it. After I washed it off with brake cleaner everything moved but the spring seemed weak and the sealing surface looked very pitted. It looks like you may be able to replace the parts inside with a rebuild kit but I am not sure if it is worth it.

http://www.ebay.com/itm/CONTROL-DEV...784?pt=LH_DefaultDomain_0&hash=item53ec9cb238

New check valves (3/4" X 3/4") are not very expensive. That 90 degree fitting is somewhat unusual in size so don't loose it. 1/8" NPT male and 5/16" compression. I just had to buy one and it had to be special ordered. I too replaced my check valve because my old one leaked. The one I linked was a direct replacement to what I had and was really good quality. The check that was linked before was steel so I would personally stay away from that (rust). If you want to test the one you have just pull it out, clean it off, then blow into the one end. There should be NO air leakage. If there is it is bad.

For a motor I would buy a 7.5 HP single phase. I bought a Baldor but Leeson is another that is available. Mine cost $600 so it was not cheap.

Thanks for the tip to avoid steel, that makes sense. As for the motor there is a guy local to me that really likes and only stocks A.O. Smith. He says the parts are easier to get and warranty replacement is simple with them. Actually the 3 phase that was on it before was A.O. Smith also. Baldor motors are made in China now so I am not sure if the quality is still up there but the price stayed the same.

Before buying a motor, consider a few things...

1. Your garage electrical - Do you have an existing run or will you need to pull wire?
2. Your air needs... 7.5HP will give more air, but does come at an additional cost over 5HP motors. Also a 5HP you would run at lower RPM and thus a little quieter and less wear & tear on the pump...
3. The motor mount (measure the holes on the tank or check the manual to figure out the frame size)
4. Motor Rotation! Most motors are reversible, but some aren't... Hehe...

Baldor would be my first choice too, but nothing wrong with a Leeson or AO Smith... Watch CL, you would be surprised how many motors pop-up. Northern Tool has a Leeson 5HP (Not the 5SPL) for like $390 (minus whatever coupon you can find)....

I do have a existing run. When my house was built I knew I would want an air compressor so I had them run 220 to the back wall in my garage. I think it is a dryer type connection with 10 gauge wire and two 30 amp breakers. But since I got a horizontal tank I think I may need to put it someplace else. The good news is I can make room right next to the electrical panel so it is a short and easy run that won't cost much.

Thanks for the motor tips. I am looking at a 7.5 HP and leaning toward A.O. Smith.

Yes, on the connection question.:thumbup:
Unfortunately, Maine is a wasteland as far as used industrial equipment is concerned...I am bird dogging a used old Curtiss right now, but I have learned not to get my hopes up too much:sad: On motors...keep in mind that there are huge differences between 56,184 and 213 frame motors.I would look to get a 184T frame 1750RPM 5HP industrial Baldor or Leeson.

Motor choice is so tough, it is a big investment. I will wait to order until I get the pump finished. After a manual spin test and it seems to work I will seriously need to look for a motor. But I will have time since I still need to paint the tank.
 

Todd.Brock

Well-known member
Joined
Jul 15, 2008
Messages
4,250
Location
Cincinnati
I just replaced the check valve in my Champion. There is a thread about ordering the correct one! I needed an unloader but ordered one without. I ended up drilling and tapping for the 1/8" NPT fitting. My compressor FINALLY quit leaking and is holding air. That is frustrating as can be!! I was going to use a thread sealant, but instead used Oatey mega tape. It's blue and I think 2x as thick as the normal white Teflon tape. . I think pink and yellow are at least as thick, if not thicker. I bought a jar of the leak detector. It was one and done and will last me a lifetime!! If that check valve in fleabay is steel, I would stay away. Mine was about 35 bucks. It looks identical to the eBay version but is all brass. You could pressurize the tank to 100 lb and test the valve that way. My thought is to not replace bad parts unnecessarily, but if 40 bucks saves you hours of grief later when the motor and pump is on, it may be worth a look. Or at least testing it when you get the tank cleaned and painted.
 

mayday0017

Well-known member
Joined
Oct 20, 2010
Messages
1,715
Location
Houston Texas
WOW! That thing cleaned up GREAT! There is no way I would paint that thing or change any stickers. At most I would spot touch up to keep from rusting but that's it. The paint is in really good condition for it's age.

Kinda jelous, wish I had a room and could find a beautiful old unit like this. Keep updating us!
 
OP
J

jonathan75

Well-known member
Joined
Mar 27, 2013
Messages
1,451
Location
NC
I hear Weg (brand) motors from Brazil are good.

Ken from Air-Flo quoted me a Weg. It seems good from what I read. Still checking on it.

I just replaced the check valve in my Champion. There is a thread about ordering the correct one! I needed an unloader but ordered one without. I ended up drilling and tapping for the 1/8" NPT fitting. My compressor FINALLY quit leaking and is holding air. That is frustrating as can be!! I was going to use a thread sealant, but instead used Oatey mega tape. It's blue and I think 2x as thick as the normal white Teflon tape. . I think pink and yellow are at least as thick, if not thicker. I bought a jar of the leak detector. It was one and done and will last me a lifetime!! If that check valve in fleabay is steel, I would stay away. Mine was about 35 bucks. It looks identical to the eBay version but is all brass. You could pressurize the tank to 100 lb and test the valve that way. My thought is to not replace bad parts unnecessarily, but if 40 bucks saves you hours of grief later when the motor and pump is on, it may be worth a look. Or at least testing it when you get the tank cleaned and painted.

I did find a part number for a rebuild kit for the check valve from Saylor Beall. Comes with a new spring and plate so I can just fix it. Can you tell me more about the leak detector? Do you have a link to it?

WOW! That thing cleaned up GREAT! There is no way I would paint that thing or change any stickers. At most I would spot touch up to keep from rusting but that's it. The paint is in really good condition for it's age.

Kinda jelous, wish I had a room and could find a beautiful old unit like this. Keep updating us!

In person the paint does not look as good as the pictures. It is like seeing a celebrity online and in movies and when you see them in person you can't believe it is the same person.
 

mayday0017

Well-known member
Joined
Oct 20, 2010
Messages
1,715
Location
Houston Texas
Fair enough, well keep up the great work sir, it is going to be a beautiful beast of a compressor... Also look and see if you can find a Dayton motor, they are great quality motors (believe they are USA made) and a little less known so you might find a better deal then a balder.
 

Todd.Brock

Well-known member
Joined
Jul 15, 2008
Messages
4,250
Location
Cincinnati
The leak detector is just soapy fluid of some type. I found online recipes for soapy water and glycerin, a whole bottle of dawn soap in water, etc. I tried soapy water and could not find the leak. I bought this when Ibought the PTFE tape and found some of the leaks. Not sure how I messed up soapy water. I replaced the check valve b/c the tank was still draining but not making bubbles anywhere I could find. The tank now holds pressure after replacing the check valve. I had already soap and retaped every joint.
http://m.homedepot.com/p/Oatey-8-oz-All-Purpose-Leak-Detector-302092/100151681/
 
Last edited:
To avoid these ads, REGISTER NOW!
Top Bottom