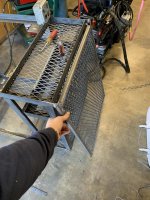
Very nice! Is the gap between the idler and cart tight enough to keep the chain from flopping over?

You are using an out of date browser. It may not display this or other websites correctly.
You should upgrade or use an alternative browser.
You should upgrade or use an alternative browser.
Show us your welding projects
- Thread starter neonnblack
- Start date
Very nice! Is the gap between the idler and cart tight enough to keep the chain from flopping over?
Not sure I understand what you mean but the tlxhain will not come loose unless you peel the chain off the sprocket or release the sprocket to spin. I've been thinking about putting some foam in it to give it additional backpressure and keep the chain tighter
Sent from my iPhone using The Garage Journal mobile app
PCO6
Well-known member
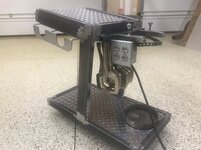
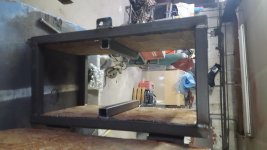
I finally got the timer working properly on my spot welder.  My first project with it was to make a drawer for my MIG welding cart.
View media item 89567
View media item 89569
View media item 89568
My first project with it was to make a drawer for my MIG welding cart. View media item 89567
View media item 89569
View media item 89568
I watched the video and still have no idea how that works......but it's cool as hell!
Nice!
Sent from my iPhone using The Garage Journal mobile app
sqznby
Well-known member
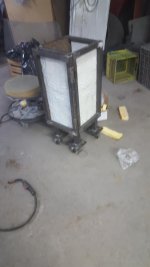
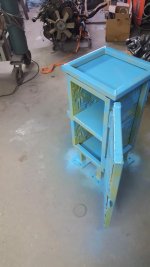
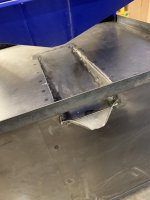
Finished up my welding cart. I'm somewhat new to welding and just a hobby welder.
Sent from my iPhone using The Garage Journal mobile app


Very nice cart

Now that chainstay, unique and functional in a clever little package, nicely done

Attachments
-
 746ee5d4b6afbe7dbc737b702d5c49d9.jpg269.5 KB · Views: 5
 -
 2c15c9275d897a6ead832d71da3c4c2b.jpg243 KB · Views: 5
 -
 59b82beb5480330535214aaa5d161d73.jpg256.5 KB · Views: 4
 -
 e07bf254dafce62a5dcf076cb37196ac.jpg189.1 KB · Views: 4
 -
 a885fd0c7a98b5d354492ccf15ed26d9.jpg296.9 KB · Views: 4
 -
 ec5f8e5ffc05d0b0439975e6e1fe7d41.jpg223.4 KB · Views: 9
Farmall450
Well-known member
Looks good gents.
Jetfixr320
Well-known member
- Joined
- Nov 21, 2013
- Messages
- 182
Very nice cart
Now that chainstay, unique and functional in a clever little package, nicely done
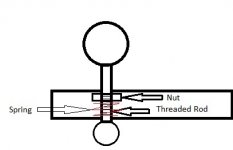
I like it. But, how is it spring loaded? LOL
I like it. But, how is it spring loaded? LOL
I welded a small 1/2” long section of threaded rod in between the standard rod lengths. I put a nut and spring on the inside of the support tube before I welded the cap on. There isn’t much threaded rod there so you don’t really see it when it moves up and down.
jalexl
Active member
fstbusa..I don't understand your description, if possible can you ad pictures.?I welded a small 1/2” long section of threaded rod in between the standard rod lengths. I put a nut and spring on the inside of the support tube before I welded the cap on. There isn’t much threaded rod there so you don’t really see it when it moves up and down.
thanks
fstbusa..I don't understand your description, if possible can you ad pictures.?
thanks
best I could sketch up in MS Paint.
Attachments
MrSurly
Well-known member
The chainstay is awesome. The question I have may be already posed, but I’m trying to understand if the chain itself it spring-loaded around the bottle? I get that the release knob is spring-loaded, but is the chain itself under tension? (No need for it to be, just curiosity) I’m thinking of “stealing” your idea and combining with an over-center latch. Great design, way cool!
Sent from my iPhone using Tapatalk
Sent from my iPhone using Tapatalk
Last edited:
TTMotorsports
Well-known member


The chainstay is awesome. The question I have may be already posed, but I’m trying to understand if the chain itself it spring-loaded around the bottle? I get that the release knob is spring-loaded, but is the chain itself under tension? (No need for it to be, just curiosity) I’m thinking of “stealing” your idea and combining with an over-center latch. Great design, way cool!
Sent from my iPhone using Tapatalk
No the chain isn’t under tension currently. I was thinking about adding some foam on the front side of the tank to give it a bit of tension so hold it on the sprocket better rather than creating a chain guide
Hagatronics
Well-known member
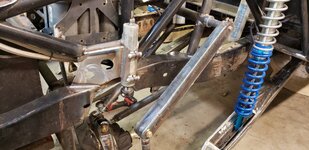
Finished up my part of 4 link on a ranger. Sway bar and bumpstops.


You aren't mucking around! Some nice work there.
Attachments


zmotorsports
ALLIANCE MEMBER
Finished up my part of 4 link on a ranger. Sway bar and bumpstops.
Sent from my SM-G965U1 using Tapatalk
Very nice work.
C91x
Well-known member
Finished up my part of 4 link on a ranger. Sway bar and bumpstops.
Sent from my SM-G965U1 using Tapatalk
how much travel are we looking at?
TTMotorsports
Well-known member
Limited to 23inches. If he buys the 3.0x16 travel shocks I built the secondary mounts for he can swing 26inch limited.
Sent from my SM-G965U1 using Tapatalk
Sent from my SM-G965U1 using Tapatalk


raskal
Well-known member


none of your images work
grrrr...stupid imgur
I changed all the image links to go through an image proxy to avoid imgur's ban of linking on GJ...hope that works now.
Last edited:
C91x
Well-known member
They're showing up for megrrrr...stupid imgur
Sent from my SM-G960U using The Garage Journal mobile app
Bigblue&Goldie
Well-known member
TT Motorsports, do you have a shop? If so, where at in Phoenix?
dkmc
Well-known member
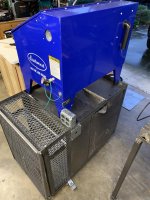
That stand for the spot welder is nice. Would like to see/hear more about it and the timer.
I finally got the timer working properly on my spot welder.

View media item 89569
View media item 89568
TTMotorsports
Well-known member
Yes my shop is deer valley rd and n central ave.TT Motorsports, do you have a shop? If so, where at in Phoenix?
Currently in permit process to build a 50x80 shop at my home off carefree highway
Sent from my SM-G965U1 using Tapatalk
Can you provide me some information on this trailer suspension device please?
Make? Model?
Thanks!
Never mind, I found them.
Last edited:
toomanytoyzz
Well-known member
Here's a small project I did for my girlfriend's birthday. I am not too keen on the color choices. They looked much different on the cap, so I might change that later. I also sanded it down to expose the underlying green. I might strip it 80% and put some other color on top to give it a harsh patina'd look.
I used some sections of tin ceiling tile I had gotten from an architectural salvage place I go to from time to time for obscure building materials. You can't beat the prices and the 1 1/2 drive is worth it because there is a BBQ place local with some AMAZING ribs.
I used some sections of tin ceiling tile I had gotten from an architectural salvage place I go to from time to time for obscure building materials. You can't beat the prices and the 1 1/2 drive is worth it because there is a BBQ place local with some AMAZING ribs.
Attachments

Last edited:
PCO6
Well-known member
That stand for the spot welder is nice. Would like to see/hear more about it and the timer.
Thanks. I built the stand, shown here prior to painting, around a basic spot welder and made it so I can easily remove it (6 bolts) so I can take it to something I'm working on if I want to. When it's on the stand and foot operated it's great to have an extra hand. The pedal is spring loaded and clamps down on the work pieces nicely. It's on wheels so I can move it around and store it easily.
I take NO CREDIT for the timer ... other than mounting it to stand. One of my Brothers is a retired Millwright and has a lot of experience with plant machinery. He built it from old bits he had laying around. The "guts" are shown in the pic below. The large gray box is the contactor, the black piece is the transformer and timer itself is the piece with the dial. Apart from fitting everything into the electrical box on the back bottom of the stand the only thing we added was a hand held remote switch. The green button switch was mounted to the box so there are 2 options to trigger the welder.
The timer has an incredible range of options. It can automatically trigger for a set time anywhere from something like a tenth of a second to once a year! I trigger it manually to a set time of about 1 to 3 seconds for a weld. After a bit of trial and error, one and a half seconds seems to be about right for the 19g metal I used for the drawer shown below.
I have another spot welder that is generally for body work. It works great except that it was designed without a timer (later ones of this type had one). Adding a timer is our next project!
View media item 36768
View media item 37680
View media item 37679
View media item 90412
View media item 90413
Last edited:
sunsation288
Well-known member
wow nice smoker !!! well done , and nice smoke ring too !!!
steel 35
Well-known member
Intended use is ?
I see a few details that are already stolen for mine
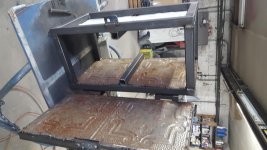
This is a powder coating station I built. The blaster cabinet sits on top, and the fold out table allows for a pop up spray tent to sit on top. There’s slide out storage for powder bottles and a top tray for the gun and other ‘stuff’. Under the slide out tray is storage for the spray tent, a box fan and filter insert for the spray tent. I wired the whole thing for electricity so there’s just a 220v and a 110v extension to plug in that runs all the lights, fans, oven, spray gun etc. I ran an airline manifold with valves to supply the blaster cabinet and the spray gun, as well as a spare air nozzle for clean up. It was a fun project!
Attachments
-
 13075F07-0ADB-4AB6-8269-4836CC7B22A6.jpg118.4 KB · Views: 132
 -
 7EB233BA-F447-460B-85C4-5F28A6D0A295.jpg159.6 KB · Views: 131
 -
 8DE9CDD0-BEA7-4004-86E7-DCC863E443E7.jpg137.6 KB · Views: 130
 -
 E38A8139-4B07-4256-BDA8-D8AE05EFD959.jpg147.6 KB · Views: 126
 -
 DB2CC6FF-6D0B-411D-B887-6C157FE638DA.jpg60.1 KB · Views: 129
 -
 9CF7D6D6-C5CE-47CD-ADEB-9E00FF3F72FC.jpg91.4 KB · Views: 126
 -
 23E931E0-1429-4B22-9E53-C97024D14CD9.jpg110.7 KB · Views: 133
Muggzy
Well-known member
I love your compact use of space! Awesome planning [emoji106]This is a powder coating station I built. The blaster cabinet sits on top, and the fold out table allows for a pop up spray tent to sit on top. There’s slide out storage for powder bottles and a top tray for the gun and other ‘stuff’. Under the slide out tray is storage for the spray tent, a box fan and filter insert for the spray tent. I wired the whole thing for electricity so there’s just a 220v and a 110v extension to plug in that runs all the lights, fans, oven, spray gun etc. I ran an airline manifold with valves to supply the blaster cabinet and the spray gun, as well as a spare air nozzle for clean up. It was a fun project!
Sent from my Pixel XL using Tapatalk
Intended use is ?
I see a few details that are already stolen for mine
Was for an off-road teardrop trailer I designed similar to a Moby1 xtr. Ended up selling the rolling frame though due to other distractions.
Can you provide me some information on this trailer suspension device please?
Make? Model?
Thanks!
Never mind, I found them.
Looks like one of these.
http://timbren.com/axle-less/
Last edited:
jeepinerdeep
Well-known member
Was for an off-road teardrop trailer I designed similar to a Moby1 xtr. Ended up selling the rolling frame though due to other distractions.
Smoker was high priority!

Really nice looking projects bud.
TTMotorsports
Well-known member


zmotorsports
ALLIANCE MEMBER


Attachments


MrSurly
Well-known member
Few more trailing arms shipping out today.


Beautiful! Stack o' Dimes, indeed! Is that all TIG?


