
You are using an out of date browser. It may not display this or other websites correctly.
You should upgrade or use an alternative browser.
You should upgrade or use an alternative browser.
Show us your welding projects
- Thread starter neonnblack
- Start date

smalltown
Well-known member
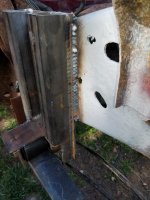
Furby1184 nice work. You must have somehow removed all of the original inside rocker panel, and tack welded the new to the floor. I'm imagining you will close that joint up with a weld the entire length to keep out water underneath.
I've got a small truck that needs similar work. I took a look underneath, and wondered just how i would replace the inner rocker.
I've got a small truck that needs similar work. I took a look underneath, and wondered just how i would replace the inner rocker.
ez-duzit
Well-known member
F--nice job.
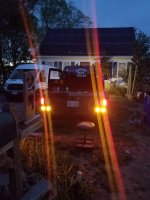
A few more pictures of the truck progress
Beauty[emoji481]
Sent from my iPhone using Tapatalk
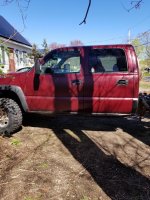
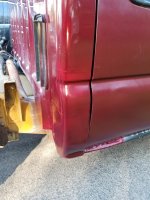
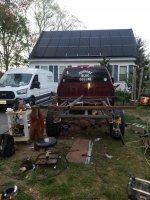
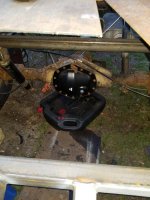
I found GJ while researching tool restorations. This is my latest project that my friend and I finished recently. Took my wife's 99 3/4 ton Dodge Diesel and converted it to 12" travel coil over shocks on all 4 corners.
Attachments
Old Man Roger
Well-known member
Did you do it for her or for you?I found GJ while researching tool restorations. This is my latest project that my friend and I finished recently. Took my wife's 99 3/4 ton Dodge Diesel and converted it to 12" travel coil over shocks on all 4 corners.

Old Man Roger
Well-known member
Just don’t tell her how much the shocks cost LOLBoth lol. I did get a bit carried away though.
Just don’t tell her how much the shocks cost LOL
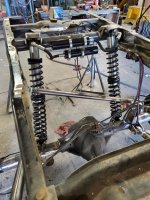
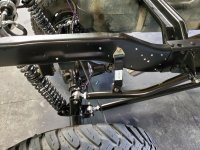
I hear you but these are FOA which are about half the cost of the Big names and still American made. I can't say I would recommend them to the average Joe though. They have a bad reputation for quality control when it comes to deburring internals and this can lead to leaks. I knew this going in and with the help of my friend who tunes and rebuilds shocks we rebuilt and blue printed them new right out of the box. Once the internals are cleaned up, there isn't much to separate them from Kings and Fox.
Old Man Roger
Well-known member
Nice. It’s good to have capable friendsI hear you but these are FOA which are about half the cost of the Big names and still American made. I can't say I would recommend them to the average Joe though. They have a bad reputation for quality control when it comes to deburring internals and this can lead to leaks. I knew this going in and with the help of my friend who tunes and rebuilds shocks we rebuilt and blue printed them new right out of the box. Once the internals are cleaned up, there isn't much to separate them from Kings and Fox.
Furby1184
Member


Furby1184
Member
I cut everything out with a plasma cutter and I did fully weld the seam. No sense fabricating stainless rockers if you're not going to do it right lolFurby1184 nice work. You must have somehow removed all of the original inside rocker panel, and tack welded the new to the floor. I'm imagining you will close that joint up with a weld the entire length to keep out water underneath.
I've got a small truck that needs similar work. I took a look underneath, and wondered just how i would replace the inner rocker.
JackOfDiamonds
Well-known member
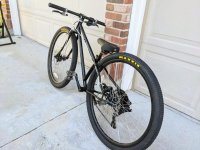
Not welding...a few brazing pictures from the last couple bikes I made.
Attachments


Furby1184
Member

iagsxr
Well-known member
Not welding...a few brazing pictures from the last couple bikes I made.
That's great. I'm afraid brazing is turning into one of those lost art things that still has it's place if people were aware.
JackOfDiamonds
Well-known member
That's great. I'm afraid brazing is turning into one of those lost art things that still has it's place if people were aware.
It really is a great process. I especially appreciate the low distortion potential and the nearly unlimited repairability. And plenty strong, as my destructive testing has shown over and over.
Attachments

Bigblue&Goldie
Well-known member
It really is a great process. I especially appreciate the low distortion potential and the nearly unlimited repairability. And plenty strong, as my destructive testing has shown over and over.
That's cool to see. I've always wondered what would yield first. I'd be curious how thick you could go with the tubing before the braze fails first?
iagsxr
Well-known member
https://www.motorcycle.com/blog/wp-content/uploads/2017/10/101717-ARCHIVE-Suzuki-XR69-image6.jpg
Don't know why I can't get the actual picture to post.
Anyhow I'm in a FB fabrication group. Someone posted a picture of that Harris frame.
The guys who didn't understand what they were looking at lost their minds convinced it was some guy in a garage who didn't own a welder so he brazed it.
I understand it's silicone bronze.
Last edited:
txvwnut
Well-known member
All Norton feather bed frames are brazed. When the builder was asked why he said brazing when done right is just as strong as weld in that area.
Slick111
Well-known member
OK welders whats the solution correct rod for welding ( cast steel I assume ) C clamps.Not trying to repair just need to build a type of holding jig by welding 2 clamps to a cold roll steel plate.
JackOfDiamonds
Well-known member
That's cool to see. I've always wondered what would yield first. I'd be curious how thick you could go with the tubing before the braze fails first?
That, I don't know. I mostly use 0.028 or 0.035 chromoly. That's about as thick as it gets for bikes. There is a theory that the braze will be stronger than the tubing as long as the fillet is X times thicker than the tubing. X varies between 3 and 6 depending who you talk to. Most bike fillets are overkill by that criteria.
Brazing is used on much thicker tubing for motorcycle frames and was historically the method used for tubular race car frames which surely also used thicker tubes.
txvwnut
Well-known member
OK welders whats the solution correct rod for welding ( cast steel I assume ) C clamps.Not trying to repair just need to build a type of holding jig by welding 2 clamps to a cold roll steel plate.
Since we’re kinda on the topic brazing would be a good choice for this, either with an o/a setup or a tig.
iagsxr
Well-known member
OK welders whats the solution correct rod for welding ( cast steel I assume ) C clamps.Not trying to repair just need to build a type of holding jig by welding 2 clamps to a cold roll steel plate.
I've accidentally welded C-clamps to stuff with just a MIG.
If they're not life and death critical I'd MIG them to the plate then hit them with a hammer after they cool. If they stay attached I'd call it a win.
Or braze them.
Or stick welder with nickel rod.
Or clean the flux off your nickel stick rod and use as filler material with your TIG.
ClappedOutBport
Well-known member
- Joined
- Mar 30, 2016
- Messages
- 998
OK welders whats the solution correct rod for welding ( cast steel I assume ) C clamps.Not trying to repair just need to build a type of holding jig by welding 2 clamps to a cold roll steel plate.
I've seen plenty of C clamps welded on. Seems like folks used just whatever. Standard mig wire, stick, whatever you've got it should stick.
harley jim
Well-known member
I just mig weld my C clamps to my bench then when Im done I clean up with a grinder.OK welders whats the solution correct rod for welding ( cast steel I assume ) C clamps.Not trying to repair just need to build a type of holding jig by welding 2 clamps to a cold roll steel plate.
Sent from my SM-A102U using The Garage Journal mobile app
Last edited:
Slick111
Well-known member
OK going to go with 75 nickel iron rod and stick weld sounds to be the way
harley jim
Well-known member
Also, I only weld around the front edge of the clamp that way a tap from a hammer will break it loose.
Sent from my SM-A102U using The Garage Journal mobile app
Sent from my SM-A102U using The Garage Journal mobile app
Furby1184
Member


Bigblue&Goldie
Well-known member
I saw this project on Pinterest. Keeps my clamps at the ready.
Is there just a slit in the square tubing the adjusting knobs ride in?
bplayer405
Member
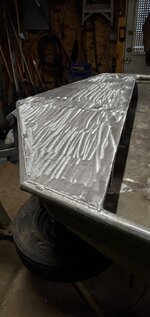
Picked up a tig welder a couple months ago and have made pretty good progress on welding thin aluminum. Working on my mod-v jon I've been sealing rivets, modified the seating, extended the front deck and added a elevated bow. Next will be raising the transom framed with aluminum rectangle and adding a rear deck. This is the type of work I want to do on the side...


Sent from my SM-G973U using Tapatalk
Sent from my SM-G973U using Tapatalk
Attachments


afazz
Well-known member
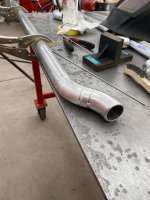
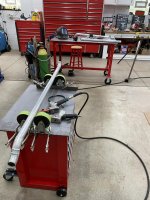
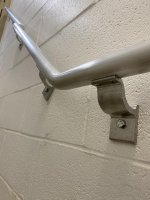
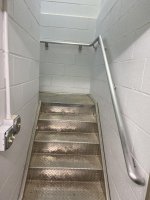
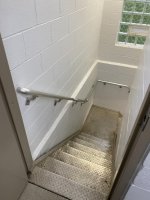
I just finished my first aluminum TIG welding project: a handrail into the garage basement. The original owner/builder commissioned the stairs, and I wanted to match the style. This was a great project to get started welding aluminum since it isn’t structural, doesn’t need to seal any fluid, and all of the welds were ground off!
Attachments
-
 763AF36E-BD59-4EE7-9227-2A11DAA58444.jpg83.3 KB · Views: 137
 -
 09242F8E-383E-4BC3-A80D-41F3B31682A1.jpg100.3 KB · Views: 148
 -
 5F6A982B-7C44-4B1A-9F76-333781700A6A.jpg138.1 KB · Views: 134
 -
 D46FFA1A-FAC2-465E-AA89-97EED779349D.jpg112.1 KB · Views: 133
 -
 9B57F91B-E728-4652-AC98-D00AB279A1DA.jpg104.5 KB · Views: 129
 -
 70EC4FC5-F493-492E-BA25-C546A84A47B0.jpg102.4 KB · Views: 129
 -
 59079898-ED74-4670-8543-1F47CE5E5BF6.jpg73.3 KB · Views: 130
zmotorsports
ALLIANCE MEMBER
I just finished my first aluminum TIG welding project: a handrail into the garage basement. The original owner/builder commissioned the stairs, and I wanted to match the style. This was a great project to get started welding aluminum since it isn’t structural, doesn’t need to seal any fluid, and all of the welds were ground off!
Excellent job. That turned out very clean and sanitary looking.

Woods_Wanderer
Well-known member
Here's my latest, I just finished up this welding/fixture table. This is my second big project since I started metal fab during covid. For this project I took heavy inspiration from several table builds here on GJ as well as a couple of excellent youtube project builds.
I designed this to be a general purpose shop and fab table, with the size and mobility aimed at keeping it out of the way in my limited floor space.
I also tried to keep costs minimal by using reclaimed scrap metal as much as possible, in fact with the exception of the top plate all of the raw steel for this table came from a local scrapyard.
Total cost of materials for the table came out to roughly $600, $330 of which was steel.
Tools were another $600 but nearly all of that was the mag drill and related tooling and assessories.
Length: 56" with an additional 36" slideout, Width: 40", Height: adjustable 32-37"
Weight: ~600lbs? it's very overbuilt


(this plate is not actually warped)
Mag drills are amazing, but if I had to do it again I'd get a shop to plasma cut these holes for me.


I designed this to be a general purpose shop and fab table, with the size and mobility aimed at keeping it out of the way in my limited floor space.
I also tried to keep costs minimal by using reclaimed scrap metal as much as possible, in fact with the exception of the top plate all of the raw steel for this table came from a local scrapyard.
Total cost of materials for the table came out to roughly $600, $330 of which was steel.
Tools were another $600 but nearly all of that was the mag drill and related tooling and assessories.
Length: 56" with an additional 36" slideout, Width: 40", Height: adjustable 32-37"
Weight: ~600lbs? it's very overbuilt
(this plate is not actually warped)
Mag drills are amazing, but if I had to do it again I'd get a shop to plasma cut these holes for me.
yes, I used my plasma cutter to cut a slit in the tubing.Is there just a slit in the square tubing the adjusting knobs ride in?
R. Deschain
Well-known member
I put together a new welding cart a month or so ago that I am pretty proud of.


shortykorte
Well-known member
yes, I used my plasma cutter to cut a slit in the tubing.
Clever. Can you get one from the middle by tilting towards you? What is the width of the slit?
Sent from my iPhone using Garage Journal
i cant get a middle on unless i take them all off. The slit is about 1/4 inchClever. Can you get one from the middle by tilting towards you? What is the width of the slit?
Sent from my iPhone using Garage Journal
sweetk30
Well-known member
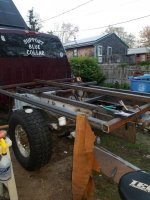
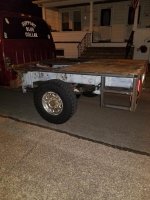
Friend wanted a side gate / ramp to load 2 atv's better . He had me install this used snowbear utility trailer ramp i saved from a rusted out trailer . The ramp was still solid so i didnt toss it .
Made up 2 mounting tabs from 2.5x2.5 1/4 angle iron . Then capped the top of the angle to set the side rail upright on . I drilled a 1" hole in each unit for the pins .
Popped the whole thing together and drilled 2 1/2" holes 1 per side for the lock pins when up .
She come out real nice and rock solid . He will clean up the rest and do a quick paint job .


