To avoid these ads, REGISTER NOW!

The Machine Work Thread

stioc

Well-known member
Joined
May 2, 2005
Messages
1,317
Location
SoCal
You shouldn't plunge with that endmill anyway. It doesnt have a center cutting flute.

100% correct.

I sharpened the cutting edges with a 5 deg relief and a 2 deg rake towards the center. This is the proper geometry for the cutting edges. There is a back relief but I didn't sharpen that. You can sharpen the cutting edges several times similar to how I did it here before the land gets too wide and then you have to sharpen the back relief.

Curious if anyone else here regrinds endmills (and other tooling) and what they use.
 
To avoid these ads, REGISTER NOW!

gte718p

Well-known member
Joined
Mar 12, 2009
Messages
3,950
100% correct..

Curious if anyone else here regrinds endmills (and other tooling) and what they use.

Never tried to bring my own, but there is a tool grinder a mile from my father in law. I drop off the bigger more expensive ones when I’m home. Less the 1/2 cheaper and better edges to buy new.

I have tried to grind lathe fooling several times. I **** at it. I need to read more on the nuisances.
 

MushCreek

Well-known member
Joined
Jan 14, 2015
Messages
9,739
Location
Upstate South Carolina
I have one of those grinding fixtures that take 5c collets, and you use on a surface grinder. As I get my rotary phase converter built, and get my surface grinder sorted out, I can look forward to sharpening the buckets of end mills I have.
 

KBigg

Well-known member
Joined
Apr 15, 2019
Messages
474
Location
NE Indiana
We have a grinding fixture for a lathe that I have used to sharpen endmills in a pinch. Generally we dont though, we send out everything thats dull once a month.
 

stioc

Well-known member
Joined
May 2, 2005
Messages
1,317
Location
SoCal
Haha, yeah I was never interested in resharpening before and I generally use inserts on the lathe so I've never sharpened lathe bits either. However, Harold's grinding book really intrigued me, especially because one could potentially resharpen other common tools too. So now after building the grinding rest (still making various accessories) I'm getting sucked into the dark side and I gotta admit it's fun.

Doesn't sound like there's a whole lot of interest here but I'll post what few things I've tried to sharpen so far (still learning) in case anyone else is getting the bug too. If nothing else it gives me a better appreciation and knowledge about the cutters. Sorta like makes you a better driver if you know how the drivetrain, brakes etc work.

A real tool grinder or accessories to go with a surface grinder will be the best setup but for us 'bottom feeders' who enjoy a bit more challenge this works almost as good just takes more setup time and care.

Chisel before:
48788554832_034bd29c9d_z.jpg


After:
48817525918_0289795eb9_z.jpg


Another endmill, this one was pretty well buggered up:
48837516441_7d69b7fedc_z.jpg


During:
48837516456_605594c705_n.jpg


48837142718_d566522709.jpg


Done (no magnification, same cheap grinding wheel):
48837691647_e0ccd82319.jpg


Cut two steps as a test:
48837739817_6999cbb4b7_z.jpg
 

whateg01

Well-known member
Joined
Mar 13, 2006
Messages
11,187
Location
doo dah, kansas, usa
I have sharpened a few of my endmills. Some I can't get the cutting edge right because I wasn't sure how to set up for the gashing. With 5 and 2 degrees, the point here hangs too low on some. Other endmills are fine.

attachment.php


I know some people say it's not worth the time to sharpen them, but first off, sometimes you chip it at 10pm on Sunday night and need the part on Monday morning. Also, sometimes, you have no money in the bank, but have a little free time. Plus, I think it's fun to make stuff work again.

Dave
 

Attachments

  • endmill.jpg
    endmill.jpg
    33.4 KB · Views: 1,175

whateg01

Well-known member
Joined
Mar 13, 2006
Messages
11,187
Location
doo dah, kansas, usa
How much does a course grind like that really hurt anything? The only time I can think that would be visible is if plunging to, say, counterbore a hole. Otherwise, the cutting is all done at the edge of the flute.

Dave
 

stioc

Well-known member
Joined
May 2, 2005
Messages
1,317
Location
SoCal
Likewise! I enjoy a good challenge and learning new things plus there's something about making things that are considered worthless work almost as good as new again.

Some people never have anything of their own to contribute so they just make themselves sound better by picking on others. After you've been here as long as I have you learn to know who they are and put them on ignore - works great for me :D

How much does a course grind like that really hurt anything? The only time I can think that would be visible is if plunging to, say, counterbore a hole. Otherwise, the cutting is all done at the edge of the flute.

Dave

The surface finish suffers a bit if the end teeth are coarse but it's all subjective. Worked just fine for my purposes :)

Oh and according to the book the 2 deg rake towards the center is correct. The cutting should happen at the outer edges. The 5 deg back rake is for the primary cutting edge (called the land) and 10-15 deg for the secondary angle. The gash is tricky, I have to rotate the endmill in the holder and set the fence at 45deg to come into the edge of the wheel.

flute-diagram.jpg


But all these angles etc are hard (impossible?) to set with just the rest that comes with the ordinary bench grinders.

48838620003_68007c6898.jpg
 

Toolmaker51

Well-known member
Joined
Nov 26, 2015
Messages
176
Location
Missouri
There are commercially built grinding tools; certainly out of reach for small shops with restricted funds and floor space. Most everything H. Hall designs and builds fit that niche.
Understanding how cutters work is at least half the battle. With used endmills and drills plentiful, filling your bins is worthwhile.
Having sharpening equipment, I like two of the benefits. 1 is the Sunday night remedy, 2 is the independence you celebrate saving a wasted cutter bought for pennies.
 

stioc

Well-known member
Joined
May 2, 2005
Messages
1,317
Location
SoCal
@Toolmaker51, I agree. I wish I hadn't tossed all those endmills that I could've salvaged...same goes for other tools too. It takes time but as a home hobbyist I'll always need an excuse to spend a few hours in the garage :)

Anyway, today I took a break from playing with the grinding rest and spent the afternoon making another project. I actually used one of the resharpened endmills for most of the work. The final finish was done with a cobbled together flycutter.

48851039177_7636f8e100_o.jpg


48850847426_d1902e9747_c.jpg
 

whateg01

Well-known member
Joined
Mar 13, 2006
Messages
11,187
Location
doo dah, kansas, usa
Well, I think we decided that 3D printing can be categorized as machine work. Eh, doesn't matter. I'm posting it anyway. Besides, we use calipers in machine work, and this involves calipers. And a key, which lets me into the house, so I can get to my little CNC mill in the living room. Works for me!

Anyway...

I keep losing the covers for the batteries on my HF digital calipers. I hate to go buy another set, as I already probably have 6 of them scattered around. Well, three were in the drawer missing batteries and covers. I also have a fancy housekey with an LED built in so I can see the keyhole, but the cover for it has been broken for some time and it barely works without it. So, last night I decided it was time to fix those. 3D printed covers for all, plus a couple extra. If you have a need, let me know and I'll send you the STL or maybe even just print some more and mail them out.

attachment.php


attachment.php


Dave
 

Attachments

  • caliper battery cover.jpg
    caliper battery cover.jpg
    103.7 KB · Views: 986
  • key battery cover.jpg
    key battery cover.jpg
    140.6 KB · Views: 979

Toolmaker51

Well-known member
Joined
Nov 26, 2015
Messages
176
Location
Missouri
I accept the mantle, declaring 3D printing actual machine work.
Here is why.........most typical machinists wouldn't/ couldn't make a cover, or small profiles typical of injection molding.
I have a very nice digital multimeter missing the battery door. Company, parts or samples seem non-existant. And I haven't solved duplication of the lock tab or the odd 90° configuration.
Am I a machinist? Well I guess, it's fed me 47 years.
Can I do additive machining, well if metal spray counts.
But that won't make a little plastic door. . . .
 

Dragoonmc

Well-known member
Joined
Feb 5, 2015
Messages
60
Speaking of 3D printing I made the green bracket on this bandsaw to attach the Dow feed cylinder to the upper arm similar to the factory bracket.
I don’t have a mill so this is what I can do.

ee7b7f03c6d2af398ba3406147bf2d18.jpg


Sent from my iPhone using Tapatalk
 

Attachments

  • ee7b7f03c6d2af398ba3406147bf2d18.jpg
    ee7b7f03c6d2af398ba3406147bf2d18.jpg
    91.3 KB · Views: 0

lilscorpion

Well-known member
Joined
Mar 15, 2010
Messages
3,599
Location
Colorado
Speaking of 3D printing I made the green bracket on this bandsaw to attach the Dow feed cylinder to the upper arm similar to the factory bracket.
I don’t have a mill so this is what I can do.

ee7b7f03c6d2af398ba3406147bf2d18.jpg


That’s cool. Surprised it’s strong enough.
 

Attachments

  • ee7b7f03c6d2af398ba3406147bf2d18.jpg
    ee7b7f03c6d2af398ba3406147bf2d18.jpg
    48.4 KB · Views: 6

sanddan

Well-known member
Joined
Jul 7, 2005
Messages
708
Location
Oregon
This weeks project, a set of bezels for the parking lights on a early 50's pickup. A friend asked me to machine this up as the bezel is no longer available. Most of the work was done on the rotary table with some hand filing to shape the area around the screw holes and the top edge which gets a radius to soften the look. The radius isn't done yet in the pictures. I plan on buffing the end result but the builder might be painting them later, I just want to give him options on the finish. Doing the first one showed me I needed a plate to bolt it to as it was hard to hold.
 

Attachments

  • IMG_1257 (Medium).jpg
    IMG_1257 (Medium).jpg
    137.4 KB · Views: 109
  • IMG_1258 (Medium).jpg
    IMG_1258 (Medium).jpg
    111.7 KB · Views: 117
  • IMG_1255 (Medium).jpg
    IMG_1255 (Medium).jpg
    62.2 KB · Views: 106
  • IMG_1254 (Medium).jpg
    IMG_1254 (Medium).jpg
    54.5 KB · Views: 108

sanddan

Well-known member
Joined
Jul 7, 2005
Messages
708
Location
Oregon
Speaking of 3D printing I made the green bracket on this bandsaw to attach the Dow feed cylinder to the upper arm similar to the factory bracket.
I don’t have a mill so this is what I can do.

ee7b7f03c6d2af398ba3406147bf2d18.jpg


Sent from my iPhone using Tapatalk

Why did you replace the original cylinder? Mine leaks a tiny amount when it's holding the saw head up but doesn't drift so I've just been ignoring it.
 
To avoid these ads, REGISTER NOW!

sanddan

Well-known member
Joined
Jul 7, 2005
Messages
708
Location
Oregon
Finish sanded and buffed.
 

Attachments

  • P1040899 (Medium).JPG
    P1040899 (Medium).JPG
    142.4 KB · Views: 140
  • P1040900 (Medium).JPG
    P1040900 (Medium).JPG
    140.5 KB · Views: 129
  • P1040898 (Medium).JPG
    P1040898 (Medium).JPG
    101.7 KB · Views: 150

Bigblue&Goldie

Well-known member
Joined
Mar 12, 2009
Messages
10,662
Location
AZ
SanDan, nice part! What size is the rotary table that you are using? I need to get one, but I have minimal experience with using one and I'm struggling on what size to buy.
 

whateg01

Well-known member
Joined
Mar 13, 2006
Messages
11,187
Location
doo dah, kansas, usa
Nice looking bezels. Iirc, the originals are stamped sheet metal. I've done some similar bezels for rectangular lights, but trying to retain factory design, so I machined dies to press them. I was going to do the same for the TS quill on my lathe but in the end, did what you did and just machined the whole thing. I hope he leaves yours just polished. They look good that way
 

sanddan

Well-known member
Joined
Jul 7, 2005
Messages
708
Location
Oregon
SanDan, nice part! What size is the rotary table that you are using? I need to get one, but I have minimal experience with using one and I'm struggling on what size to buy.

Mine is an 8" I got from Enco back in the day. The choice was based on weight, the max I was ok lifting. I think it's about 86lbs. I usually use a lift table so I can just slide it on/off. I also have a cheap 6" 3-jaw chuck that I can mount on it, good for round stock. The stock for this project was 3" wide by 3/8" thick sheet of mystery aluminum.
 

sanddan

Well-known member
Joined
Jul 7, 2005
Messages
708
Location
Oregon
Nice looking bezels. Iirc, the originals are stamped sheet metal. I've done some similar bezels for rectangular lights, but trying to retain factory design, so I machined dies to press them. I was going to do the same for the TS quill on my lathe but in the end, did what you did and just machined the whole thing. I hope he leaves yours just polished. They look good that way

I thought the originals would be stamped Sheetmetal. For a one off this worked but not cost effective if I was making a bunch. These were for a friend's project so machined was it.
 

Dragoonmc

Well-known member
Joined
Feb 5, 2015
Messages
60
Why did you replace the original cylinder? Mine leaks a tiny amount when it's holding the saw head up but doesn't drift so I've just been ignoring it.


My bandsaw did not have a down feed cylinder originally so this is mostly to help when I cut thin material and to help with variation on the cut finish.


Sent from my iPhone using Tapatalk
 

Bigblue&Goldie

Well-known member
Joined
Mar 12, 2009
Messages
10,662
Location
AZ
I have a standard series 1 Bridgeport. I'm not worried about moving it; just want a table that fits my machine well.
 

Monza Harry

Well-known member
Joined
Dec 29, 2018
Messages
1,433
Location
Windsor ON
I bought an 8" for my Bridgeport, reasoning the "Almighty Dollar" The 10" was my goal but at 2 1/2 times the price this was a decent compromise, Mine came with the diving plates but no tail stock that will be another ~$80 US [about 120 Canuk dollars]. Realistically the 8" is pretty much the limit for using it vertically with any length of drill bits/cutters with a fair sized work piece mounted up. Dividing head is about 10-11" tall another 4" for your keyless chuck from the ~19" of head to table for your Bridgeport and you are there. Just some thoughts. Harry
 

lilscorpion

Well-known member
Joined
Mar 15, 2010
Messages
3,599
Location
Colorado
SanDan, nice part! What size is the rotary table that you are using? I need to get one, but I have minimal experience with using one and I'm struggling on what size to buy.

Really the only constraint, as far as I'm aware, is weight. Even if the base is larger than the width of your table you can still attach it without issue. My rotary table may even be 16" in diameter (I forget) and works just fine on a series 1 style J-head mill.

I've never really used mine much since I converted my Mill to CNC. Not because it's not useful, but because I'll do whatever I can to avoid risking hurting my back again lifting the damn thing up on the table. I do refer to it as "that big *******" for a reason. I think I'd use it more if I had a gib crane (or some other lifting apparatus) which could help me get it from it's storage place to the mill. Because I can't easily, the storage place has shifted over time from "easily accessible for when I need it" to a place more "long-term and out of the way".

So...my .02 - Big as you can get it is super desirable but small as you can manage may just end up being the best approach.
 

matt_i

Well-known member
Joined
Mar 14, 2008
Messages
10,719
Location
SE Michigan
I have a 10" rotab made by Moore. Seems OK, as above the VMC is more versatile usually, a 12" would be good too but that's a really big tool.

The thing I don't love is having to remove the vise, losing its alignment with the x-axis to put in the rotab. I've tried to put it right next to the vise in the center but then the table is usually way out at the end of the travel with the rest of it hanging out the other side.

Lacking an overhead hoisting system, Imo the best would be a rolling cart that you can set the mill table either 1/8" higher or lower with the knee depending on which way you are going with it. Then sliding it "slightly downhill" is very easy on both the tool and your back.
 

ClappedOutBport

Well-known member
Joined
Mar 30, 2016
Messages
998
I'm going to be the devil's advocate here and suggest the smallest rotary table you can get by with. I don't have a spot where I can stick a rotary table next to the mill, so I have to carry it. I am a young fellow, but heaving that >100lb hunk of iron up is still very difficult for me. One trip to the doc for screwing up your back is more expensive than just buying the bigger rotary table if and when you need one.

A neighbor was in the shop one day asking for some help, I asked him to help me move the rotary table to the mill. He slipped and dropped his end. I held on 'til it hit the concrete. If fell slow, but still fell. Had to stone it and I think the handle shaft may be slightly bent now. That one is a 12", I'd much rather have an 8" for most jobs.
 

stioc

Well-known member
Joined
May 2, 2005
Messages
1,317
Location
SoCal
My 8" rotary table hasn't seen any use since converting the mill to CNC and I'm glad I don't have to deal with its size and weight anymore. For gear cutting I was glad I was able to utilize my 20lbs spindexer instead. So I agree with those who suggested getting one that will not sit unused collecting dust because of its bulk and weight.
 

sanddan

Well-known member
Joined
Jul 7, 2005
Messages
708
Location
Oregon
I delivered the parts yesterday and got to see them installed. The truck's style is the "rat rod" or weathered look, the complete body was painted and then weathered to look old.
 

Attachments

  • IMG_1263 (Medium).jpg
    IMG_1263 (Medium).jpg
    88 KB · Views: 124
  • IMG_1262 (Medium).jpg
    IMG_1262 (Medium).jpg
    81.9 KB · Views: 123
  • IMG_1261 (Medium).jpg
    IMG_1261 (Medium).jpg
    46.3 KB · Views: 124

whateg01

Well-known member
Joined
Mar 13, 2006
Messages
11,187
Location
doo dah, kansas, usa
Small, but time consuming, project for a friend who needed a prop for his daughter's play, Clue. Mostly work with a bandsaw and file, but some work on the mill squaring up parts and the lathe turning the barrel and hardware and ramrod. He'll stain the stock and probably use rub n buff for a patina on the metal parts. Oh, also a couple 3d printed pieces.

attachment.php


Dave
 

Attachments

  • 20191021_184003.jpg
    20191021_184003.jpg
    95 KB · Views: 1,052

Toolmaker51

Well-known member
Joined
Nov 26, 2015
Messages
176
Location
Missouri
SanDan, nice part! What size is the rotary table that you are using? I need to get one, but I have minimal experience with using one and I'm struggling on what size to buy.

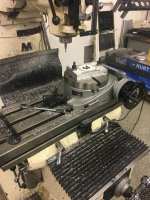
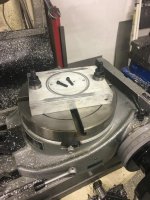
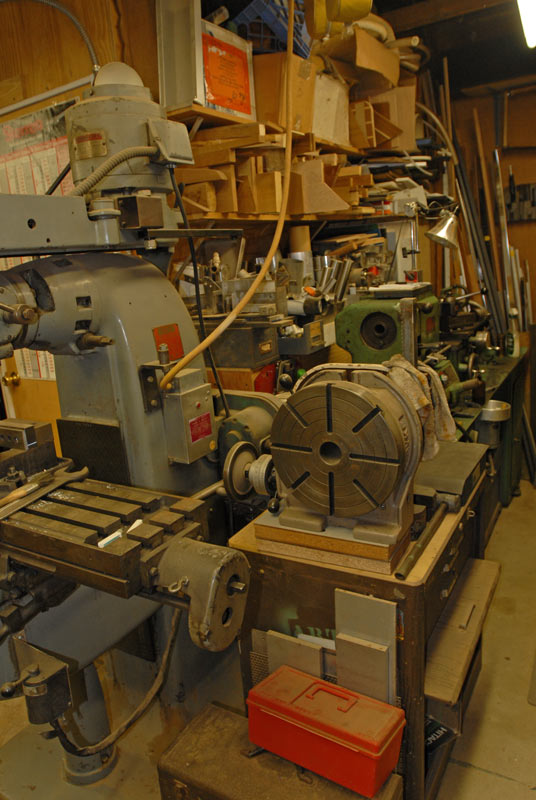
Bridgeport pattern mills are 12 and 16 inch Y axis. I've never used a rotab smaller than 12. To me, picking a rotab hinges on the Y axis; that is what limits capacity of turning a disc. A good alternate might be 10" with a square subplate of 1/2" or 3/4" aluminum, square enlarges the clamping area and easier to find. Drill and tap an equally spaced dense matrix of clamping holes.
The unexpected drawback to a small table is when a subplate required for capacity. The locks and handwheel are hard to reach, the leverage of milling is outside the original envelope and makes climb milling difficult.
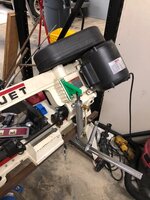
A part of machining is to manipulate tooling; lift table, engine hoist, overhead crane or a strong back.
I have a lift, commercially [Lucasey] made of SuperStrut/ Unistrut, a small cable winch, and 4 swivel casters. The lift surface is 1/4" x 1-1/4 cold roll bent to 90 and gusseted; the best feature. These arms attach with strut nuts, therefore can be preset as desired, even offset. The engineered capacity is 150 pounds.
 
To avoid these ads, REGISTER NOW!
Top Bottom