To avoid these ads, REGISTER NOW!

THE WALKER-TURNER THREAD - Post your Walker-Turner pics

OP
H

Hoorn

Well-known member
Joined
May 19, 2020
Messages
1,140
Location
Glendora, CA
@Private Lugnutz, agreed that Walker Turner started in Jersey City, however Walker-Turner's earliest known patent application, from Feb 21, 1931, states that Walker-Turner is a Corporation of New York. That patent application was granted for a sanding device.

Screenshot_20230701-171940.png

There is no 1931 Walker Turner catalog to reference as they sold their tools at that time mostly through Sears, Roebuck & Co. Perhaps you have a very early Walker Turner adjustment tool used for one of their early machines.

Screenshot_20230701-172849.png
 
Last edited:
To avoid these ads, REGISTER NOW!

Private Lugnutz

Well-known member
Joined
Mar 30, 2012
Messages
30,491
Location
The Authentic Jersey Shore
Walker-Turner's earliest known patent application, from Feb 21, 1931, states that Walker-Turner is a Corporation of New York.
The plot thickens! Thanks!
Perhaps you have a very early Walker Turner adjustment tool used for one of their early machines.
I was hoping that would be a possibility, but it sounds better coming from someone else! Thanks.
 
OP
H

Hoorn

Well-known member
Joined
May 19, 2020
Messages
1,140
Location
Glendora, CA
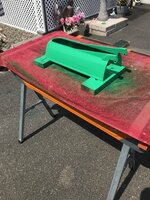
I had some time to work on my band saw today. I had given each panel of the base a coating of red oxide primer and two coats of alkyd enamel. I ordered stainless steel bolts to exactly match those specified by Walker Turner.

PXL_20230706_042302965.jpg

The only challenge I had was the original pin snapped off under moderate load and I had to come up with a replacement. I remove the broken pin, drilled out the original hole 1/32nd larger and cut an HSS tap to size as a replacement.

PXL_20230708_002915233.jpg

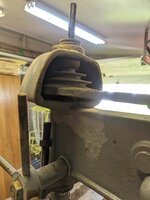
Here is that bushing as it would sit inside the gearbox housing. Note how offset it is to shift the reducer assembly out of gear.

PXL_20230702_213125820.jpg

In this picture I have mounted the gearbox housing. Although WT is not breaking any new ground here, I want to show the relationship between the gears and how the reduction is accomplished.

This is not the position I will keep the gearbox. I had it in this position because it was easier to work on. Note the ball handle is in the "IN" gear position.

PXL_20230708_022759233.jpg

While in this position the reducer gear is meshed with the drive gear. When combined with the pulley gear, this will result in a 10 to 1 speed reduction.

PXL_20230708_015131489.jpg

When the handle is moved to the "OUT" of gear position, the off-center mounted shaft rotates the reducer gear away. Here you can see the teeth make no contact.

This will make more sense when the four step pulley is eventually mounted. The pulley has a small gear on the end that will mesh with the larger wheeled gear on top once it is mounted on the shaft.

PXL_20230708_015032348.jpg

Here is a shot of the handle. You withdraw the plunger and move the ball either in or out. The plunger will then snap into place into a pre-drilled hole.

PXL_20230708_015516852.jpg

The original specifications for lubrication from Walker Turner call for a "light grease". Because of this I opted to go with an NLGI 1 grease. This one was just a bit more expensive but it's an absolutely outstanding light grease that will give me years of service.

PXL_20230708_022745437.jpg

Inching closer to a finished product. Note the casting on the mainframe. Because this was two cast iron halves fused together, there are many original patches formed during manufacture. I made no attempt to fill any of these rough parts of the casting, they're just part of the saw's history.

I find time spent like this in the workshop to be very rewarding, even when unexpected issues pop up.

PXL_20230708_035927212.jpg
 
Last edited:

Robvulaj

Active member
Joined
May 14, 2022
Messages
39
This is my new Walker Turner 1100 20" drill press. I stole this from a shop that was going to scrap it because they were moving and had 2. Pais 100 bucks. I had to run there the night before a family trip disassemble it throw it in the back of my suv (wish i owned a pickup) and dump it all into my basement shop. 20230709_174124.jpg

Well i got back last night and couldn't resist going thru it a bit. I couldnt believe there was absolutely zero rust on the drill press. There were two apparent issues with the drill right away. The front of the table trough was cracked off but i can live with that and the quill didn't return on its own.

So i wanted to clean off all the grime and go thru all the moving parts. Im extremely eager to just use this in my shop so i want to just clean/grease/oil all the functional bits of this before i spend weeks trying to strip off and repaint. Which i may not even do im not sure yet.

I started by cleaning down the base and coulm i decided since i wasnt repainti g not to remove the colum from the base but just to take apart the table lifting mechanism. Scraped off all the old dried grease amd whatnot.

20230709_210100.jpg

This table operated extremely smoothly when i first tested it so i decided not to remove each gear individually and just turn thru them picking out all the old grease and scrubbing them in place. One of the locating pins was missing so i replaced that and packed the worm with red n tacky grease. I was careful not to get the grease on the gear for the rack and pinion tho because i wanted to use oil on it instead. Just because the rack is exposed the way it is i thought it would be easier to clean and periodically lube that way.
20230709_221834.jpg
 

Robvulaj

Active member
Joined
May 14, 2022
Messages
39
I moved on to the table itself just cleani g off old grime. I need to stone it flat yet it looks like it was sitting near where they were welding im not sure but there are little metal bumps here and there and their holes all over the place. But for 100 bucks who can complain.20230709_212738.jpg

On to the hard part. The head casting and quill. The quill was in nice shape but the top bearing retainer was poped out i realized and the pulley for the belt was sliding up and down with the bearings. I learned the hard way that this was the only way to replace a belt i cant believe thats how they intended it but i pressed it back in place after cleaning only to realise it had to come out to put the blet on. The belt and bearings were in great shape i would would normally replace them just because its apart but i really wanted to return this to service so i put it back together to test out. 20230709_233445.jpg
20230710_000012.jpg

Next i put the stop collar back on and then muscled the casting back onto the colum. From there i re inserted the quill and tried to see what i could do to fix the spring. The housing for the spring is cracked and the tab in the center where the hole hold the spring to the handle crank was snapped off. I tried my best here but unfortunately no luck. I will show you what i did however because if the housing wasnt cracked this would have worked. I bent out a bit of the inner spring and used this roper whitney hole punch for the first time to punch two holes one to fit over the pin and a smaller one to slide in the groove i then filed inbetween then and it fit perfectly but then when i put enough tension to return the spring the outer part thats supposed to be held by the housing started to let go. So i need a new spring and housing. If anyone has please let me know. Ill make a seperate post later asking.. 20230710_013500.jpg
20230710_013636.jpg
 

Robvulaj

Active member
Joined
May 14, 2022
Messages
39
The final assembly was next i put the motor back. I just wanted to hear it spin. Its almost silent i was so happy about that at least. Ill spend more time cleaning it later but i cant explain how excited i am not to have to muscle a table up and down anymore. I also plan to replace the super short cord thats on here right now but here she is all assembled and running smoothly.

20230710_024157.jpg
 
OP
H

Hoorn

Well-known member
Joined
May 19, 2020
Messages
1,140
Location
Glendora, CA
@Robvulaj terrific series of posts, nice job resurrecting another quality machine from the past.

I've had one 1100 series that I flipped and didn't have longer than 48 hours, but what I remember most was how my back felt after getting it in and out of my SUV by myself. Those 20" DPs are HEAVY.

Well done!
 

Robvulaj

Active member
Joined
May 14, 2022
Messages
39
@Robvulaj terrific series of posts, nice job resurrecting another quality machine from the past.

I've had one 1100 series that I flipped and didn't have longer than 48 hours, but what I remember most was how my back felt after getting it in and out of my SUV by myself. Those 20" DPs are HEAVY.

Well done!
Thank you @Hoorn ! 500 lbs shipping weight i believe, its crazy how much heavier it is than a 15"
 

Snip's

Well-known member
Joined
Apr 29, 2017
Messages
1,850
Location
Ohio
Hi Hoorn...
Is that a Baileigh mobile base on your WT bandsaw?
I've been looking for a quality mobile base...
 
OP
H

Hoorn

Well-known member
Joined
May 19, 2020
Messages
1,140
Location
Glendora, CA
Brother, that is a "general international". It has a weight rating of 500 lb which is right on the edge for this thing.

I did not buy it, it was the least obtrusive mobile base that I had. I removed it from one of the multitude of machines I've run through my shop. It works decent enough, I just need it to roll forward a few feet and back every so often.
 
OP
H

Hoorn

Well-known member
Joined
May 19, 2020
Messages
1,140
Location
Glendora, CA
Update pics on the band saw.

I enclosed the gearbox after putting in the entire tube of grease.

PXL_20230710_050204664.jpg

I thought I was right on target when I measured this drive shaft bracket. Nope.

PXL_20230710_050252240.jpg

Ultimately I had to disassemble the gear box, undo a few set screws and get that shaft about 1/8" further towards the drive wheel to keep it from binding. Once this was done everything turned exceptionally smooth with new bearings and packed with new grease.

Here is the drive wheel and the correct setup as shown by Walker Turner. Bearing end cap, with a 1/4" thick bushing followed by the wheel held in place by a woodruff key and locking nut. The end of the shaft is tapered.

PXL_20230716_175828344.jpg

Lower wheel has absolutely zero lateral play.

PXL_20230716_193248500.jpg

Inching closer.

PXL_20230716_193313067.jpg
 
Last edited:

jsulli

Active member
Joined
Feb 12, 2023
Messages
31
started to restore a WT 900 series and posted a photo on vintage tool discussion. was told there was a walker turner thread, and hope I posted these photos on it. hopefully didn't intrude on someone else's post but only way I found to post on the thread. so, this is going to be the start of a fun project imho.
 

Attachments

  • IMG_3404.jpeg
    IMG_3404.jpeg
    1.4 MB · Views: 28
  • IMG_3532.jpeg
    IMG_3532.jpeg
    1.4 MB · Views: 21
  • IMG_3523.jpeg
    IMG_3523.jpeg
    977.8 KB · Views: 23
OP
H

Hoorn

Well-known member
Joined
May 19, 2020
Messages
1,140
Location
Glendora, CA
Thanks Jayman, assuming the BS you refer to is belt sander rather than band saw, I had it color matched with an internal part that had perfect original paint with sheen. 1937 Delta grey with the slightest hint of green.
 
Last edited:

Jayman17

Well-known member
Joined
Feb 6, 2017
Messages
3,795
Location
Seattle, Wa
I actually meant the Walker Turner BS you are currently working on. Looks like the grey has some green in it? Hard to tell on a computer but it looks good.
 
OP
H

Hoorn

Well-known member
Joined
May 19, 2020
Messages
1,140
Location
Glendora, CA
Regarding the color of the bandsaw, I took an internal part that had a lot of original color and was in great condition to my local Ace hardware. They have a fairly sophisticated computer generated color match machine and we painted the color matched paint right onto that original paint. When it dried there was no discernible difference and it all looked to be one solid color.

To my eyes The Walker Turner color is primarily green and depending on the lighting can have a touch of blue or grey.

For those that don't wish to bother with color matching or do not have enough original paint to do so, a very close match would be paint #1575 from Benjamin Moore which is called rainy afternoon.

Here is a swatch of rainy afternoon compared to a walker Turner drill press.

42815.jpg

Here is that swatch color.

42820.jpg
 

spudley

Well-known member
Joined
Dec 27, 2016
Messages
702
Location
Northeast Wisconsin
Beautiful work Hoorn.
I've recently came to possess a 14" WT bandsaw that appears to be your latest project's brother. Even has the black id tag 20-842.
The good; it includes a non stripped out tensioner, non cracked trunnion, original clicking miter gauge and the functional gearbox, although I doubt I'll be doing any metal cutting.
The bad; no original base and a Dayton 3/4 hp motor. The PO also painted the doors and some of the frame with a close matching gray. (Not complaining as all this beauty cost was brkfst for three friends that helped move it out of a basement).
Any chance you have a picture of your matched paint can with the colorant levels? I'd like to be as close as possible, if not I'll go with the 1575.
Thanks for so much info.
 

Attachments

  • 20230716_161455.jpg
    20230716_161455.jpg
    365.8 KB · Views: 28
OP
H

Hoorn

Well-known member
Joined
May 19, 2020
Messages
1,140
Location
Glendora, CA
@spudley here it is.

42448~2.jpeg

This is Benjamin Moore Advance paint, a hybrid alkyd enamel. It dries very hard and has a long open time. I went with satin sheen as these old manufacturers did not use semi or high gloss on their machines. I would have preferred an oil based paint, but I live in California.

Nice band saw! I see an aftermarket upper blade guide and the clicking miter gauge doesn't appear to be a WT Driver Line, but also an aftermarket type. Document your restoration on this thread as best you can.
 

Attachments

  • 42448~2.jpeg
    42448~2.jpeg
    111.8 KB · Views: 26
Last edited:
To avoid these ads, REGISTER NOW!
OP
H

Hoorn

Well-known member
Joined
May 19, 2020
Messages
1,140
Location
Glendora, CA
Just about done with the band saw itself. I have two Walker Turner motors I'm simultaneously refurbishing to see which one I prefer.

PXL_20230803_221331206.jpg

PXL_20230803_221341303.jpg

PXL_20230803_221355406.jpg

PXL_20230803_221451764.jpg

Of interest, the original motor pulley is cast iron. Even by 1940 most pulleys were zamak or cast aluminum but this one is a very heavy solid cast iron example.

PXL_20230803_221559644.jpg

PXL_20230803_221608123.jpg

PXL_20230803_221615325.jpg
 

jsulli

Active member
Joined
Feb 12, 2023
Messages
31
@jsulli this is it, you found the correct thread. Welcome aboard and can't wait to see your progress pictures.
1692362653022.jpeg
I just came across this walker press for sale with the ships captain wheel. the table has the arc of shame and seller says it runs fine. It comes with a steel table base. problem is he's 2hrs away. he wants 140.00 for everything. Good deal?
 
OP
H

Hoorn

Well-known member
Joined
May 19, 2020
Messages
1,140
Location
Glendora, CA
@jsulli difficult to judge based on a single photograph and without seeing in person. Is it a W-T motor, how does it run? Looks like it may have an aftermarket chuck, what is the runout and how smoothly does it operate? Condition of the bearings and the spindle pulley?
The ships wheel is a plus, and has resale value, but a DP is something that really needs to be inspected prior to purchase. The price is not awful.
 

jsulli

Active member
Joined
Feb 12, 2023
Messages
31
@jsulli difficult to judge based on a single photograph and without seeing in person. Is it a W-T motor, how does it run? Looks like it may have an aftermarket chuck, what is the runout and how smoothly does it operate? Condition of the bearings and the spindle pulley?
The ships wheel is a plus, and has resale value, but a DP is something that really needs to be inspected prior to purchase. The price is not awful.
Thanks for the quick reply and information. I was interested in this for the ships wheel to put on one I am restoring. seems they are hard to find and offered fellow his price for the wheel only, which he didn't want to do. basically it would be a buy for the wheel and rest spare parts, the table has the worst arc of shame that I"ve ever seen. although I have a nice table to replace.
 
OP
H

Hoorn

Well-known member
Joined
May 19, 2020
Messages
1,140
Location
Glendora, CA
If that is the purpose, you will reclaim the $140 by selling the spindle pulley, handles, feed stop, spindle cover, etc.

The ships wheel looks badass on the DP, but most agree it's not the most user friendly design.
 

motorcitykid

Well-known member
Joined
Dec 3, 2022
Messages
421
Location
Detroit River
Just about done with the band saw itself. I have two Walker Turner motors I'm simultaneously refurbishing to see which one I prefer.

PXL_20230803_221331206.jpg

PXL_20230803_221341303.jpg

PXL_20230803_221355406.jpg

PXL_20230803_221451764.jpg

Of interest, the original motor pulley is cast iron. Even by 1940 most pulleys were zamak or cast aluminum but this one is a very heavy solid cast iron example.

PXL_20230803_221559644.jpg

PXL_20230803_221608123.jpg

PXL_20230803_221615325.jpg
My God is this beautiful example of artisan level machinery! I aspire to do a similar restoration on this Childs&Co 14” Bandsaw I just acquired. I absolutely love old machines.
 

Attachments

  • IMG_2013.png
    IMG_2013.png
    5.5 MB · Views: 26

jsulli

Active member
Joined
Feb 12, 2023
Messages
31
If that is the purpose, you will reclaim the $140 by selling the spindle pulley, handles, feed stop, spindle cover, etc.

The ships wheel looks badass on the DP, but most agree it's not the most user friendly design.
1694202272704.jpeg
came across a head assembly with the ships wheel. cleaned up and just need to make a key way for it. should be done with this soon I hope.
 
OP
H

Hoorn

Well-known member
Joined
May 19, 2020
Messages
1,140
Location
Glendora, CA
@motorcitykid really appreciate the kind words, looking forward to what you can do with your band saw. Hope it's mostly complete as I imagine finding spare parts for a "Child's & Co" would be difficult.
 

jsulli

Active member
Joined
Feb 12, 2023
Messages
31
@jsulli looks like it also has a W-T table lift.
I tried installing the table lift from a floor model on the bench model. problem was the lift has a round disc that connects to a production table. tried to place disc on small table underneath and doesn't sit flush. table lift is difficult to raise even on floor model, all gears are fine cosmetically. would you know if lifting is a common problem with these?
 

GraniteDragon

Member
Joined
Sep 23, 2023
Messages
9
First post! Hello!
SO a couple days ago i picked up a WT drill press, the first one i've ever owned. I got it from a farm supply auction yard, which was different in itself. I'm not sure how long it was there but when i picked it up it had a pretty solid layer of dust on it. It was stored outside and I'm 90% sure it got rained on multiple times. The worker there let me plug it in and verify that it actually ran, bunch of dust came out of it but it operated. I'm very unknowledgeable on this topic and come seeking your help! So many questions. How do i move the unit up and down on the support pole? I don't even know what the support pole is actually called. How do i grease the motor? I'm planning on doing one project with it and then tearing it down and completely rebuilding it. Unless i should do that first? Thanks for taking your time to read this noobs post. Heres some pictures of it!
 

Attachments

  • Badge.jpg
    Badge.jpg
    150.1 KB · Views: 21
  • Front Pulley.jpg
    Front Pulley.jpg
    121.9 KB · Views: 18
  • Motor Badge.jpg
    Motor Badge.jpg
    152.8 KB · Views: 13
  • Rear Pulley.jpg
    Rear Pulley.jpg
    151.8 KB · Views: 15
  • Press.jpg
    Press.jpg
    226.9 KB · Views: 14
  • thumbnail.jpg
    thumbnail.jpg
    161.7 KB · Views: 18
  • Walker Turner.jpg
    Walker Turner.jpg
    184.8 KB · Views: 17

7th Kahuna

Well-known member
Joined
Aug 4, 2012
Messages
1,704
Location
Los Angeles, CA
First post! Hello!
So many questions. How do i move the unit up and down on the support pole? I don't even know what the support pole is actually called. How do i grease the motor? I'm planning on doing one project with it and then tearing it down and completely rebuilding it. Unless i should do that first? Thanks for taking your time to read this noobs post. Heres some pictures of it!
Hello and Welcome.

Thanks for sharing the pictures. That is a solid machine you have there. I am no expert on Walker Turner but drill presses are for the most part pretty simple.

The support pole is the column. Greasing the motor probably isn't what you are imagining. I'd skip that for now unless it is telling you it needs it. I would replace the cords, sooner rather than later. Those look pretty crusty. You might want to add some grease to the mechanism in the head (the gears that move the chuck up and down) if it has been sitting out. You might also use some compressed air to clean out the motor. Try to blow up and out rather than down and in. At some point you may need to open that motor up for cleaning and / or to replace the bearings. Does it spin smoothly if you remove the belt? How are the belts? Flexible? If need be, a segmented belt can be acquired from some place like Harbor Freight. I can't recall if you can change the belt without disassembly or not.

Link Belt https://www.harborfreight.com/vibration-free-link-belt-43771.html

If you need a parts diagram to help built confidence (I like them), check out http://vintagemachinery.org/

If everything is moving freely, I don't see why you couldn't do your project first. Most of these machines get put back into use without a complete tear down. I would check for run-out. Depending upon what you are planning, this may or may not be an issue. In its simplest, you can check for run-out by just chucking a small bit you know is straight (roll it on a table) and then spinning the chuck. If the point of that bit 'wobbles' back and forth then run-out is an issue. A little run-out in woodworking may not be an issue. A little run-out in metal work may. There is no adjustment for run-out. You will be rebuilding or replacing the machine.
 
Last edited:

7th Kahuna

Well-known member
Joined
Aug 4, 2012
Messages
1,704
Location
Los Angeles, CA
Nice little touch. On the upper wheel arm, this 1940s LA based supplier "Frey Industrial Supply Co."

105089.jpeg

I kept my Walker Turner drill press simply because I liked the retailers tag. If only the Walker Turner tag were in as good a condition. I couldn't find any information on Sun Machinery.

sun.jpg

wt.jpg

Oddly I don't seem to have any pictures of the whole machine.

I paid $40 for it. The ad was for a '$60 Craftsman standing drill press' and 'another brand with a stand'. They didn't even list a price for the WT. No respect. You can see it there in the back. It was super dirty but appears to be in good mechanical condition. No arch of shame. Sadly I haven't had an opportunity to give it anything more than a quick wipe down.

00c0c_1eTDCfhhqVb_600x450.jpg
 
Last edited:

7th Kahuna

Well-known member
Joined
Aug 4, 2012
Messages
1,704
Location
Los Angeles, CA
^ Ah come on, I bought them both, you know he gave me a discount. :giggle:

I think they were $50 and $60, but he knocked off $20 if I took both of them.

The vari-slo was missing a part so it wouldn't lock. With the help of two members here, I was able to get the measurements for the part and get that part machined. Works great now.
 

GraniteDragon

Member
Joined
Sep 23, 2023
Messages
9
Hello and Welcome.

Thanks for sharing the pictures. That is a solid machine you have there. I am no expert on Walker Turner but drill presses are for the most part pretty simple.

The support pole is the column. Greasing the motor probably isn't what you are imagining. I'd skip that for now unless it is telling you it needs it. I would replace the cords, sooner rather than later. Those look pretty crusty. You might want to add some grease to the mechanism in the head (the gears that move the chuck up and down) if it has been sitting out. You might also use some compressed air to clean out the motor. Try to blow up and out rather than down and in. At some point you may need to open that motor up for cleaning and / or to replace the bearings. Does it spin smoothly if you remove the belt? How are the belts? Flexible? If need be, a segmented belt can be acquired from some place like Harbor Freight. I can't recall if you can change the belt without disassembly or not.

Link Belt https://www.harborfreight.com/vibration-free-link-belt-43771.html

If you need a parts diagram to help built confidence (I like them), check out http://vintagemachinery.org/

If everything is moving freely, I don't see why you couldn't do your project first. Most of these machines get put back into use without a complete tear down. I would check for run-out. Depending upon what you are planning, this may or may not be an issue. In its simplest, you can check for run-out by just chucking a small bit you know is straight (roll it on a table) and then spinning the chuck. If the point of that bit 'wobbles' back and forth then run-out is an issue. A little run-out in woodworking may not be an issue. A little run-out in metal work may. There is no adjustment for run-out. You will be rebuilding or replacing the machine.
Thanks for all the great information! Yeah my current project will not be bothered by runout at all. I have yet to strip the machine down but i'm pretty sure there is a bit of runout. So i'll be reading on that next lol
 
To avoid these ads, REGISTER NOW!
Top Bottom