To avoid these ads, REGISTER NOW!

Below 265 SQ/FT Tiny Tokyo Shop

All workspaces below 265 squarefeet.

Guster

Well-known member
Joined
Mar 11, 2012
Messages
1,543
Location
Auckland, New Zealand
Looks like a sturdy bracket on that track. Is there one on each side?

Those little mills are handier than not having a mill but demands patience. That mill has some features that lends itself to being a little on the supple side for anything more than aluminium. Next step up would be something like a Sieg square column mini mill. Maybe a little less portable but won't take up too much space. Then you also have the option of converting it to CNC later down the track.

PS. Oh no... just looked at local Makita track part prices and Fathers day is coming up!
 
To avoid these ads, REGISTER NOW!
OP
B

Bakafish

Well-known member
Joined
Feb 7, 2017
Messages
477
Location
Tokyo
Dependancies are the bane of rapid progress... When I rebuilt the bathroom and my shop (really more of an office full of tools at this point) I ran a lot of additional electrical lines to support more 200v equipment, a dedicated clothes dryer and to clean up retrofitted air conditioning wiring that was run outside of the house. I detailed some of the electrical constraints in this post, but basically all this new wiring (including a beefy grounding line) have been sitting unconnected in the floor space below the electrical panel waiting for me to replace it with one that has additional capacity to support these new circuits. As the pantry shares the wall where all the circuits converge it made sense to open it up and get all this taken care of while access was still exposed.

This is someone's idea of how to wire a house :shocking:

rats_nest.png


Just a tangled mess of unmarked and unsecured wires :wtf: so that will need cleaning up as well.

In Japan all circuits sit behind a single large (60A in my case) GFI breaker for safety, but that means any ground fault will trip the entire panel. I wasn't crazy about that as I have a Miller TIG welder and potentially other experimental stuff I want to start using and I don't want the stress of potentially knocking out all power to the building when I'm working. The panel I ordered has a lot more flexibility as it is designed to support solar and EV charging, so I can have an independant GFI domain for the more sketchy equipment and not have to worry about disrupting house power if something gets temperamental.

Another fascinating aspect of the 'Japanese way of doing things' is the crazy variety of consumer electrical panel designs available. These units are basically modular, the individual breakers are easily swapped out, there is no actual reason for the sheer overkill of designs, but the Panasonic catalogue has 4 families, 200 pages, thousands of preconfigured and physically distinct panels offering everything from full computerized current tracking, earthquake sensing auto cut off, Solar and Fuel Cell cogeneration support, EV and IH range capabilities, and on and on. Instead of just offering a few basic frames and having the customer add the GFI and breakers required like we do in the states, they offer specific models for every conceivable need. The inventory and marketing costs to do this must be astounding, the whole approach is incomprehensible. So it took me many days to wade through all the offerings to find a unit that could be bent to my will without too much additional costs. The replacement unit was about $600 US and I bought a few hundred more for some additional oddball breakers, like the one that supports a special combo 200v/100v 20A outlet in my shop.

combo_plug.png


I also bought an interroom exhaust fan to try and pull excess heat out of the pantry as I worry it is getting way too hot in the summer. I eventually want to seal and insulate the crawl space beneath the house, and ideally I would have a duct running down a story to the coolest corner in the crawl space to help keep it naturally conditioned. But that's just adding more dependancies, so it will have to be retrofitted if I ever get that far, I may just have to do spot cooling or forgo summer root storage in there for now.

The other things I need to do are adding a new circuit/outlet to the wall behind where the new cabinets will go to power the LED lighting, the compact freezer and any additional appliances (I want to custom build a vacuum sealer) and I also want to run a CO2 line as I will have a beer tap in the kitchen when I remodel it, and I want the CO2 bottle and regulator remotely located in some of the dead space in the pantry. Lastly I want to add one last 50A circuit to the driveway to someday support an electric car charger.
 

Motoman1100

Well-known member
Joined
Oct 2, 2014
Messages
443
Location
GA
Thanks for the update. It just never gets old seeing how things are put together around the world.
 
OP
B

Bakafish

Well-known member
Joined
Feb 7, 2017
Messages
477
Location
Tokyo
old_panel.png


This is the old panel, mounted close to the ceiling on the other side of that wall with the mess of wires. The 60A current limiter there was how the electrical companies limited the maximum amount of power you could consume, is being phased out now that the meters have been upgraded to "smart meters" and have their own software controlled circuit. The three wire feed from the meter (and from the meter to the pole) are all 14mm sq, so they are only rated for 60A anyway, so getting a higher current GFI (75A or 100A) would have required pulling a more robust cable and requesting upgrading the drop from the pole and a special "exception" as 60A is the maximum for stand alone single family houses. Suffice to say I don't want to create any reason for them to start investigating what the **** is going on here that requires more power, I will set up current monitoring to help keep under the threshold.

The current breaker does have a serious limitation to the design though, because of its design it can trip on as little as 30A depending on how balanced the draw is. In Japan you get two 100v branches 180 degrees out of phase from each other. Going across the 2 branches gives you 200v, but the primitive current limiter can't really account for that, so it will throw at well below 60A if there isn't symmetry. My hope is that the "Smart Meter" will do a better calculation of total draw, and once this new panel is all sewn up I can request they remove the limiter, but for now it is acting as the main power disconnect and will be the only potentially live circuit (on its input side) when I swap the two panels.

new_panel.png


On this new panel, there are clearly a lot more circuits, but it also is set up to isolate them better. There is a whole sub-block (the far left) on the input side that is designed to go in front of the current limiter (which I will not use for now as I'm not interested in moving live wires from the current limiter's input side) but I can also use it for a 120v/60Hz sub panel driven by an inverter for US tools for example. Directly next to the main GFI there is a smaller independent 30A GFI breaker, it is spec'ed for an EV charger but I will use it for the welding outlet in my shop for now. I am running a 50A capable drop to the driveway just in case we ever get a car (so unnecessary in the heart of Tokyo, but that new Taycan or the Audi Sport may be something the waifu can expense... worth being prepared! :pimpflash )

On the far right lower corner is a 2-way breaker for Solar or Co-generation. They have these fuel cell based generators that allow you to use natural gas to generate electricity (and use the waste heat to make hot water.) I can't recall ever having a power failure here since the big earthquake, so not really worth investing in such a redundancy, but I have flat roofs so solar isn't off the table. It will go unused.
 

garfieldzzz

Well-known member
Joined
Jun 30, 2014
Messages
305
Location
BY
Tokio is definately special and I loved it every time being there. Its absolute interesting to follow your jurney through abysses and shallows round there. keep on going please.
 
Last edited:
OP
B

Bakafish

Well-known member
Joined
Feb 7, 2017
Messages
477
Location
Tokyo
The electric panel swap went flawlessly. I spent several days vacuuming and slithering around in the tiny paved crawlspace in order to run the 50A capable 200v line for the electric car charger. Since the panel is near the ceiling on the second floor it required me to fish it through a first story wall and then another 20 meters drilling through all the first floor flooring joists, then up through the outside wall to a special Panasonic EV outlet. This is the sort of labor really makes you respect the guys who do this sort of work for a living. I was covered in bruises by the time it was over, despite kneepads and protective gear. 25 years of grime filled the space, I was spitting up dust and spiders for days...

Panel_Done.png

panel_closed.png


With all the wiring complete, the new grounding rod sunk in the yard and the panel in place I installed the CAT6 drop next to it (for potential home power monitoring at some point.) I then properly secured all the runs and ran several pull strings for any future pulls, as I wouldn't be able to easily pull the sheetrock once the pantry cabinets were in place. I replaced the sheetrock panel I had carefully removed to access the wiring, this house uses 5/8" sheetrock which is very unusual here in Japan and must be special ordered in large quantities, so I treat it like a precious resource and must carefully reuse any piece I work on.

Then I spent several days stripping off the old wall paper, patching, priming and repapering the room. I intalled a new outlet located in the service area behind the cabinet, that's where I ran the CO2 line as well since I plan on locating a gas cylinder for a kitchen beer tap in some of the dead space created by the odd room dimensions. I also put in a small ventalation fan near the celing that pulls hot air out of the room (during summer it can get really hot in there, which is not great for a pantry obviously) I was tempted to put a cold air duct from the crawlspace, and still may, but I will see how it does this summer. I have been trying to keep away from too much feature creep, and will have good access to add the duct when remodeling the bathroom under the pantry if it is needed.

I then cut and assembled the base of the cabinets. I used my Festool Domino and Kreig pocket screws with Titebond III on the 18mm Baltic Birch plywood. This was hand fininshed with domestic water based polyurathane over the system's poly based primer using foam brushes (surprisingly difficult to find here, go figure.) I used Sigutsune leveling feet (my hardware company of choice) and got it leveled out before lagging it to the wall sills. Next I wanted to build the Freezer platform section and Shochu storage unit. We have the largest consumer stand alone freezer available here in Japan, of course it is pretty tiny, but better than nothing. I'm getting old and lazy, and like things within reach, so I wanted to lift it up a few feet to better access stuff inside. I will put a large root drawer underneath it, and so I put ventilation in the back that will use the convective draw of the compressor heat to pull fresh air through the lower section.

base_frame.png


I've commented before about Shochu, I tend to get large quantities as part of the tax system here, so an efficent storage system is needed and I spent days doing modeling to create a flexable storage system that could store the large 1.8 liter bottles, as well as standard wine, smaller 900ml style bottles and even standard beer cans on the same platform. The design is pretty complex, and really begs for a CNC router to pound out the 15 (euro slider for cost reasons) sliding shelves, but I will try to do it by hand using templates before dong something rash. When complete a shelf can hold either 3 big bottles, 6 small/wine bottles, or 24 cans, so it should handle a decent stockpile. I intend to have additional refridgerated storage in the dining-room when I remodel the kitchen, storage space always evaperates faster than you expect (nature abhors a vaccuum.)

right_cabinet.png
 
OP
B

Bakafish

Well-known member
Joined
Feb 7, 2017
Messages
477
Location
Tokyo
For the larger panels I attepted to use my Graco Ultra-Max airless sprayer. The tip was a Fine Finish Low Pressure FFLP210 that was shipped with the unit (a domestic model sold here in Japan) but it applied way too much finish. Graco barely has any footprint here in Japan, so I needed to order some lower flow tips (FFLP208 & FFLP308) from the US as they are not stocked by anyone here and must be special ordered at great cost. Recently Amazon US has really improved the international shipping system though, and despite some strange tracking issues, I've been relying on it for small items more and more, really saving a lot of money with it and able to get otherwise unobtanium stuff. I'm hoping the smaller flow tips will make the sprayer viable as I have found hand finishing with this poly is a little difficult to get it really level (at least in the current season.)

The left wall cabinets will use a really well built Fulterer German pantry slide for the pullout section and custom built rails for the other cabinet. Despite the space constraints here, there is no such product or storage concept similar to a pantry slide, so I reached out to Fulterer to see if there was a local distributer other than Haffle who didn't stock it and sold it for $1000. The regional Rep was very kind, he was going to specially import one for me, but I found it was easy enough to get one in the states for about $300 and have my parents forward it for $90, but I was impressed with the manufacturers commitment and the unit is really well built and surprisingly cheap for the complexity and quality.

The custom rails were made from (2) 800cm length sections of 1/4" thick 40mm Angle Iron bridged with plywood platforms with leveling feet tapped and threded directly into the rails. It was hot rolled steel, the finish wasn't bad, but I wasn't looking forward to grinding/sanding them clean and went to YouTube University to see what solutions were out there. A lot of Mercuric Acid suggestions, but there were a few claims of Vinegar being able to do the job and I happened to have a gallon jug from our last Costco run. After racking my brain on what kind of container I could use to soak the two rails in vinager without having to explain to the wifu why there was a giant plastic lined box full of vinegar bubbling in the driveway, I remembered I had some leftover VU50 PVC pipe and an end cap! 24 hours and far less vineagr than expected later, I had parts that were nice and clean with a gentle rub of scothbright. Some quickly applied spray primer and gloss white and they were ready for service.

rails_open.png


The point of the rails is that the cabinet can roll on the steel wheels seen mounted to the bottom panel to give access to the dead space created by the 135degree angle of the two walls. By sliding out the "pantry Slide" a space is created that the other cabinet can slide into, creating access to the trianglar area that would otherwise be inaccessable. A kind of Japanese puzzle box, but I'm hoping that it will work out well. I can put the Gas tank and regulator, DC power supply for lights, and potentially a vaccuum pump and humidity monitoring and fans for the root drawer. I really wanted to utilize every bit of space, and being able to put 'utilities' out of sight was a good usage I feel.

rails_closed.png


Of course I got sidetracked building my tools again.

My original plan for the assembly table was to mount the router plate directly on the top surface, but this would have required large holes on both sides to clear the depth of my router and I was really worried about screwing up the cuts and that access to the router would be poor. My table design has holes on the side panels to allow for clamping and potential extensions. So I decided to make an seperate table for the router that utilized these holes, I had some nice folding shelf brackets and made some interface plates from Aluminum angle stock I had in my stash. Cutting the router plate relief was less stressful on a smaller peice that was eiser to replace if I botched it. I had 3D printed a set of templates to do the cut witch I had tested out successfully on a piece of scrap, but I decided to make a dimensionally accurate template out of wood instead of relying on complex offsets. I did 3D print a corner template to get the corner radiuses right, using this template I could make sure I had a precision fit as I could slide it over the plate itself and confirm it was correct.

new_template.png

template_close.png

template_cut.png


I added a second layer of MDF underneath to increase the strength as I wanted a full width miter slot and that would leave a very weak seam that was unlikely to hold up very long. The Incra plate fit my cutout with zero clearance, a perfect fit.

table.png


I reenforced the soft lip where the leveling screws baered on the top with thin aluminum trim epoxied with JB weld. The Chinese made Aluminum miter slot was similarly epoxied after a dado was carefully cut into the finished top. The edges of the miter slot were hand filed to match the beveled edges of the top. The Incra plate was bought locally as the Incra dealer in Japan has a version custom drilled for the Makita 1801 router I use. The big Makita plunge routers have a threaded bore that allow you to change the depth from the top when table mounted. It ships with a long, but poorly finished phillips screw, which felt like garbage. So I made a replacement out of a stainless steel M6 treaded rod which I locktighted into a custom derlin adaptor (first chips on my mini lathe!) I used a tiny set of thrust bearings to further reduce friction and a special M8 bolt on the other side to give it a good interface, I will make some kind of "speed handle" at some point to assist raising and lowering the router. A Musclechuck quick change collet made for my somewhat uncommon Makita just arrived from the states and I will pull out my Mitutoyo dail indicator to get it well aligned.

On a recent buisiness trip to Sydney I raided the local woodworking shops and bought a few grand worth of tools that I couldn't easily get here in Japan. The one thing I was unable to get was the Incra Superfence that I wanted for the table. I ended up ordering it direct from the US when I got back, they seem to be backordered on a lot of their products so it was an 8 week wait, but they handled the international shipping with no problem and the rates were reasonable (way cheaper than ordering it from the local dealer who also had no stock.) It arrived in perfect shape, and again using aluminum bar stock I created adaptor plates to let the unit utilize the Festool style holes in my table top to mount it.

incra_mount.png


3D printed dogs with M8 barrel nuts inside create a super strong interface between the Incra mount and the table. I made my own knobs using a standard stainless steel M8 hex bolt and a 3D printed part. The table can be mounted to any of the four sides, is installed and removed with two of the 3D printed knobs. It is aligned level to the main table easily, only requiring a single 1mm shim on the bottom dogs to reach parallel. Here she is all decked out.

the_works.png


The Incra fence can be flipped around and used with the Festool rail system I made for small precision cuts. I really haven't been using that setup as much as I expected, but there is a lot more work to be done, so I will try to get it into the workflow.
 

Brian R

Well-known member
Joined
Dec 1, 2009
Messages
591
Location
Chestertown, MD
'25 years of grime filled the space, I was spitting up dust and spiders for days...'

Just spit out my coffee, thanks. Your posts are so detailed and the work is fascinating. Good job and thanks for posting.

Brian
 

nicholam77

Well-known member
Joined
Dec 18, 2016
Messages
2,655
Location
Minneapolis, MN
Wow, I've been missing this thread! The Incra gear looks fantastic.

I like the idea of the router table hanging off the assembly table a lot. Gives you more flexibility and access, like you said. Any flex in the folding shelf brackets when you use the router table?

Love your use of 3D printed parts for your woodworking.

The cabinets are looking very neat and tidy. :thumbup:
 
OP
B

Bakafish

Well-known member
Joined
Feb 7, 2017
Messages
477
Location
Tokyo
Wow, I've been missing this thread! The Incra gear looks fantastic.
I like the idea of the router table hanging off the assembly table a lot. Gives you more flexibility and access, like you said. Any flex in the folding shelf brackets when you use the router table?

table_down.png


They are rock solid but expensive, my favorite brand Sugatsune EB-303 that were bought for a fold away seat project (not yet implemented) for the entryway. Japanese houses are all "no shoes inside" and they are very skilled at quickly slipping them on and off while maintaining balance. They tend to wear shoes very loosely for that reason, but with size 12 feet it isn't really an option for me without going full 'clown mode.' I find it difficult to lace up while standing gracefully at my age, and need a little crutch to help. I'll detail it when I get to that stage.

It is easy to remove, but being able to quickly fold it really helps given the minimal space I actually have, and makes storing it much easier as well.

Love your use of 3D printed parts for your woodworking.

The cabinets are looking very neat and tidy. :thumbup:

The 3D templates for woodworking are a gamechanger I think, and I'm trying to advocate their adoption. As much as I salivate over the $300 Woodpecker one time router templating system, the fact that I can print out any profile I need for a few cents is hard to argue with. Plus you can basically do any complex scallop or pattern you can dream up as a single piece.
 
Last edited:

Brian_P

Well-known member
Joined
Jan 27, 2017
Messages
47
Location
Georgia
Love this thread - have been following for a year or so, but just realized I had never commented. Easily one of my favorites on GJ; I love seeing the different construction techniques and equipment in Japan! One of my favorite countries to visit, though I can't imagine moving there as an American and trying to do serious home improvement. Who knows, if they ever accept foreigners in my line of (actual) work, maybe I'll have to try one day.
 
OP
B

Bakafish

Well-known member
Joined
Feb 7, 2017
Messages
477
Location
Tokyo
Thanks for the encouragement guys!

I've been working on creating an adjustable router template tool similar to the Festool MFS-400 and wanted to use the nice Aluminum 15x60mm extrusions I use for other jigs. I was looking at the Woodpecker's website and was really surprised to see that they made a similar jig, and they were using the 15x90mm version of the same stuff I use!

Their solution was interesting, it looks super strong, but I didn't want to make any radical modifications to my extrusions since I use them for other jigs and such.

I made some overly complex prototype 3D printed parts, but my concerns fueled by the Woodpecker design turned out to be unneeded as due to favorable geometry and tight tolerances the thing just worked with friction.

router_rail_part.png


The 3d model, instructions and parts list are on Thingaverse, let me know if you have any questions.

router_rail_finished.png
 
Last edited:

gearhead1960

ALLIANCE MEMBER
Joined
Mar 21, 2019
Messages
1,793
Location
Manassas, VA, a small blot in history
Just finished reading this entire thread. Fascinating read and superb craftsmanship and engineering skills. Your comment about the pride in quality of manufacturing of consumer items is spot on. My wife and I do a fair amount of Estate Sale shopping and we always look for MCM styles from the 60's and 70's that are Japanese manufactured. The quality of the stainless is outstanding and never fails to sell for far more than what we pay. Thanks for the great write-ups and education about the culture....
 

sakurama

Well-known member
Joined
Oct 10, 2010
Messages
1,458
Location
Portland - the cool one.
Yes, this is a very cool thread. I'm glad I revisited it. I just love all the foreign garages/shops and the issues that come with them. The stylist that I work with is Japanese and I love her stories of the cultural differences we have and also the things we share. Some day I will visit but I'm very happy I don't have to chop my trash up to have it removed!

Gregor
 
OP
B

Bakafish

Well-known member
Joined
Feb 7, 2017
Messages
477
Location
Tokyo
I appreciate you guys stopping by. I said before, Sakurama is my spirit animal for all this. I stumbled across his mega-thread one day while trying to kill time in the office, and it struck me viscerally. Three or four days of uninterrupted reading later I realized that I wanted a house that with good bones that I could spend my days making better. (And that I had a lot to learn about grace and humility, but that's a different point.) I discovered Festool, Mitutoyo, and the simple beauty of Baltic Birch. I strive as an unbidden disciple to not bring shame on his great works.

Was in the heart of Ebisu the other night and stumbled upon a tiny motorbike shop, surrounded by food and entertainment (really strange place for it) and they had a bunch of what I think were single pot, OHC, 50cc 4-stroke Honda retro cafe-style custom labours of love that made me think of Gregor and how much he would enjoy it here. Japanese are unmatched in their ability to deep dive into hyper-specialized collecting, customization and curation of all cool things. Cutting up garbage is a small price to pay, and can be cathartic at times :lol2:
 
OP
B

Bakafish

Well-known member
Joined
Feb 7, 2017
Messages
477
Location
Tokyo
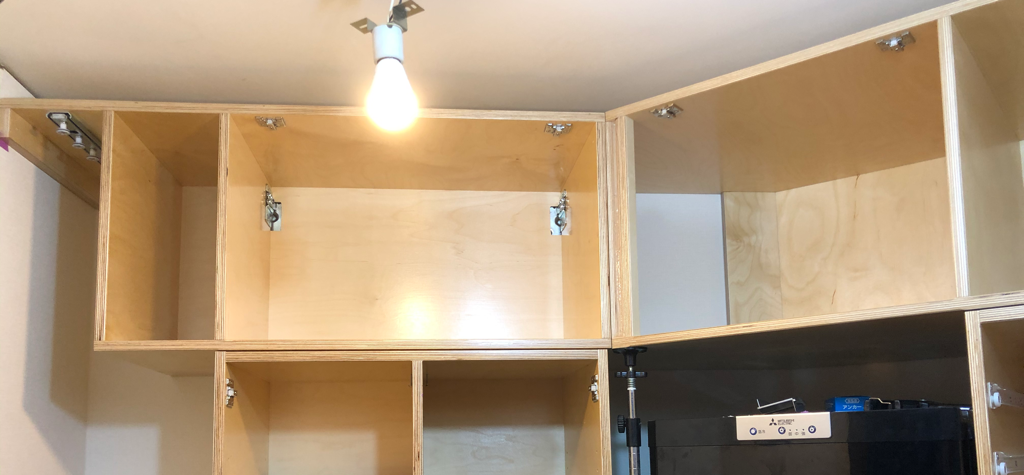
I finally got to put my homebrew System32 track system to the test. If you are not familiar, Festool offers a complete system intended to assist a router to drill precisely 32mm spaced 5mm holes used by many standardized Euro cabinet systems. They sell special guide rails, otherwise identical to their saw rails, but with a pattern of holes drilled in them. A LR-32 System kit designed for their routers that utilizes those holes to quickly knock out shelf holes and hinge mounts costs about $500 on top of the new rails you have to buy. That's assuming you already own Festool routers, which I don't and which are not available in Japanese native voltages anyway.

But as I've mentioned before, Makita uses a compatible track profile, and they make a router adaptor for using the guide rail for straight alignment. All I needed was to create some system of 32mm spaced holes and I was in business.

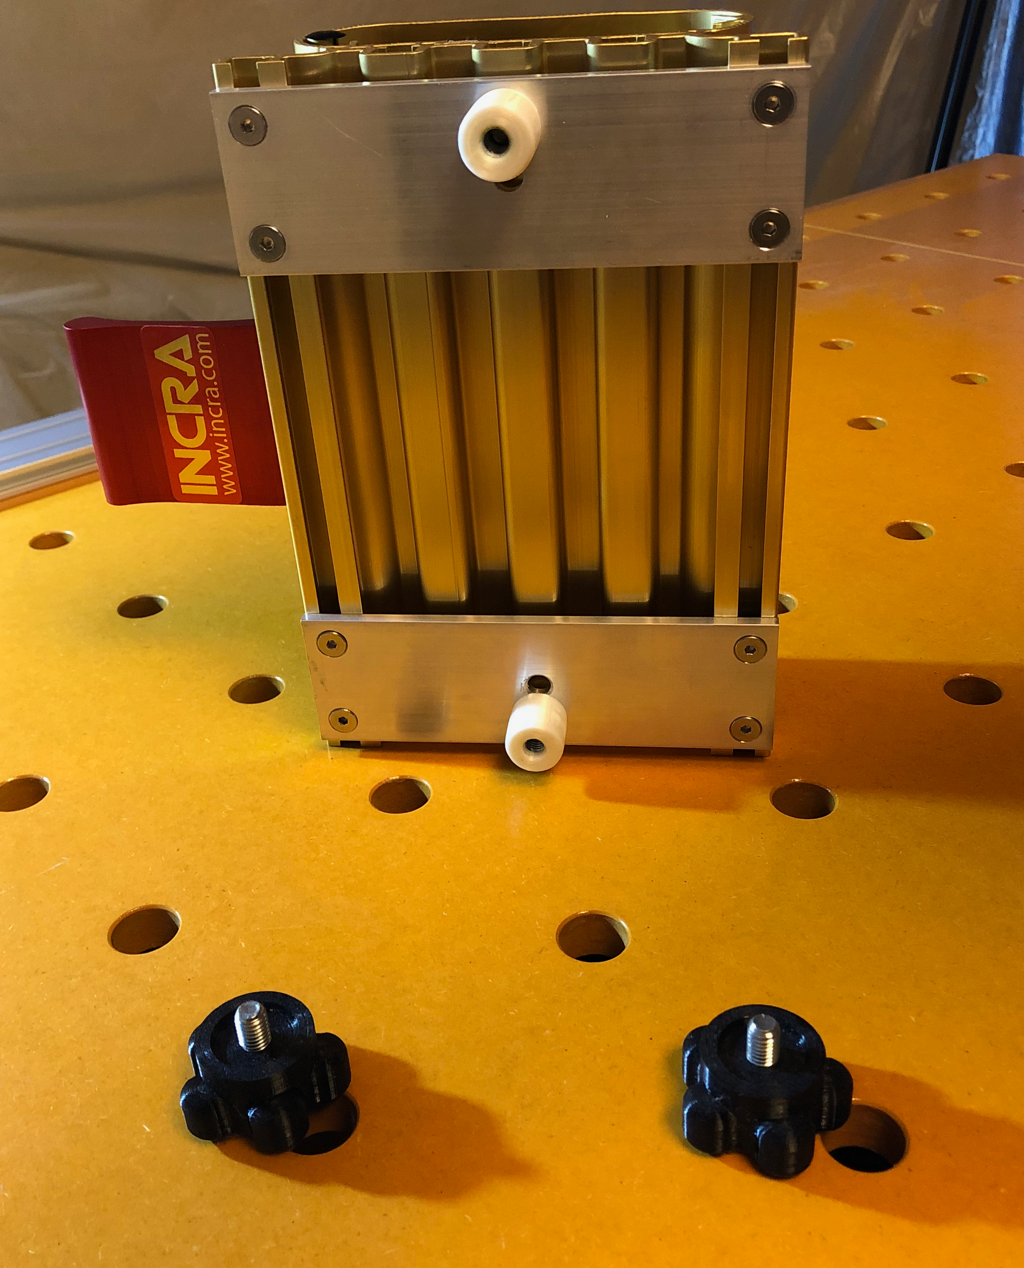
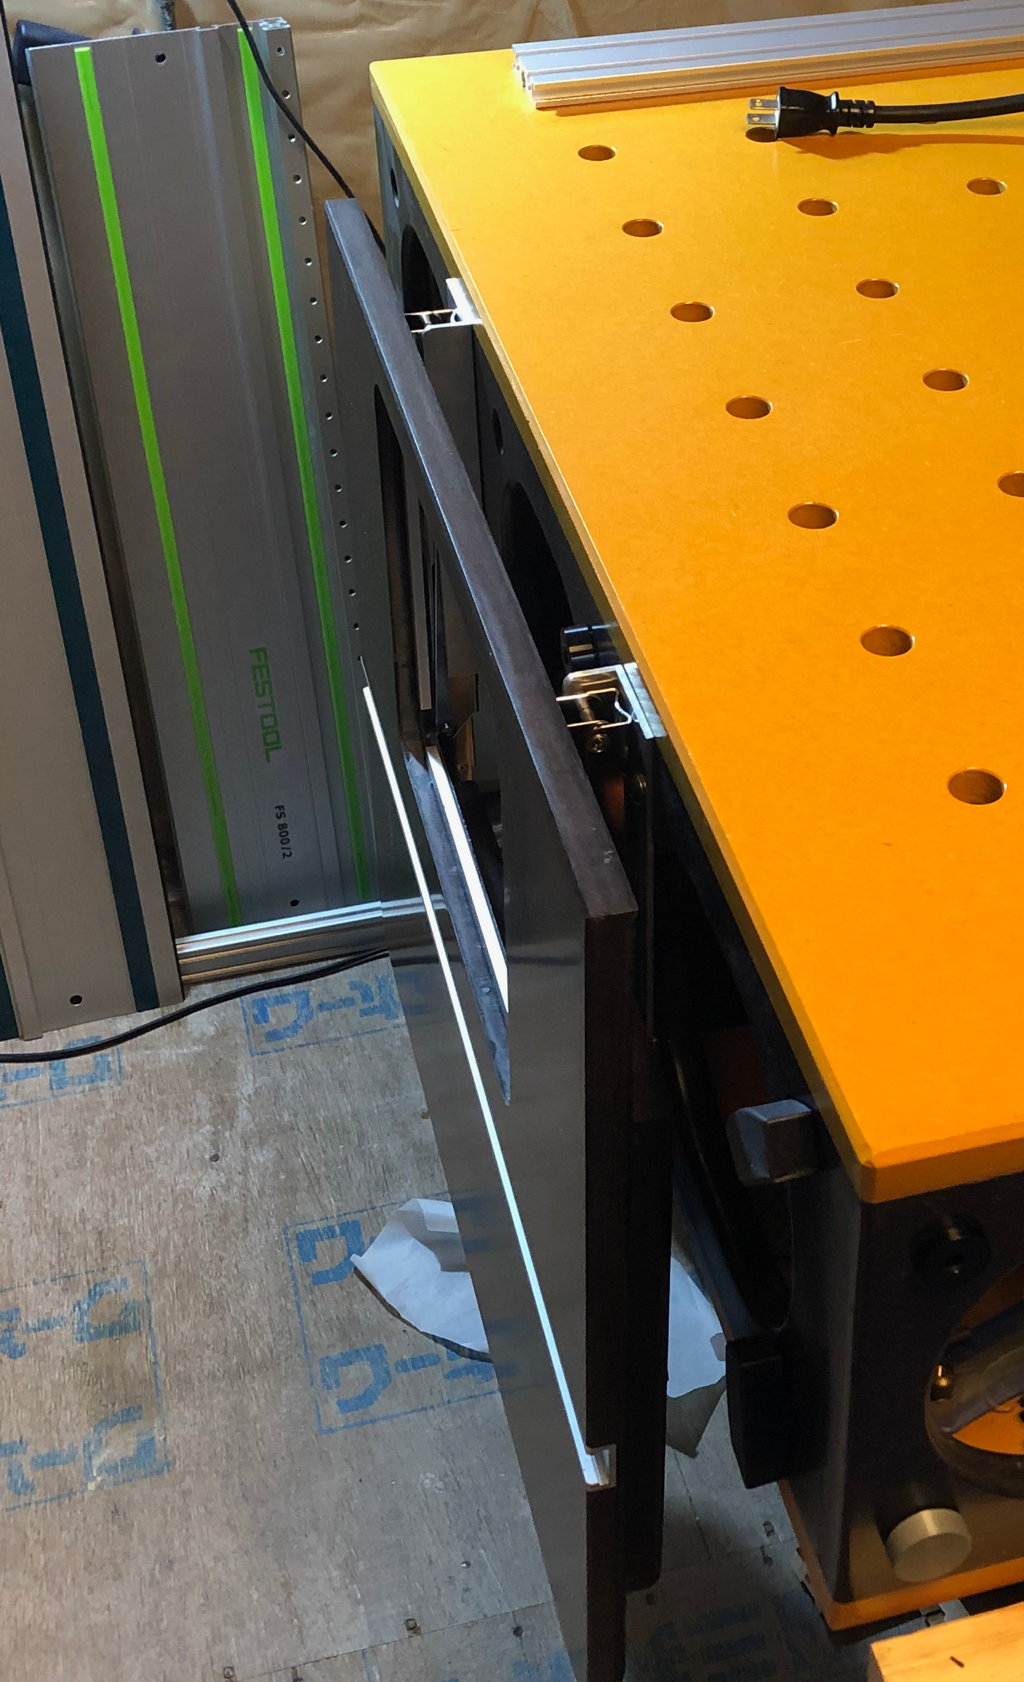
I was not crazy about the Idea of drilling holes in my expensive tracks (at the time Makita had yet to bring their track system here to Japan, it was US/EU only so I just had a few precious and expensive Festool Rails.) I had flown the router adaptor over from the states, and mocking everything up in Fusion 360, I could see that an inexpensive 20mm extrusion could be secured to the back rail of the guide rail, and provide the detents for the spacing.

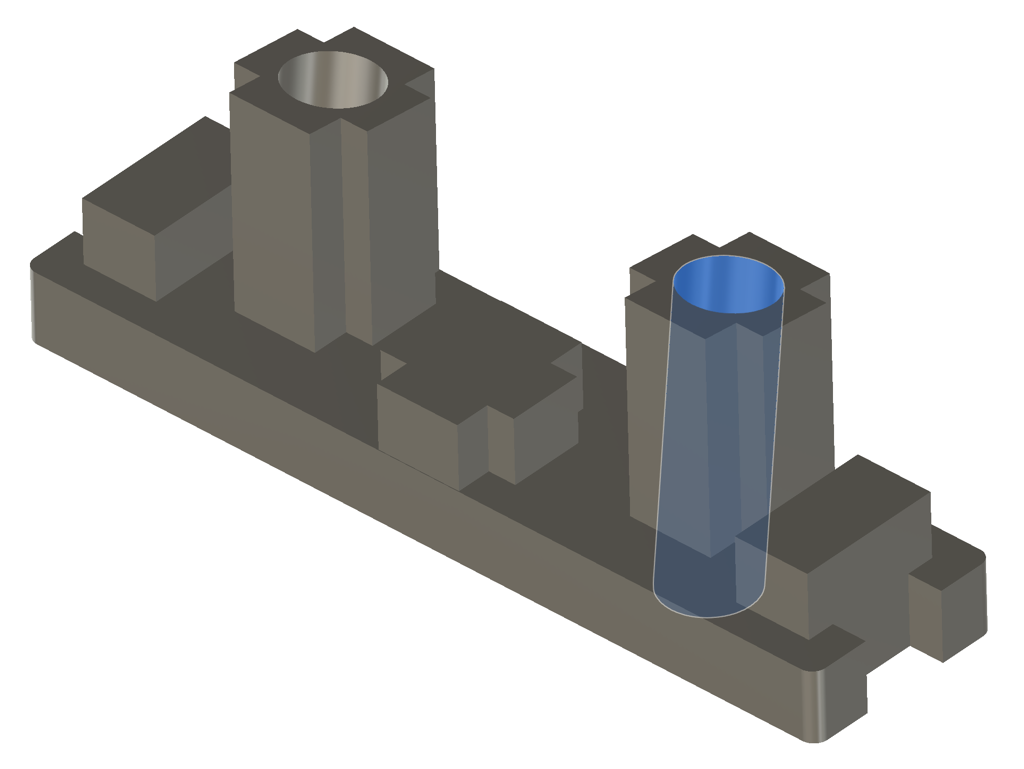
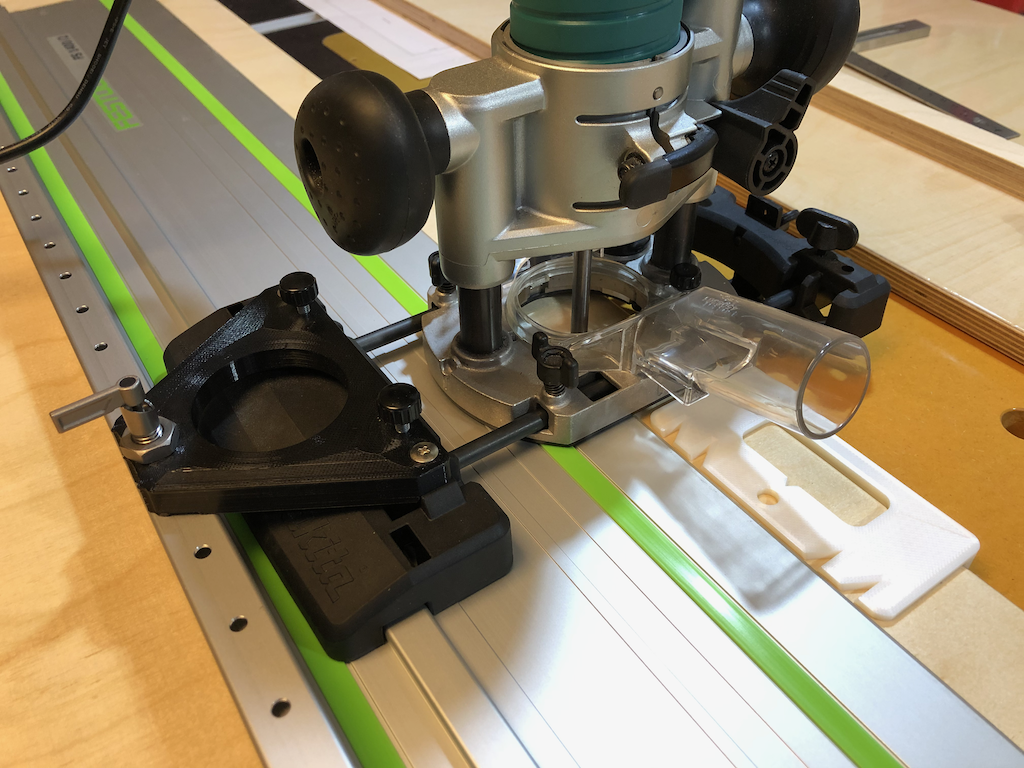
I found a precision spring loaded 
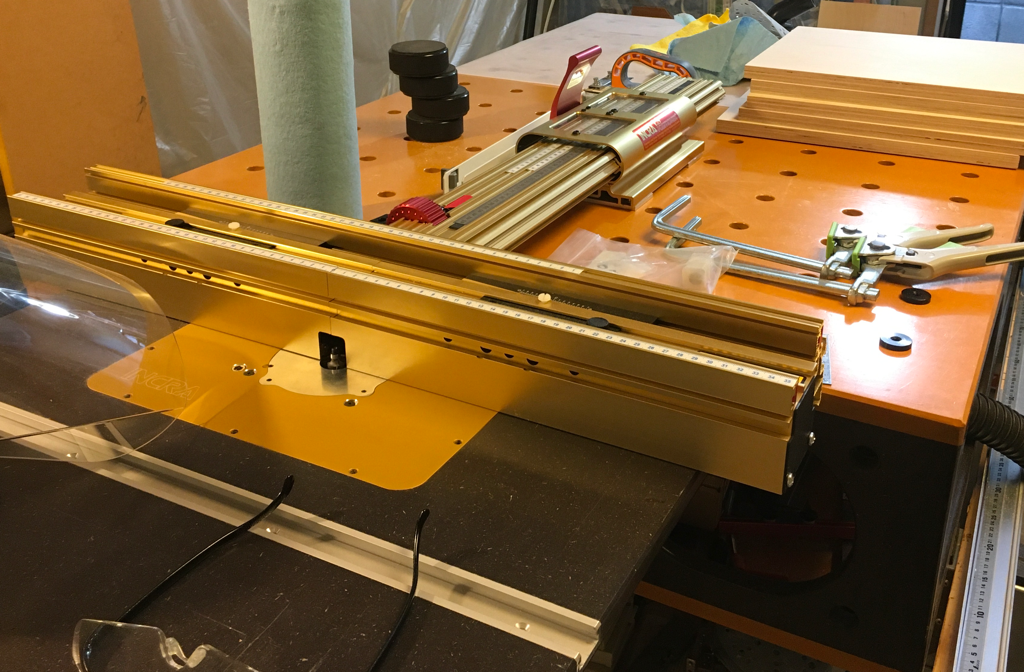
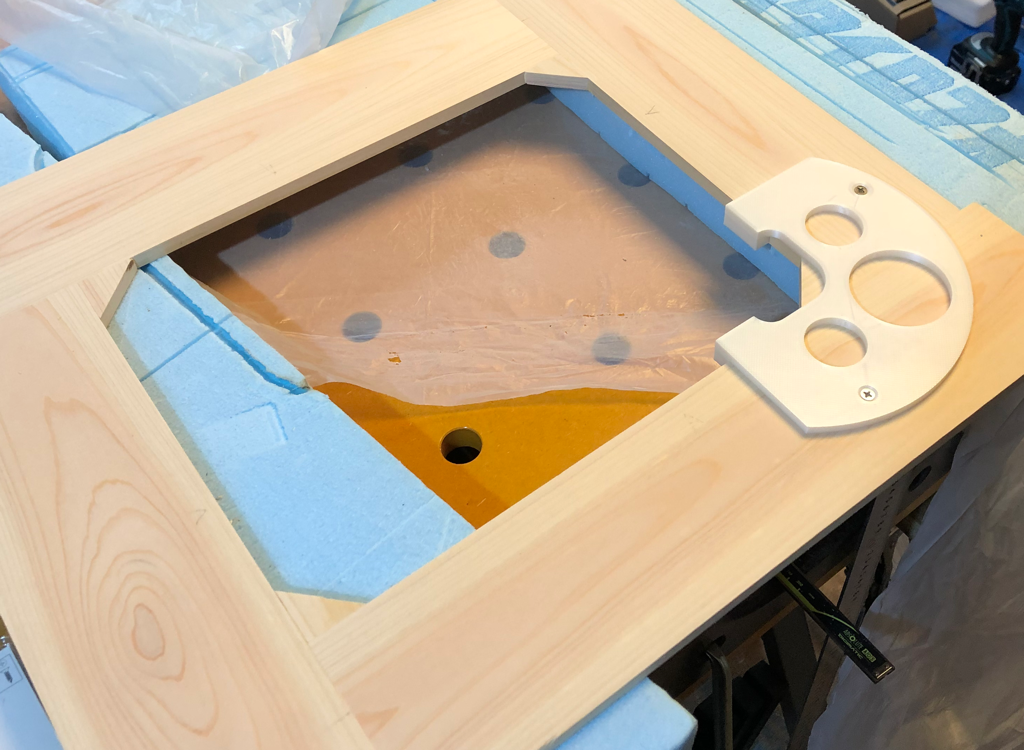
Indexing Plunger and 3d printed an adaptor that screwed to the existing mounting points of the Makita rail mount. That's the black triangular piece with the big round opening seen screwed to the top of the factory Makita guide.

system32_close.png


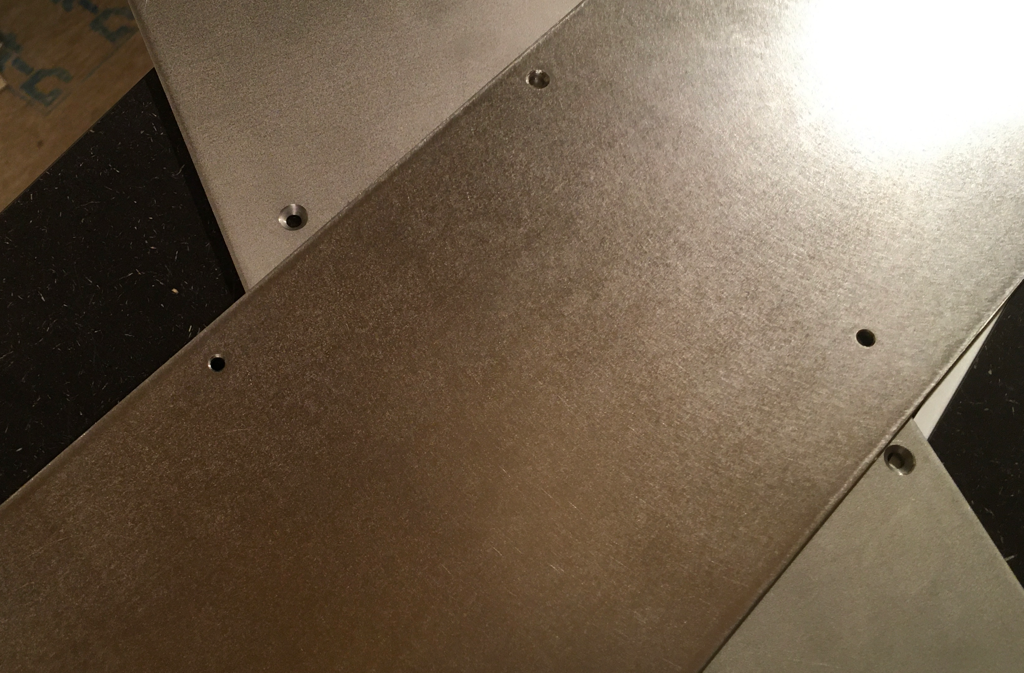
The aluminum profile has 3 sides grooved, and one side flat. I used my mini-mill with a 4.9mm DLC drill bit and carefully drilled 3 holes, clamping it to my desk vice, then releasing and resetting the x-axis vice like an inchworm. I then used a 5mm reamer to get the holes to size, and chamfered them with my Noga kit.

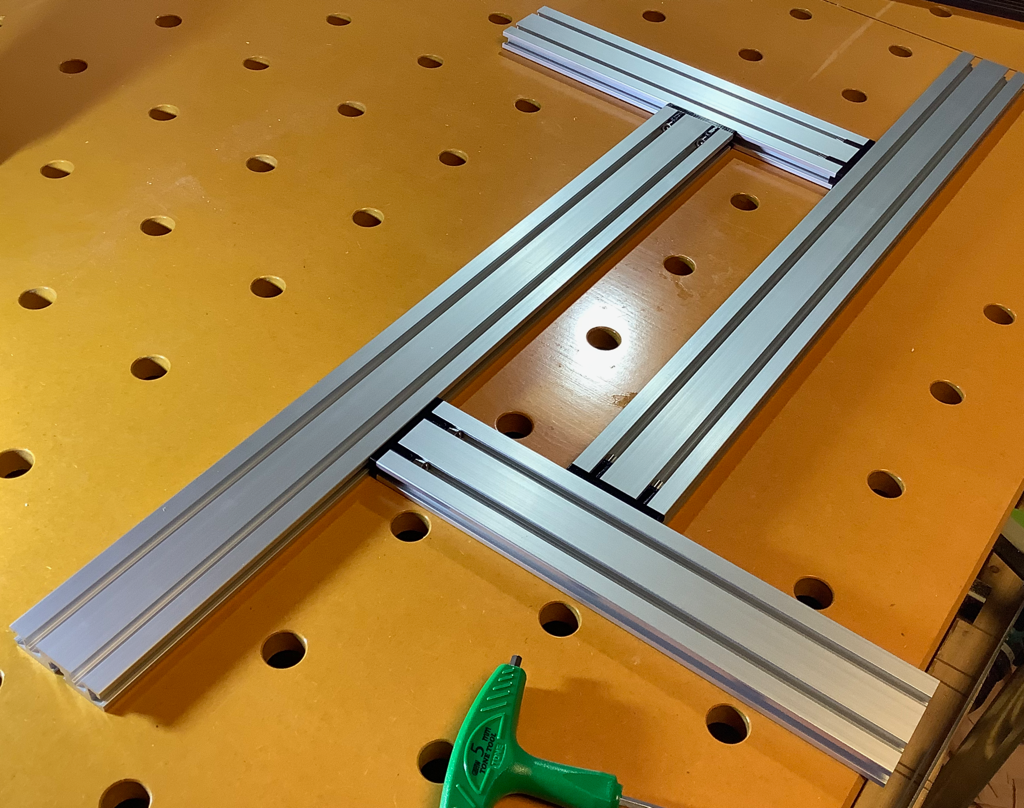
3d printed t-nuts with brass inserts connect the extrusion to the Festool guide rails, the screws are accessed from above with a few through holes drilled in the profile.

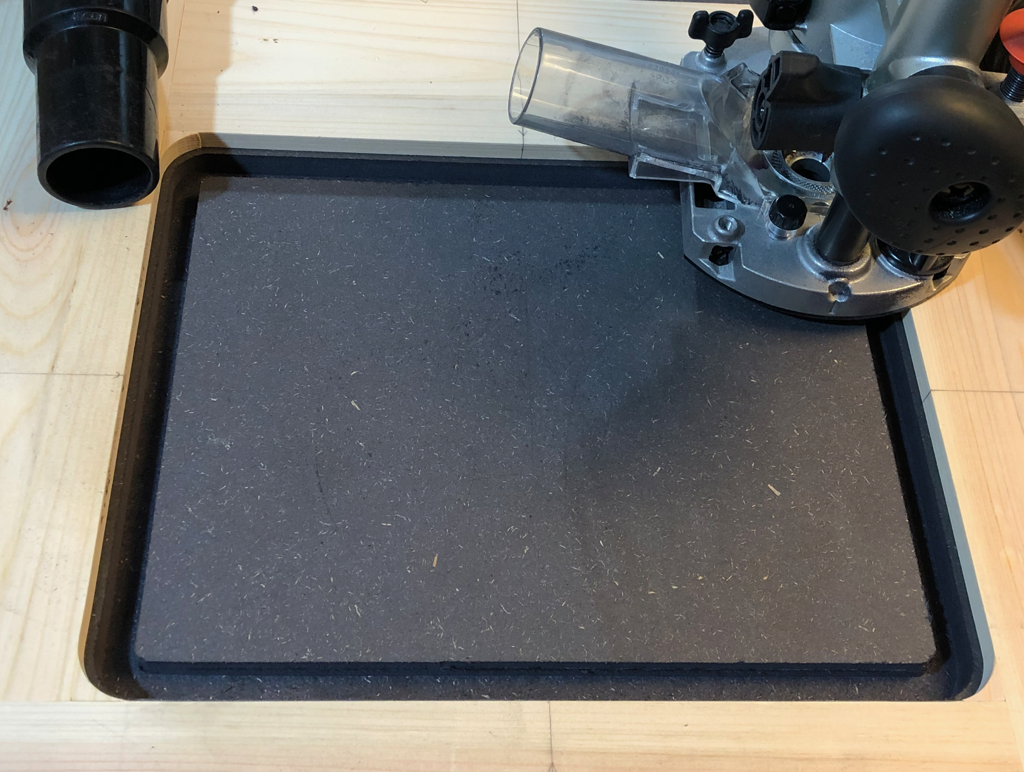
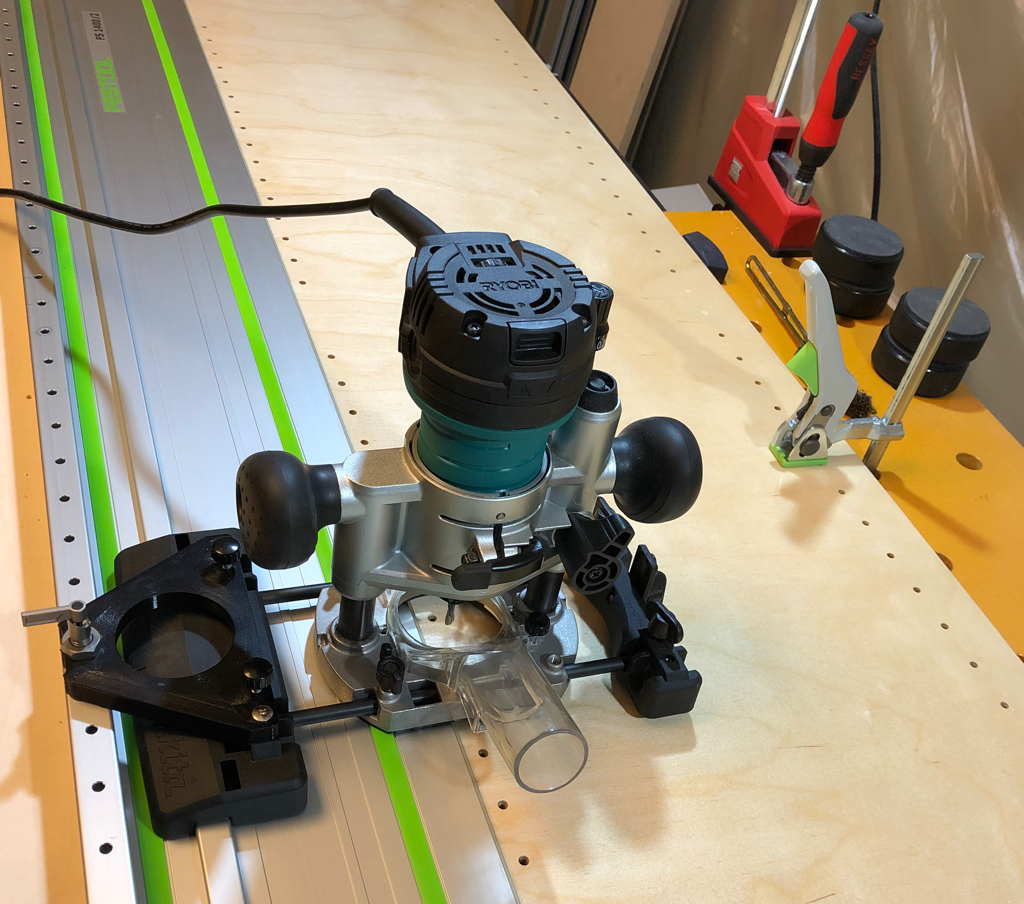
The only remaining issue was that my Makita 1801 router was a bit overkill for drilling little 5mm dowel holes. I had a 
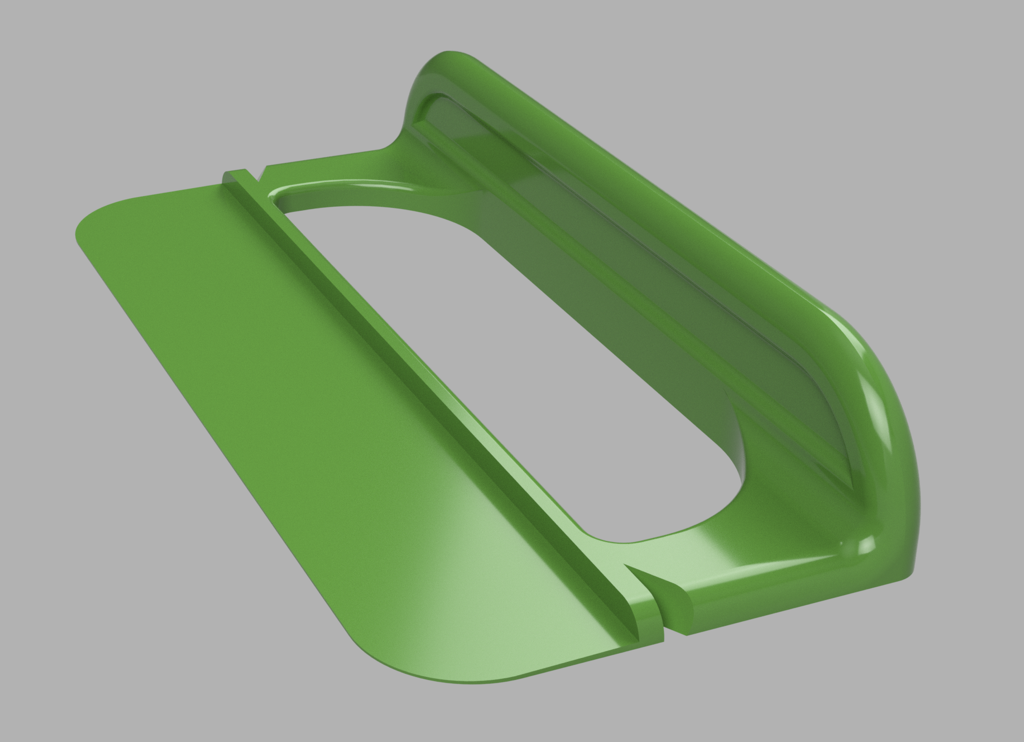
Ryobi TRE-60v trim router, which is a domestic market product. (The Ryobi name was leased to a different company in the US, they are not the same tools anymore.) But the Makita rail adaptor is designed for the two rail Makita plunge mount so I 3d printed a sleeve adaptor (the grey part) for the slightly smaller diameter Ryobi to fit snugly in the Makita plunge mount, and it works great! As much as I love my Makita tools, when I was shopping for the smaller trim router, the Ryobi just was a better design. Makita have subsequently released a very competitively featured 18v unit, but these high energy drain tools just make more sense to me to be corded. I can't see myself doing routing up on a ladder any time in the future, some things just make more sense as corded.

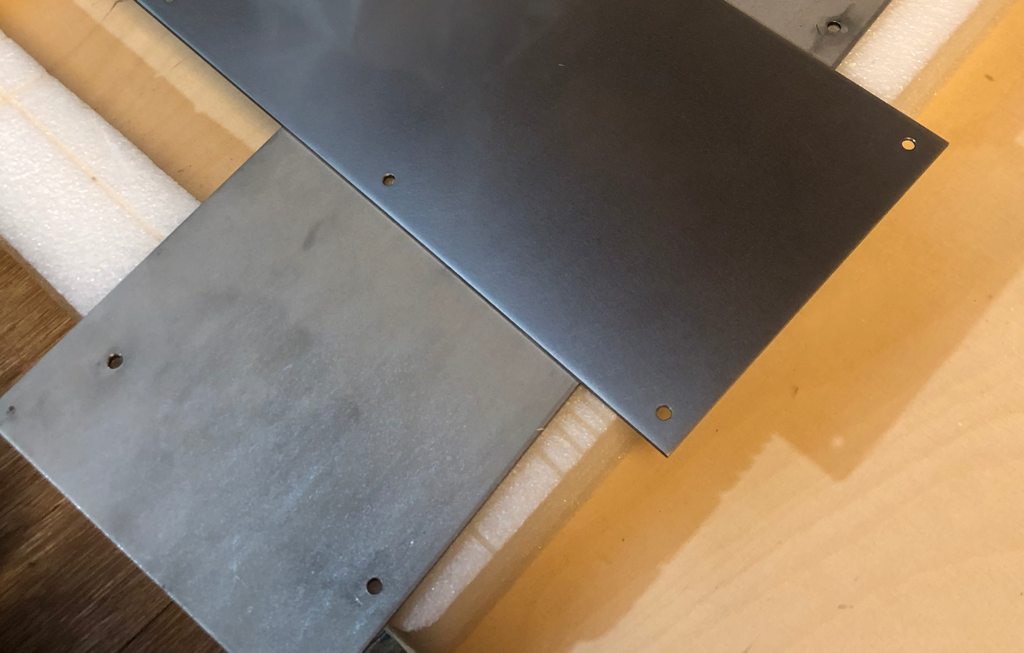
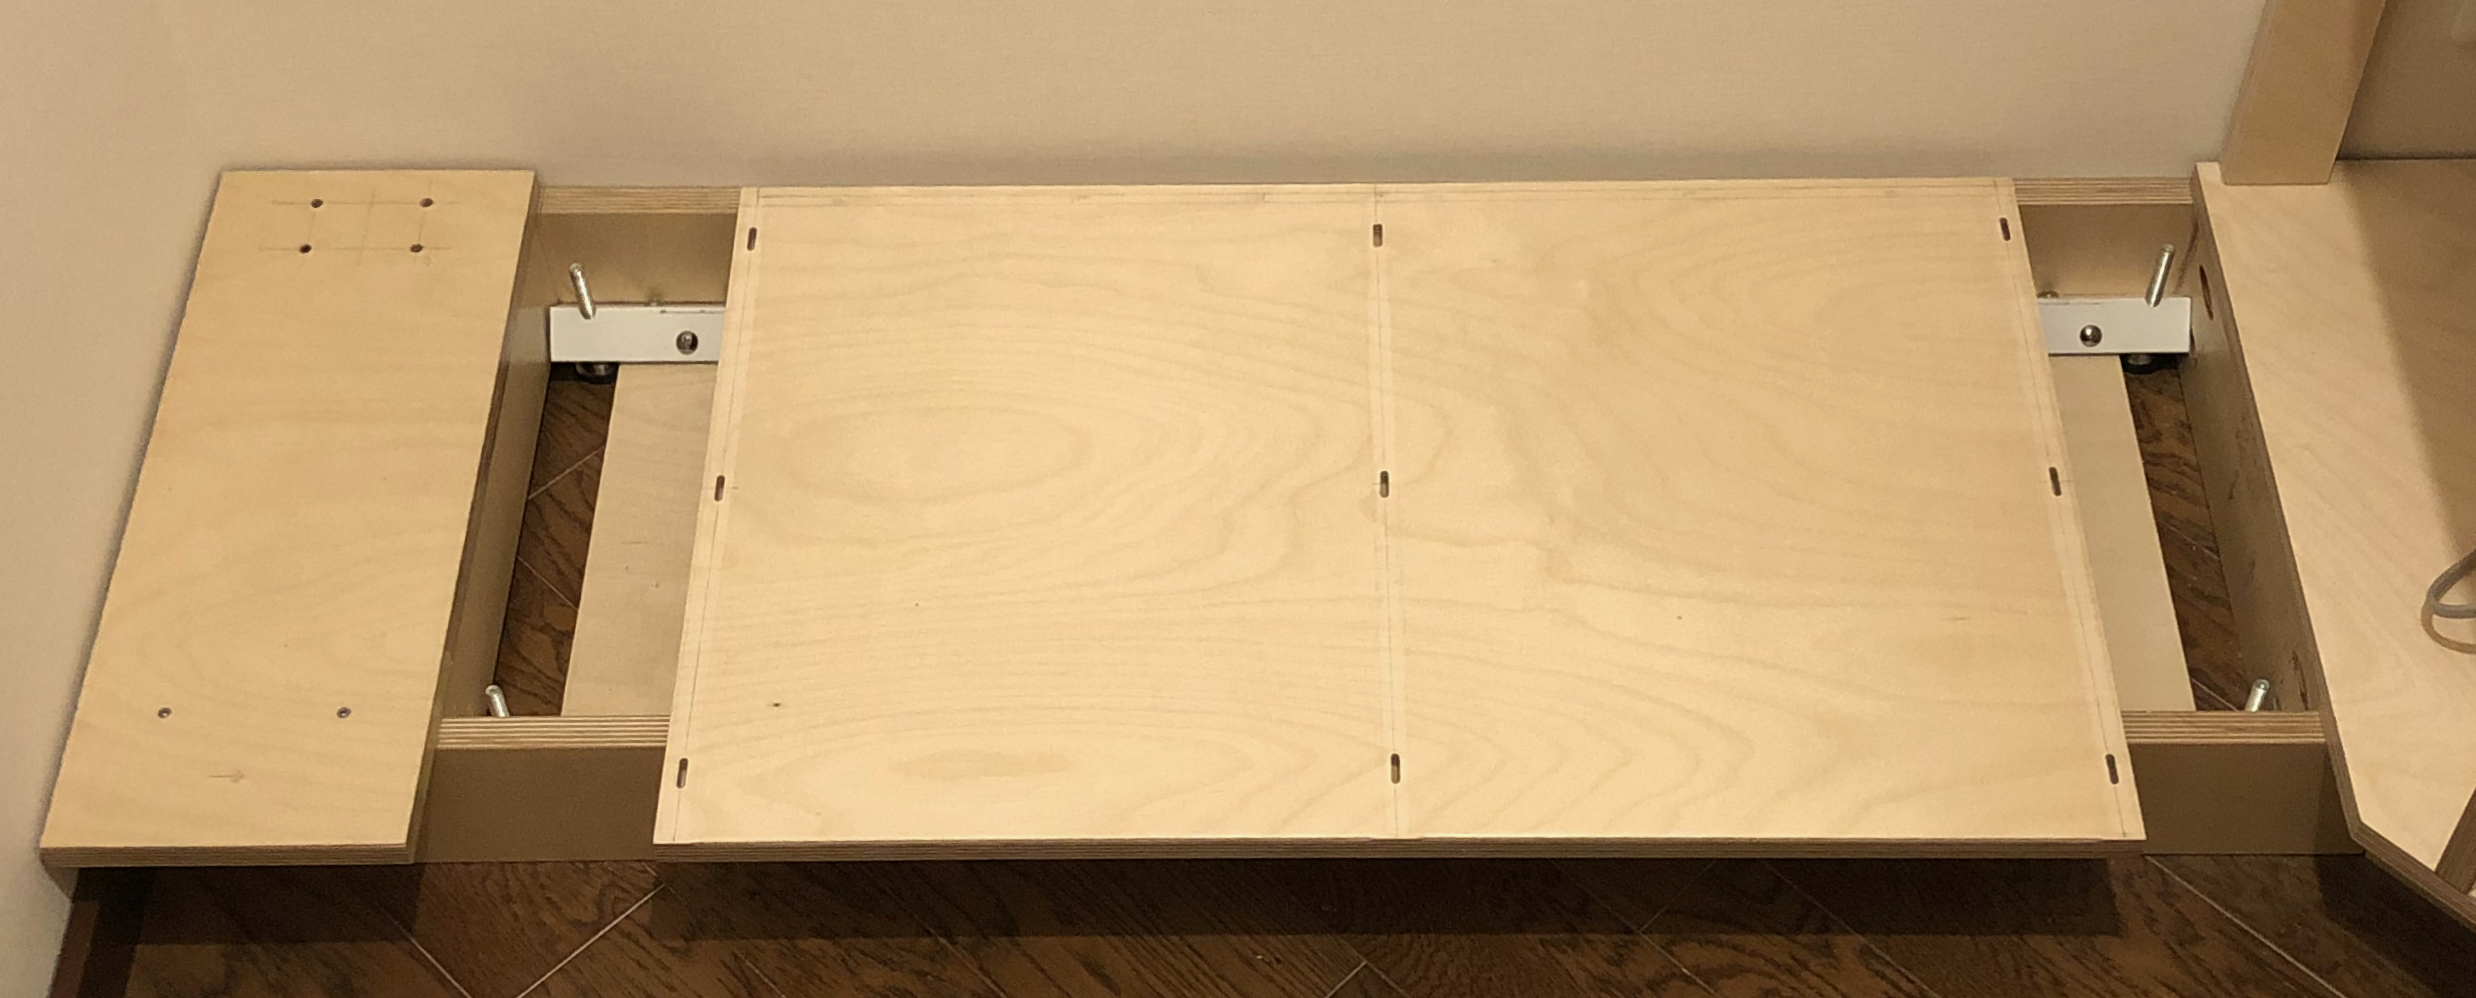
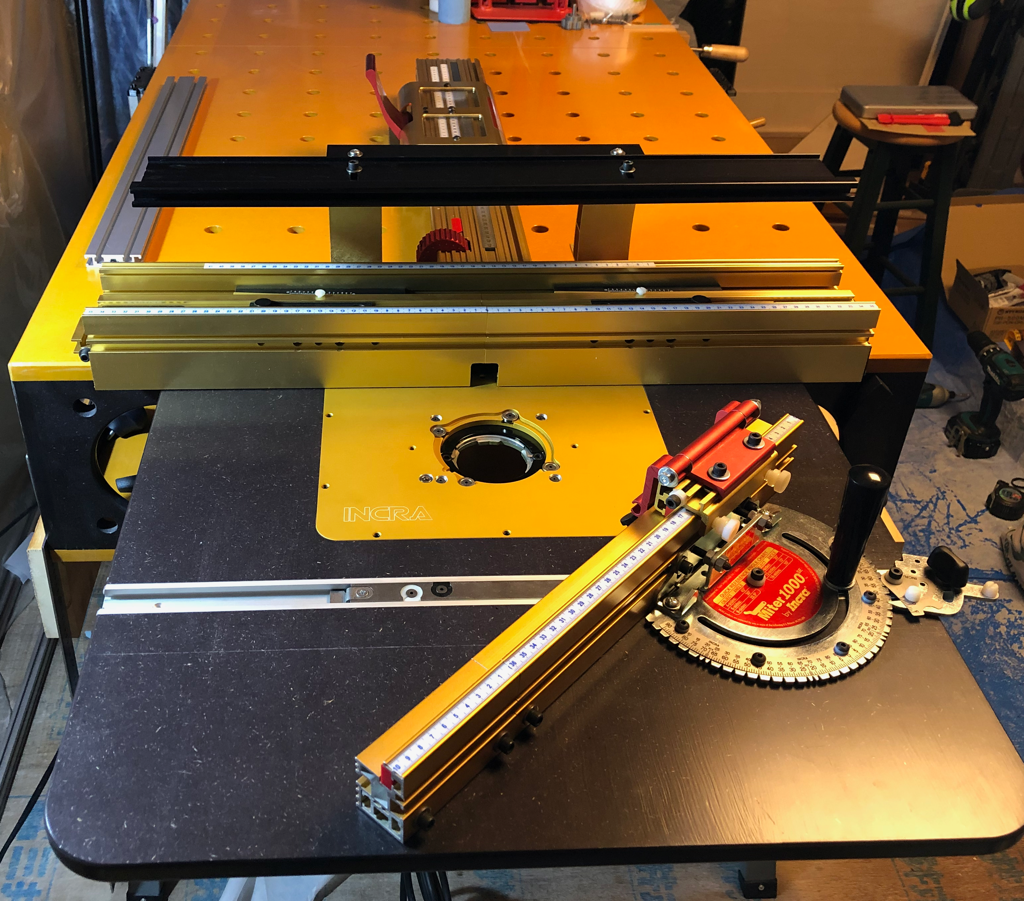
The white plate in the picture above allows me to align the guide rail and detents to the workpiece. I use a 1/4" to 8mm pin (part of a cone shaped guide alignment tool) mounted in the router, and the hole in the guide plate is offset 37mm from the edge and has notches at 16mm increments to achieve standard spacing.

system32_row2.png


To make the holes I'm using a 
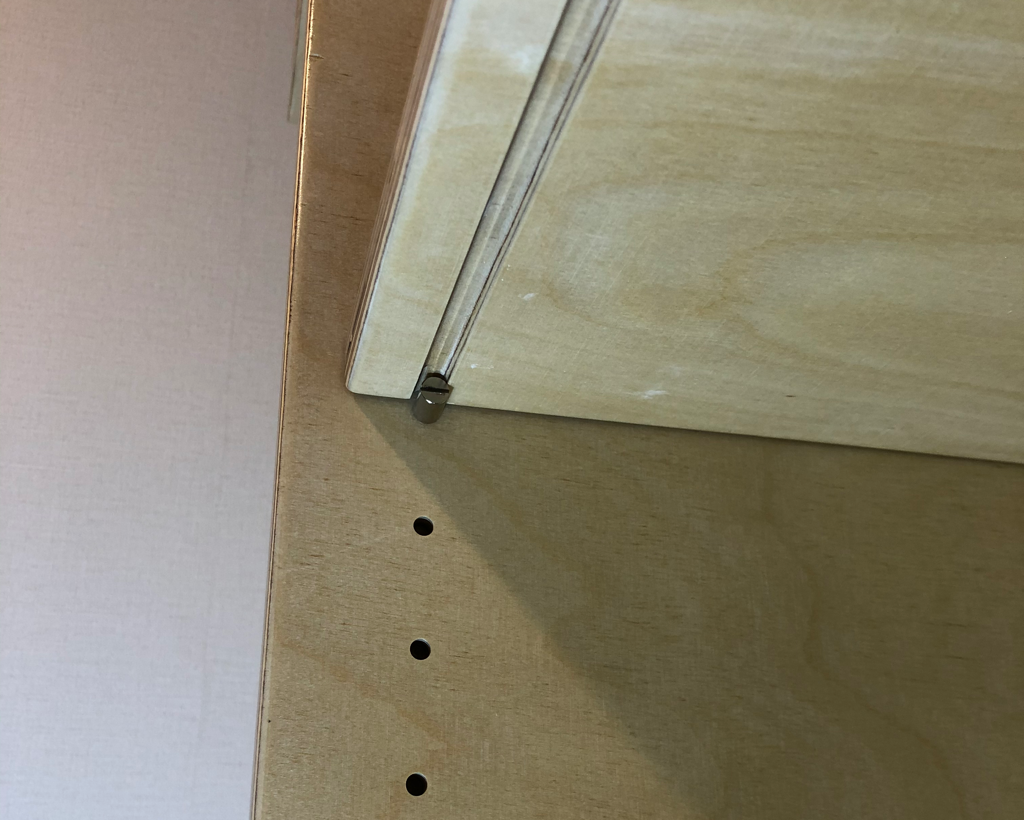
MLCS 5170 5mm downcut carbide bit. Because it is a down cut I need to peck at the holes to keep the burning minimized, but it makes a really clean hole. I made very faint touches to mark the hinge plate locations, I will drill those screw pilot holes by hand today.

Setup is time consuming, to get the rail aligned is not bad, but getting a short rail properly clamped on a longer piece is frustrating, nailing the hole alignment requires patience. I will add that both of these issues would be present using the Festool system, as it is designed to set the offset using an alignment block that mounts to the underside of the rail. That solution requires the rail to slightly overhang the reference edge of the workpiece, which in this instance would require 2 rails joined together (where you need to worry about the join being properly spaced) or one giant rail (more $$$)

The horizontal offset is much easier to dial in since the guide rail offset is not critical as long as it is parallel. The Makita adaptor uses two round rails that the router can traverse so the actual offset can be tuned easily, and the helper template for the critical 37mm spacing in the front makes that easy.

Festool uses a pair of removable, spindly looking arms to get the rail parallel and precision(?) spaced from the front of the workpiece, but I'm not sold on that as part of the solution. I'll continue to use this and update any workflow refinements, I'm always iterating things, I think I can improve the ease of setup. But for now just being thorough with my setup will suffice.

So, the verdict?

The Good:

The Festool system is $600-$700 assuming you own a compatible Festool router. I spent about $50 and can utilize all my existing rails and routers. My precision is really good, the index plunger snicks into place with a satisfying 'click' at every hole, and frees up with a gentle flick of my thumb. It feels solid as a rock, I was able to re-depth a row of under cut holes with perfect alignment and no ovalization.

The Bad:

Time consuming setup. No ability (with big pieces anyway) to just swap in new workpieces and have everything aligned. Festool rails are difficult to clamp on large surfaces (Gecko may help?)

Rating:
★★★☆
 
Last edited:

nicholam77

Well-known member
Joined
Dec 18, 2016
Messages
2,655
Location
Minneapolis, MN
Very cool! I'll probably want to do some shelf pins at some point and was already looking at copying something like this.

As usual, your solution is way more polished and professional looking.

I have a DeWalt plunge router and got their track adapter but was disappointed to find it didn't really work well with the Makita track (from my tracksaw) despite appearing somewhat universal. Do you like the Makita track adapter? I might have to try that and see if I can get it to work for my DeWalt router.

Again, 3D printer coming in handy!
 
OP
B

Bakafish

Well-known member
Joined
Feb 7, 2017
Messages
477
Location
Tokyo
Very cool! I'll probably want to do some shelf pins at some point and was already looking at copying something like this.

Very similar idea, the fixed distance sled follows the Festool design, and I am thinking that there are some advantages to locking this distance (in that you can then reference the hole location from the rail, which would be easier in some cases.) I'm loathe to depend on indirect locating as errors stack, and there's already a lot of places where things can get out of calibration. But the Festool way of using fingers to offset the rail, that locates the sled, that locates the router, certainly speeds things up.

As usual, your solution is way more polished and professional looking.

Thanks! I'm already working on a few improvements. I will be uploading the 3d files to Thingaverse so people can make their own soon.

I have a DeWalt plunge router and got their track adapter but was disappointed to find it didn't really work well with the Makita track (from my tracksaw) despite appearing somewhat universal. Do you like the Makita track adapter? I might have to try that and see if I can get it to work for my DeWalt router.

Again, 3D printer coming in handy!

The Makita unit is simple, mostly plastic, but it fits the Festool and Makita Rails well and has two set screws to adjust the fit (the two brands of guide rails have differences in some non-critical internal dimensions, but the major reference faces are the same.) I don't know how DeWalt routers mount, Makita uses two parallel steel rods that traverse through the router base, and are thumb screwed to the rail slider and an end cap that has an adjustable foot (to keep the router parallel with the workpiece.) The kit comes with two different sized rods, and has two different spacings to accommodate both small and large Makita routers. The overall design of this rail adaptor seems sound, and this part of my solution works well.

I will note that Makita have subsequently released 3 other rail adaptors for circular saws and Jigsaws that may be adaptable to the DeWalt if the router adaptor isn't suitable. Or if you are using a DeWalt trim router it may work with the excellent Makita plunge base accessory, the inner diameter is 65mm and my 3d printed adaptor sleeve for the 60mm Ryobi has worked perfectly.
 
OP
B

Bakafish

Well-known member
Joined
Feb 7, 2017
Messages
477
Location
Tokyo
Progress on the pantry has been a bit slow despite the self imposed "shelter in place" I've been practicing for the last few months. The many moving parts make tolerances very fiddly, I knew they would, but it increases the stress levels, which increases the friction of working on the project. It also means several rounds of test fitting, followed by measurements, redesign then disassembly. So many hours of work results in finding the state of the project the roughly the same place (or regressions when you screw up one element of the process.) Anyway, enough whinging.

I've been buying a lot of Veritas woodworking tools, I really like them. But being here in Japan I thought it would be kind of sacrilegious if I didn't try and incorporate some of the famous local tools. I almost bought a set of the Veritas PM-V11 chisels on my last trip to Sydney, but they were out of stock on a few sizes and the handle finishes on what they had in stock were poorly matched with each other (yes, a ridiculous quibble, but it would have bothered me forever.) Anyway, I took it as a sign to try and do the research and see what Japan had to offer.

Well, a few things about that plan. Most of the best Japanese tool makers are these very old boutique makers, with very little marketing information, no websites, lots of exclusivity (so no 'one stop shop' to try and get a scope of cost and quality comparison) and various 'target audiences' as there seems to be a big market of showpiece sets with damascus, ebony and elaborate inlays that are more focused towards collectors than intended for actual use. There are also several different types of high carbon steel that are used, these are named after color of the wrapping paper (blue, or white) the raw stock is shipped with. There are variations within those steels, and even finding out which type was used on a particular set is difficult, let alone actually determining what is best.

I spent a lot of time trying to narrow down my wishlist and came across some information on a specific variant that was really interesting. The PM in PM-V11 stands for "Powdered Metal" which is a technique that creates a finely grained, highly homogeneous steel alloy that theoretically outperforms traditional methods. Old Japanese craftsman are very slow to adopt changes to a proven formula, but there is one maker 播州三木 (Banshu Miki) that uses a very advanced Hitachi HAP-40 powdered metal HSS alloy for one of their top tier sets called ねずみ (Nezumi, or 'mouse.')

C1.png


This 5 piece set was about $750, and is a special order product with a 3 month lead time. As with virtually all Japanese professional chisels, they come with a partially finished initial grind and the top reinforcement hoops not fully in place. So the 'highly experienced' customer is expected to set them up to their exacting preference, which for me means stressfully pounding on hundreds of dollars worth of virgin tools :fingersx:

There are some good videos in both Japanese and English discussing the process of setting these hoops, and frankly none of them really deviated, so it isn't really clear to me why this whole process isn't done at the factory. But ritual and tradition are pointless to argue against over here, so I used a small piece of Delrin rod to tap off the rings.

C2.png


Smoothed out the inner surface of the ring with a small rounded file then gently compressed the top of the handle.

C3.png


Then reset the hoop (using an appropriately sized impact socket as a setting tool) so that the handle was about 2mm proud.

C4.png


I soaked it in water for a few minutes, then mushroomed the top as shown by the instruction videos.

C5.png


Later I will use my set of Shapton ceramic stones and Veritas MKII jig to sharpen them for the first time. Wish me luck!
 
To avoid these ads, REGISTER NOW!

wout

Well-known member
Joined
Dec 26, 2013
Messages
786
Location
Belgium
Awesome! That kind of really old craftsmanship you only find in Japan imo. A friend of my has some of those kitchen knifes (1500euro/piece).

Wout
 

Brian_P

Well-known member
Joined
Jan 27, 2017
Messages
47
Location
Georgia
Can't recall if I've commented on this thread, though I've been following it for a year or two. It's fascinating to see the differences in construction techniques, and I have no idea how you've managed to fight through the differences in local material availability and construction technique. It's driven me nuts just moving around the USA, much less another country.

Nevertheless, I love the carefully crafted tools. Last time I was in Japan, I learned about Japanese writing instruments, and haven't looked back. Would love to do the same with some tools, as I've been generally disappointed with declining quality in what we have available here. Any other particularly notable tools you've discovered there, or any sources for such tools that don't require walking into the shop in person with a fluent translator?
 

E12-535iTurbo

Well-known member
Joined
Feb 27, 2014
Messages
492
Location
The Netherlands
Later I will use my set of Shapton ceramic stones and Veritas MKII jig to sharpen them for the first time. Wish me luck!

I bought the same Veritas jig recently and I have to say they are working very well. I can literly shave myself with my chisels now. Which was not to the amuzement of my wife. :)
 
OP
B

Bakafish

Well-known member
Joined
Feb 7, 2017
Messages
477
Location
Tokyo
Any other particularly notable tools you've discovered there, or any sources for such tools that don't require walking into the shop in person with a fluent translator?

The notables are pull saws and block planes. I've gone exclusive on Kijima Japanese saws, mainly because of some quality ones being available via the Furusato 'tax redirection gift' system I think I detailed in an earlier post. Basically you can allocate a percentage of your tax money to another locality who will reciprocate with a 'gift.'

S1.png


There are some interesting ones here, the unit on the far right has a flexible section, about a third of its length with the teeth set flush so you can easily flush cut without marring the surface. The leftmost one is paper thin, with almost no kerf. And there is a reverse angle one in the center that helps reach in tight spaces or awkward angles. The blades are easily replaceable (my main 2 came with spares ) and so unlike some other traditional Japanese tools, these don't really require a lot of care and attention, just respect.

The block planes on the other hand seem to be taking the chisel adventures to a higher level. Like Japanese chisels they use laminated blades, an ultra hard high carbon steel layer hand forged to a mild steel reinforcement layer that keeps it intact under use. But they use wooden bodies that require care and are 'set' in place with a hammer after a lot of careful tuning. The whole concept looks daunting and I feel way more comfortable with my Veritas and more straight forward threaded adjustments and monolithic blades. They are also really expensive... I'm leaving them for later.

There are a few local brands I stick to. Other than the Festool stuff Sakurama turned me on to, I am a big fan of Makita and own tons of their 18v stuff. (They are releasing a new line of 40v gear over here with a new completely incompatible battery system, which I think is stupid as hell. As far as I can tell Makita USA is ignoring it, and I hope it fails. The last thing anyone wants or needs is a new battery format.) But the most obtainable but under the radar Japanese tools that may be of interest are Tajima and Shinwa. I'm pretty sure both market products overseas, and are really good quality. I use Tajima tape measures and Shinwa squares and rules and they are really good.

The well known Mitutoyo, OLFA, Noga and Hakko are my go to brands for their respective categories. I do have a Starrett carpenters square set, partially because Mitutoyo doesn't sell a Western style carpenters square here in Japan, but mostly because everyone should have at least one nice Starrett tool.

There are many other really good, very esoteric JP brands with little public facing information. I've spent a good deal of money on Ishihashi Seiko drills and taps. I have a bench vise and small anvil from Nabeya (Eron). Various Tsunoda and Engineer wire cutters, snips and small pliers. And KTC sockets, wrenches, screwdrivers and other general tools. So I do try and keep it local when I can, but I have good German and US made stuff too, and will always go with what seems best and well engineered for the money with only a small amount of favoritism points for the local stuff :)
 
Last edited:

Trapps

ALLIANCE MEMBER
Joined
Feb 10, 2017
Messages
1,992
Location
The Detroit Zoo
With SO MUCH content here in GJ, I am not surprised I miss a thread every now and again. Not to imply I am not bummed when I do. I am. Especially when it includes things like small spaces, ingenuity, outstanding craftsmanship, perseverance, excellent detailed documentation and last but not least Japan.

When asked if I could have only one foor for the rest of my life, what would it be; my answer comes before the question is done being asked: sushi. I have been fortunate to visit Japan several times, and on occasion (every single trip) I have metaphorically attempted to eat my weight in sushi. There's a joint in Asakusa, near the Kaminarimon, that is now a regular stop for me if in the neighborhood.

I love Japan; the people, the food and the culture. I was even a Geisha for Halloween not long ago.

Bakafish, your work is fantastic. I lived in England for 3 years in the mid 90's and really struggled with home improvements / DIY. I cannot imagine doing it in Japan and retaining any sense of sanity.

Shosan to arigato gozaimasu!
 

kwyjibo

Well-known member
Joined
Apr 8, 2008
Messages
736
Just dropping in to tell you how much I enjoy reading about your adventures. keep it coming

To paraphrase an old Eddie Murphy joke: when I was a kid, my mom would call me Baka so often, I thought that was my name. My sister was konoyaro. I could always tell how mad she was by how she said the first word of the sentence: bahh-kahhh (slow, drawn out = not too bad) versus bakayaro! (= better start running)
 
OP
B

Bakafish

Well-known member
Joined
Feb 7, 2017
Messages
477
Location
Tokyo
I always like to hear Baka as a term of endearment. Japanese are not the most expressive folks, calling someone Baka is often as close to "I love you" as you'll get.

stones.png


So the great sharpening experiment was a bit of a fail. There were some indications that Shapton ceramic stones were not ideal for this alloy, but I had them anyway and so I gave it a go. I do have a cheap very course CN diamond plate for flattening the stones, but it is too crude to use on them.

The first problem was that following the advice of the Shapton FAQ I used the back side of the stones. The issue is that they only chamfer the top edges of the stone. The razor sharp corners on the bottom of the stones contributed to the majority of my many lacerations. 3 fingers and both thumbs ended up with cuts, which painlessly spouted blood into the sharpening slurry, but in short order made everything I do a bitter reminder to wear gloves next time.

The real issue is that the HAP-40 steel is ridiculously hard. Like insanely hard. This coupled by the factory grind having a very mild back bevel about 1mm from the tip, ment that after 6 hours I only managed to half *** sharpen the 2 smallest chisels in the set. The considerably larger surface area of the larger chisels has me wondering what I got myself into. These are all hollow ground of course, so we are only talking about the edges, but this alloy really comes off slow.

crack.png


I also noticed a hairline fracture on the tip of the 9mm chisel :-( I'm hoping it will not chip out during use. It can be ground out, it is pretty close to the bevel, but I don't look forward to losing so much material. Unfortunately there is no real support path to try and get a replacement. I'm pretty sure I didn't cause it, but the hoops are already set and there is no way to even contact the manufacturer (short of taking a 6 hour trip to Miki, which I certainly will do some day as being the center of Japan's traditional tools manufacturing they have a tool festival there every year.)

So I'm letting my stones dry, and will make a second attempt (using gloves!) once my fingers heal. I think I may add a quality Diamond based roughing stone to deal with the back bevels, once those are done they will not be a factor anymore.

On the success side, the Veritas MKII honing guide worked really well. I have the deluxe set with the 'narrow blade' mount, and it set a perfect bevel and was as easy to use as I had hoped. So many tools work better on paper than in real life, so this was a happy result.
 

Vette60

Well-known member
Joined
Mar 15, 2006
Messages
447
Location
Glen Allen, VA
Hi.

Just came across this awesome thread bakafish! Really enjoying it. I am working 2nd shift (3PM to Midnight) at our manufacturing facility and have a bit more time on my hands...I'll poke around more here for sure.

Stay safe and keep posting!
 
OP
B

Bakafish

Well-known member
Joined
Feb 7, 2017
Messages
477
Location
Tokyo
Followup:

Got a $30 300/1000 grit, solid 8mm thick, no name, diamond plate. This helped a lot with material removal. Unfortunately I kind of butchered one of the chisels, almost removing the entire bottom relief in pursuit of a flat surface. None of them came out good enough for me to want to show off my work. They deserved better than this, I'm hoping they hold up despite the abuse.

Non-slip nitrile coated cloth gloves saved my fingers this time. Please use gloves when attempting to flatten the bottoms. Honing the bevel bare handed seemed to be fine.

The Veritas Mk.II honing guide (with the narrow tool clamp) continued to outperform my expectation. It helped me perfectly regrind the primary bevels (I didn't micro-bevel, will try them with a single grind first.) The largest chisel used a 35 degree angle while the others were all 30. Several of them had slightly skewed base grinds, the Veritas got everything straight and square, very pleased. It gave me confidence where the seemingly simple task of flattening the bottoms nearly broke me.

Why was it so hard to flatten them? Well for one thing there was the aforementioned tiny back-bevel in the front that required a lot of material removal to deal with. Second, because this is a laminated steel tool, the extremely hard alloy that makes up the bottom plate (and therefore the cutting edge) doesn't extend all the way to the back of the bottom surface. This is intentional as it means the mild steel absorbs all the shock and nonlinear strain of the hasp/neck/shoulder area of the tool. The problem is that the rear surface of the tool is far softer and melts away while the harder cutting surface in the front barely gets scratched. So you can't easily use it as a reference and have to flatten the bottom by trying to just hone the front 80% of the blade that is the alloy portion.

This wouldn't be so bad except that there is the helpful hollow back grind which basically makes the front surface far larger than the two edges that you end up referencing off of, so inevitably I started removing material from the middle, which is the opposite of what I was trying to do and leaving an ugly step where that transitions to the part of the base not being ground by the stone.

I will note that in some of the instructions I saw, the edge of the stone was waxed to prevent this from happening, but I misunderstood this as an attempt to bias the tool towards the front (which it kind of was, but now I know why, and now you do too.)

Ideally I should have learned these lessons on a cheap set of serviceable chisels before going ham on these handcrafted lovelies. But I was trying to avoid the typical pattern of buy something good enough then feel like it is stupid to buy the thing I really want (or subsequently discover exists when the shortcomings of what I bought become obvious.) Or I realize what I have works great and I hardly use them anyway, so I really shouldn't be lusting over a better version. Then I just end up buying the better thing, because why the hell not? And now I have two sets of things I don't really use... This happens to me more often than I want to admit (I certainly don't need 3 angle grinders for example.)

Anyway, the end result seems serviceable, they are super sharp for sure. I don't think they are irreparably harmed, I just can't show off their shiny metal *** as it isn't mirror flat like I had hoped. I have them a thick coat of museum wax and bundled them up in their box. I will report the results when I break them out and use them, first chips...
 

Brian_P

Well-known member
Joined
Jan 27, 2017
Messages
47
Location
Georgia
Thanks for the suggestions! I wasted an impressive amount of time reading about those brands. Will probably pick up some of the Kijima saws, as those are definitely different than anything I own. Also made a note of some of the other brands - can get most of them in the US, and I'm a sucker for good quality tools in a world of inexpensive junk. Hope your chisels do the job as advertised!
 
OP
B

Bakafish

Well-known member
Joined
Feb 7, 2017
Messages
477
Location
Tokyo
Progress has been slow as the project is in a more fiddly stage than normal. The sliding cabinet and rails went well. I then made the cabinet that goes above it, using a light aluminum track to ensure it doesn't tip forward or back once it is fully loaded (or during one of our frequent earthquakes.) This cabinet (the one on the upper left) also provides support for the upper pantry slider mount. I used some Italian made Camar cabinet wall mounts, as I wanted to be able to ensure as small of a gap as possible between the upper cabinet and the sliding cabinet below it. They kind of misrepresented the amount of adjustability though, instead of the 20mm they claimed, you only get about 10mm if they are mounted at the minimum distance from the wall (as I chose for strength.) So that required me to create interstitial plates to reuse the 14 holes I had placed in the wall and realign them to put that adjustability range where it needed to be.

model.png


Lesson Learned: If you are going to be setting things up, use the minimum number of holes, and once you have determined that it works, only then go back and fully propagate all available mounting points. :(

So once the top left cabinet was situated, I redid all the measurements for the upper right cabinet. I had to compensate for all the drift and inaccuracies, I knew better than to just base the unit on my model's dimensions. So many hours of work with my levels, rulers, plumb bobs and cardboard templates, I finally started building out the right side upper cabinet.

Because of the geometry of the room and the other cabinet, I needed to remove the left side cabinet in order to place the right side cabinet, then finally I can reinstall the left side unit. I will say that the Camar mounts made that quite a bit easier than it would have been otherwise. Complicating this was the aforementioned slider I had recessed into the bottom of the cabinet. The shuttle mounts to the top of the slider cabinet with two M4 machine screws, so before I can mount it to the wall I needed to carefully position the upper cabinet over the sliding cabinet, carefully align and attach two long M4 screws to the shuttle in the rail, then attach and adjust the upper cabinet to the wall. I will replace the long screws with appropriate length ones once I'm sure it is finished.

So all of this so far has been an effort chasing millimeters. Not that I didn't know this going in, my constraints were super tight, the room is really a kind of useless shape and the size of the key components (the freezer, shochu bottles, etc.) were pretty much fixed. I think I couldn't have done this any other way, but when I do the kitchen I really need to try and give myself more margin for error.

Lesson Learned: Professional cabinet makers undersize their cabinets and use scribed trim panels out of necessity, not laziness. Be willing to give up a few centimeters to gain hours of work and reduce overall stress.

top.png


So with the two top cabinets in place, and the sliding cabinet secured, I can soon start letting my wife utilize some of the storage space for all the food we have piled up in the living room and hallways. I needed to make some shelves for the sliding cabinet, I chose to use chromed pins that thread into 5mm brass inserts for the shelf supports. The problem with these is that they are kind of ridiculously expensive, about $2 for a set of 4 of the inserts, so my plans of pressing them into all the available holes didn't really make sense. I will use them for some of the main shelves, and an alternate system for more adjustability. There are not many good options over here, I ordered samples of all the best candidates I could find, hopefully I won't have to order from the states. The issue is that a lot of "5mm" pins are actually 4.8mm which is really loose IMHO and doesn't feel stable at all. The "L" type units that are captured by the shelf itself seem a lot more likely to be secure, I have some of those coming from China, so we'll see.

incra.png


All of this boring prelude is leading up to my first use of the Incra router table system :) I put some nice grooves in the bottom of the shelves to keep them firmly located on the pins. I have to say that everything worked extremely well, the stainless steel threaded rod with the thrust bearing to raise and lower the router worked like butter, giving perfect precision (one turn = 1mm.) The Musclechuck and adaptor sleeves made swapping bits really easy, and the Incra fence did its job exactly as one could hope for. Nothing instills confidence more than clicking off 10ths of a millimeter to your offsets. Just did what I needed it to do :thumbup:

groove.png


So now I'm working on the pantry slider. I wanted to standardize on a modular container system that would be flexible, available here in Japan and hopefully would be maintained over time. The OXO POP system seemed to be the most suitable, so the pantry slider is being built around those dimensions (basically multiples of 80mm.) Like an idiot I precut a lot of the parts before making that key decision, so it has lead to a lot of strained redesign and chasing of millimeters again. $40 of stainless steel plate in place of 18mm ply gives me 3 more storage slots, do I recut major panels to gain enough depth to go three units deep? Painful tradeoffs all in search of maximizing efficiency :(

Lesson Learned: Don't cut anything until the design is final.
 

Trapps

ALLIANCE MEMBER
Joined
Feb 10, 2017
Messages
1,992
Location
The Detroit Zoo
...Be willing to give up a few centimeters to gain hours of work and reduce overall stress...

It is comments like this that occasionally make me consider therapy. Mostly because I end up in some hotly contested argument with myself, often overheard by my family, thus requiring explanation, which only further fans the flames.

I need those centimeters.
I need less stress.
Time is not a renewable resource.

It is almost akin to the age old argument of Quality, Fast, Inexpensive. Pick 2.

Also, as the owner of a new router table, thanks for the Musclechuck inspiration! Looks like a cool time/effort saver.

:beer:
 
OP
B

Bakafish

Well-known member
Joined
Feb 7, 2017
Messages
477
Location
Tokyo
I need those centimeters.

Let's be honest with each other, it's really millimeters we are sweating over... :)

Also, as the owner of a new router table, thanks for the Musclechuck inspiration! Looks like a cool time/effort saver.

I found that no matter how hard I try, I always manage to bang my wrench against the brittle edge of my carbide router bits. The whole locking pin setup most routers use is BS too. It always feels like it is getting wallered out and will eventually fail. This Musclechuck system is so much easier and safer, especially when using it in a table.
 
OP
B

Bakafish

Well-known member
Joined
Feb 7, 2017
Messages
477
Location
Tokyo
The stainless plates came, I have to say that Japanese companies are really customer service oriented and professional. The plates were both cut to dimension, accurate to 2 decimal places, on some rough 304 stainless plates...

What I totally forgot was that stainless is really awful to drill. I have some precious Cobalt drills made by a specialized Japanese company Ishihashi Seiko in a set I bought, but I didn't want to break a bit from the set. Kind of defeats the purpose, I think I found a source for replacements, but until I was sure I didn't want to risk it... so I gathered all the sacrificial cheap bits I had and ordered some inexpensive Monotaro shop branded 2.5mm and 4mm cobalt bits in case things went pear shaped.

What I really need is a drill press (or better yet a real milling machine) but my strongest drill is an AC powered Makita with a built in gear reduction. I modified the trigger of this drill a while ago to accept a set screw to limit the maximum speed. This really improved the controllability of the drill as otherwise it was really easy to over speed, it really had a hair trigger.

One of the top YouTube hits for SS drilling advice recommended using water as the coolant/lubricant. In my case, this turned out to be **** advice, I had good cutting oil and eventually when I switched it made things work much better, but sacrifices needed to be made. Many bits were shattered, blood from the shrapnel flowed on two different occasions (I used a face shield and safety glasses, so it was just ornamental flesh wounds.)

The cheap Cobalt drills arrived today, and switching over to the Proxxon mini-mill (it has more balls in low speed than I gave it credit for) I finished up the required holes. One of the plates will end up being sandwiched, so the screws needed to be countersunk. I few months ago I bought a few sizes of those strange single hole 45 degree countersink end-mills. The ones with a hole drilled through them at an angle, that look like they shouldn't really work, but count me as a convert. As hard as making those holes, I had them all deburred and chamfered with zero drama.

Next I had to deal with the finish. I was originally going to use Aluminum plate, which is super easy to work with, but I wanted extra strength and Al is so easy to scratch I figured it would end up looking cheap. Painted mild steel would have been the best compromise, but having made the plunge I needed to follow through. The plate, as accurately dimensioned as it was, had a hot rolled finish, so it was not very attractive.

unfinished_plates.png


So I pulled out the Festool Rotex and some of my precious sanding disks hand carried back from my last trip to AU, and started polishing it (I rounded the edges that would be exposed to humans by draw filing it first.) Sanding metal is super messy, I had fine gray dust coating everything,.I don't have all the fine grades of paper or the polishing pads to get a mirror finish, but I wasn't looking for that anyway. I don't really want to draw attention to it, it was a kluge to get more space, so a brushed finish should do the trick.

finished_plates.png


This is the two finishes contrasted, it doesn't really come out well in a photo. I will go at it with some steel wool and WD-40 and see if I can spruce it up even more, but it doesn't look bad in person. They have some real heft and I think they will keep the pantry slider feeling solid. I will mock up one shelf to make sure that the OXO containers fit well, then start on putting the most complex part, the pantry slider, together.
 
Last edited:

rixtrix1

Well-known member
Joined
Aug 25, 2013
Messages
3,010
Location
Chandler, AZ (from west NE)
I always like to hear Baka as a term of endearment. Japanese are not the most expressive folks, calling someone Baka is often as close to "I love you" as you'll get.

Delightful! My Japanese wife often uses the term "Baka", but I assure you, there's no endearment intended, lol.

So good to see you continuing on with improvements, considering all the restrictions living in Japan poses on almost everything. I follow the car scene there somewhat and can only imagine how expensive it must be to own a shop and then pass costs along to the customers.
 
OP
B

Bakafish

Well-known member
Joined
Feb 7, 2017
Messages
477
Location
Tokyo
I find a belt sander, or a larger, 2-3" sanding drum, works quite well in giving a decent brushed finish.

Yes, I have a great belt sander and I totally forgot about it. I didn't consider it because I only have fairly coarse belts, but I really should have started out with it, and removed the (relatively) deep pitting of the hot rolled surface.

I ended up putting the Rotex into spin mode and went over it again with 180/320/400 then switched to finer grades of 3M ScotchBright pads just pressed against the worn paper and driven by the orbital mode. There are still very small pits because I didn't start aggressively enough, but it looks a lot better.

polished.png


Here it is compared to the unpolished side, it's almost a matte mirror finish, it looks like stainless now. I think I will add a bit of paste wax or something just to keep it from discoloring later. They won't get much handling, but once in place they will be difficult to clean up.
 
Last edited:

starckie

Well-known member
Joined
Apr 15, 2013
Messages
53
Location
Central PA
... I am a big fan of Makita and own tons of their 18v stuff. (They are releasing a new line of 40v gear over here with a new completely incompatible battery system, which I think is stupid as hell. As far as I can tell Makita USA is ignoring it, and I hope it fails. The last thing anyone wants or needs is a new battery format.)

Have to agree with you there. A few years ago I chose the Makita track saw over the Festool primarily because of the consistent battery format and the ability to use the same batteries on 18v and 36v tools. I would hate to see them stop developing the 36v line in favor of the new battery system

Been following your thread for a long time - love your space and craftsmanship.
 
OP
B

Bakafish

Well-known member
Joined
Feb 7, 2017
Messages
477
Location
Tokyo
I did some Yak Shaving last night. Frustrated yet again by the track saw track positioning always being extremely fiddly when wanting to cut small pieces off a larger piece of stock, I recalled a little aid shown by the 10 minute workshop (Peter Millard.)

The problem is that ideally you want to use the plastic strip along the edge of your track rail to perfectly align to your cut line, with the piece of stock that you want to keep located under the rail. This results in the kerf of the blade fully positioned in the waste area, and the plastic strip helping to reduce any tearout. This works well when what you are cutting is as wide or wider than the rail itself, as you have the full bottom surface of the rail supported, and you can clamp the rail directly to the part you are cutting.

The problems with attempting to cut strips thinner than the rail is that you will often need to use a second piece of stock under the rail to support the back and ensure the rail is held flat to the stock you are cutting. Additionally, because the Festool style rails have their clamping slot towards the back of the rail, you often cannot clamp to the stock being cut, and since the non-slip strips are in the same area, you really lose a lot of the secure connection between the rail and the stock being cut.

The MFT table can help with some of this, but just picture the scenario where you have a full 4x8 sheet of heavy birch ply, and you want to cut a 10mm strip the whole 2440mm off of it, you can't hang the rail out in space with just the lip in contact with the sheet, if you flip the rail around so it is supported by the sheet, you need to compensate for the kerf (2.2mm) when marking your cut line, which is a pain in the ***. So this little 3D printed dingus makes this whole procedure a lot easier.

kerf_tool1.png


The idea is that you mark your cut lines just like normal, then you put the rail on the other side of the cut line than traditionally, and slide this under the plastic lip, with the 2.2mm bar butted snugly against the edge. Then you line up the line to the dingus, and it compensates for the kerf without having to do any funky measurement compensation. To be clear, this means the plastic strip is no longer protecting the piece that you are cutting from tearout, but there is a replaceable sacrificial part for the Festool track saws that helps with that (I just wish it was better designed to deal with different plunge depths.)

kerf_tool2.png


I know this is not a very complex solution, but if you have run into the same frustration, and have a 3D printer, give it a try and see if it is worth the quarters worth of plastic. Files can be found (after approval) here.
 
To avoid these ads, REGISTER NOW!
Top Bottom