To avoid these ads, REGISTER NOW!

Woodworking 101--Tools and Tips

CRSINMICH

Well-known member
Joined
Aug 15, 2015
Messages
2,397
Location
Southeastern Michigan
Jim: I prefer doohickey but can't abide hoosiewatsit.

As a retired teacher I'm trying to resist asking something like, "Teacher! Teacher! When do we get to saws? And vises? And chisels? Is Jimmy supposed to be bleeding?"

Seriously though, I'm enjoying this thread immensely. I'm only about at step two or three so going back to step one is good. I'll see what I missed the first time.
 
Last edited:
To avoid these ads, REGISTER NOW!
OP
J

jimreed2160

Well-known member
Joined
Aug 7, 2016
Messages
3,589
Location
Tallahassee FL
CRS--Glad to have you on board. I have been known to do some teaching so stop me if I get too "teachy". As for Jimmy bleeding, it's his workshop where blood is a frequent visitor. The round stains on the workbench are sweat (because this is Florida) and the small dark smears are probably blood. If your project does not have a bloodstain or two on it, you probably weren't working fast enough! :lol_hitti
 

CRSINMICH

Well-known member
Joined
Aug 15, 2015
Messages
2,397
Location
Southeastern Michigan
Jim: By all means keep on teaching. Someday I'll tell you the story of "The Great Kimball Shop Disaster". That put an end to me accepting any substitute assignments for shop classes.

I always keep a clean dry cloth within easy reach and a supply of various sizes of Band-Aids nearby.

I hope you were serious about wanting more diagrams. Here is one from 1902 that I didn't realize I had because it was misfiled. This diagram is old enough that the plane in the middle is one of those transition planes. Wood sole and metal on top.
 

Attachments

  • Stanley1902Catalog2-Big.jpg
    Stanley1902Catalog2-Big.jpg
    149.8 KB · Views: 317

drivesitfar

Well-known member
Joined
Oct 23, 2013
Messages
35,999
Location
Pacific Northwest
Jim: thanks for the 411 on planes and i'm sure there is a lot more information to follow from you and other members like CRS and EZ posted. also thanks for showing me (us) the marking tools and a few pictures and descriptions of how to use them.

CRS: thanks for the picture of the exploded plane that i'm sure i'll refer to many many times in the future.

EZ: so i have a lot of the planes you posted and i've yet to maybe use more than a couple of them. i even have the concave (or is it convex) plane for rounding out. i'm not certain which planes are low-angle block planes and rabbit planes so would you mind just posting up a few pictures showing up which is which? great collection and a few i've never seen.

BJ: thanks for letting me know just how much stuff you can get in a 3 car garage and yes i'm looking forward to pictures when you have time of all your projects and maybe some mention on how you made them.

ALL: i think most of you WOODWORKERS don't know just how talented and knowledgeable you are cause some of the basic stuff you can do amazes those of us that don't work with wood much or at all. please if you have time to explain or pop make and post a video or youtube link to one explaining the technique i'm sure I won't be the only one asking questions and learning. WELL DONE ALL of you for taking the time to post up pictures and teach us.

SKYLIGHT or DRYROT LEAK FIX: this isn't really a wood project, but it is sort of so i'll post up what kind of damage you might get if you have water collecting on wood at your home or out in the weather. we put in this skylight with 3 good size pieces of glass maybe 28 years ago. i had an inkling that it might have been leaking so i ran up and put on more caulking about 10 years ago and it seemed to stop the problem.

well yesterday my BIL stopped by to help me finish the trim on the inside of my front door, but since the weather was decent and he's very talented at Caulking (which is a skill BTW) we went up to my skylight and started removing the old caulk. as we were doing so we were able to pull out the rusty screws that were suppose to be holding the metal supports that held the glass in place. well we went underneath and pulled off the siding covering the 2x6's and look what we found. good thing i had plywood on the one side and also a very good thing it wasn't raining and we were able to take it apart. i had material to rebuild here at DIF'S hardware store so without a trip to pick up some and the aid of my Fein we put it all back together and caulked it in before dark. WHEW!!

i have more pictures but you get the idea and for those of you that have never heard of a German made Fein you might google it and save some cash to own one. mine is about 9 years old so not the newest, but if you have the right blade it's the right tool for a lot of tough jobs. i've cut many a piece of molding to fit in a dresser instead of using a tool i don't own which i'm sure will be shown on this thread. I like manual tools, but i also like well built tools that use power that are made for the job and do it well.
 

Attachments

  • WP_20161110_058.jpg
    WP_20161110_058.jpg
    125.3 KB · Views: 296
  • WP_20161110_051.jpg
    WP_20161110_051.jpg
    103.8 KB · Views: 298
  • WP_20161110_031.jpg
    WP_20161110_031.jpg
    160.7 KB · Views: 324
  • WP_20161110_020.jpg
    WP_20161110_020.jpg
    139.1 KB · Views: 333
  • WP_20161110_014.jpg
    WP_20161110_014.jpg
    130.9 KB · Views: 346
  • WP_20161110_013.jpg
    WP_20161110_013.jpg
    83.8 KB · Views: 326
  • WP_20161110_002.jpg
    WP_20161110_002.jpg
    149.7 KB · Views: 329

Irongrave

Well-known member
Joined
Jan 28, 2014
Messages
115
Location
Florence SC
I will add my little piece of 101 knowledge.

Keep your saw blades and bits clean. Products like CMT blade cleaner and the like are worth their weight in gold. A quick soak and light brush off will extend the life of your blades and give you much cleaner cuts. Avoid household cleaners as may will react with the carbide in the teeth.

Another one is keep your metal work surfaces waxed with a normal paste wax no silicone so most auto waxes are out. this helps keep keep rust from forming and the wood glide over the surface smoothly.
 

ztorres

Well-known member
Joined
Sep 22, 2016
Messages
195
Location
Iowa
A tip that my grandfather has taught me and I use so much is to rub a screw in beeswax. It seems to help the screw go in easily and wood typically doesn't split.


Sent from my iPhone using Tapatalk
 

ez-duzit

Well-known member
Joined
Jun 24, 2013
Messages
5,094
Location
Marina del Rey
Before buying a bunch of machines, get the Festool track saw. It has revolutionized my woodworking. Splinter-free cuts on both sides of expensive veneered plywood. Glue-joint quality cuts.

TS-75-Guide-Rail.jpg
 

Irongrave

Well-known member
Joined
Jan 28, 2014
Messages
115
Location
Florence SC
Before buying a bunch of machines, get the Festool track saw. It has revolutionized my woodworking. Splinter-free cuts on both sides of expensive veneered plywood. Glue-joint quality cuts.

TS-75-Guide-Rail.jpg

This they also have a new framing track saw that is extremely versatile.
 

drivesitfar

Well-known member
Joined
Oct 23, 2013
Messages
35,999
Location
Pacific Northwest
ZT: i wonder how many of the guys use BEESWAX on the slides of their wood cabinet drawers with or without slides? good tip on the screw and i'm about to put in a door plate and i'll try it. thanks.

EZ: from what i've seen i don't think FESTOOL makes a tool i wouldn't want to own. only thing is they don't come up used much on CL and they are spendy so i'll have to maybe sell some stuff i'm not using to pay for a few. do all Festool tools have the dust collection system and do they all use the same unit to **** up the dust and debris?

thanks for the endorsement cause i really like their sander and dust collection unit that is maybe first on my list.

ALL: I mentioned the Fein i own is about 9 years old and sometimes i forget i own it, but if i'm doing something that needs a quick fix like my skylight yesterday or just cutting a hole in drywall or oak this is the tool. i'm still trying to figure out which blades work better for each job, but i'd highly recommend it or maybe some of their competitors cheaper versions work ok too. i have a Ryobi 18v that i'll check and see if it has more options for blades and let everybody know.

here's a fein video in case some of you haven't seen this tool and believe me it works like a charm. i also think the cord on it is 10 or maybe 15 feet long which is nice too.


ez-duzit

Well-known member
Joined
Jun 24, 2013
Messages
5,094
Location
Marina del Rey
My Festool track saw kit was purchased on c/l for $350. To this I added a 10' track which is indispensable for straightening the edges of rough lumber and making long cuts in heavy plywood.

Don't fret the $. It is SO worth it!
 

drivesitfar

Well-known member
Joined
Oct 23, 2013
Messages
35,999
Location
Pacific Northwest
EZ: thanks and i'm thinking that Festools are worth the money and just wish i had more of it or them. so does the dust collection system have the same unit for all the tools or do you know?
 
OP
J

jimreed2160

Well-known member
Joined
Aug 7, 2016
Messages
3,589
Location
Tallahassee FL
Iron
Puget
ztorres
Ez
Thanks for posting your tips. It is great to accumulated this knowledge in a single place. I am sure that by sharing our collective wisdom others will be served.

There was a whisper of CHISELS earlier. Of those tools I am a big fan and have numerous sets and singles around the shop. One tip I have is to go for the sets. Sometimes with tools, you do not know you need a tool until you use it. Thus it is with chisels. Sets of graduated chisels means that you will always find a good size to use and you will rarely have to stop work to sharpen. If one edge gets nicked or if it dulls during your project, just grab one up or one down and keep going.

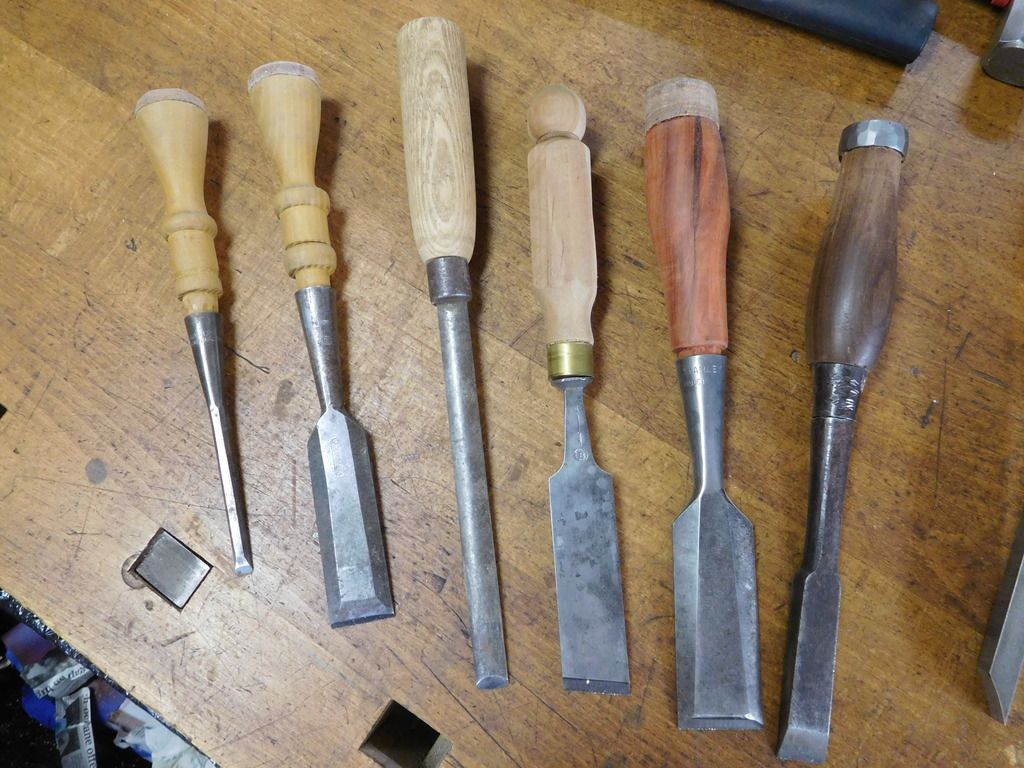
I can show sets later if there is interest. Today I will showcase chisels and chisel handles that I have made. If you call yourself a woodworker, then you should not avoid a chisel rehandle project. After all, chisel handles are wood. Here is the class photo.

DSCN0830.jpg


The first group is what I call the Primatives. These handles were made using pocketknives, drawknives, and other chisels. Most of these are from my early days of ww and the quality shows.

DSCN0831.jpg


My shop includes tools from various sources and some are very special. That is the case with the 1/4" chisel on the right with a whittled handle. That chisel and handle came from my grandfather's shop and he whittled the handle himself. The others came from various sources and were rehabilitated for use. These are functional but are not beauties. It is OK to make a quick handle and put the chisel back to work. I kept at it and my skills did improve over time. Never give up.

The next group is a graduated set of Japanese style paring chisels. Hold them with two hands and pare slivers away from your project.

DSCN0832.jpg


The large chisel is actually from Japan and is factory made. It is about 3/8" and the body cross section is triangle shaped. It cost me over $50 at the time. I wanted a full set but could not stand the $$$ pain. So I ground up some steel and added it to a heat treating batch of plane blades that I was working on. The ferrules are brass pipe and the handles are turned from African hardwood--Padauk I think. Sizes are 1/4, 3/16, and 1/8. They are sharp and work well.

The next group is hand ground speciality chisels. Sorry for the fuzzy photo.

DSCN0833.jpg


I bought two 1/4 chisels at Big Lots and ground them at 45 degrees. It was a slow process which required frequent dunking. Most tool steel for chisels changes its temper around 400 degrees. If you quench and see steam, you have exceeded 220. So take care and quench often. These are handy for cleaning out inside dovetail pockets--think drawer front. You need the pair to get at both sides. The chisel in the middle was a cheapie that I ground for a project. It was not too useful. What can I say? Not all holes you drill will produce a gusher.

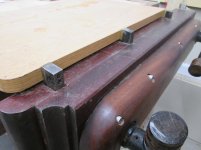
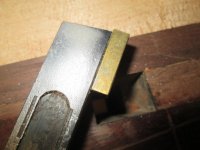
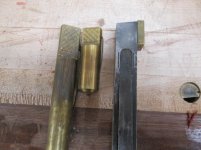
The next group includes a mortise chisel set and two 1/8 chisels I made.

DSCN0835.jpg


One day while searching "handle lots" on that auction site, I hit the mother lode and ended up with a box of nice handles. They even have a hole drilled for the chisel tang. I opened it up a bit, slammed home the blade, and filled the sides with glue and toothpicks. These little 1/8 chisels get lots of use because, like a cute cheerleader, they can go anywhere. I made the mortice chisels because I could not find what I wanted. They are made from 1/2" bar stock and were heat treated by my source. Sizes are 1/2, 3/8, and 1/4. The handles were turned from ash to fit my big paws. I grabbed the blades and whacked the handles on my workbench to send them home. Whups--the sharp corners did some slicing and Jimmy did some bleeding that day.

The next group of chisels are from Fancy Handle Town. I made these at various times for orphan chisels that I rehabilitated.

DSCN0837.jpg


It's amazing how a little lathe experience upgrades your handling skills. I got really fancy and added leather tips to some of them. It was pretty easy to do. I turned a dowel on the end of the handle and fitted it with leather washers. Go to the auction site and look for parakeet toys.

DSCN0839.jpg


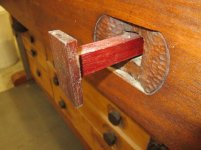
Remember to be safe when using chisels. I like to use a mallet. One hand on the chisel and one hand on the mallet means NO hands available for sticks. Working like this usually requires a vise. WooHoo--more tools to buy.

DSCN0834.jpg


Here is my 40+ yo mallet, wrapped in friction tape and duck tape. The tape muffles the sound and keeps the mallet from rebounding.
 

ez-duzit

Well-known member
Joined
Jun 24, 2013
Messages
5,094
Location
Marina del Rey
far--the track saw is the only Festool I own.

Another tool worth its weight in gold is the Japanese saw.

Start with this one with replaceable blades. Quickly breaks down to fit in your tool bag. Extremely fine cuts without splintering or chipping. Very fast for compound angles as there is no setup. Also recommend the Japanese chisels.

large-hid105.jpg
 
Last edited:
OP
J

jimreed2160

Well-known member
Joined
Aug 7, 2016
Messages
3,589
Location
Tallahassee FL
And here are my Japanese user chisels.

DSCN0838.jpg


The set includes the Grizzly round over chisel set of 5 and the regular set of 10. They are housed in my custom rack. Hit them with the hammer--I have large and small.

I like Japanese chisels because they are stubby like the Stanley #60 **** chisels. They are easy to hold. They sharpen to a razor edge and keep that edge a long time. I keep this set handy and grab for one of them often.

So that is a run down of chisels. I will go over other sets (Marples Blue, Iyoroi, etc) if there is interest.
 
OP
J

jimreed2160

Well-known member
Joined
Aug 7, 2016
Messages
3,589
Location
Tallahassee FL
Ez--thanks for the Festool intro. I have heard raves from Festool users. Many of us ww, however are cheapskates financially conservative. Maybe you could post a few projects so we could share your enthusiasm. (?)
 

ez-duzit

Well-known member
Joined
Jun 24, 2013
Messages
5,094
Location
Marina del Rey
24" x 48" teak table for yacht. Starfish inlay of Birdseye maple. Solid teak edge banding biscuit jointed and epoxied.

cstar-table-1_zpsa96860b2.jpg


Full restoration 1963 48' Grandy Marlineer.

113475_1798899_zpsda39c90f.jpg


Full restoration 1984 43' Beneteau.

1623_zpsn6j7k4uk.jpg


Full restoration 1962 32' Chris Craft.

risky-business-1_zps982d6a77.jpg
 
Last edited:

Irongrave

Well-known member
Joined
Jan 28, 2014
Messages
115
Location
Florence SC
Drives The festool system is just that a full system all of their vacs work with their tools though the larger vacs work better with their miter saw. Even their boxes are designed to work and lock to each other in the same foot print. If you do a lot of sanding or the tools are earning your dinner there are not many better.
 
To avoid these ads, REGISTER NOW!

CRSINMICH

Well-known member
Joined
Aug 15, 2015
Messages
2,397
Location
Southeastern Michigan
Jim: Thanks for giving us a look at your chisels. I do have a couple of sets but most of mine are orphans that I pick up at garage sales and estate sales for a buck or two. I like taking a long thin rusty thingy and turning it into a functioning chisel. What is it with chisel makers and animals? In addition to chisels with deer heads on them I also have some with swans and there is even one with a shark. (I haven't found a Tongue-in-Cheek emoji so TIC will have to do.)

EZ: Very impressive work especially the boats. I recently found out that I am related to the Chris of Chris Craft so, on behalf of my family I would like to say, "Thank you very much!".

EDIT: Irongrave: I just saw what you posted below me. Very nice work on that table and chairs. Breadboard ends are the way to go.
 
Last edited:

Irongrave

Well-known member
Joined
Jan 28, 2014
Messages
115
Location
Florence SC
Solid oak table sanded flat with a Festool Rotex 6 inch sander and matching vac. Also the glue up uses Festool domino mortise and tenons
20150818_124017-M.jpg


the end of the table we wanted to hide the end grain but do it a little differently and we use a whole pile of block clamps
20150820_114400-M.jpg


_MG_8066-M.jpg


_MG_8065-M.jpg
 

drivesitfar

Well-known member
Joined
Oct 23, 2013
Messages
35,999
Location
Pacific Northwest
EZ: did you do all those boats by yourself or do work or own the company that restores those awesome boats. it would take me a lifetime to restore just one and then i'd have to cross my fingers it wouldn't sink. nice looking table too.

IG: that's what i'm thinking about Festool's sander for sure and a few of you guys seem to love their track saw. great looking table and i like the end you made for it.

Jim: thanks again for sharing more of your skills and showing up a few of your great tools. i think i just picked up an English made chisel like the wood handled ones you own. boy i hop i live long enough to get them organized and use them.

ALL: speaking of shop machines my dad gave me his barely used Shopsmith maybe 5 years ago and i just have no place to put it. Anybody have a Shopsmith or have pros and cons about owning one? since i have planers and a bandsaw and a couple small old table saws i was thinking i could use the lathe and tablesaw on it at least and maybe the other attachments if they were good enough or had enough power. thoughts on SHOPSMITHS??
 
OP
J

jimreed2160

Well-known member
Joined
Aug 7, 2016
Messages
3,589
Location
Tallahassee FL
Drives--Shopsmiths are well made. (BTW-I once interviewed with the company when I was in Dayton OH).

Plus is that it takes up less space than independent tools.

Minus is that it takes time to reconfigure.

I hear that just the lathe alone is worth the price of admission. Get some chisels and try it out. Lathe turning can be addictive.
 

drivesitfar

Well-known member
Joined
Oct 23, 2013
Messages
35,999
Location
Pacific Northwest
JIM: well i own the Shopsmith and i might have 3 sets of chisels other than the ones my dad might own with the shopsmith so i'm looking forward to using the lathe. last time i used one i was 14 in Woodshop in the 8th grade and i still have the bowl i made. i just need to find the space to set up the Shopsmith or maybe i'll just set it up at my Dad's house and use it when i'm over there for a visit just to start.

BTW i'm loving this thread and looking forward to what i can learn from a lot of you guys that really have some serious skills.

thanks again
 

bj383ss

Well-known member
Joined
Sep 29, 2011
Messages
3,166
Location
TX
Wow. Some serious contribution in here today. So much I can't even go back and post a comment on each post so just read through all of it and very impressed with the content and skill level of those posting so far. Love those Chris Craft boats. My grandfather restored a 1966 Cabin Crusiser. I have some pics of it and can post later.

Love the allure of the chisels.

I don't own any Festool but I will admit the track saw is pretty cool and I think Grizzly even makes a somewhat decent knockoff of it.

So one thing I can post tonight would be my Hand tool cabinet I built. I reckon everyone can relate to it.

I joined the case with 3/4" box joints I cut on the tablesaw. You can barely make them out at the op of the photo. I still haven't filled it up all the way after 7 years.

Jim I am sorry it only has 3 hand planes.

DSCN0343 by bjohnson388, on Flickr

DSCN3488 by bjohnson388, on Flickr

20161111_201009 by bjohnson388, on Flickr

Few construction photos.

Picture 001 by bjohnson388, on Flickr

Picture 005 by bjohnson388, on Flickr

Picture 006 by bjohnson388, on Flickr

6 drawers that are box jointed as well. They are my favorite for making joints as no fasteners are used and they are super strong.

DSCN3489 by bjohnson388, on Flickr

Bret
 

bj383ss

Well-known member
Joined
Sep 29, 2011
Messages
3,166
Location
TX
JIM: well i own the Shopsmith and i might have 3 sets of chisels other than the ones my dad might own with the shopsmith so i'm looking forward to using the lathe. last time i used one i was 14 in Woodshop in the 8th grade and i still have the bowl i made. i just need to find the space to set up the Shopsmith or maybe i'll just set it up at my Dad's house and use it when i'm over there for a visit just to start.

BTW i'm loving this thread and looking forward to what i can learn from a lot of you guys that really have some serious skills.

thanks again

Drives I would definitely set it up for the just using as a lathe. Turning itself is a whole other adventure and set of tools. I have my grandpa's 1939 Craftsman lathe and have really enjoyed making projects on it. Just a couple...

My favorite Rocketship.

DSCN7350 by bjohnson388, on Flickr

Whitewall tires for my 32' Ford Scale Model

DSCN6691 by bjohnson388, on Flickr

DSCN6692 by bjohnson388, on Flickr

Tire on the left is first experimental. Tire and rim on the right is Walnut Tire, Aspen wood for the white wall and Maple for the rim.

DSCN6694 by bjohnson388, on Flickr
 

turbowoodworker

Well-known member
Joined
Mar 18, 2012
Messages
3,520
Location
Apex NC
It looks like I am a little behind as I am still discussing my workbench. There are some nice projects posted above and I can't wait to see more.

I was asked about bench dogs. Well I'm not patient enough to teach myself videography but here are some pics of my bench in use.

Two types of dogs, round and square. The only real difference in function is that round dogs can rotate in their hole to accomodate slightly irregular forms. Otherwise, as I discussed previously, it is all in the method of installation.

The first pics are of the square dogs and the last is of round dogs on the face vise. Again, nothing fancy, probably 17th century technology at work in my shop.
 

Attachments

  • IMG_7766.jpg
    IMG_7766.jpg
    138.7 KB · Views: 207
  • IMG_7765.jpg
    IMG_7765.jpg
    133.1 KB · Views: 197
  • IMG_7763.jpg
    IMG_7763.jpg
    136.2 KB · Views: 192
  • IMG_7759.jpg
    IMG_7759.jpg
    139.9 KB · Views: 202
  • IMG_7758.jpg
    IMG_7758.jpg
    144.6 KB · Views: 209
  • IMG_7760.jpg
    IMG_7760.jpg
    145 KB · Views: 199

turbowoodworker

Well-known member
Joined
Mar 18, 2012
Messages
3,520
Location
Apex NC
I thought some might want to see a little addition to my bench that comes in handy when working with long boards on the face vise. It is just a retractable deadman to support the long end while planing.
That's all on my bench unless you have questions.
Rick

Trying to add pics that didn't make it last night:
 

Attachments

  • IMG_7771.jpg
    IMG_7771.jpg
    135.8 KB · Views: 194
  • IMG_7770.jpg
    IMG_7770.jpg
    141.7 KB · Views: 212
  • IMG_7769.jpg
    IMG_7769.jpg
    134.3 KB · Views: 198
Last edited:

turbowoodworker

Well-known member
Joined
Mar 18, 2012
Messages
3,520
Location
Apex NC
Last one for tonight. My seven year old wanted a mallet like dad's, so I made him a smaller version of mine. Then my four yo daughter had to have one too, hence the third mallet. Now I have to explain why I am using them myself as that middle size is perfect for light work.
 

Attachments

  • IMG_7772.jpg
    IMG_7772.jpg
    142.5 KB · Views: 210

turbowoodworker

Well-known member
Joined
Mar 18, 2012
Messages
3,520
Location
Apex NC
Last one, I promise. My son demonstrating the (mis)use of the dovetail saw and the vise.
 

Attachments

  • IMG_4436.jpg
    IMG_4436.jpg
    137 KB · Views: 267
OP
J

jimreed2160

Well-known member
Joined
Aug 7, 2016
Messages
3,589
Location
Tallahassee FL
Turbo--Thanks for the pictures. Good work getting your kids in the middle of things. Having children in the workshop turns happy time blissful. You can never have too many assistants.
 

bj383ss

Well-known member
Joined
Sep 29, 2011
Messages
3,166
Location
TX
Nice hammers Turbo. I have those on my build list. Never have gotten around to it. Glad to see your young ones are interested in what dad does. My youngest like hanging in the shop. He is 7. My oldest will come out every once in awhile.

My youngest made his first shelf and painted it last month. I really enjoy having him in the shop.

20161015_105957 by bjohnson388, on Flickr

Bret
 

turbowoodworker

Well-known member
Joined
Mar 18, 2012
Messages
3,520
Location
Apex NC

Attachments

  • IMG_4374.jpg
    IMG_4374.jpg
    136.5 KB · Views: 222
  • IMG_4376.jpg
    IMG_4376.jpg
    135.5 KB · Views: 225
  • IMG_4382.jpg
    IMG_4382.jpg
    136.3 KB · Views: 237
To avoid these ads, REGISTER NOW!
Top Bottom