
You are using an out of date browser. It may not display this or other websites correctly.
You should upgrade or use an alternative browser.
You should upgrade or use an alternative browser.
Woodworking 101--Tools and Tips
- Thread starter jimreed2160
- Start date


Teenager with old tools
Well-known member

evintent
New member
Really useful thread ,there is good information in this site too http://millworkguide.com
drivesitfar
Well-known member
TEEN: nice looking handle you made out of that branch. do you put on the BLO or other product while the piece is spinning? I still remember how much i loved doing that 45 years ago in wood shop and making that wood shine.
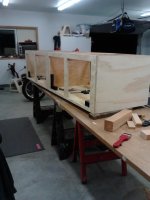
ALL: i'm still looking for ideas for my little wood bins. DaveF a GJ member bought this 72 drawer oak cabinet a couple years ago and it came with all the drawer fronts, but he had to rebuild a few of the drawers. i'd still like to buy or be able to build something like this.
ALL: i'm still looking for ideas for my little wood bins. DaveF a GJ member bought this 72 drawer oak cabinet a couple years ago and it came with all the drawer fronts, but he had to rebuild a few of the drawers. i'd still like to buy or be able to build something like this.
Attachments


Nice dresser your are making Z. I bet that thing is heavy. I have never made a cabinet with a dadoed back like that. I always just use 1/4" hardboard. You will be able to set anything your want on top of it. What kind of joints are you going to use to assemble the drawers?
I agree with you on the environment. I never had any woodshop in school. But my grandpa and dad both taught me woodworking along with mechanic work. I do all my own repairs around the house and on the cars. Not only to save money but I don't trust anybody to work on my stuff as most people do janky work and charge a fortune for it.
Jim thanks for the lessons. I really like the sliding dovetail joint. But I would never have the patience for all that. That is a very interesting saw. Have never seen one like that before, not even in a woodworking mag.
Bret
TEEN: nice looking handle you made out of that branch. do you put on the BLO or other product while the piece is spinning? I still remember how much i loved doing that 45 years ago in wood shop and making that wood shine.
ALL: i'm still looking for ideas for my little wood bins. DaveF a GJ member bought this 72 drawer oak cabinet a couple years ago and it came with all the drawer fronts, but he had to rebuild a few of the drawers. i'd still like to buy or be able to build something like this.
Drive are looking for what to store in it? I would personally store hardware in that badboy and make some labels.
Bret
OP
jimreed2160
Well-known member
Teen--Keep on turning.
Drives--You are only 73 boxes away from having the same thing sitting in your shop. Just make 72 little boxes and one really big one. Oh yeah, there are a few dados required.
Drives--You are only 73 boxes away from having the same thing sitting in your shop. Just make 72 little boxes and one really big one. Oh yeah, there are a few dados required.
drivesitfar
Well-known member
BJ: i don't own that cool oak cabinet that DaveF restored and not sure he didn't get an offer he couldn't refuse for it or if he still owns it. i have several old metal cabinets like that where i'm storing nuts, bolts, parts, electrical and plumbing and misc. things in.
as far as these wood bins i think i'll put some BLO on them and just store those little boxes of old brass screws and nuts and bolts i'd use for woodworking.
JIM: and shy a little OAK too.
ALL: speaking of that do most of you cabinet builders have bins with old handles and bits and pieces so when you do a project you can vintage it up a bit?
drivesitfar
Well-known member
Zach: your cabinet with the trim pieces is coming along nicely and sounds like the fun is just beginning with all the drawers you are making. good luck
BJ: i noticed on your garage thread that you are re sizing some cabinets and care to share the thinking and pictures over here on this thread cause there is a ton of RE PURPOSING some of the guys (and gals) would love to know how to do. i can't tell you how many awesome pieces of furniture i see go to waste.
BJ: i noticed on your garage thread that you are re sizing some cabinets and care to share the thinking and pictures over here on this thread cause there is a ton of RE PURPOSING some of the guys (and gals) would love to know how to do. i can't tell you how many awesome pieces of furniture i see go to waste.
Zach: your cabinet with the trim pieces is coming along nicely and sounds like the fun is just beginning with all the drawers you are making. good luck
BJ: i noticed on your garage thread that you are re sizing some cabinets and care to share the thinking and pictures over here on this thread cause there is a ton of RE PURPOSING some of the guys (and gals) would love to know how to do. i can't tell you how many awesome pieces of furniture i see go to waste.
Drive I will take some more detailed photos on my work today so that I can maybe better explain it and post it up on this thread when I get done.
Bret
WhoWhatNow
Well-known member
Acetone might take the paint off. You can degrease with kerosene and clean with denatured/industrial alcohol.
Just keep it dry and clean. Paste wax will contaminate your wood and can ruin finishes and glue joints.
I use paste wax on my planes as well as the cast iron top of my table saw and jointer. Never had an issue in years.
Definitely avoid any kind of automotive wax though as they could contain silicone
Thanks guys. I'll wipe it down and put it to work.
OP
jimreed2160
Well-known member
Keep up the woodworking, y'all. Making sawdust and shavings is a worthwhile pursuit. I spent a little time in the shop cleaning up metal for a new project. Nothing of worth to photograph yet except my grimy paws. Today's lesson is about bench hooks.
So you have a workbench! Good for you. I hope it has a good end vise and some stout dogs. Even with a shoulder vise, your bench might leave you stranded on a project. Perhaps a bench hook could help you. It is merely a board or piece of plywood with end cleats on opposite sides. It hooks onto the side of your bench and provides a raised cleat for holding your workpiece. Here is mine in action.

Of course, there must be handplanes. Today we have a miter plane and a regular Bedrock #605 jack plane. Notice my ancient bench hook is a little warped. I have set the bar really low this time so that anyone with some decent wood can build something much better.
One of the many uses of a bench hook is to hold work for end trimming. When you crosscut a rail or style, the end might look a little rough. You could always clamp it into submission but it might still look a little off. Use your miter plane and bench hook to trim that end to a perfect 90 degree **** that is smooth as glass. The miter plane here is modeled after the Stanley #9 plane. It has sides that are precision ground and squared off. Many ww build their own shooting boards for these planes. A shooting board is a flat surface with raised tracks for the plane to ride between. Adjust your shooting board to 45 degrees and use it to trip mitered corners. Anyway, the plane has a blade bedded at 35 degrees for fine work on end grain. At that angle, it is more likely to slice rather than splinter. This Lie Nielsen model also comes with a handy handle.

And here it is in action. Just hold the workpiece and drag the plane back and forth. The blade is like a bench plane in that it does not extend to the edge. That keeps your bench safe.

You can also do this job with a regular bench plane. It is just a little more difficult to hold. Just make sure the sides are a good 90 degrees to the sole. Jack plane size is the best. That means a #5 or #605.

Using your bench hook can add versatility to your workbench. It is also an easy project. Make one today and enjoy your weekend.
So you have a workbench! Good for you. I hope it has a good end vise and some stout dogs. Even with a shoulder vise, your bench might leave you stranded on a project. Perhaps a bench hook could help you. It is merely a board or piece of plywood with end cleats on opposite sides. It hooks onto the side of your bench and provides a raised cleat for holding your workpiece. Here is mine in action.
Of course, there must be handplanes. Today we have a miter plane and a regular Bedrock #605 jack plane. Notice my ancient bench hook is a little warped. I have set the bar really low this time so that anyone with some decent wood can build something much better.
One of the many uses of a bench hook is to hold work for end trimming. When you crosscut a rail or style, the end might look a little rough. You could always clamp it into submission but it might still look a little off. Use your miter plane and bench hook to trim that end to a perfect 90 degree **** that is smooth as glass. The miter plane here is modeled after the Stanley #9 plane. It has sides that are precision ground and squared off. Many ww build their own shooting boards for these planes. A shooting board is a flat surface with raised tracks for the plane to ride between. Adjust your shooting board to 45 degrees and use it to trip mitered corners. Anyway, the plane has a blade bedded at 35 degrees for fine work on end grain. At that angle, it is more likely to slice rather than splinter. This Lie Nielsen model also comes with a handy handle.
And here it is in action. Just hold the workpiece and drag the plane back and forth. The blade is like a bench plane in that it does not extend to the edge. That keeps your bench safe.
You can also do this job with a regular bench plane. It is just a little more difficult to hold. Just make sure the sides are a good 90 degrees to the sole. Jack plane size is the best. That means a #5 or #605.
Using your bench hook can add versatility to your workbench. It is also an easy project. Make one today and enjoy your weekend.
rick carpenter
Well-known member
ALL: i'm still looking for ideas for my little wood bins. DaveF a GJ member bought this 72 drawer oak cabinet a couple years ago and it came with all the drawer fronts, but he had to rebuild a few of the drawers. i'd still like to buy or be able to build something like this.
That's an old library card catalog. I remember when that's all they had. Then it went to dedicated terminals in the library, then to online. Maybe now Siri can find it for you. I wish I had one, and then I'd wish I had a use for it. I saw once where the guy made handles out of all the little parts he had inside.
Ok Drive here is the write - up for my cabinets that went under surgery. I had to cut them in half with the bottoms being 42" high to fit under a wall cabinet in the shed, and the two top halves would be mounted over my workbench.
You can see these cabinets on the far left side of this shot.
 20161118_195528 by bjohnson388, on Flickr
I started by marking all the doors and then taking them off. Next I took off the face frames and cut them to the right length. Then I took each side off one at a time and cut them to length and them put them back on so everything would stay where it was
Here you can see how much I had to cutoff of the bottom doors.
 20161201_102008 by bjohnson388, on Flickr
First bottom cabinet done. I had to add a rail to the top of the face frame and a top. I also replaced the kick board at the bottom as it was rotted. These are cheap particle board bookshelves.
 20161201_174051 by bjohnson388, on Flickr
 20161201_174102 by bjohnson388, on Flickr
Here is the first upper cabinet done. I was going to cutoff the part below the doors but then I thought why not just add a shelf. Then I just had to add a rail to face frame and done. I will go back and paint and finish these at a later date.
 20161201_190129 by bjohnson388, on Flickr
 20161201_190137 by bjohnson388, on Flickr
Started work on the 2nd lower cabinet.
 20161201_202944 by bjohnson388, on Flickr
 20161201_202950 by bjohnson388, on Flickr
New top and face frame rail on the 2nd base cabinet.
 20161202_093109 by bjohnson388, on Flickr
Drilling some pocket holes for the rail.
 20161202_093415 by bjohnson388, on Flickr
 20161202_093433 by bjohnson388, on Flickr
Putting the frame together. I really enjoy using pocket screws they are easy to do, fast, and strong.
 20161202_093654 by bjohnson388, on Flickr
After mounting the face frame back to the cabinet next thing was to cut the doors down.
 20161202_094511 by bjohnson388, on Flickr
On the tablesaw sled. You can see how my left side of the saw is limited in width due the DC. I had a brain fart when I did that. The main reason I am relocating all this.
 20161202_094710 by bjohnson388, on Flickr
 20161202_094718 by bjohnson388, on Flickr
Cut to length.
 20161202_094912 by bjohnson388, on Flickr
Cut the rabbet on the back side of the door as the hinges on it are 3/8" inset.
 20161202_095305 by bjohnson388, on Flickr
 20161202_095002 by bjohnson388, on Flickr
Door fits good. Time to reinstall the bottom hinge.
 20161202_095342 by bjohnson388, on Flickr
 20161202_095546 by bjohnson388, on Flickr
Both doors installed.
 20161202_101140 by bjohnson388, on Flickr
Installed in their new home.
 20161202_101756 by bjohnson388, on Flickr
2nd part next.
Thanks for looking,
Bret
You can see these cabinets on the far left side of this shot.
20161118_195528 by bjohnson388, on FlickrI started by marking all the doors and then taking them off. Next I took off the face frames and cut them to the right length. Then I took each side off one at a time and cut them to length and them put them back on so everything would stay where it was
Here you can see how much I had to cutoff of the bottom doors.
20161201_102008 by bjohnson388, on FlickrFirst bottom cabinet done. I had to add a rail to the top of the face frame and a top. I also replaced the kick board at the bottom as it was rotted. These are cheap particle board bookshelves.
20161201_174051 by bjohnson388, on Flickr
20161201_174102 by bjohnson388, on FlickrHere is the first upper cabinet done. I was going to cutoff the part below the doors but then I thought why not just add a shelf. Then I just had to add a rail to face frame and done. I will go back and paint and finish these at a later date.
20161201_190129 by bjohnson388, on Flickr
20161201_190137 by bjohnson388, on FlickrStarted work on the 2nd lower cabinet.
20161201_202944 by bjohnson388, on Flickr
20161201_202950 by bjohnson388, on FlickrNew top and face frame rail on the 2nd base cabinet.
20161202_093109 by bjohnson388, on FlickrDrilling some pocket holes for the rail.
20161202_093415 by bjohnson388, on Flickr
20161202_093433 by bjohnson388, on FlickrPutting the frame together. I really enjoy using pocket screws they are easy to do, fast, and strong.
20161202_093654 by bjohnson388, on FlickrAfter mounting the face frame back to the cabinet next thing was to cut the doors down.
20161202_094511 by bjohnson388, on FlickrOn the tablesaw sled. You can see how my left side of the saw is limited in width due the DC. I had a brain fart when I did that. The main reason I am relocating all this.
20161202_094710 by bjohnson388, on Flickr
20161202_094718 by bjohnson388, on FlickrCut to length.
20161202_094912 by bjohnson388, on FlickrCut the rabbet on the back side of the door as the hinges on it are 3/8" inset.
20161202_095305 by bjohnson388, on Flickr
20161202_095002 by bjohnson388, on FlickrDoor fits good. Time to reinstall the bottom hinge.
20161202_095342 by bjohnson388, on Flickr
20161202_095546 by bjohnson388, on FlickrBoth doors installed.
20161202_101140 by bjohnson388, on FlickrInstalled in their new home.
20161202_101756 by bjohnson388, on Flickr2nd part next.
Thanks for looking,
Bret
2nd part...
And the last cabinet. The 2nd upper. I had to cut the width on this one by 6" so it would fit in the place I had planned for it.
 20161202_111403 by bjohnson388, on Flickr
2 new bottom shelves added. I figured I could put all my sandpaper on these 2 shelves.
 20161202_112353 by bjohnson388, on Flickr
Putting the face frame back on. I don't normally put these together like this. My normal is building the face frame flat on the workbench and then installing it on the cabinet. But sense these have already been attached I figured I could put the 2 stiles on and the cut the rails to fit.
 20161202_113601 by bjohnson388, on Flickr
Cut all the rails and setup a stop block so they would all end up the exact same length and a square face frame.
 20161202_113858 by bjohnson388, on Flickr
Face frame done.
 20161202_114731 by bjohnson388, on Flickr
Next up was ripping the width of the doors down. I forgot to take pictures of this. And sense I cut the inside part of the doors so I wouldn't have to redo the rabbeted edges I had to redrill the holes for the handles.
 20161202_142716 by bjohnson388, on Flickr
 20161202_142848 by bjohnson388, on Flickr
And here it is finished. You may notice (maybe) the bottom rail is different than the picture before. I forgot I installed the other cabinet a little bit different so I had to make this one so they would match. You will see what I mean in the last photo.
 20161202_143658 by bjohnson388, on Flickr
This cabinet did not have a back so I found some leftover I had and it fit the grooves perfect so I just had to cut it size.
 20161202_135833 by bjohnson388, on Flickr
Here are both cabinets mounted to the wall. I mounted a ledger underneath them on the wall level first at the height I wanted to mount them. This makes it easy to mount them by your self. I set them up on the ledger and screw them into the wall. Done.
 20161202_150119 by bjohnson388, on Flickr
I still need to paint repaint them at some point. I just noticed in this picture the doors on each cabinet are not even with each other. I will have to fix that. You can also see how much skinnier the 2nd cabinet is.
 20161202_150129 by bjohnson388, on Flickr
That was long winded. I have had several people ask me to include more pictures and steps so I tried to take more pictures as I worked today.
And the last cabinet. The 2nd upper. I had to cut the width on this one by 6" so it would fit in the place I had planned for it.
20161202_111403 by bjohnson388, on Flickr2 new bottom shelves added. I figured I could put all my sandpaper on these 2 shelves.
20161202_112353 by bjohnson388, on FlickrPutting the face frame back on. I don't normally put these together like this. My normal is building the face frame flat on the workbench and then installing it on the cabinet. But sense these have already been attached I figured I could put the 2 stiles on and the cut the rails to fit.
20161202_113601 by bjohnson388, on FlickrCut all the rails and setup a stop block so they would all end up the exact same length and a square face frame.
20161202_113858 by bjohnson388, on FlickrFace frame done.
20161202_114731 by bjohnson388, on FlickrNext up was ripping the width of the doors down. I forgot to take pictures of this. And sense I cut the inside part of the doors so I wouldn't have to redo the rabbeted edges I had to redrill the holes for the handles.
20161202_142716 by bjohnson388, on Flickr
20161202_142848 by bjohnson388, on FlickrAnd here it is finished. You may notice (maybe) the bottom rail is different than the picture before. I forgot I installed the other cabinet a little bit different so I had to make this one so they would match. You will see what I mean in the last photo.
20161202_143658 by bjohnson388, on FlickrThis cabinet did not have a back so I found some leftover I had and it fit the grooves perfect so I just had to cut it size.
20161202_135833 by bjohnson388, on FlickrHere are both cabinets mounted to the wall. I mounted a ledger underneath them on the wall level first at the height I wanted to mount them. This makes it easy to mount them by your self. I set them up on the ledger and screw them into the wall. Done.
20161202_150119 by bjohnson388, on FlickrI still need to paint repaint them at some point. I just noticed in this picture the doors on each cabinet are not even with each other. I will have to fix that. You can also see how much skinnier the 2nd cabinet is.
20161202_150129 by bjohnson388, on FlickrThat was long winded. I have had several people ask me to include more pictures and steps so I tried to take more pictures as I worked today.
I was equally impressed by how nice that catalog looked.That's an old library card catalog. I remember when that's all they had. Then it went to dedicated terminals in the library, then to online. Maybe now Siri can find it for you. I wish I had one, and then I'd wish I had a use for it. I saw once where the guy made handles out of all the little parts he had inside.
Card catalogs are great but if you can find a card file, for punch cards or medical records rather than library cards, you should go that route. Usually they are metal and usually about the same drawer dimensions just much heavier empty, you would be doing even better for yourself.
My dad has an old card file and that sob is heavy. I swear there's 30lb of lead in it mixed in with all his rusty hardware from the 60s until now. Moved that thing prob 5-6 different houses over the years and I swear that's why I have bad knees.
But with all that weight not a single drawer or support sags.
Last edited:


drivesitfar
Well-known member
Zach: i can't see the dowels so i'll take your word for it that you have them installed. i did notice you used what i thought was a picture frame clamp to square up your dresser's corners. do you do that everytime and does everybody else use those kind of clamps?
BJ: thanks for all the pictures and it really helps tell a story. it also helps those of us that haven't built cabinets to see a little more how they are made. THANK YOU.
Jim: thanks for showing another plane I need to put on the list and another good lesson on how to use it.
BJ: thanks for all the pictures and it really helps tell a story. it also helps those of us that haven't built cabinets to see a little more how they are made. THANK YOU.
Jim: thanks for showing another plane I need to put on the list and another good lesson on how to use it.
Slednut
Well-known member
Anyone use these, I've found many uses for them including keeping cabinets square during assembly.
http://www.rockler.com/clamp-it-ass...-PucIIwFPmmTnCvPec6t9Q38zB8wZWTNfMhoCRZzw_wcB
These cabinets were for the garage so I just screwed them in place then filled the holes with putty.
http://www.rockler.com/clamp-it-ass...-PucIIwFPmmTnCvPec6t9Q38zB8wZWTNfMhoCRZzw_wcB
These cabinets were for the garage so I just screwed them in place then filled the holes with putty.
Attachments
Teenager with old tools
Well-known member

OP
jimreed2160
Well-known member
Teen--Good job on the file handle. The shape looks easy on the paws. Repetition adds quality--do a whole set of these and I'll bet they get lots better.
When I turn handles and knobs, I like to drill the hole first and then turn around it if possible. It is easier for me to drill a turning square than it is to drill a slippery turned piece.
ALL--It seems that woodworking is not dead, but alive and kicking. It is snowing sawdust this Christmas on GJ as we blow by 30k views! Thanks for yer eyeballs.
ez-duzit
Well-known member
...hole kinda went off center...
Start over.
OP
jimreed2160
Well-known member
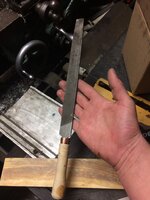
Jack Rabbet Plane
The plane of the day is a jack rabbet skewed jack plane made by DA Schutte of Chillocothe, Ohio. If you find a bunch of old woodies, you are sure to find a skewed rabbet in the bunch. They were popular because they perform many tasks. They make great rabbets, dados, and even raised panels. They were used in boatbuilding, carriage building, timber framing, and even door panel making. This one is marked #2. Maybe there was one larger (!).

The first thing I did was check out the blade. It seemed inconsistent and close inspection showed a few nicks. I honed those out and tried again. Here are the test shavings. The mallet is for adjustment. Tap the toe to lower the blade. Tap the heel to back it out. Tap the wedge to keep it in place. Sounds tedious, but it is really quick and easy.

The first job was a dado. I cut two shoulders using a stairsaw. Then I clamped a woodscrew beside one of the saw kerfs to use as a batten. The plane rode against it and began making shavings.

Here is the finished dado.

My next challenge was to make a raised panel. I found a nice piece of pine and marked it.

Then I used an old Disston back saw to cut saw kerfs for the cross grain panel shoulders.

With the saw kerfs done, I cut two 1/8" grooves with my Stanley #45 combination plane.

I used a shoulder plane to cut a vee into the waste side of each cut. This vee cut protects the inside panel shoulder from the next plane.

I shaved down the end panel using the jack rabbet.

Here is the jack rabbet working down the side. Going with the grain makes nice shavings.

I did some close cleanup work with my #140 skew rabbet.

Panel making reminds us that woodworking involves solid geometry. As you draw the panels down, watch the intersection on the corner. The sides are equal when you see a diagonal line. Notice that this one is too far to the left. That means that the left side needs to be trimmed more.

Ahh. Now we are looking good.

So there is the jack rabbet plane in action. Making panels is pretty easy if you have the right tools. It takes practice, but the end result looks nice. It is also a nice display of handwork. Nobody will mistake your new project as something from Ikea.
It is time to go out there and make panels. Let the chips fly.
The plane of the day is a jack rabbet skewed jack plane made by DA Schutte of Chillocothe, Ohio. If you find a bunch of old woodies, you are sure to find a skewed rabbet in the bunch. They were popular because they perform many tasks. They make great rabbets, dados, and even raised panels. They were used in boatbuilding, carriage building, timber framing, and even door panel making. This one is marked #2. Maybe there was one larger (!).
The first thing I did was check out the blade. It seemed inconsistent and close inspection showed a few nicks. I honed those out and tried again. Here are the test shavings. The mallet is for adjustment. Tap the toe to lower the blade. Tap the heel to back it out. Tap the wedge to keep it in place. Sounds tedious, but it is really quick and easy.
The first job was a dado. I cut two shoulders using a stairsaw. Then I clamped a woodscrew beside one of the saw kerfs to use as a batten. The plane rode against it and began making shavings.
Here is the finished dado.
My next challenge was to make a raised panel. I found a nice piece of pine and marked it.
Then I used an old Disston back saw to cut saw kerfs for the cross grain panel shoulders.
With the saw kerfs done, I cut two 1/8" grooves with my Stanley #45 combination plane.
I used a shoulder plane to cut a vee into the waste side of each cut. This vee cut protects the inside panel shoulder from the next plane.
I shaved down the end panel using the jack rabbet.
Here is the jack rabbet working down the side. Going with the grain makes nice shavings.
I did some close cleanup work with my #140 skew rabbet.
Panel making reminds us that woodworking involves solid geometry. As you draw the panels down, watch the intersection on the corner. The sides are equal when you see a diagonal line. Notice that this one is too far to the left. That means that the left side needs to be trimmed more.
Ahh. Now we are looking good.
So there is the jack rabbet plane in action. Making panels is pretty easy if you have the right tools. It takes practice, but the end result looks nice. It is also a nice display of handwork. Nobody will mistake your new project as something from Ikea.
It is time to go out there and make panels. Let the chips fly.
Last edited:
OP
jimreed2160
Well-known member
Drives--You inquired about hand plane storage. Well, here is how I store my Stanley #45 combination plane. The issue of storing it in its original box is that the plane has to be totally disassembled to fit into the box. I like to keep mine ready for action. Here are two planes along with extra sets of cutters. Not fancy, but functional.

Stanley included a screwdriver for adjusting the plane. These are often MIA. Mine was also missing, so I made my own. It has an ebony handle and is flat on the end so it stands up. Take that--Stanley!

Stanley included a screwdriver for adjusting the plane. These are often MIA. Mine was also missing, so I made my own. It has an ebony handle and is flat on the end so it stands up. Take that--Stanley!
turbowoodworker
Well-known member
Thanks Jim for all the nice tutorials. Good pictures.
Well it is tough out in the boonies when the DSL (yes you heard correct, DSL) goes down. I can read the Forum but posting is a real pain on the phone.
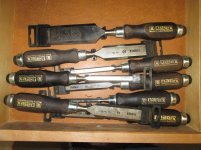
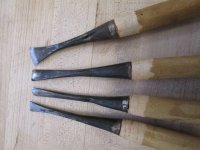
But before I went "off grid" I had promised Teenager to post up some pictures of similar carving tools to his fishtail chisels. So here is a set. I inherited a carving set from my godfather, a very talented and accomplished wood carver. These were in the set and are marked "Japan".
I also included a few pictures of standard bench chisels and mortising chisels for comparison. In fairness, I recall Jim doing a better and more thorough job of discussing chisel types earlier in the thread, so I'll let it go at that.
Now to wait for the pictures to upload on my sloooow but thankfully functional DSL!
Well it is tough out in the boonies when the DSL (yes you heard correct, DSL) goes down. I can read the Forum but posting is a real pain on the phone.
But before I went "off grid" I had promised Teenager to post up some pictures of similar carving tools to his fishtail chisels. So here is a set. I inherited a carving set from my godfather, a very talented and accomplished wood carver. These were in the set and are marked "Japan".
I also included a few pictures of standard bench chisels and mortising chisels for comparison. In fairness, I recall Jim doing a better and more thorough job of discussing chisel types earlier in the thread, so I'll let it go at that.
Now to wait for the pictures to upload on my sloooow but thankfully functional DSL!
Attachments

turbowoodworker
Well-known member
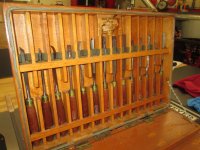
How about a picture of my godfather's carving tools? They came in a very nice wooden briefcase with compartments much like the old TV repairman attaches. The main set is a complete Marples set. There are several others included as well, mostly smaller detail chisels and rifflers, files, and some homemade chisels as well.
I have put a lot of these to work on the Rococco carvings on my classic long rifles. Godfather is smiling down on me when I pull them out, I'm sure.
I have put a lot of these to work on the Rococco carvings on my classic long rifles. Godfather is smiling down on me when I pull them out, I'm sure.
Attachments

turbowoodworker
Well-known member


turbowoodworker
Well-known member
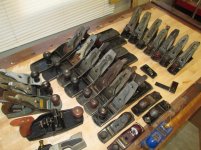
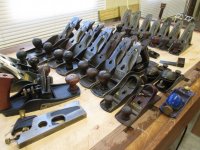
And last for this morning, how about a family photo or three. I spent the last few days rehabbing my planes. Derusting and sharpening, making sure the soles are flat.
So they cooperated for a few family shots. Most are standard Baileys (#8, 2 #7s, a couple of #6s, #5s.) There are some no names in there that are likely Stanleys as well judging from their age and heft. I previously posted pics of the Crowntop Craftsman and an earlier Craftsman Jack plane. There are some #4s, #3s as well and the two on the left are Veritas scraper plane and shoulder plane. The blocks in the front are a mix of Stanley and really old (long C) Craftsman and a newer Record.
I've been using the #6 to flatten the workbench top. It does a nice job of finding the high spots.
Thanks for looking.
Attachments

drivesitfar
Well-known member
Turbo: i agree that your GODFATHER must be smiling as you open that cool ATTACHE with his old tools in them. i know i won't ever find a case like that, but now it's on my radar. he's also telling you to start USING THEM MORE.
just curious cause i have a lot of planes to tune up would you mind maybe giving a quick TO DO list and or post up a few pictures of how you DERUST and sharpen your planes. i'm guessing you take a plane all apart and just start wiping down and then get on a stone or two (what grit) and sharpen them?
thanks for sharing and even though you have DSL i remember it being faster than my service i still get some days on this MODERN INTERNET.
good luck
ALL: so i can't say i find stacks of wood like this everyday, but i do fairly often and wondering what you guys would pay for a stack like this or what you could or would build with it.
Attachments


Craptain
Well-known member
What would I pay? I couldn't give a clue without more information. What is the wood(s), condition, etc. A quick glance on my phone suggests that it is badly stored construction grade lumber. To me that is worthless. However if it was seasoned oak or other hardwood it could be worth a small fortune. BTW to me a fortune is still not much.
As a rule of thumb, I don't pay more than approx 1/3rd of my usual trade cost for lumber like that. So you need to have some idea of retail for various woods before you even look at it. Then estimate how much usable wood you can get out of it.
Just my opinion. Your local situation may vary.
Edit: storage is not as bad as I first thought.
Sent from my SM-G900T using Tapatalk
Last edited:
turbowoodworker
Well-known member
Drives,
That wood is really weathered and cupped, at least some of it. Only looking at the pictures and not able to inspect, I would venture that with a planer and jointer, the thicker 5/4, 8/4 stuff may get you a few board feet after a lot of work.
I personally would not pay for it unless I had a specific barnwood project to do. I would mention to the owner/neighbor/relative that as a woodworker I could sure put some of that to use. That statement might just get you some for free. Not to sound like a cheap mooch, but that stuff will require more work than you imagine.
So unless you have a specific task, I wouldn't personally be interested (lest my hoarding gene kicks in badly then...).
turbowoodworker
Well-known member
Drives,
So to your question about rehabbing planes.
It depends how bad they are. My Craftsman jack planes only required sharpening and a wipedown. I sharpen like everyone else. Progressive grit stones, nothing fancy, handheld, no angle jig. You are cutting wood not titanium.
First step is when you buy the used plane. Use a straight edge to look for a flat sole. Don't bother buying one that is warped. Check for chips and cracks that might affect function. Pass on anything bad. There are lots of good Stanleys out there. Make sure all the parts are there and in decent shape. Most old planes are in good shape and are often showing few signs of hard use.
When I get a new plane from an antique store, I first tear it all down, remove the screws from the tote and front handle, clean and buff the brass screws. Take off the blade, chip breaker and screw, frog and frog screws. Not much left after that but the body. Clean the body, the inside surfaces are usually painted. Mine were badly rusted from improper long term storage and humidity. I used vinegar and heeded your previous advice about vinegar pitting cast iron. It took about 24 hrs to get a good surface for the wire wheel.
Then after cleaning all the parts, light oil, and blade sharpening, they go back together. Test cut and adjustments. Shazaam! Good as new.
Hope this helps. This really refers to typical bench planes as many of Jim's examples have lots of other weird parts. So know what you are looking at before buying. I can take one apart and post pictures later if you think that is helpful.
Rick
drivesitfar
Well-known member
Turbo: while i own enough planes and have a fair knowledge of them to get a good idea what you are saying i bet there are a lot of members and future members that could use the pictures and more explanations of the process.
thanks for taking the time to explain.
Turbo and Craptain: thanks for your take on this woodpile. while i don't always find piles of this of cedar or hardwoods i see a fair amount of them. i also would much rather use my 12 inch dewalt planer, 6 inch jet planer and small hand planers and planes to make old lumber useful instead of buying another 2x4 or 2x6 that seems like BALSA wood now at the big box stores. i tend to build a fair amount of thinks so having a good lumber pile at the ready is a good thing for me.
ALL: i don't know if i'll get anywhere on this project this week cause something always seems to change my direction, but i'm hoping to pull out a lot of my woodworking stuff and start making room for my shopsmith so i can maybe have a sort of wood shop shed set up.
i'm still looking for more opinions on this or any wood piles that might look similar for what to look for and maybe have an idea of value.
cheers
OP
jimreed2160
Well-known member
Turbo--Thanks for the chisel shots. Those are nice.
Drives--That wood looks like a lot of construction lumber in questionable shape. Price is free or case o beer. I usually buy hardwoods for specific projects since my storage space is limited.
All--Sorry to leave you hanging on the panel. I finished this morning and here are the money shots.


It made lots of pretty shavings. The random board I picked for a tutorial turned out nicer than I thought it would. It is too pretty to throw out. Now I need to think of a suitable project. Hmmm...What needs a door?
Drives--That wood looks like a lot of construction lumber in questionable shape. Price is free or case o beer. I usually buy hardwoods for specific projects since my storage space is limited.
All--Sorry to leave you hanging on the panel. I finished this morning and here are the money shots.
It made lots of pretty shavings. The random board I picked for a tutorial turned out nicer than I thought it would. It is too pretty to throw out. Now I need to think of a suitable project. Hmmm...What needs a door?
OP
jimreed2160
Well-known member
Cutting Dowels
I use dowels frequently in my woodshop. I cut them with a coping saw when I needed them. Then one day I needed to cut a whole bunch of them at the same length. Here is what I came up with.

It is a plain 2x4 with a vee groove and a box hot glued on the end.

When I need many dowels the same size, I clamp a stop somewhere on the box. Today I needed some really short dowels for a vise project (cover up pin pockets for painting). The jig worked great for these tiny guys.
They are 1/4 x about 3/4 to 1. Hard to handle otherwise.

I added a screw eye on the end so I can hang the whole thing on a pegboard. I don't use it often, but really appreciate having it around.
I use dowels frequently in my woodshop. I cut them with a coping saw when I needed them. Then one day I needed to cut a whole bunch of them at the same length. Here is what I came up with.
It is a plain 2x4 with a vee groove and a box hot glued on the end.
When I need many dowels the same size, I clamp a stop somewhere on the box. Today I needed some really short dowels for a vise project (cover up pin pockets for painting). The jig worked great for these tiny guys.
They are 1/4 x about 3/4 to 1. Hard to handle otherwise.
I added a screw eye on the end so I can hang the whole thing on a pegboard. I don't use it often, but really appreciate having it around.
schor
Well-known member
On that wood I would say less than firewood prices. You really have no clue what you have there till you clean some of it up and there's a ton of work involved. Maybe offer to clean it up for someone and charge them $50?
OP
jimreed2160
Well-known member
Turbo--Thanks for the plane pictures. I see that your shop also has a big plane attracting magnet in it. 
OP
jimreed2160
Well-known member
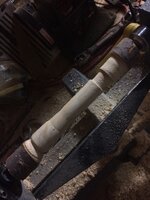
Miter Trimmer
Even when your saw is set at 45 degrees, it can be hard to get a precise miter cut. That is where the miter trimmer comes in to save your bacon. You can find these about--often at reduced prices because they take up so much space. Mine is a Dosch. It was missing its handle and one of the cutters had a really nasty nick in the cutter. Bad news for the seller but good news for a bargain hunter like me who loves to fix things.

My replacement walnut handle is in the foreground. Notice the wooden cover on the front. When I was playing with this thing in the shop, I really worried about sticking my finger in the wrong place. And this thing is very unforgiving. So I made a protective cover.

Ouch. Those blades are sharp enough to shave with. I removed the nick and then polished the edges until they shone.
Then it was on to the handle. The mech has a compound dovetail key because the lever force is quite strong.

But I am a woodworker. All I needed to do was find a walnut scrap and put a dovetail on it. Zippidy do and the problem is solved.

You cannot use this thing and not think of the guillotine.

It trims off little tortured shavings.

And will take pretty large stock. But it is best with miter corners.

If you find one, latch on to it. Then you will own your miters.
Even when your saw is set at 45 degrees, it can be hard to get a precise miter cut. That is where the miter trimmer comes in to save your bacon. You can find these about--often at reduced prices because they take up so much space. Mine is a Dosch. It was missing its handle and one of the cutters had a really nasty nick in the cutter. Bad news for the seller but good news for a bargain hunter like me who loves to fix things.
My replacement walnut handle is in the foreground. Notice the wooden cover on the front. When I was playing with this thing in the shop, I really worried about sticking my finger in the wrong place. And this thing is very unforgiving. So I made a protective cover.
Ouch. Those blades are sharp enough to shave with. I removed the nick and then polished the edges until they shone.
Then it was on to the handle. The mech has a compound dovetail key because the lever force is quite strong.
But I am a woodworker. All I needed to do was find a walnut scrap and put a dovetail on it. Zippidy do and the problem is solved.
You cannot use this thing and not think of the guillotine.
It trims off little tortured shavings.
And will take pretty large stock. But it is best with miter corners.
If you find one, latch on to it. Then you will own your miters.
turbowoodworker
Well-known member
Jim,
I always look for those things but have yet to find one. They show up on CL occasionally but not cheap.
I will continue my quest.
I always look for those things but have yet to find one. They show up on CL occasionally but not cheap.
I will continue my quest.