To avoid these ads, REGISTER NOW!

Woodworking 101--Tools and Tips

jar944

Well-known member
Joined
Jul 26, 2010
Messages
5,912
Location
Northern VA
Working on a entry bench with some beaded inset cabinetry.


Coping and sticking some cabinet door rails and stiles. These are 1&5/32 thick vs the std 3/4 and are cut with an exterior door cutterhead for an extra deep profile.

Turned those parts into this bench
 

Attachments

  • 20190121_171052.jpg
    20190121_171052.jpg
    58.6 KB · Views: 122
  • 20190121_155405.jpg
    20190121_155405.jpg
    56.3 KB · Views: 115
  • 20190121_155157.jpg
    20190121_155157.jpg
    84.2 KB · Views: 105
To avoid these ads, REGISTER NOW!

rlitman

Well-known member
Joined
Oct 18, 2010
Messages
24,596
Location
Long Island
I got to see this beauty on Monday:

e8026e97202d634aa03885d5bee898dd.jpg
a3d475bdebea5c210e4788eb4388bd87.jpg
acc15c9197796fd6a10c5fa44f82f01a.jpg
13a44bbcb2784a1d6b77c886d57df434.jpg
 

Attachments

  • 13a44bbcb2784a1d6b77c886d57df434.jpg
    13a44bbcb2784a1d6b77c886d57df434.jpg
    411.3 KB · Views: 4
  • acc15c9197796fd6a10c5fa44f82f01a.jpg
    acc15c9197796fd6a10c5fa44f82f01a.jpg
    306.5 KB · Views: 1
  • a3d475bdebea5c210e4788eb4388bd87.jpg
    a3d475bdebea5c210e4788eb4388bd87.jpg
    282.5 KB · Views: 1
  • e8026e97202d634aa03885d5bee898dd.jpg
    e8026e97202d634aa03885d5bee898dd.jpg
    727.2 KB · Views: 2
OP
J

jimreed2160

Well-known member
Joined
Aug 7, 2016
Messages
3,589
Location
Tallahassee FL
Jar--Nice bench. It's good to throw out a project every now and then to keep the family on your side.

Rman--Thanks for the pictures. That is an amazing set of tools.
 

dirt_dobber

Well-known member
Joined
Jul 9, 2016
Messages
327
Location
Bee Cave, TX
I know "live edge" things have been done before but this is my first attempt to do any.
I brought a 48" long and 6" thick Walnut slab from a guy on craigslist and rather than using my draw knife to get rid of the bark I thought it would be fun to make use of it for a picture frame. I finished the frame with 3 coats of spray shellac to go into the crevices of the bark. The bark turned from grey to brown
once I applied the finish.
Those pictured are my son, daughter-in-law and my 6 year old triplet grandsons.
.
IMG_6542.jpg

IMG_6566.jpg

IMG_6567.jpg
 
OP
J

jimreed2160

Well-known member
Joined
Aug 7, 2016
Messages
3,589
Location
Tallahassee FL
I just installed a new cabinet at the end of my bench and moved most of my user planes into it.
 

Attachments

  • DSCN8335.jpg
    DSCN8335.jpg
    152.1 KB · Views: 95
  • DSCN8331.jpg
    DSCN8331.jpg
    152.4 KB · Views: 106
  • DSCN8330.jpg
    DSCN8330.jpg
    155.4 KB · Views: 101
  • DSCN8336.jpg
    DSCN8336.jpg
    155.5 KB · Views: 100

txlonghorn1989

Well-known member
Joined
Feb 27, 2017
Messages
2,786
Just wanted to say I discovered the WW'ing thread a week or so ago. I've been reading some everyday, keeping it open and making what progress I can. Enjoying the heck out of it. Only on page 8 so far, 50+ to go. Good good stuff. Wish I'd found this sooner but like discovering John Prine late in life...better late than never! :)
 

CRSINMICH

Well-known member
Joined
Aug 15, 2015
Messages
2,397
Location
Southeastern Michigan
SENSITIVE LATERAL ADJUSTMENT​
I can't remember where I first saw this but it works well for me. I've been using some of my wooden planes and this is the standard method of making lateral adjustments to the cutting iron. It also works on metal planes. CAUTION: This is a 3 oz. ball pein. They are usually much heavier but even a 4 oz. seems too heavy for this use. TAP the side of the iron. It should make a soft "tink" . The adjustment can be much finer than with the lateral adjustment lever.
 

Attachments

  • BP tip (6).jpg
    BP tip (6).jpg
    138.2 KB · Views: 54
Last edited:

Bob Heine

ALLIANCE MEMBER
Joined
Oct 24, 2009
Messages
10,705
Location
Boca Raton, Florida
This is a 3 oz. ball pein. They are usually much heavier but even a 4 oz. seems too heavy for this use. TAP the side of the iron. It should make a soft "tink" . The adjustment can be much finer than with the lateral adjustment lever.
Here I was, minding my own business and you gave me another project. I need to fix my neglected plane iron hammer that I used for random projects. I have had this miniature ball pein hammer forever. I thought about replacing the handle with a straight one but decided I liked the curve (I also couldn't find a handle for this small a head).
attachment.php


The head came loose many years ago so I tightened it up with a finishing nail in the wedge slot (it worked so I hacked the nail off. Recently I destroyed the hammer's value by giving the head a little polish (the polished faces leave less noticeable marks). Today I pulled the piece of nail and removed the head. Once apart, I weighed it. It appears to be a 2 oz. Champion DeArgent of uncertain age.
attachment.php


Now that it's apart I decided to further degrade it's value by polishing the bottom of the head that is hard to reach before I re-assemble it.
attachment.php


I think I can make a small red oak wedge to fit. Then I can go back to my workbench/workshop repair. I will sleep better knowing I have a plane iron adjuster ready to go. Then I just have to remember to use it next time.

Seriously, CRSINMICH, thanks for the tip.
 

Attachments

  • Hammer 2 oz Repair 1.jpg
    Hammer 2 oz Repair 1.jpg
    44.5 KB · Views: 535
  • Hammer 2 oz Repair 3.jpg
    Hammer 2 oz Repair 3.jpg
    120.2 KB · Views: 528
  • Hammer 2 oz Repair 2.jpg
    Hammer 2 oz Repair 2.jpg
    89.6 KB · Views: 536

CRSINMICH

Well-known member
Joined
Aug 15, 2015
Messages
2,397
Location
Southeastern Michigan
You're welcome, Bob: I wish I could take credit but it's pr0bably been done since craftsmen made the transition from wood to metal planes. BTW, I've heard that ball peins this small were used for making gaskets. Supposedly the gasket material was laid onto one side of the part where the gasket would go. The small pein was then used to tat-tap-tap around the edges and openings until the gasket was formed. I'm not sure about that but it's a good story.

p.s. My other small pein is a Bonney.
 
OP
J

jimreed2160

Well-known member
Joined
Aug 7, 2016
Messages
3,589
Location
Tallahassee FL
TX--Welcome to the thread. Feel free to post pictures of your ww projects.

CRS--Good tip. When I use woodies, I generally tap on them with a piece of scrap--1x1 hardwood works great. It works on the toe (to advance blade), the heel (to retract the blade), the wedge (to set the blade) and on the side of the blade for lateral adjustment. Of course, your method is more repeatable since I cannot seem to find the same stick.

Bob--Good for you. I think you should shine away on those rusty brown hammer heads. That's how they looked back in the day. I like your save on the handle. A brand new handle on a vintage head just does not look right to me.
 

Craptain

Well-known member
Joined
Apr 18, 2013
Messages
4,028
Location
Tampa Bay FL
. BTW, I've heard that ball peins this small were used for making gaskets. Supposedly the gasket material was laid onto one side of the part where the gasket would go. The small pein was then used to tat-tap-tap around the edges and openings until the gasket was formed. I'm not sure about that but it's a good story.

p.s. My other small pein is a Bonney.

That method of gasket making definitely works. From being a mere youth I was taught that method by my father and used it often. Still do for that matter and not a youth anymore.

Sent from my SM-G930T using Tapatalk
 

Bob Heine

ALLIANCE MEMBER
Joined
Oct 24, 2009
Messages
10,705
Location
Boca Raton, Florida
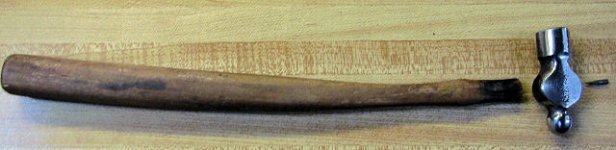
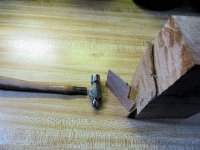
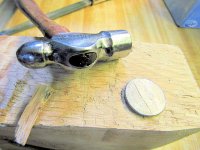
I found a hunk of oak (from a pallet) and managed to cut a big wedge. Without measuring anything, I cut a smaller wedge from the big one.
attachment.php


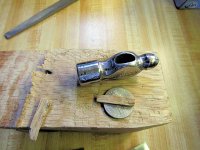
I mistakenly cut the small wedge to fit the long dimension of the handle and had to split and fit the wedge to the smaller dimension. It's becoming a pretty small piece of wood.
attachment.php


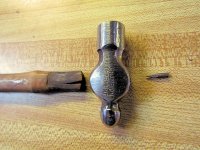
A few taps with tack hammer and the wedge did its job. The head is nice and tight and it should be good for the rest of my life. I did burn the end of the handle and wedge when I buffed the head one last time.
attachment.php

That method of gasket making definitely works. From being a mere youth I was taught that method by my father and used it often. Still do for that matter and not a youth anymore.

Sent from my SM-G930T using Tapatalk
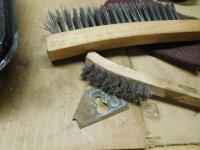
Now that I'm old and have some spending money I buy ready-made gaskets but back in my poverty-stricken youth I used shirt cardboard (is that still a thing?) and a ball pein hammer to tap the holes and edges to fine-tune carburetor gaskets. I also re-used cylinder head gaskets. That required a little steel wool and a coat of axle bearing grease.

My first encounter with a ball pein hammer was in 1952. My mother was a Cub Scout den leader and she got a project from her pack leader. It was a square of copper sheet and a short section of two-or three-inch pipe. You held the copper sheet tight to the pipe and tapped on the copper sheet to form a bowl. Back then smoking cigarettes was good for you and the final result of the project was a shiny ash tray for dad.

Back then, especially during the Korean War, tobacco companies not only advertised everywhere, but had a controlling interest in TV shows. I especially remember Ralph Bellamy and Man Against Crime. Every episode featured a double-door made of Camel cigarette packs opening. It was either at the beginning of the show or the end. Got this from Wikipedia: "The R. J. Reynolds Tobacco Company (Camel cigarettes) sponsored the series, as well as holding a monetary share in the program and a copyright on the series. Mike Barnett was frequently shown smoking a cigarette (and occasionally flashing a pack at the camera), and at the conclusion of the program, Ralph Bellamy would put on reading glasses and read a list of veterans' hospitals and military bases to which "the makers of Camels" was donating cigarettes that week."

It's good they stopped advertising Old Gold cigarettes before I hit puberty. A pack of cigarettes with an apparently naked lady inside was Esquire-esque (
).

Memory is a funny thing -- can't be sure what I had for dinner last night but 1952 is clear as a bell.
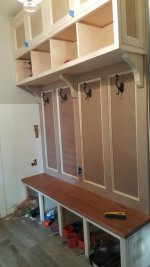
 

Attachments

  • Hammer 2 oz Repair 4.jpg
    Hammer 2 oz Repair 4.jpg
    115.2 KB · Views: 33
  • Hammer 2 oz Repair 5.jpg
    Hammer 2 oz Repair 5.jpg
    106.9 KB · Views: 495
  • Hammer 2 oz Repair 6.jpg
    Hammer 2 oz Repair 6.jpg
    120.2 KB · Views: 497
To avoid these ads, REGISTER NOW!

56vette461

Well-known member
Joined
Jan 13, 2013
Messages
492
Location
Northern California
You're welcome, Bob: I wish I could take credit but it's pr0bably been done since craftsmen made the transition from wood to metal planes. BTW, I've heard that ball peins this small were used for making gaskets. Supposedly the gasket material was laid onto one side of the part where the gasket would go. The small pein was then used to tat-tap-tap around the edges and openings until the gasket was formed. I'm not sure about that but it's a good story.

p.s. My other small pein is a Bonney.

That is a true story. Gasket material came in square sheets of various thickness and you made what you needed
 

jar944

Well-known member
Joined
Jul 26, 2010
Messages
5,912
Location
Northern VA
This oliver followed me home today.

1946 oliver hollow chisel mortiser
 

Attachments

  • 20190203_163845.jpg
    20190203_163845.jpg
    85.3 KB · Views: 92

HenryAZ

MEMBER EMERITUS
Joined
Sep 18, 2012
Messages
1,054
Location
South Congress AZ
4--you seem to be getting serious bout your mortises! That's quite a machine.
Your monster mortiser looks like quite a machine. Never saw a 5 head tenoner, as we only used two head single end tenoners.

In addition to several floor mounted hollow chisel mortisers, the shop where I worked had a chain mortiser. It had a chain bar in place of the hollow chisel, and the foot pedal raised the bed and door stile into the chain. We usually only set that up for larger orders of doors, but it sure made quick work of mortising.
 
OP
J

jimreed2160

Well-known member
Joined
Aug 7, 2016
Messages
3,589
Location
Tallahassee FL
Preston shave

Back in the day, Preston turned some of the nicest tools around. I found this spokeshave while I was cleaning up. It is a fine example of cast iron tool art from the Victorian era. My guess is 1880-pre WWI. This shave had nice bones which were covered in rust. My first thought was to give it an Evaporust spa treatment but closer inspection revealed only surface rust. So I got busy with my brushes, Scotchbrite pads, and Simple Green.

My goal is to make the tools look like they were just resting on granddaddy's shelf. Gentle cleaning is the way to go if you are after that result.

After a good cleaning and polishing, I coated all but the blade with paste wax.
 

Attachments

  • DSCN8432.jpg
    DSCN8432.jpg
    151.7 KB · Views: 55
  • DSCN8437.jpg
    DSCN8437.jpg
    149.7 KB · Views: 73
  • DSCN8436.jpg
    DSCN8436.jpg
    144.9 KB · Views: 58
  • DSCN8435.jpg
    DSCN8435.jpg
    150.2 KB · Views: 61
  • DSCN8434.jpg
    DSCN8434.jpg
    152.7 KB · Views: 64
  • DSCN8433.jpg
    DSCN8433.jpg
    115.5 KB · Views: 55
  • DSCN8431.jpg
    DSCN8431.jpg
    152.1 KB · Views: 61
OP
J

jimreed2160

Well-known member
Joined
Aug 7, 2016
Messages
3,589
Location
Tallahassee FL
Preston shave

After an hour of brushing and scrubbing, most of the rust had moved from the shave to my hands. The blade was in great shape and only needed a little honing to put it back to work.

My reward was pulling a nice shaving.
 

Attachments

  • DSCN8438.jpg
    DSCN8438.jpg
    151.4 KB · Views: 59
  • DSCN8439.jpg
    DSCN8439.jpg
    152.8 KB · Views: 62

jar944

Well-known member
Joined
Jul 26, 2010
Messages
5,912
Location
Northern VA
Jar--Nice score. We are anxiously awaiting pictures of the chips flying.

I'm also anxiously awaiting flying chips

Your monster mortiser looks like quite a machine. Never saw a 5 head tenoner, as we only used two head single end tenoners.

In addition to several floor mounted hollow chisel mortisers, the shop where I worked had a chain mortiser. It had a chain bar in place of the hollow chisel, and the foot pedal raised the bed and door stile into the chain. We usually only set that up for larger orders of doors, but it sure made quick work of mortising.

The 5 head I have is a small tenoner as far as tenoners go.

5 head is a bit of a misnomer in that they have 4 heads (2 tenon and 2 cope) and a cutoff saw

This cute little thing only weighs around 800lbs the powermatic 2a was based largely off this design
 

Attachments

  • millbury1of3.jpg
    millbury1of3.jpg
    79.8 KB · Views: 74
  • IMG_2123.JPG
    IMG_2123.JPG
    114.1 KB · Views: 92

HenryAZ

MEMBER EMERITUS
Joined
Sep 18, 2012
Messages
1,054
Location
South Congress AZ
I'm also anxiously awaiting flying chips
5 head is a bit of a misnomer in that they have 4 heads (2 tenon and 2 cope) and a cutoff saw
That's exactly like ours were. I wasn't counting the cope heads and the saw, just the tenon cutters. We hardly ever used the saw as the stock was rough cut to a length that didn't need further cut-off.
 

jrj3rd

Well-known member
Joined
Aug 20, 2005
Messages
139
Location
Severna Park, Maryland
I got to see this beauty on Monday:

e8026e97202d634aa03885d5bee898dd.jpg
a3d475bdebea5c210e4788eb4388bd87.jpg
acc15c9197796fd6a10c5fa44f82f01a.jpg
13a44bbcb2784a1d6b77c886d57df434.jpg

See you visited the NY Historical Society :) Couldn't figure a way to sneak the box out when I was there a couple weeks ago (wife is a Tiffany lamp fan)
 

Attachments

  • 13a44bbcb2784a1d6b77c886d57df434.jpg
    13a44bbcb2784a1d6b77c886d57df434.jpg
    67 KB · Views: 0
  • acc15c9197796fd6a10c5fa44f82f01a.jpg
    acc15c9197796fd6a10c5fa44f82f01a.jpg
    45.1 KB · Views: 0
  • a3d475bdebea5c210e4788eb4388bd87.jpg
    a3d475bdebea5c210e4788eb4388bd87.jpg
    36.6 KB · Views: 0
  • e8026e97202d634aa03885d5bee898dd.jpg
    e8026e97202d634aa03885d5bee898dd.jpg
    105 KB · Views: 2

Jolomite

Well-known member
Joined
Oct 6, 2011
Messages
163
Location
Detroit, Michigan
Preston shave

After an hour of brushing and scrubbing, most of the rust had moved from the shave to my hands. The blade was in great shape and only needed a little honing to put it back to work.

My reward was pulling a nice shaving.

Nice work, Jim! That's a nice turn of phrase about transferring the rust to your hands- ain't that the truth!

-Joe
 

jar944

Well-known member
Joined
Jul 26, 2010
Messages
5,912
Location
Northern VA
Temporarily wired up to test.. and chips successfully made.
 

Attachments

  • 20190205_212248.jpg
    20190205_212248.jpg
    148.3 KB · Views: 134
  • IMG_20190205_222544_379.jpg
    IMG_20190205_222544_379.jpg
    91.7 KB · Views: 136
  • 20190205_212353.jpg
    20190205_212353.jpg
    71.7 KB · Views: 156
OP
J

jimreed2160

Well-known member
Joined
Aug 7, 2016
Messages
3,589
Location
Tallahassee FL
Nice work, Jim! That's a nice turn of phrase about transferring the rust to your hands- ain't that the truth!

-Joe
Well, not all of the rust went on my hands. A substantial part of it was imbedded in the belly section of my tee shirt. When I get busy cleaning rust I often emerge from the shop looking like Charlie Brown's friend PigPen. :thumbup:
 

rlitman

Well-known member
Joined
Oct 18, 2010
Messages
24,596
Location
Long Island
See you visited the NY Historical Society :) Couldn't figure a way to sneak the box out when I was there a couple weeks ago (wife is a Tiffany lamp fan)

I'm a Tiffany Studios fan as well, though as great as that display is, years ago the Met had a temporary exhibit put together that was even more impressive. For me though, the structural glass staircase was one of the most interesting pieces in that room.

We actually went there to catch the end of the Harry Potter History of Magic exhibition. That was quite impressive.
 

slodat

ALLIANCE MEMBER
Joined
Feb 6, 2010
Messages
3,682
Location
Central-ish, WA
I bought this disc sander a few years ago. I put together the pile of parts and finally got it all completed today. 20” 3 phase disc sander with single phase input power, braking and full automated dust collection.

4c2e4716644701510e297ec11e648204.jpg

Video of it running. I’m getting zero dust out of it. Very happy!!


Attachments

  • 4c2e4716644701510e297ec11e648204.jpg
    4c2e4716644701510e297ec11e648204.jpg
    726.8 KB · Views: 4
To avoid these ads, REGISTER NOW!
Top Bottom