It's a wood whisperer guild project. I can't remember he based the design on.rrich1 ....nice work.
design inspired by james krenov?
Sent from my Pixel 3 XL using Tapatalk

It's a wood whisperer guild project. I can't remember he based the design on.rrich1 ....nice work.
design inspired by james krenov?
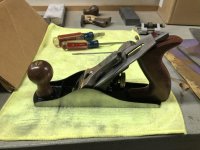
Made some headway on my plane restorations. The new knobs and totes came in and I finished initial flattening if the Stanley no. 3. The Siegley needs some more work before I am ready to spray them and finish polishing the sides and soles. Here are a couple in progress shots of the Stanley.
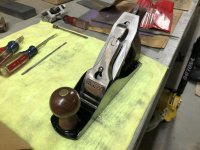
Well, this project got sidelined for quite awhile, too many other priorities. I finally got the no. 3 coated and reassembled. It’s as perfect as I can really make it.
 then you need to put a couple of onion skin like shavings along side of it in the photos.
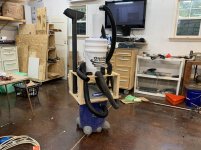
When I had mine going (a smaller metal vac) I made it side by side. This cut down on it being too heavy and also allowed it to fit underneath my table saw at the time.Got me a Dust deputy cyclone dust collection system, you’re supposed to screw it to the side of the shop vac but I didn’t want to drill holes in my shop vac...$99 at woodcraft, I love it..it’s a little top heavy but I know how to handle it.

What is everyone using for assembly screws for cabinets etc...
When I had mine going (a smaller metal vac) I made it side by side. This cut down on it being too heavy and also allowed it to fit underneath my table saw at the time.
Sent from my Pixel 3 XL using Tapatalk
What is everyone using for assembly screws for cabinets etc, if not using pocket screws. I don’t have any local source and need to order online. ***** to not be able to fondle them first.
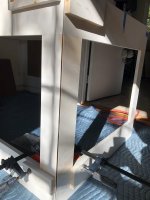
I'm installing wainscoting and have run into an issue with an outside corner miter. Below is the mockup of the two joining panels, they are not yet attached to the wall or pieced together.
I cut the miter using a track saw after than panels were assembled. There is a significant gap down the middle of the miter. I was originally planning on gluing the panels together then attaching to the wall, but I'm not sure my little miter spring clamps have enough pressure to hold the pieces together, or that the glue is even strong enough.
Does anyone have suggestions on how to fix this?
Re-cut the miter properly.
Re-cut the miter properly.
")
...starting over might be the best option...
I did not suggest that he start over--simply re-cut the miter.
I'm installing wainscoting and have run into an issue with an outside corner miter. Below is the mockup of the two joining panels, they are not yet attached to the wall or pieced together.
I cut the miter using a track saw after than panels were assembled. There is a significant gap down the middle of the miter. I was originally planning on gluing the panels together then attaching to the wall, but I'm not sure my little miter spring clamps have enough pressure to hold the pieces together, or that the glue is even strong enough.
Does anyone have suggestions on how to fix this?
I'm no expert woodworker, so I'm just telling you what I would try before starting over. To be clear starting over might be the best option, but it is one I would try to avoid if I could,.... 'cause I'm lazy. I would get a 45 degree chamfer bit on a router table and maybe a strip of tape on the table top near the bit and running parallel to the fence to raise the work up just a bit so that the bit cuts the back of the miter first and just sneak up on it removing a little bit each pass until it fits good (or good enough depending on how particular you are). If you have to "fudge something" (tech term, I like to throw in any response to make me look more knowledgeable) because the piece ends up a little shorter it is easier to hide or disguise it at the inside corner on the left of the first photo. For instance
you may need to add a thin strip of wood glued and sanded flush to the end of the left piece, but it probably wouldn't be noticed in the inside corner after painting.
.....or you could just ...
Do you have a biscuit joiner and clamps to go across the joint in both directions? The biscuits would keep the joint from sliding around and provide extra strength the clamps would then pull the joint together.
another great idea, thanks. i have a domino, and about a dozen of the clamps you see in the photo. i didn't think about using the domino, but i could use the smallest dominos and pull that joint closer. do you think the glue would hold that joint closed? thanks again for the tip.
I think the glue would hold, most glues are stronger than the wood itself. If you go this route, it would be a good idea to do a dry run before applying glue. Depending on how large the gap is, the dominos could bottom out in their holes before the joint closes. The clamping pressure needed to close up the gap would give you the best idea if the pieces could be used as is or not. If you’re breaking out in a sweat, gritting your teeth, and grunting trying to pull the joint closed, it’s probably not going to work. Lol
do workworking they said. it'll be fun they said.I would remake the corner with the stiles full length and either miterfold or lockmiter then add the rails afterwards.
Alternatively just see if tape in a miterfold setup would pull that corner together. I'm assuming the wood has a bow if it's that far off and you used a track saw.

yes, the face of the style is slightly bowed out from the rail, causing the gap. just googled miterfold and makes a lot of sense for this application. i have a 1x2 that'll cap the wainscot panel so the full length style seam won't even show. thanks for the tip!


Hi all, happy I found this thread, I've already learned plenty just browsing through older posts here. And don't think the username means I'm any sort of pro... I am not!! Lol.
Does anyone have experience using heat lamps or small fan/heaters to help with staining and finishing in cold weather? Winter is creeping in here in Indiana and in my current living situation, my 'workshop' is an uninsulated garage. I'd like to do smaller projects like bandsaw boxes, some shelves and small end tables etc, using mostly oil-based stain (I've got some fast-dry types that are supposed to dry in an hour) and for finish (which I'm also pretty new at) I have Minwax polyurethane (and mineral spirits if a wipe-on mix works better?) and spray lacquer. Something that I could just put on a table and point at the project would be great...
From anyone who's done this, any advice, warnings and especially heat lamp recommendations would be much appreciated!
What glue are you using on the PVC Jar?
Sent from my iPhone using Tapatalk
Its just azek pvc glue