To avoid these ads, REGISTER NOW!

The Vintage Craftsman GP Motor Thread

tubes_rule

Well-known member
Joined
Dec 12, 2023
Messages
46
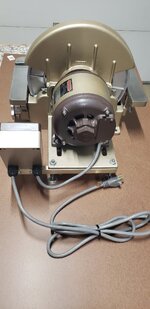
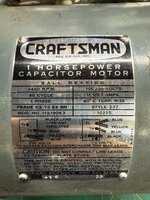
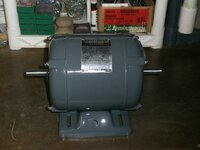
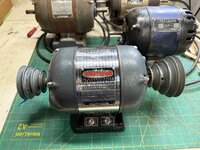
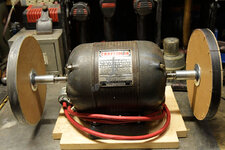
Thanks to Hoorn I finally have the sander I really want. No thanks to Hoorn I recently came across a thread were he and a few others are showing their amazing Delta sanders that look like they're a few notches above this little CM. I'm going to stick with this one, it has a lot more power than the Shopsmith 12" disc I've been using.

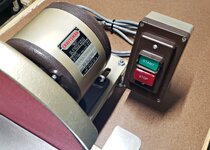
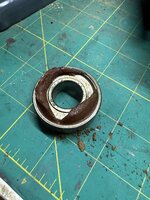
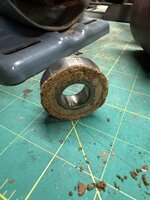
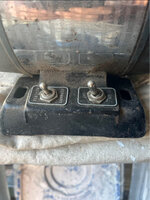
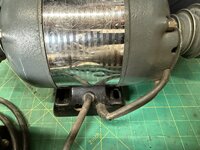
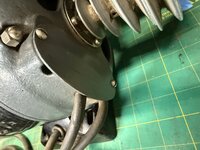
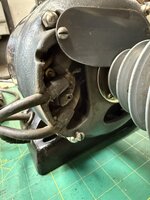
This one was in pretty good shape so I just cleaned it up and added the same switch I recently put on my drill press. Now it's time to get it dirty.

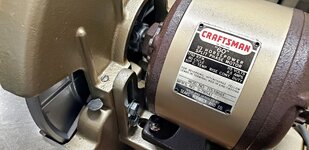
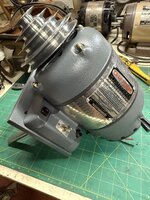
The dark brown on the end caps and motor base is original. I only cleaned and waxed it.

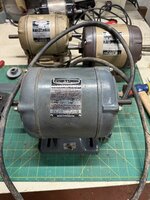
20250611_110805m.jpg


20250611_110902m.jpg

20250611_110922m.jpg

20250611_111002.jpg
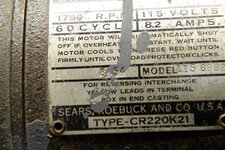
Wow gorgeous in every respect. But the tag is nice. Would love that clean for mine. Probably do something similar to the band because mine was the chromed one.
 
To avoid these ads, REGISTER NOW!

micromind

Well-known member
Joined
Sep 24, 2023
Messages
3,081
Location
Fernley, Nevada, about 30 miles east of Reno.
Thanks to Hoorn I finally have the sander I really want. No thanks to Hoorn I recently came across a thread were he and a few others are showing their amazing Delta sanders that look like they're a few notches above this little CM. I'm going to stick with this one, it has a lot more power than the Shopsmith 12" disc I've been using.

This one was in pretty good shape so I just cleaned it up and added the same switch I recently put on my drill press. Now it's time to get it dirty.

The dark brown on the end caps and motor base is original. I only cleaned and waxed it.

20250611_110805m.jpg


20250611_110902m.jpg

20250611_110922m.jpg

20250611_111002.jpg

Actual cord-grips.........the mark of a true professional!
 

BSWS

Well-known member
Joined
Jun 2, 2019
Messages
360
Location
Tucson AZ
As Mike (zmotorsports) says, Overkill is Underrated. Actually those strain reliefs are ridiculously cheap on Amazon

Thanks for the compliments but all I did was follow the lead from a few guys on this forum. I also studied Hoorn's pictures and watched nearly every one of Jeff's videos. Now it's time to find something else I can paint Champagne Mist.
 

DDOPWD23

Well-known member
Joined
Jul 8, 2024
Messages
149
Location
Glen Rock, NJ
I have a question for you all. I’ve never come across one of these motors and I looked it up in the catalog. It’s not pictured in the catalog but it states that these “6O” motors have no on/off switch and have bronze sleeves that are oiled for life. There is no way to add oil, both manual and catalog state that they can be mounted vertically or horizontal. It’s $15 so not much of a loss but if I had to could I take it apart and add oil???
 

Attachments

  • IMG_7322.jpeg
    IMG_7322.jpeg
    1.2 MB · Views: 14
  • IMG_7323.jpeg
    IMG_7323.jpeg
    1 MB · Views: 9

FrankLee

Well-known member
Joined
Sep 13, 2010
Messages
3,617
Location
seMI, 48317
I have a question for you all. I’ve never come across one of these motors and I looked it up in the catalog. It’s not pictured in the catalog but it states that these “6O” motors have no on/off switch and have bronze sleeves that are oiled for life. There is no way to add oil, both manual and catalog state that they can be mounted vertically or horizontal. It’s $15 so not much of a loss but if I had to could I take it apart and add oil???
That's exactly what I would do.


DDOPWD23

Well-known member
Joined
Jul 8, 2024
Messages
149
Location
Glen Rock, NJ
Thanks Franklee, I have that stuff in stock and that’s what I plan on doing. Just wanted to make sure. I’m most likely going to put it on a 6x48 disc/belt sander that calls for a 1725 rpm motor. It’s the older one that has bronze bushings in the roller drums for the belt. My friend wants it, I was going to sell it but I’ll give it to him all fixed up and functioning.
 

jd5000

Well-known member
Joined
Jan 17, 2024
Messages
146
Location
Massachusetts
I have a question for you all. I’ve never come across one of these motors and I looked it up in the catalog. It’s not pictured in the catalog but it states that these “6O” motors have no on/off switch and have bronze sleeves that are oiled for life. There is no way to add oil, both manual and catalog state that they can be mounted vertically or horizontal. It’s $15 so not much of a loss but if I had to could I take it apart and add oil???
If you really want an on/off switch on the motor, you could drill a hole in the base and add one. It looks like there is enough room.


DDOPWD23

Well-known member
Joined
Jul 8, 2024
Messages
149
Location
Glen Rock, NJ

DDOPWD23

Well-known member
Joined
Jul 8, 2024
Messages
149
Location
Glen Rock, NJ
Has anyone had any experience with this 1HP Emerson motor? I replace the power cord with a temporary one. The original was cord was unsafe with the amount of exposed wire. All it would do was hum and then trip the breaker. It would not set off the GFI though.

I pulled it apart and inspected the wires and there are no breaks that I can see. The windings all look good not burnt. The bearings were very stiff so I changed them out. I happened to have a set of 6203s.

I put it back together and it will hum and slowly move the rotor. I went to give it help thinking maybe the capacitor is bad and I got a slight shock from the shaft and then it tripped the breaker.

I’ll take it apart tomorrow again and see if I missed a wire and also look at the capacitor. I will have to order one. That thing is very big, it’s a round one and it’s mounted in the end bell. I can get more pictures tomorrow I was just trying to do the basics before bed.

Thanks

Oh and a side note, I’ve never seen a shielded bearing push out all the grease.
 

Attachments

  • IMG_7374.jpeg
    IMG_7374.jpeg
    816.2 KB · Views: 6
  • IMG_7373.jpeg
    IMG_7373.jpeg
    1.1 MB · Views: 5
  • IMG_7372.jpeg
    IMG_7372.jpeg
    1,000.5 KB · Views: 6
  • IMG_7370.jpeg
    IMG_7370.jpeg
    755.4 KB · Views: 5
  • IMG_7371.jpeg
    IMG_7371.jpeg
    629.6 KB · Views: 6

FrankLee

Well-known member
Joined
Sep 13, 2010
Messages
3,617
Location
seMI, 48317
I'm not sure I can help much, but I do have more questions than answers.

Has anyone had any experience with this 1HP Emerson motor? I replace the power cord with a temporary one. The original was cord was unsafe with the amount of exposed wire. All it would do was hum and then trip the breaker. It would not set off the GFI though.
Did the original cord have a ground wire? Does your temp cord have a ground wire? If not, I would not expect the gfci to trip with a wiring issue.

I pulled it apart and inspected the wires and there are no breaks that I can see. The windings all look good not burnt. The bearings were very stiff so I changed them out. I happened to have a set of 6203s.

I put it back together and it will hum and slowly move the rotor.
How did it run before you dismantled? Any hum, smoke or smell?

I’ll take it apart tomorrow again and see if I missed a wire.

I went to give it help thinking maybe the capacitor is bad and I got a slight shock from the shaft and then it tripped the breaker.
I suspect a short somewhere. Check for a pinched wire and cracked wire insulation.

and also look at the capacitor. I will have to order one. That thing is very big, it’s a round one and it’s mounted in the end bell. I can get more pictures tomorrow I was just trying to do the basics before bed.
I had the 3/4 hp version of that model. The cap specs are underneath the isolating tape. It's a pita to get off.
1757069570418.jpeg 1757069679382.jpeg

Oh and a side note, I’ve never seen a shielded bearing push out all the grease.
That is weird. To me, it kinda looks like the grease was in the bearing bore before the bearing was installed.
 
Last edited:

DDOPWD23

Well-known member
Joined
Jul 8, 2024
Messages
149
Location
Glen Rock, NJ
I'm not sure I can help much, but I do have more questions than answers.


Did the original cord have a ground wire? Does your temp cord have a ground wire? If not, I would not expect the gfci to trip with a wiring issue.


How did it run before you dismantled? Any hum, smoke or smell?


I suspect a short somewhere. Check for a pinched wire and cracked wire insulation.


I had the 3/4 hp version of that model. The cap specs are underneath the isolating tape. It's a pita to get off.
1757069570418.jpeg 1757069679382.jpeg


That is weird. To me, it kinda looks like the grease was in the bearing bore before the bearing was installed.
When I first tried it with the original power cord(very carefully) it just hummed and then tripped the breaker. No smoke or smell or smoke only because it would run for about a second.

Temp power cord does have a ground and it is screwed into the base of the motor. I just used one of the mounting bolts.

I’ll have to take it apart again. I worked on it this morning cleaning the contacts for the C-switch. No luck there. Just spins slow with a hum then trips the breaker.

I did inspect all the wires and they all looked in tact and no cracks. I’ll have to look again. I’ll also have to look at the capacitor to get the specs. I feel that is the least of my problems since it should not be tripping the breaker. Something is shorting out. Then again I don’t know what the varnish would look like if it was off of the start windings.
 

Attachments

  • IMG_7375.jpeg
    IMG_7375.jpeg
    693 KB · Views: 8
  • IMG_7376.jpeg
    IMG_7376.jpeg
    632.3 KB · Views: 9

FrankLee

Well-known member
Joined
Sep 13, 2010
Messages
3,617
Location
seMI, 48317
When I first tried it with the original power cord(very carefully) it just hummed and then tripped the breaker. No smoke or smell or smoke only because it would run for about a second.

Temp power cord does have a ground and it is screwed into the base of the motor. I just used one of the mounting bolts.

I’ll have to take it apart again. I worked on it this morning cleaning the contacts for the C-switch. No luck there. Just spins slow with a hum then trips the breaker.

I did inspect all the wires and they all looked in tact and no cracks. I’ll have to look again. I’ll also have to look at the capacitor to get the specs. I feel that is the least of my problems since it should not be tripping the breaker. Something is shorting out. Then again I don’t know what the varnish would look like if it was off of the start windings.
Check for continuity between the hot and neutral prongs of the plug and the case of the motor.
Did you try to spin the rotor by hand to get it to run?
 

DDOPWD23

Well-known member
Joined
Jul 8, 2024
Messages
149
Location
Glen Rock, NJ
I will have to try probing it next.

I did try helping it out to spin up but the breaker trips when I try but I guess it’s just coincidence.

I hope it’s a simple fix and not a total loss.
 
OP
1

11b30b4

Well-known member
Joined
Jul 16, 2020
Messages
1,029
Location
GA
Sounds like one of the lead wirers is connected to the wrong place on the terminal bar and/or thermal protection switch. I recently had a similar problem. Upon reassembling my motor (also a 1 hp) I noticed that one of the wires that run from the terminal bar to the thermal protector had come lose on both ends. I correctly connected it to the Thermal protector but incorrectly connected it to the terminal bar. The motor would run for 30 seconds then trip the breaker. I had to review video footage of the disassembly and figured out that I conned the wire to the wrong place on the terminal bar. Once that was correct, it ran like new. As for the shock, that also indicates that something is not wired correctly in my opinion. I always do a screw driver check on a motor before touching it.
BTW, I have this exact motor on my table saw. If you thing it would be helpful, I can remove it and open it up and record what wire is going where?
 

DDOPWD23

Well-known member
Joined
Jul 8, 2024
Messages
149
Location
Glen Rock, NJ
Check for continuity between the hot and neutral prongs of the plug and the case of the motor.
Did you try to spin the rotor by hand to get it to run?
No luck. I checked all the leads and they all read 1.5ohms. The start windings are a little bit higher at 6.8ohms but that’s to be expected. I found a nut in there but it doesn’t go to anything. I thought maybe that was it creating a short. I checked every wire add no breaks.

Now I have a close circuit no matter what way I hook the switch. I even bypassed the switch and still the same thing.

I mean I don’t know if it’s a protection thing if the starter windings don’t spin up it trips and it needs to be running and I just need to get a new capacitor.

I guess I will get a capacitor and see what happens.
 
To avoid these ads, REGISTER NOW!

DDOPWD23

Well-known member
Joined
Jul 8, 2024
Messages
149
Location
Glen Rock, NJ
Sounds like one of the lead wirers is connected to the wrong place on the terminal bar and/or thermal protection switch. I recently had a similar problem. Upon reassembling my motor (also a 1 hp) I noticed that one of the wires that run from the terminal bar to the thermal protector had come lose on both ends. I correctly connected it to the Thermal protector but incorrectly connected it to the terminal bar. The motor would run for 30 seconds then trip the breaker. I had to review video footage of the disassembly and figured out that I conned the wire to the wrong place on the terminal bar. Once that was correct, it ran like new. As for the shock, that also indicates that something is not wired correctly in my opinion. I always do a screw driver check on a motor before touching it.
BTW, I have this exact motor on my table saw. If you thing it would be helpful, I can remove it and open it up and record what wire is going where?
That would be helpful if you could take a picture of it. I believe it was never opened but now I’m second guessing. It too is destined for the same table saw you have if it can get it to work.

I am also leaning towards a bad thermo switch as well. But I will see if your pictures will help me to discover if something is connected wrong. I don’t think it matters but can you get a picture of the switch leads as well. I appreciate whatever help you are able to offer.

Thank you to both you and FrankLee for the assistance.
 

FrankLee

Well-known member
Joined
Sep 13, 2010
Messages
3,617
Location
seMI, 48317
I doubt it would be the thermal switch, but it's an easy test to bypass. You can also bypass the capacitor and try to start by hand.
 
Last edited:
OP
1

11b30b4

Well-known member
Joined
Jul 16, 2020
Messages
1,029
Location
GA
Ok, first here is the link to the Owner’s Manual for this motor.


Second, here is a wiring diagram based on my motor.

full


These are some pics of the motor.

full


full


full


full


full


full


I hope this helps
 

DDOPWD23

Well-known member
Joined
Jul 8, 2024
Messages
149
Location
Glen Rock, NJ
Ok, first here is the link to the Owner’s Manual for this motor.


Second, here is a wiring diagram based on my motor.

full


These are some pics of the motor.

full


full


full


full


full


full


I hope this helps
It was a success!! The wiring diagram helped me out. I had just one wire backwards. There was two green going to the switch and I tired both ways but still same result.

Inside it was wired correctly. I do need a new capacitor that is a fact which isn’t an issue. With that being said I think the problem was I was using a 15amp outlet and maybe the motor trying to spin up without the capacitor was putting a big draw on that breaker. It’s not the only thing on that breaker. This is all a guess by the way.

I switched over to a 20amp with nothing running on it and I was able to help the motor spin up to speed by hand and it ran without issues. No smoke, not getting hot, doing its thing.

I ran out of time and I will just have to open it again later today to get the numbers from the capacitor.

Thanks again Franklee and 11b30b4!
 

DDOPWD23

Well-known member
Joined
Jul 8, 2024
Messages
149
Location
Glen Rock, NJ
Success!!! I installed the new capacitor and it fired right up. The slight vibration you hear is either a temporary wire nut or the capacitor vibrating. It was a lot smaller than OEM. Now that I know I have a working motor I can break it down and restore it for my table saw. Thanks again 11b30b4 and FrankLee for your help.


DDOPWD23

Well-known member
Joined
Jul 8, 2024
Messages
149
Location
Glen Rock, NJ
Alright, I have another question. Is this a perverse owners doing or did these style motors actually come reversible? I remember seeing in the 30s catalog that they have motors like that. It has Atlas switch labels and not the usual Packard ones.

Judging by the pulleys it looks like it could have come from one of those multiple tool stands. I just don’t know what else could have run on 1750 rpm besides a drill press, sander and a bandsaw. Table saw and jointer would have needed 3450 rpm. Has anyone come across or actually owned one?

They want $75 for it, I was just going to pick it up because I need to replace a current one I have. I can’t seem to get rid of a slight vibration. It’s not the pulley because I’ve tried 4 different ones. It has new NSK bearings it in so it’s not that either.
 

Attachments

  • IMG_7802.jpeg
    IMG_7802.jpeg
    844.9 KB · Views: 5
  • IMG_7803.jpeg
    IMG_7803.jpeg
    1.5 MB · Views: 6
  • IMG_7804.jpeg
    IMG_7804.jpeg
    1.3 MB · Views: 7

FrankLee

Well-known member
Joined
Sep 13, 2010
Messages
3,617
Location
seMI, 48317
Alright, I have another question. Is this a perverse owners doing or did these style motors actually come reversible? I remember seeing in the 30s catalog that they have motors like that. It has Atlas switch labels and not the usual Packard ones.

Judging by the pulleys it looks like it could have come from one of those multiple tool stands. I just don’t know what else could have run on 1750 rpm besides a drill press, sander and a bandsaw. Table saw and jointer would have needed 3450 rpm. Has anyone come across or actually owned one?

They want $75 for it, I was just going to pick it up because I need to replace a current one I have. I can’t seem to get rid of a slight vibration. It’s not the pulley because I’ve tried 4 different ones. It has new NSK bearings it in so it’s not that either.
I don't necessarily think it was perverse, but imo, a previous owner swapped an earlier F/R base. AFAK, the 6962 motors never came with a F?R switch. I believe the black paint on the base is original.

I haven't researched the combo machines too much, but I believe they came with a 3/4 hp, 1750 rpm motor. The pulley on the motor would have been larger to run the saw and jointer.
 
Last edited:

DDOPWD23

Well-known member
Joined
Jul 8, 2024
Messages
149
Location
Glen Rock, NJ
I don't necessarily think it was perverse, but imo, a previous owner swapped an earlier F/R base. AFAK, the 6962 motors never came with a F?R switch. I believe the black paint on the base is original.

I haven't researched the combo machines too much, but I believe they came with a 3/4 hp, 1750 rpm motor. The pulley on the motor would have been larger to run the saw and jointer.
Yes, that’s what I was thinking as well. I can see that option being for a metal lathe and I think atlas still made the lathes into the 50s for Sears. Not too sure on that but they probably didn’t supply the motors though.

I asked the seller to send video of the motor running in both directions via the switch. He never sent it. I’m thinking it doesn’t work and a previous owner must have just grabbed a base from another motor. Similar to motor I just posted. That’s the era I know to have the reverse option.
 

Attachments

  • IMG_6749.jpeg
    IMG_6749.jpeg
    716.7 KB · Views: 7
OP
1

11b30b4

Well-known member
Joined
Jul 16, 2020
Messages
1,029
Location
GA
There are several other tools that run 1725-1750 rpms. Wood lathes and scroll saws come to mind. I am not sure of the metal lathes ran at 1750 or 3450 rpms. The only tool I have that has a reversing switch is my shaper and that thing runs at 3450. The reversing switch is a separate attachment and not part of the motor. I am not a very experienced wood worker so I am not real clear on what tools a revering switch would be useful. Also you mentioned sanders as one of the tools to run at 1750 rpms. My 6 x 48 recommends a 3450 rpm motor.
 

Capt. Curt

Well-known member
Joined
Dec 31, 2018
Messages
92
Location
Harrison Arkansas
Wow, you guys have some really cool looking motors. I love the older Craftsman (30s and 40s) motors. Thank you all for sharing.

I finished rebuilding another 115 motor for my 150 drill press. here is a pic of the motor with the sardine can capacitor.

full


And this is that motor assembled.

full


113.19063

full


The 113.19063 is a beast of a motor. This motor is a 1 HP capacitor start, 3450 RPM, 115/230-volt, 60 cycles motor and is reversable with dual shafts. The motor weighs 45.5 pounds and is 13 ¼” to each end of the shaft. The housing is 9 ½” long and 7 ¾” in diameter and the keyed shafts are 5/8”.

full


full


I am not sure about the age of this motor. I suspect it is a mid- 50s motor but the stamping on the data plate says 15A 33. I will look more closely at the capacitor tonight and see if there is a date on it. This motor was attached to my 113.27520 10” table saw. I relaced the cord and powered up the motor to see if it run and it worked perfectly.

full


One of the unique features of this motor aside from its size is the capacitor and where it is housed. In this pic you can see (through all the saw dust) capacitor is housed inside the terminal end frame. Both of the end frames are made from cast iron and the stator band rolled steel about ¼” thick.

full


The base on this motor is removable and previous owner did a fine job of splicing in the toggle switch (not really).

The original bearings for this motor were New Departure 77503 (double shielded). The bearings are 40mm x 11mm with a 17mm bore.

full


I disassembled the motor and placed all the metal parts in simple green for degreasing. I will add some pics as I work on the rebuild.
Working on this motor was a lot of fun and I learned a bit more about motors. Specifically, that for anything around the 1HP range you need a 1HP rated switch. The switch in this motor was only rated for ¾ HP and when I reassembled it, the switch was permanently on. I could move the switch to he off position, but the motor stayed on. This is because the switch was fused in the open connection position and is a common issue with switches not rated for the voltage and amps of a 1 HP motor.

I removed the data plate from the stator band and needed to redrill the panel screw holes.

full


I filled in the old holes with PC-7 and once the stator is painted you will never know anything was done to it.

I reached out to MattBlast to have the data plate reproduced. We worked together to build the graphics and I am very pleased with the final product. Here is a side by side of the new and old data plates.

full


Anyway, here are the parts being primed and painted.

full


full


full


And here is the finished motor:

full


Thanks for the interest.
Here's the same 1-HP 3450-rpm motor dated 1955 I restored for my 1966 Craftsman Floor Model table. I replaced the original capacitor, starting switch and bearings.
 

Attachments

  • Craftsman 1-HP motor right.jpg
    Craftsman 1-HP motor right.jpg
    251.6 KB · Views: 9
  • Craftsman 1-HP Motor.jpg
    Craftsman 1-HP Motor.jpg
    239.9 KB · Views: 7

DDOPWD23

Well-known member
Joined
Jul 8, 2024
Messages
149
Location
Glen Rock, NJ
There are several other tools that run 1725-1750 rpms. Wood lathes and scroll saws come to mind. I am not sure of the metal lathes ran at 1750 or 3450 rpms. The only tool I have that has a reversing switch is my shaper and that thing runs at 3450. The reversing switch is a separate attachment and not part of the motor. I am not a very experienced wood worker so I am not real clear on what tools a revering switch would be useful. Also you mentioned sanders as one of the tools to run at 1750 rpms. My 6 x 48 recommends a 3450 rpm motor.
Yes, you are correct I forgot about the two different speed of sanders. I should do a speed comparison video of the two. I happen to have both versions in my shop. The older ones with the bronze sleeves run at 1400 final drive. And the two that you have that have a final speed of 2700. I work on that today.

I didn’t know about any of those other speeds.

I also didn’t know that the reverse mechanism was external of the motor. I just thought its was like how a VFD unit does it. I know there were old motors that had handles on them to reverse it. But I think those were RI motors.

I’ll know soon enough when I pick it up today.
 

DDOPWD23

Well-known member
Joined
Jul 8, 2024
Messages
149
Location
Glen Rock, NJ
So on my way to pick up the motor I was thinking it over. Maybe the switch is wired into the terminal bar and in there you can reverse the direction of which way you want the motor to permanently spin. If you just wired the switch to that then you can get it to reverse. So the switch is double pole double throw just without the usual 0n/0ff/On.


As I was driving there the seller sent a video of it working. When I got there to inspect it I was right and I guess it was wired that what from the factory but not for this motor. A similar one that was the black and blue style. A member FrankLee spotted that the base is black and not the original to this motor. It also still has the Atlas style switch tags. What I meant by wired from the factory that way is as you can see the motor base has three holes in it. Power coming in from the outlet, forward and reverse for the terminal bar and what the third hole was for I do not know but maybe someone else does. I included some pictures and a video to see it in action.


I will swap out this base for the other black and blue one pictured below and wire this the traditional way. I want to put this on a drill press. The current motor has a slight vibration that must be in the rotor. It has all new NSK bearings and everything is cleaned up. Ive tried 4 different pulleys and they are not the issue with being out of balance.

I know I have a lot of motors but I find them for cheap and they are back ups. All under $30, or came with a machine that someone was going to scarp anyway.


Attachments

  • IMG_7919.jpeg
    IMG_7919.jpeg
    787.2 KB · Views: 8
  • IMG_7916.jpeg
    IMG_7916.jpeg
    794.9 KB · Views: 7
  • IMG_7917.jpeg
    IMG_7917.jpeg
    540.5 KB · Views: 7
  • IMG_7918.jpeg
    IMG_7918.jpeg
    527.8 KB · Views: 7
  • IMG_7920.jpeg
    IMG_7920.jpeg
    825.7 KB · Views: 8
  • IMG_7921.jpeg
    IMG_7921.jpeg
    810.5 KB · Views: 10

Beerhippie

Well-known member
Joined
Oct 13, 2023
Messages
9,940
Location
Far NE Oregon
Here's another 115.6962 I picked up on Friday:

54864447312_10b90481bf_o.jpg

54861335231_1467082ce4_o.jpg

54865381196_f267e3e709_o.jpg

8 54 is a date code? Sorry for the pic--it's not a steady-hands morning.

It's currently wearing a set of arbors for buffing/grinding wheels and a set of these:

54861693560_9c3fd0fcb5_o.jpg

Red cord and plug are mine. Ugly, but less likely to kill me than the one that was on it. I grounded it to the base.
 

DDOPWD23

Well-known member
Joined
Jul 8, 2024
Messages
149
Location
Glen Rock, NJ
Having an issue with a 6962 motor. It worked fine before I took it apart and painted everything. It works fine in the horizontal position. It’s only until I mount it on the drill press in the vertical and it’s under a load with the belt attached that it shorts out. I can see sparks from the terminal bar or around that area before the GFI trips. Anyone have this issue? I’m going to take it apart tomorrow to take a look. Maybe a wire is cracked and grounding out. I don’t think it’s any problem with the windings since it will run for 10 minutes in the horizontal position and doesn’t even get warm. Just does its job.
 

Attachments

  • IMG_8709.jpeg
    IMG_8709.jpeg
    803.1 KB · Views: 8

FrankLee

Well-known member
Joined
Sep 13, 2010
Messages
3,617
Location
seMI, 48317
Having an issue with a 6962 motor. It worked fine before I took it apart and painted everything. It works fine in the horizontal position. It’s only until I mount it on the drill press in the vertical and it’s under a load with the belt attached that it shorts out. I can see sparks from the terminal bar or around that area before the GFI trips. Anyone have this issue? I’m going to take it apart tomorrow to take a look. Maybe a wire is cracked and grounding out. I don’t think it’s any problem with the windings since it will run for 10 minutes in the horizontal position and doesn’t even get warm. Just does its job.I
Is there any horizontal movement of the rotor shaft?
How far did you take it apart?
Replace the wiring?
Any pictures during assembly?

In the past, I've had issues with a capacitor terminal grounding out, a switch wire grounding out, bad routing of wiring that grounded out when the rotor scraped the insulation off, pinched wiring between the stator and the end frame. exposed wire between the stator and the end frame.

Someone recently reversed the installation of the switch shield and the switch insulator.
 

DDOPWD23

Well-known member
Joined
Jul 8, 2024
Messages
149
Location
Glen Rock, NJ
Is there any horizontal movement of the rotor shaft?
How far did you take it apart?
Replace the wiring?
Any pictures during assembly?

In the past, I've had issues with a capacitor terminal grounding out, a switch wire grounding out, bad routing of wiring that grounded out when the rotor scraped the insulation off, pinched wiring between the stator and the end frame. exposed wire between the stator and the end frame.

Someone recently reversed the installation of the switch shield and the switch insulator.
Yes, there is horizontal movement of the rotor.

I unscrewed the centrifuge switch, thermo protector switch and the terminal bar. I cleaned all the cast parts and painted them.

I didn’t replace any wires since they were all good and not cracked.

That was the only picture I took before I put it back together. The only thing I didn’t when it was back together was switch the rotation because the pulley was mounted on the side with the thermo switch and terminal plate. I like to have those on the bottom so I can easily access them.

I will have to check all those things tomorrow. I ran out of time today to take it all back apart.

I got lucky. This is the 5th one I’ve done and this one has given me trouble. It’s probably something simple I over looked.

Attachments​

  • IMG_8688.jpeg
    IMG_8688.jpeg
    973.4 KB · Views: 0
 

Attachments

  • IMG_8688.jpeg
    IMG_8688.jpeg
    973.4 KB · Views: 8

DDOPWD23

Well-known member
Joined
Jul 8, 2024
Messages
149
Location
Glen Rock, NJ
Is there any horizontal movement of the rotor shaft?
How far did you take it apart?
Replace the wiring?
Any pictures during assembly?

In the past, I've had issues with a capacitor terminal grounding out, a switch wire grounding out, bad routing of wiring that grounded out when the rotor scraped the insulation off, pinched wiring between the stator and the end frame. exposed wire between the stator and the end frame.

Someone recently reversed the installation of the switch shield and the switch insulator.
Ok so I took it completely apart this morning. Checked all the leads coming off the stator. There was one lead off the stator to the terminal bar that was a little frayed. I can see some of the shielding in the bottom of the end bell. I replaced the wire and put it all together.

I bench tested it and it worked fine. I then mounted it on the drill press and I noticed it didn’t spin as easily when in the horizontal position. I tested it without the belt on it and it worked. When I put the belt on it tripped the GFI and I can see a spark.

I think I have too much horizontal play and when the weights fly open on the CS they must be making contact on something that trips it.

There was a shim on that side from the factory and I noticed the bearings I got did not have a raised inner race. I will put another shim on that end to space the rotor away and see if that solves my problem.

I’ll see how it goes later.
 

FrankLee

Well-known member
Joined
Sep 13, 2010
Messages
3,617
Location
seMI, 48317
the bearings I got did not have a raised inner race
I think that's the problem. Spacing of those motor bearings is critical.

Imo, you should shim both sides to space those bearings like the original bearings.

Or, if the old bearings are not damaged, clean them and repack.

I've cleaned and reused dozens of sets of those bearings. Only one time did I find axial play in the old bearings after cleaning and did not reuse them.

Relevant posts:
https://www.garagejournal.com/forum/threads/craftsman-drill-press.227480/page-138#post-11150184

https://www.garagejournal.com/forum/threads/craftsman-drill-press.227480/page-136#post-10906534
 
Last edited:

DDOPWD23

Well-known member
Joined
Jul 8, 2024
Messages
149
Location
Glen Rock, NJ
I think that's the problem. Spacing of those motor bearings is critical.

Imo, you should shim both sides to space those bearings like the original bearings.

Or, if the old bearings are not damaged, clean them and repack.

I've cleaned and reused dozens of sets of those bearings. Only one time did I find axial play in the old bearings after cleaning and did not reuse them.

A relevant post:
Who that’s a great write up and the cutaways are amazing to see what it all looks like for someone who has not tackled one of these.

I do still have the originals. I can clean them, I just didn’t want to deal with the open end in the long run. They should be fine with my use though. They have been operating just fine since 1948, not cared for by previous owners.

From the factory there was one shim on the switch side. Should I leave that there and not shim the other side? I figure the spring washer will take up the slack on the other side. I do have other spring washers to double up. I’ve seen them doubled up in some applications.

I guess that’s why that motor was flipped when I got it off a parts drill press. Someone must have flipped it for a reason and changed the rotation. I attached a picture of how it was before I did the restoration.

I do appreciate the link to that post you made. Really great stuff. Looks like you were a teacher in another life.
 

Attachments

  • IMG_8710.jpeg
    IMG_8710.jpeg
    1.3 MB · Views: 7
To avoid these ads, REGISTER NOW!
Top Bottom