To avoid these ads, REGISTER NOW!

Woodworking 101--Tools and Tips

CRSINMICH

Well-known member
Joined
Aug 15, 2015
Messages
2,397
Location
Southeastern Michigan
BMR: Here are some woodworking terms that you might already know but if not they'll be helpful in making decisions about which plane to buy.

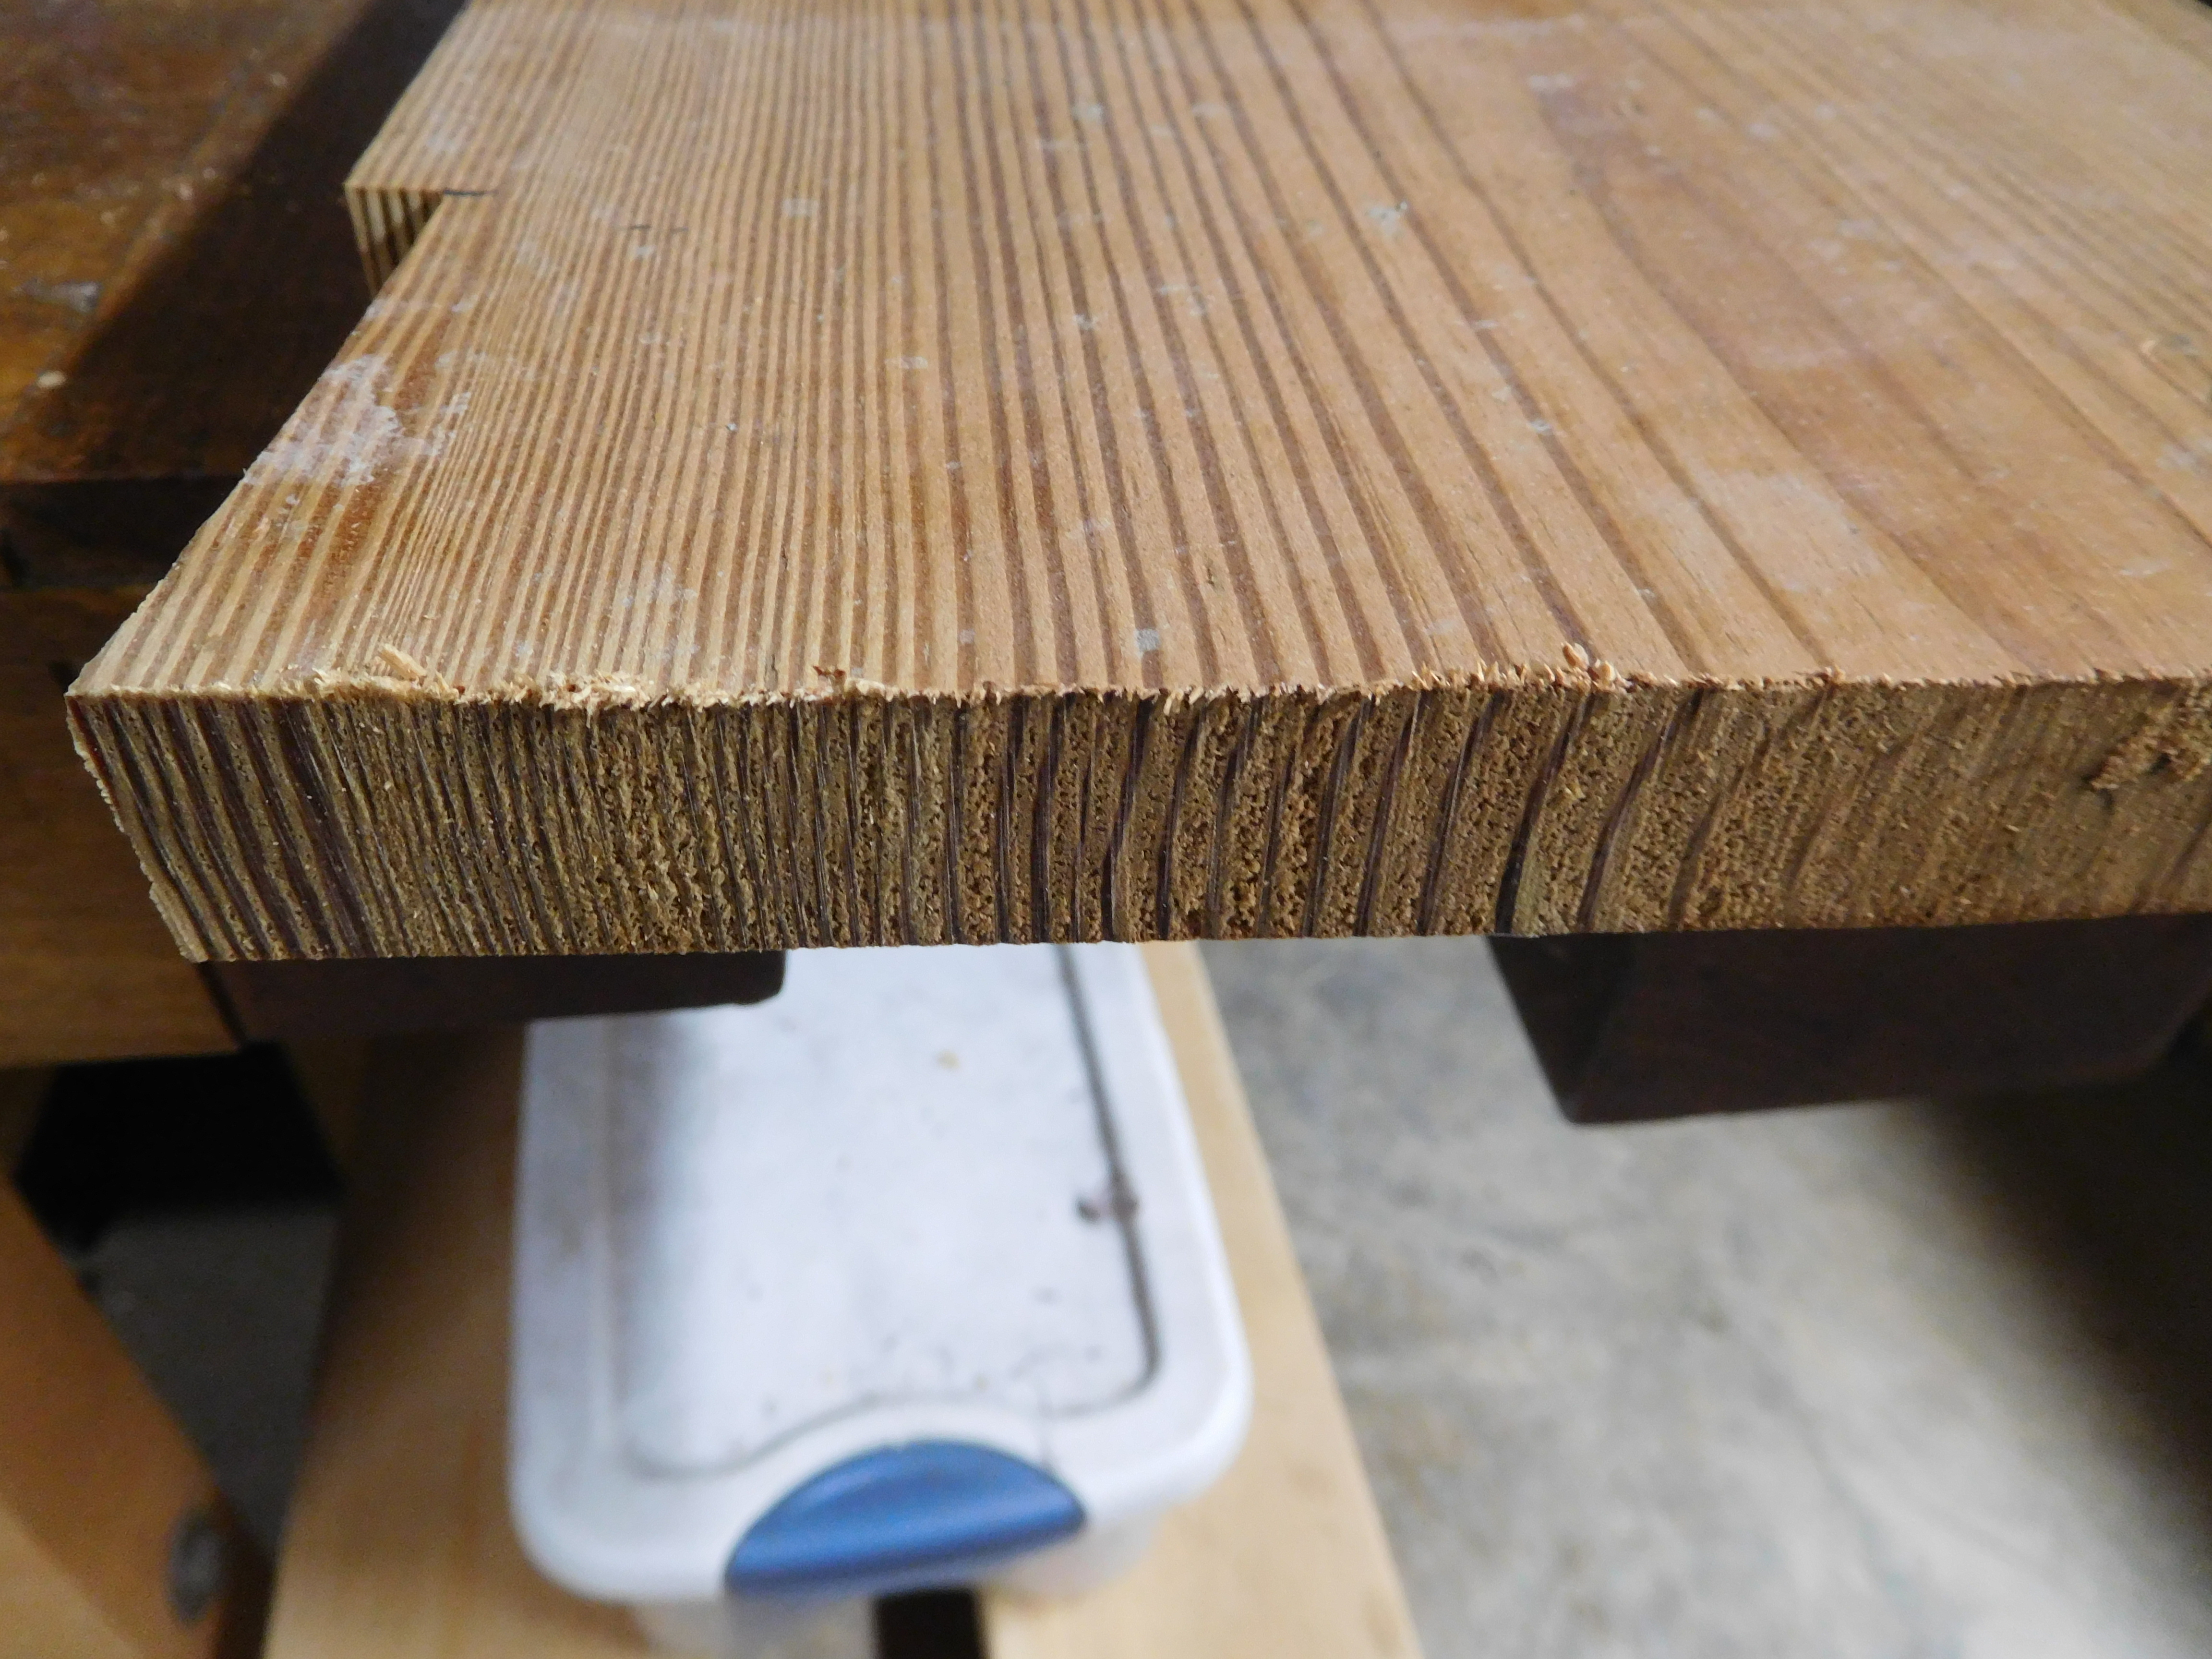
GROOVE: You specified goooves when you asked about plough planes so I started here. A groove is a flat bottomed recess in a the face of a board that goes with the grain.
DADO: A dado is the same thing as a groove except that it goes across the grain.
RABBET (REBATE): Similar to the above but since it's located at one edge of the board it only has one shoulder.

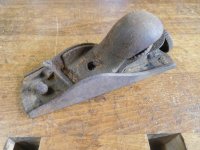
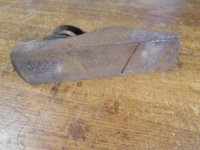
There are many ways to cut each of these three but some ways are better (easier, safer, faster) than others for a given type of recess. You asked about cutting grooves. Those can be done with saws and chisels but it's far faster and easier to use a plow (plough) plane. A shoulder or rabbet plane would also work but you'd have to have a separate plane for each size of groove (or dado) you wanted to cut. (Not exactly but close enough).

Dadoes can be made in the same ways as grooves but extra care will have to be taken to prevent chipping and splitting because the cut is going across the grain. A plane with a spur (sometimes called a nicker) will make it easy to get a recess with crisp edges. If the joint is going to be seen in the finished piece this will be more important.

Rabbets can also be made with many of the same methods. If it is a cross-grain rabbet even more care will need to be taken to prevent chipping and splitting. This is where skew planes will shine. The cutting iron (blade) is not at 90 degrees to the width of the sole of the plane. It is skewed by a few degrees. That means that the blade slices through the wood fibers instead of pushing against them and it will produce a smoother cut.

I apologize if the terminology was too basic for you or if I was too windy. I used to be a teacher and I just can't help myself.

By the way, a router plane, when used with a saw and/or a chisel, will make all of these cuts and do many other things too.

AFTERTHOUGHT Last week I made rabbets on all four edges of a piece. I cut the rabbets on the long sides (with the grain) with a shoulder plane and a batten. On the short sides (against the grain) I sawed the shoulder lines to depth with a backsaw then split out the waste with a chisel. I then cleaned up and flattened the surfaces of all four rabbets with a router plane.
 
Last edited:
To avoid these ads, REGISTER NOW!

Jolomite

Well-known member
Joined
Oct 6, 2011
Messages
163
Location
Detroit, Michigan
CRSinMich, Thank you for your write up. I have to admit, I consider myself pretty good with the odd wood working task, but did not have a proper definition for those terms. I appreciate the primer on methods as well!
 

cheechi

Well-known member
Joined
Feb 29, 2012
Messages
4,384
Location
Triad, NC
Jim

tell me more about how your website works, as in is it hosted by a company or at your home? do you have a bandwidth limit that would be exceeded if you simply hosted an image on the website and linked them here, similar to how you did with whatever old service?

For example;
DSCN4584.jpg


I just grabbed this off your site and now it's here. If you have bandwidth limit issues I will definitely remove it, but as you can see it let me do it without any issue. And as you can see, you can link whatever size image you like without some third party determining how big your images can be.

Then again, if you prefer the images resized (again for conserving bandwidth) then I could see that as a benefit too.
 
OP
J

jimreed2160

Well-known member
Joined
Aug 7, 2016
Messages
3,589
Location
Tallahassee FL
Che--Most of my time working for the man was in IT and I have played with having a website for years. None of them got far because of the back end work. Yes, I was a Unix admin back in the day, but there is a ton of work that needs to be done and maintained.

Fast forward to now when I can have a hosted site with a managed service back end. All I have to learn is Wordpress from the application side. The host manages security, updates and hardware. I can now concentrate on content.

GJ is an excellent site. Some of the sites I have dealt with delete posts after a certain time. Of course, even with GJ, things get lost to history because the chronological thread posting buries older postings. That really bothers me. I like to do write-ups on plane rehabs and have posted hundreds on line. Most of them are lost in the ether. I hope this time to capture them and index them so they have a more permanent shelf life.

So the PB thing really forced me to look hard at service offerings and I found one that works for me. I put alot of effort into this thread and it is really bumming me out to think that the pictures will soon be unavailable. I will keep it up here but my main effort will be where I have more content control. In the beginning I will have to strike a balance between content and presentation. I am afraid the site will be rough looking for awhile because I will spend lots more effort on content.

Sorry if this rambles but that is how my brain works.
 
OP
J

jimreed2160

Well-known member
Joined
Aug 7, 2016
Messages
3,589
Location
Tallahassee FL
Frame update

I dropped the frame off at the glass shop today for a mirror installation. Hope to have it back soon so I can post a money shot of it hanging on the wall.
 

BMR24

Well-known member
Joined
Oct 2, 2017
Messages
234
Location
Rocky Mountains Colorado
Crsinmich thank you for your input. I've done a lot of reading about woodworking and have done a couple of projects, but I'm still at the very beginning of learning the craft. I always appreciate knowledge shared, no matter how basic or advanced. I know I'm looking for a plane that will produce grooves, so unless I can find a 1/4" shoulder plane or something then a plow is what I'm after. I do have a router plane, but I'd like to be able to make the grooves more efficiently. My concern is if I find say a Stanley 45, it'll be online, and usually they are missing parts or are in mint condition with a high price. Even though veritas is too expensive I know the plane will be ready to use and have a flat and true skate/fence ect... I was hoping the release of the combination plane would lower the price of the small plow, but no such luck yet.
 

CRSINMICH

Well-known member
Joined
Aug 15, 2015
Messages
2,397
Location
Southeastern Michigan
BMR: Don't give up on finding a usable plow plane. I have been able to find a couple at estate sales and antique stores that were reasonably priced. One was given to me in a Prentiss vise purchase. Various sized irons are a bit more difficult to find. You are right Stanley 45's are usually expensive and often have missing parts and there are a lot of parts to lose. I don't mean to brag (well, maybe just a little) but I was lucky enough to find a complete 45 in original box at an estate sale for $25. The plane gods smiled on me that day. The problem with looking for a specific plane at sales is that you have no idea when you might find one. If you need/want one soon it might be best to just take the plunge and buy one new. Christmas is coming - start dropping hints.
 
OP
J

jimreed2160

Well-known member
Joined
Aug 7, 2016
Messages
3,589
Location
Tallahassee FL
BMR--In my opinion, complete sets of #45s are really for collectors. Back in the day I think the best customers were house carpenters who used the various bits to make special trim and other specialty items. Imagine being stuck on a job site and finding yourself short a single T&G floorboard with no Home Depot around. Said carpenter could whip out his Stanley #45 and T&G the beejeebers out of the available lumber. Full sets (7) of beading blades are common because I think they were rarely, if ever, used. It is not coincidence to me that the cutters I find missing from the sets most often are 1/8, 1/4, and 1/2. Those are exactly the cutters I use the most.

A #45 body, midsection and a fence will get you going if you have a few cutters. Midsection is not used with the 1/8. Lee Valley has excellent cutters that fit the #45, so you could upgrade to their plane in the future.

It was my fascination with combination planes that got me into planecraft. Gizmosity is high and they are fun to use but many of the cutters never get a date to the prom. :dunno:
 
OP
J

jimreed2160

Well-known member
Joined
Aug 7, 2016
Messages
3,589
Location
Tallahassee FL
Plane rehab

Maybe this one is some sort of record. It went from a box of rust on the porch to a user plane in less than 30 hours. The "how I shot the bear" story is on my website, (splintermaking.com) but here is an abbreviated version.

I found a sad looking #140 block plane on that famous auction site. It was very rusty but looked like it could be brought back to life. I threw out a few bids and adopted it.

What arrived was one of the rustiest planes I have ever seen. I dunked the body in my Evaporust tube o' rust horrors and dunked the smaller pieces in the deli meat container. Guess what? Evaporust does not work well when it is cold. I had to bring in the deli box to warm up.

Blade was in pretty good shape so I just ground a new bevel and flattened the back. The boneyard coughed up a knob to replace the missing one. And then I pulled some of the curliest shavings ever! One more plane that can get back to work.
:rocker:
 

Attachments

  • DSCN4683.jpg
    DSCN4683.jpg
    138.9 KB · Views: 41
  • DSCN4684.jpg
    DSCN4684.jpg
    141.4 KB · Views: 40
  • DSCN4685.jpg
    DSCN4685.jpg
    136.5 KB · Views: 42
  • DSCN4738.jpg
    DSCN4738.jpg
    145.5 KB · Views: 52

chrislehr

Well-known member
Joined
Apr 10, 2009
Messages
1,704
Location
Portland, OR
Not quite fine woodworking but i no longer trip over my pile of clamps.

adcfd71bb5e30fa2ff159b86ad1bc77d.jpg
 

Attachments

  • adcfd71bb5e30fa2ff159b86ad1bc77d.jpg
    adcfd71bb5e30fa2ff159b86ad1bc77d.jpg
    839.6 KB · Views: 0

chrislehr

Well-known member
Joined
Apr 10, 2009
Messages
1,704
Location
Portland, OR
Chris--Good job on the clamps. Post a few close ups so we can all borrow your ideas.


f21579fa76de922cc70ab61475828d07.jpg

Heres the bar clamp one. The pipe clamp one i made a while back and dont have a closer pic. Will take one later

Cut the bar slots with three kerf widths in my crosscut sled. Screwed and glued and the back is attached to the wall with six GRK 4” fasteners into studs
 

Attachments

  • f21579fa76de922cc70ab61475828d07.jpg
    f21579fa76de922cc70ab61475828d07.jpg
    931.9 KB · Views: 0
Last edited:

BikerDad

Well-known member
Joined
Apr 24, 2014
Messages
975
Location
Utah
On the plow plane, just save yourself oodles of aggravation, get the Veritas. The aggravation avoided is in finding a vintage plane, that has a good/complete set of blades, that is in good condition AND actually works well. There are more than a few virtually unused Stanley 45s out there that look great, but for whatever reason, just flat don't work worth ****. You can be sure that ol' Stanley ain't gonna stand behind a plane that was built before today's beancounters were even born.

As an alternative to the Veritas options (Small plow or Combination plane), there is a beastie out of China by the maker of the Woodriver planes. The QUANGSHENG NO. 043 PLOUGH PLANE. You'd have have somebody in the UK/EU buy it and ship it here, as Quangsheng doesn't sell under it's own name here and retailers aren't allowed to ship 'em here.
 

BMR24

Well-known member
Joined
Oct 2, 2017
Messages
234
Location
Rocky Mountains Colorado
bikerdad thanks for your input, it's nice to see there is alternative in the new market, not that I'm keen on Chinese products, or the purchasing hassles. But good to know about
 

cheechi

Well-known member
Joined
Feb 29, 2012
Messages
4,384
Location
Triad, NC
i no longer trip over my pile of clamps.
I love projects like this. Fix a long time problem with a piece of plywood.

Jim
Have you considered for your plane rehabs, maybe a few photos and a writeup are ok but something like youtube might be simpler? Maybe it won't, but it would take a lot for things to get lost in the ether (to the uploader at least) there.

What I meant earlier wasn't written for a unix admin audience, I didn't realize you already knew what I was trying to tell you. Hope you didn't think I was talking down to you.
 
To avoid these ads, REGISTER NOW!

chrislehr

Well-known member
Joined
Apr 10, 2009
Messages
1,704
Location
Portland, OR
Anyone know a source for metal clamp feet - jorgensen specific, 1.5" diameter, I need like TWO, but if its like 5-10 per package, that's cool too.
 

rrich1

Well-known member
Joined
Oct 7, 2015
Messages
793
Well this wasn't terrifying at all! Got the hole cut for the leg vise handle. I think before i glue the hub on i am going to make the parallel guide.19e2882aff64f05fac2467391fe8e9c2.jpg539846accc8c87a4b97383478187ed73.jpg

Sent from my Pixel XL using Tapatalk
 

Attachments

  • 539846accc8c87a4b97383478187ed73.jpg
    539846accc8c87a4b97383478187ed73.jpg
    89.2 KB · Views: 0
  • 19e2882aff64f05fac2467391fe8e9c2.jpg
    19e2882aff64f05fac2467391fe8e9c2.jpg
    77 KB · Views: 0

hunterguy86

Well-known member
Joined
Jan 22, 2012
Messages
168
Location
Central Texas
Any tips for cutting mortise and tenon joints? I'm trying to do them for a Paul sellers style workbench I'm building using his method. The mortise seems ok for the first half inch of depth, but seems to go crooked after that. The tenon does not sit square to the leg, but rather angles in quite a bit. I'm using a standard half inch chisel that is good and sharp. I don't own a mortise chisel.


Sent from my iPhone using Tapatalk
 
OP
J

jimreed2160

Well-known member
Joined
Aug 7, 2016
Messages
3,589
Location
Tallahassee FL
Chris--Good luck looking for the clamp feet. My Jorgies are old and flop over so I clamp a woodscrew on the tail to hold them up.

Hunter--Sorry to hear about your mortise issues. One problem in ww is lack of experience but you gotta start somewhere. The dudes of old had LOTS of experience and things get much easier. That means your second bench will be lots easier.

But back to M&T. No need to have mortise chisels--they just speed things up. If mortise drift is your problem, use an old trick and drill some pilot holes. I would start with a good sized hole about 1/8" inside on each corner. Leave some meat in case the drill bit drifts--you can trim it down later. Once you have the corners marked, drill some progress holes to connect them. Then drill the stuffings out of the waste in the middle. At some point, it should be "chisel ready". Good luck.
 

ez-duzit

Well-known member
Joined
Jun 24, 2013
Messages
5,094
Location
Marina del Rey
1--I'd hide or flush the fasteners on the ends of the handles.

86--bore most of the waste out of the mortises, in a drill press, using a Forstner bit of the correct size. Then you need only do a little cleanup with the chisel. Then cut your tenons a tiny bit oversize on the bandsaw or using a hand saw; finish to size with a rabbet plane or chisel.
 

rrich1

Well-known member
Joined
Oct 7, 2015
Messages
793
Ez- it was thinking that same thing. I think i am going to glue one side on and the other find some hidden screws. Pretty sure i saw some at my wood store.

Sent from my Pixel XL using Tapatalk
 

ez-duzit

Well-known member
Joined
Jun 24, 2013
Messages
5,094
Location
Marina del Rey
1--you can simply countersink for a flathead screw or counterbore and plug the hole, if there is enough thickness. But those screw heads sticking out will grab your skin and look unfinished.
 

R_einan

Well-known member
Joined
Aug 29, 2016
Messages
461
Location
Eastern WA
Could use a plug cutter and hide the fastener with a glued in tapered plug, a contrasting wood would make a nice detail on the handle ends. Just a thought
 

rrich1

Well-known member
Joined
Oct 7, 2015
Messages
793
Ez- i don't believe there is enough thickness for that. I'll figure something out.

Sent from my Pixel XL using Tapatalk
 

R_einan

Well-known member
Joined
Aug 29, 2016
Messages
461
Location
Eastern WA
Another idea, you could use a dowel that extends through the knob into the handle. It would be as strong as a screw and you would also avoid glueing endgrain, it would provide a long grain to long grain joint.
 

hunterguy86

Well-known member
Joined
Jan 22, 2012
Messages
168
Location
Central Texas
Try using Mortise and Loose Tenon jointery. The router cuts the mortise, and you resaw stock to the corresponding width, round over the square corners and trim to length.


It's easy to dial in the fit of the tenon after the mortise is cut. For thicker stock use multiple mortise and tenons.


.


Thanks for the tip.

I was trying to do this by hand. Just gotta keep at it I guess. I wonder if it's how I'm holding the chisel or something.

Here are some pictures of my problem. As you can see, it's square in the up and down direction. It's just twisted when perpendicular to the leg as shown in picture 2.

608ab9ac673abcc76fc3b068a10a88a8.jpg

a43897aced90dcaeff84abd1816bc4da.jpg


Sent from my iPhone using Tapatalk
 

Attachments

  • a43897aced90dcaeff84abd1816bc4da.jpg
    a43897aced90dcaeff84abd1816bc4da.jpg
    491.1 KB · Views: 0
  • 608ab9ac673abcc76fc3b068a10a88a8.jpg
    608ab9ac673abcc76fc3b068a10a88a8.jpg
    583.6 KB · Views: 0
OP
J

jimreed2160

Well-known member
Joined
Aug 7, 2016
Messages
3,589
Location
Tallahassee FL
Hunter--One of the beauties of the M&T joint is that you are the only person who knows what lurks inside. Early in my ww career, I would mess up the tenons by cutting them too loose. When I did that, I just glued a little wood on the tenon end and went from there.
 

rlitman

Well-known member
Joined
Oct 18, 2010
Messages
24,591
Location
Long Island
Any tips for cutting mortise and tenon joints? I'm trying to do them for a Paul sellers style workbench I'm building using his method. The mortise seems ok for the first half inch of depth, but seems to go crooked after that. The tenon does not sit square to the leg, but rather angles in quite a bit. I'm using a standard half inch chisel that is good and sharp. I don't own a mortise chisel.


Sent from my iPhone using Tapatalk

Are these through mortises, or blind? For a through mortise, you only go to half the depth from each side, which reduces the error as you tunnel blindly in there.

Thanks for the tip.

I was trying to do this by hand. Just gotta keep at it I guess. I wonder if it's how I'm holding the chisel or something...

Could be. Could also be how you're sharpening. If the bevel is not right, you can cause issues like this.

If your chisels are the Japanese style with rings pressed on, that could be a problem too. You need to strike right on the middle of the handle, and that's easiest if the head has a little crown to it. If you're striking on the ring, you're driving the chisel at an angle.

Even if the chisel is sharpened perfectly symmetrically, and if you always strike it straight on the center, the wood grain can lead you astray, so you're always guiding the chisel, and correcting with each strike. This is easiest if you work in small chips, as the deviations will remain smaller. And perhaps you should stand up your square next to your work, to give you a visually square reference to sight your chisel against.

As for pre-drilling: I don't like it. I've tried that, and I always seem to get a wavy sided socket. The chisel will want to drift into the openings, and I find it cuts more true if it is cutting across the full mortise. The most I would consider is to pre-drill ONE hole, to give the chips a space to expand into, but, for the most part, I find this unnecessary.

As for proper mortising chisels: I like them, but they're not necessary. Their straight sides help keep them aligned in the socket, but the help that provides is minimal. Most of it still relies on your eyes and hands.

So, good luck, and keep at it. You'll improve.
 

rrich1

Well-known member
Joined
Oct 7, 2015
Messages
793
Another idea, you could use a dowel that extends through the knob into the handle. It would be as strong as a screw and you would also avoid glueing endgrain, it would provide a long grain to long grain joint.

i like that idea!
 
To avoid these ads, REGISTER NOW!
Top Bottom