To avoid these ads, REGISTER NOW!

Craftsman Drill Press

OP
F

FrankLee

Well-known member
Joined
Sep 13, 2010
Messages
3,547
Location
seMI, 48317
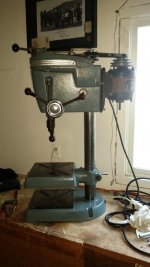
I made some progress on the Craftsman 100 DP restoration, the paint turned out really great.

I misplaced the spacer with the nut cut out that is used to hold the head frame on the column (Headstock lock - part #18119). Really hoping I find it! For now I'm going to use the part from the 150 which doesn't have the nut cut out but has a thread instead (Headstock and Table Lock - part #18121), which will work just fine. If anyone has an extra or would be willing to help me reproduce one (I don't have the machinery), I'd be grateful.


That is looking very good!

Did you find the lock cylinder?


honza.vosalik said:
I'm looking online at these bearings. Do you think the covered bearings would work on the DP?

https://recstuff.com/towing-trailer...x_D9dL4GXpkoWS0JQTO2Aaupj4q1MyhxoCQKEQAvD_BwE

Check the origin of those bearings in that link.

Check the "Bearing" links in my first post.

I use shielded bearings in the pulley and sealed bearings in the quill. Be aware that the bore in the quill bearings should be a 5/8" special bore, not 15mm.

Next time I order pulley bearings, I think I'm going to try those bearing inserts that Cjmac posted.

I will often attempt to clean bearings before I order new ones. Most times they work great after cleaning and lubing.
 
Last edited:
To avoid these ads, REGISTER NOW!

sheltonfilms

Well-known member
Joined
May 28, 2014
Messages
157
I will often attempt to clean bearings before I order new ones. Most times they work great after cleaning and lubing.

What's the method for removing one of the shielded sides of the double shielded bearings? Seems like they are pressed in pretty good.
 

honza.vosalik

Well-known member
Joined
Feb 27, 2016
Messages
882
Location
Missouri
I'm not sure if anyone posted a comparison of the "80" and "100" yet. So here it is, you can see how similar they look, but how different in size they are. :)
 

Attachments

  • dp_compare.jpg
    dp_compare.jpg
    107.4 KB · Views: 100
Last edited:
OP
F

FrankLee

Well-known member
Joined
Sep 13, 2010
Messages
3,547
Location
seMI, 48317
Last edited:

honza.vosalik

Well-known member
Joined
Feb 27, 2016
Messages
882
Location
Missouri
MyCraftsman 100 DP is almost done! I put the Dunlap motor (that came from the 150) there for now till I finish the original motor. I still need to do some adjustments on the Vari-slo. The whole setup runs very quiet :)
 

Attachments

  • 20180702_215157.jpg
    20180702_215157.jpg
    70.3 KB · Views: 96
  • 20180702_215217.jpg
    20180702_215217.jpg
    64.2 KB · Views: 87
  • 20180703_082615.jpg
    20180703_082615.jpg
    66.3 KB · Views: 87
  • 20180702_215248.jpg
    20180702_215248.jpg
    108.5 KB · Views: 87

honza.vosalik

Well-known member
Joined
Feb 27, 2016
Messages
882
Location
Missouri
Question regarding the Vari-slo: Are the leveling screws supposed to touch the top of the head frame or go behind it? What size are they?
 

Vice

Active member
Joined
Jun 15, 2018
Messages
27
Location
USA
Is there a list of the different supplies needed to clean and refurbish a drill press? I am going to be making a run to the store soon and want to make sure I get everything in one go (or check off the list things I already have.) sandpaper grit, and different cleaning agents are the main question but I know I`ll need some other supplies.
 
OP
F

FrankLee

Well-known member
Joined
Sep 13, 2010
Messages
3,547
Location
seMI, 48317
Tools, Cleaning Supplies and Consumables

Tools, Cleaning Supplies and Consumables

Is there a list of the different supplies needed to clean and refurbish a drill press? I am going to be making a run to the store soon and want to make sure I get everything in one go (or check off the list things I already have.) sandpaper grit, and different cleaning agents are the main question but I know I`ll need some other supplies.

Here's a list of consumables I use:
  • mineral spirits
  • lacquer thinner
  • Simple Green
  • Grez-Off
  • liquid Bar Keepers Friend/Zud
  • citric acid powder
  • vinegar
  • green Scotchbrite pads
  • sandpaper - 100 - 1200 grit
  • steel wool - #000 & #1
  • Johnson's paste wax
  • Meguiar's cleaner wax
  • Super Lube grease
  • Super Lube oil
  • 3-in-1 oil
  • anti-seize
  • PBlaster, Liquid Wrench & WD-40
  • threadlockers - purple, blue, green, & red
  • paper towels
  • cotton swabs
  • toothpicks
  • HF assorted wire brushes

Besides the standard mechanics tools, I use:
  • an assortment of hemostats
  • an assortment of stainless steel dental picks (I use these a lot!)
  • tooth brushes
  • magnetic retrievers - pen-size and extendable
  • a variety of spiral wire tube brushes/copper fitting brushes
  • glass jars - tall & wide-mouth

No doubt these lists will grow as I think of things.


11/17/2019

My Current Go-To Cleaning Products


.
 
Last edited:

Rushton

Well-known member
Joined
Dec 27, 2016
Messages
55
Location
Richmond, VA
The shields are usually pretty thin. I use a sharp awl or similar with a small ball peen hammer to pierce the shield and pry it up.

I also usually remove both shields if the bearings are removed. Or only one shield if still installed.
https://www.garagejournal.com/forum/showthread.php?p=6112216#post6112216

Frank, are you able to re-install the shields you remove? If so, what's your magic process? I've had a very difficult time doing this. They are so thin that they deform and I can't get them to fit back into place.
 

sheltonfilms

Well-known member
Joined
May 28, 2014
Messages
157
Frank, are you able to re-install the shields you remove? If so, what's your magic process? I've had a very difficult time doing this. They are so thin that they deform and I can't get them to fit back into place.


I don’t think it’s really necessary. Earlier models only had single shielded bearings and the open faces where facing the inside of which part they were installed. Quill face inside tube and spindle pulley ones are open face to each other. Not too exposed to grit or dirt this way due to them enclosed in either the quill or the casted tube of the headstock.
 
OP
F

FrankLee

Well-known member
Joined
Sep 13, 2010
Messages
3,547
Location
seMI, 48317
Frank, are you able to re-install the shields you remove? If so, what's your magic process? I've had a very difficult time doing this. They are so thin that they deform and I can't get them to fit back into place.

I don’t think it’s really necessary. Earlier models only had single shielded bearings and the open faces where facing the inside of which part they were installed. Quill face inside tube and spindle pulley ones are open face to each other. Not too exposed to grit or dirt this way due to them enclosed in either the quill or the casted tube of the headstock.

Right. Shields are destroyed when removed.

As Shelton pointed out, pulley bearings will be mostly protected by the pulley. Quill bearings will be more vulnerable, but should be ok in normal home-shop environments.
Motor bearings are also mostly protected by the external covers and minimally exposed internally.
 

Rushton

Well-known member
Joined
Dec 27, 2016
Messages
55
Location
Richmond, VA
Thanks, Shelton and Frank. One of my "destroyed" shields for my quill simply got left out when I re-installed. I flipped the exposed side to the inside the the head hoping that would be okay. I've wondered about this, but now I can let that thought alone and just continue enjoying the drill press.
 

honza.vosalik

Well-known member
Joined
Feb 27, 2016
Messages
882
Location
Missouri
This showed up locally,looks pretty clean.
 

Attachments

  • 37130319_10205040752016446_9164538002876137472_n.jpg
    37130319_10205040752016446_9164538002876137472_n.jpg
    117 KB · Views: 129
  • 37254297_10205040745416281_3949559763993362432_n.jpg
    37254297_10205040745416281_3949559763993362432_n.jpg
    146.8 KB · Views: 63
OP
F

FrankLee

Well-known member
Joined
Sep 13, 2010
Messages
3,547
Location
seMI, 48317
This showed up locally,looks pretty clean.

That's an interesting(not) set-up for the motor pulley and the motor mount.

The motor pulley is installed upside-down for use with middle pulley and there is none. There is a hand knob for the motor mount lock. It negates the convenience of the pivoting motor mount and eliminates all options for changing speeds.

That machine needs a new home.


BTW, nice job on the motor.
 

honza.vosalik

Well-known member
Joined
Feb 27, 2016
Messages
882
Location
Missouri
That's an interesting(not) set-up for the motor pulley and the motor mount.

The motor pulley is installed upside-down for use with middle pulley and there is none. There is a hand knob for the motor mount lock. It negates the convenience of the pivoting motor mount and eliminates all options for changing speeds.

That machine needs a new home.


BTW, nice job on the motor.

Good observation, he's asking $150. If I didn't already have one, I'd go for it.
 
To avoid these ads, REGISTER NOW!

Rushton

Well-known member
Joined
Dec 27, 2016
Messages
55
Location
Richmond, VA
With any reasonable luck, I will be picking up a new (to me) drill press on Saturday. A model 100 with its original paint and original 1/2 HP motor that looks to be in beautiful condition. It is model number 103.23130 which, as far as I know, were built from around 1946 to 1951.

Anything special I should watch out for and check on this early Model 100?

Front.JPG

Side.JPG

33212c4d-7d89-4dd6-9525-1556c4e0a460.jpg

81e1e49f-d983-4c5f-be88-8c4a4129c7d5.jpg
 
OP
F

FrankLee

Well-known member
Joined
Sep 13, 2010
Messages
3,547
Location
seMI, 48317
With any reasonable luck, I will be picking up a new (to me) drill press on Saturday. A model 100 with its original paint and original 1/2 HP motor that looks to be in beautiful condition. It is model number 103.23130 which, as far as I know, were built from around 1946 to 1951.

Anything special I should watch out for and check on this early Model 100?

That IS a beautiful machine!

With a few exceptions, it is identical to your 103.24811 you posted in May. The motor is an older model and may have a date code imprinted in the information label. The table has the tilt option. All lock handles and cylinders are cast.

Things to look for... broken or missing parts, run-out, bearing noise while running.

Good luck!
 
Last edited:

Rushton

Well-known member
Joined
Dec 27, 2016
Messages
55
Location
Richmond, VA
Thanks, Frank! I was struck by how nice the condition appeared. And the seller says it is operating perfectly with exceptionally tight run out tolerances. I don't yet know the history of this machine and hope the seller will be able to share some of that. I thought those lock handles and cylinders would be cast - thanks for confirming that. I'll be extra careful to remove and stow them for transport.

The somewhat newer 103.24811 that I posted in May had steel handles and cylinders, which was nice. So, that one has now gone to my sister's workshop and this one will be for my son-in-law.
 
Last edited:

Rushton

Well-known member
Joined
Dec 27, 2016
Messages
55
Location
Richmond, VA
One thing I noticed when I had it all apart was that just one tooth on the pinion gear seemed to have excessive wear. Just one. Have you noticed that on any others?
attachment.php

Yes, unfortunately I have seen that before...

That is a very common issue with the pinion gears. That will occur when the pinion gear tooth hits the quill cylinder when it reaches the end of the tooth rack on either the top OR the bottom of the quill. Your picture shows the tooth that hits the bottom of the quill...

I haven't noticed any operational problems with this issue.

Frank, I returned today with that early Model 100 bench drill press I mentioned in an earlier post and the one defect I found is as described in these posts I've quoted above. In my case, however, the damage to that one pinion gear tooth has ragged edges that creates a real binding spot in the travel of the quill.

I plan to pull everything about for cleaning and re-lubricating. While I have the pinion gear and quill assembly removed, do you think I would be safe in filing the ragged edges of that tooth back enough so that that doesn't bind on the quill teeth/grooves? I don't want to proceed down a bad path in trying to fix this.

Sorry, no pictures at the moment. Just thought I'd toss the question out to see if you have an immediate opinion.

Thanks!
 

Craptain

Well-known member
Joined
Apr 18, 2013
Messages
4,027
Location
Tampa Bay FL
Re: The Classic Craftsman 100/150 Drill Press

My personal opinion, cleaning up the pinion is required. However take care to go no further than the original profile.

Sent from my SM-G930T using Tapatalk
 

bubinga

Well-known member
Joined
Jul 26, 2014
Messages
12,744
Location
Bridgeport Ohio. (Across River From Wheeling WV)
Frank, I returned today with that early Model 100 bench drill press I mentioned in an earlier post and the one defect I found is as described in these posts I've quoted above. In my case, however, the damage to that one pinion gear tooth has ragged edges that creates a real binding spot in the travel of the quill.

I plan to pull everything about for cleaning and re-lubricating. While I have the pinion gear and quill assembly removed, do you think I would be safe in filing the ragged edges of that tooth back enough so that that doesn't bind on the quill teeth/grooves? I don't want to proceed down a bad path in trying to fix this.

Sorry, no pictures at the moment. Just thought I'd toss the question out to see if you have an immediate opinion.

Thanks!
Not Frank here, but I know a little, and I'll guess the rest.... L0L
I'd say filing 0r grinding would be 0k to do.
Let us know how you make 0ut!

Sent from my MotoG3 using Tapatalk
 

sheltonfilms

Well-known member
Joined
May 28, 2014
Messages
157
Re: The Classic Craftsman 100/150 Drill Press

Triangle file. Never would touch it with a grinder.


Sent from my iPhone using Tapatalk
 

bubinga

Well-known member
Joined
Jul 26, 2014
Messages
12,744
Location
Bridgeport Ohio. (Across River From Wheeling WV)
Re: The Classic Craftsman 100/150 Drill Press

The Classic Craftsman 100/150 Drill Press

26408336528_5a6c24bb40.jpg


I started this thread in 2012 when I bought my first Craftsman 100 drill press. Since then, it has morphed into a blog or chronicle of many vintage Craftsman machines that I and others have acquired.

Although I described all the vintage machines I have bought and sold, this thread is still primarily about the classic Craftsman 100 and 150 drill presses.

There is a lot of useful information and discussion here, but with 1500+ replies, it can be somewhat difficult to find specific information between the irrelevant, trivial and pointless posts. I don't want to discourage scrolling through this entire thread, but I created the links below to open specific posts regarding drill press topics within this thread that I deemed most pertinent.


Caveat

I AM NOT AN EXPERT. I have a fair amount of experience with these machines, but what I don't know is still greater than what I do know. The whats and hows are easy. There are many threads and posts on how-to. The whys and whens are more challenging.

Everyone's abilities, experience levels and resources are different. There are various products, tools and techniques I use and demonstrate throughout this thread. These should not be interpreted as advice or recommendations.

I prefer to avoid giving advice or recommendations. Instead, I describe what I used, what I did, or what I would do... things that worked, and sometimes didn't work FOR ME. Some things I used or did early in my experience have changed.

Most of the links below are compilations of MY experiences, techniques, opinions, observations, and conclusions. YMMV, but I hope you find them helpful.


My original first post was merged into the second post.


Craftsman 100/150 15½" Drill Press topics:
and some Craftsman 80 13½" drill presses,
and some Craftsman and Dunlap 12¼" drill presses.


Craftsman Drill Press Options and Accessories:
Below are options and accessories that I have or had at one time. This is not a complete list of options or accessories; there are many, many more.


Custom Drill Press Hacks, Mods and Tools:

Other noteworthy links, threads, and posts:

My keeper machines and other projects:
Hey, that picture is my D/P..... L0L

Sent from my MotoG3 using Tapatalk
 

Rushton

Well-known member
Joined
Dec 27, 2016
Messages
55
Location
Richmond, VA
Re: The Classic Craftsman 100/150 Drill Press

Triangle file. Never would touch it with a grinder.

Thanks everyone! Triangle file and staying within the original profile all make good sense. This is how I will proceed. I won't get started on this for another few weeks, but once I start I'll share some pictures.
 
OP
F

FrankLee

Well-known member
Joined
Sep 13, 2010
Messages
3,547
Location
seMI, 48317
Frank, I returned today with that early Model 100 bench drill press I mentioned in an earlier post and the one defect I found is as described in these posts I've quoted above. In my case, however, the damage to that one pinion gear tooth has ragged edges that creates a real binding spot in the travel of the quill.

I plan to pull everything about for cleaning and re-lubricating. While I have the pinion gear and quill assembly removed, do you think I would be safe in filing the ragged edges of that tooth back enough so that that doesn't bind on the quill teeth/grooves? I don't want to proceed down a bad path in trying to fix this.

Sorry, no pictures at the moment. Just thought I'd toss the question out to see if you have an immediate opinion.

Thanks!

I sure would like to see a before-repair picture if possible.

I can't add anything to the comments above except that I had one classic dp recently with the same issue where the dented pinion gear tooth would catch slightly on the quill during mid-feed. I've had plenty of other pinion gears with that dent, but none had that issue of catching the quill. I could not figure out why this one did.

I ended up reinstalling the pinion shaft so that dent was in it's original position at the bottom of the quill gear rack.

This issue reinforces the importance of having a fully-seated and properly tightened feed stop bracket on the quill, and also of never letting go of the feed handle when the quill is extended.

In the past, I've sparingly used a low-strength thread locker/bearing mount on the feed stop bracket/quill.
 

Rushton

Well-known member
Joined
Dec 27, 2016
Messages
55
Location
Richmond, VA
I sure would like to see a before-repair picture if possible.

Frank, I will post a before-repair picture once I start working on this drill press. The feed stop bracket had slipped. The binding on the quill was mid-feed and it pretty well stopped the quill movement. You could pull it past the sticking point, but it caused me a lot of concern when I first pulled on the feed handles.

I don't know whether this is a recent injury or whether it's been like this for a long time. The person I bought it from immediately knew the cause of the binding and showed me the damaged pinion gear tooth (looking down from the top of the head). So, he was aware of the issue. Hopefully there is no damage to the quill itself and it's just on the pinion, but I suspect the quill will also have suffered some damage right at that binding point.

Allow for a few weeks, then I'll start on it and post some pics.
 
Last edited:

Ijhursh

Well-known member
Joined
Dec 23, 2016
Messages
125
Location
FL
Re: The Classic Craftsman 100/150 Drill Press

Hey Frank, I am starting my restoration of 113.24511, pics below, mine has a GE motor, is there a thread with one of these?
57a6a7f63343970b37066f64dc5f54a2.jpg3c95ee53f3c5d120204198fac3589d18.jpg410b309f32f9b1424c0bfe937faf48ad.jpg


Sent from my iPhone using The Garage Journal mobile app
 

Attachments

  • 57a6a7f63343970b37066f64dc5f54a2.jpg
    57a6a7f63343970b37066f64dc5f54a2.jpg
    247.7 KB · Views: 3
  • 3c95ee53f3c5d120204198fac3589d18.jpg
    3c95ee53f3c5d120204198fac3589d18.jpg
    285.1 KB · Views: 2
  • 410b309f32f9b1424c0bfe937faf48ad.jpg
    410b309f32f9b1424c0bfe937faf48ad.jpg
    224.8 KB · Views: 2
OP
F

FrankLee

Well-known member
Joined
Sep 13, 2010
Messages
3,547
Location
seMI, 48317
Re: The Classic Craftsman 100/150 Drill Press

Hey Frank, I am starting my restoration of 113.24511, pics below, mine has a GE motor, is there a thread with one of these?

I can't help with the GE motor, but this thread is mostly dedicated to the classic Craftsman drill presses, including yours.

Your drill press is a late model 150, so there are specific procedures and topics in posts that are relevant to that vintage. The first post serves as an index.
 

Ijhursh

Well-known member
Joined
Dec 23, 2016
Messages
125
Location
FL

Attachments

  • 57a6a7f63343970b37066f64dc5f54a2.jpg
    57a6a7f63343970b37066f64dc5f54a2.jpg
    247.7 KB · Views: 4
  • 3c95ee53f3c5d120204198fac3589d18.jpg
    3c95ee53f3c5d120204198fac3589d18.jpg
    285.1 KB · Views: 3
  • 410b309f32f9b1424c0bfe937faf48ad.jpg
    410b309f32f9b1424c0bfe937faf48ad.jpg
    224.8 KB · Views: 6
OP
F

FrankLee

Well-known member
Joined
Sep 13, 2010
Messages
3,547
Location
seMI, 48317
Frank, I will post a before-repair picture once I start working on this drill press. The feed stop bracket had slipped. The binding on the quill was mid-feed and it pretty well stopped the quill movement. You could pull it past the sticking point, but it caused me a lot of concern when I first pulled on the feed handles.

I don't know whether this is a recent injury or whether it's been like this for a long time. The person I bought it from immediately knew the cause of the binding and showed me the damaged pinion gear tooth (looking down from the top of the head). So, he was aware of the issue. Hopefully there is no damage to the quill itself and it's just on the pinion, but I suspect the quill will also have suffered some damage right at that binding point.

Allow for a few weeks, then I'll start on it and post some pics.

When you get to it, let me know if you need those parts. I think I have spares of both.
 
OP
F

FrankLee

Well-known member
Joined
Sep 13, 2010
Messages
3,547
Location
seMI, 48317
Re: The Classic Craftsman 100/150 Drill Press

Ok, looks like there is a code P05 on the sn, what is that?

I'm not sure... possibly some kind of date code. I believe that may be an Emerson addition to the information label.


Also is there a paint that matches the grey?

I'm not sure about this either. There is a wiki page on VM regarding paint matching for Craftsman machines. That color may or may not be listed.
 
To avoid these ads, REGISTER NOW!
Top Bottom