To avoid these ads, REGISTER NOW!

Above 1200 Sq/FT Eastern Washington Workshop

Wokspaces above 1200 squarefeet.
OP
S

slodat

ALLIANCE MEMBER
Joined
Feb 6, 2010
Messages
3,679
Location
Central-ish, WA
Ah ha...the telehandler is a great answer! It did look as though the f150 had a bit of tongue weight on it. Looking forward to seeing you get it up and moving.


I lowered the F150 in the back when I bought it to level it out. The tongue weight wasn’t bad, the weight was on the trailer axles. The truck needs airbags, all of the new F150’s benefit from them for towing from what I’ve read. I was thoroughly impressed with the 5.0/10 speed while towing. It’s really cool how well it works in tow/haul mode.
 
To avoid these ads, REGISTER NOW!
OP
S

slodat

ALLIANCE MEMBER
Joined
Feb 6, 2010
Messages
3,679
Location
Central-ish, WA
Moved the mill into its home. The toe jack made quick work of moving and turning the 6000 pound machine. I’m not going to set it on the floor until it’s up and running. I need a machine pry bar to lower it off the bar its sitting on.

9778865518191d90edb206efe4e34184.jpg
 

Attachments

  • 9778865518191d90edb206efe4e34184.jpg
    9778865518191d90edb206efe4e34184.jpg
    333.5 KB · Views: 0
Last edited:

jbmatth

Well-known member
Joined
Jun 3, 2013
Messages
5,681
Location
Northern Ok.
I didn't realize toe jacks existed, I will need to move a mill of similar size at some point and have been struggling with that part. Thanks a ton for that tip (pun intended).

JB
 
OP
S

slodat

ALLIANCE MEMBER
Joined
Feb 6, 2010
Messages
3,679
Location
Central-ish, WA
I didn't realize toe jacks existed, I will need to move a mill of similar size at some point and have been struggling with that part. Thanks a ton for that tip (pun intended).

JB


I am so happy with the TEMCo jack. It was truly an easy one man operation. The other must have is a machinery pry bar.
 

matt_i

Well-known member
Joined
Mar 14, 2008
Messages
10,717
Location
SE Michigan
Great looking toe jack, I've seen some (brand new) that looked completely cobbled from a bottle jack. That one seems to have a lot more "engineering" into making custom parts.

I've relied on "pinch & point" prybars for some years (see also McMaster Carr :D) The 7 footer is tough to resist. I always take that one on the road in case something gets shifted and I have to put it back.
 

jbmatth

Well-known member
Joined
Jun 3, 2013
Messages
5,681
Location
Northern Ok.
I didn't realize that was a thing either, I may make my own after looking at prices though, I have most everything laying around.

JB
 
OP
S

slodat

ALLIANCE MEMBER
Joined
Feb 6, 2010
Messages
3,679
Location
Central-ish, WA
I thought about making one.. I needed the mill moved and I don’t have the thicker steel on hand to make one from. Or a mill to make the parts. Would be a fun project for sure. The return springs are a must. I did some some decent stuff on YouTube about making toe jacks.
 

lilscorpion

Well-known member
Joined
Mar 15, 2010
Messages
3,599
Location
Colorado
I thought about making one.. I needed the mill moved and I don’t have the thicker steel on hand to make one from. Or a mill to make the parts. Would be a fun project for sure. The return springs are a must. I did some some decent stuff on YouTube about making toe jacks.


I might have bought the same one. I need to install some leveling feet at some point early this year. Even though they’re not cheap, they work really well for moving a mill.
 
OP
S

slodat

ALLIANCE MEMBER
Joined
Feb 6, 2010
Messages
3,679
Location
Central-ish, WA
I’ve planned on sorting out a touch probe on the cnc router since I installed the Centroid Acorn control. It has a probe detect feature that locks out the spindle when the probe is in use to prevent damage to the probe. Because it’s going on the router when I found out about a wireless option I knew that’s what I wanted. I bought Cliff Hall’s really well made ITTP (impact tolerant touch probe) and XoomSpeed’s wireless conversion. Both items are truly impressive.


I drew up a terminal box to mount my probe detect manual pushbutton next to the spindle and printed it on the 3d printer.


13918c38463a81671f95cd41bea552e6.png


206d07b1711b106ef2e1b58587494de7.png


a926504bf0f786035d8009a85510b0a0.jpg


66843cf839909cee6d69b4409cc19abd.jpg


Today I got it all wired up and working. There’s an additional probe receptacle on the box in case I ever want to use a wired probe.


First order of business was getting concentricity dialed in. I got it to a few tenths. As good as it got today.


4ac186b43157b8f3ef136ec8a0e4cf28.jpg


Then run a bore probing cycle on a known bore size and see how things look. I am really happy with the probe and the wireless conversion. I'm excited to add this to the control. Lots to learn!


9c6255ec9c547f9335f89116f19af8d6.jpg


fb017cfbcf057ac57a2b05ed592bb18c.jpg


a82263def172249062e221b67f220277.jpg


1c255d60ad14be95ceb1ab27426a6911.jpg


44b067659c7c4daae6252135e34113b4.jpg
 

Attachments

  • 206d07b1711b106ef2e1b58587494de7.png
    206d07b1711b106ef2e1b58587494de7.png
    610.6 KB · Views: 0
  • 1c255d60ad14be95ceb1ab27426a6911.jpg
    1c255d60ad14be95ceb1ab27426a6911.jpg
    1.3 MB · Views: 0
  • 44b067659c7c4daae6252135e34113b4.jpg
    44b067659c7c4daae6252135e34113b4.jpg
    1.3 MB · Views: 1
  • a82263def172249062e221b67f220277.jpg
    a82263def172249062e221b67f220277.jpg
    1.4 MB · Views: 1
  • 13918c38463a81671f95cd41bea552e6.png
    13918c38463a81671f95cd41bea552e6.png
    528.7 KB · Views: 1
  • a926504bf0f786035d8009a85510b0a0.jpg
    a926504bf0f786035d8009a85510b0a0.jpg
    1.2 MB · Views: 1
  • 66843cf839909cee6d69b4409cc19abd.jpg
    66843cf839909cee6d69b4409cc19abd.jpg
    711.9 KB · Views: 0
  • 4ac186b43157b8f3ef136ec8a0e4cf28.jpg
    4ac186b43157b8f3ef136ec8a0e4cf28.jpg
    1.4 MB · Views: 0
  • 9c6255ec9c547f9335f89116f19af8d6.jpg
    9c6255ec9c547f9335f89116f19af8d6.jpg
    1.4 MB · Views: 0
  • fb017cfbcf057ac57a2b05ed592bb18c.jpg
    fb017cfbcf057ac57a2b05ed592bb18c.jpg
    139.1 KB · Views: 0
Last edited:
OP
S

slodat

ALLIANCE MEMBER
Joined
Feb 6, 2010
Messages
3,679
Location
Central-ish, WA
I’m trying to learn how to make cool **** in the shop! ;)

I can’t deny I dig marrying new tech with traditional methods. As cool as digital fabrication can be, it only goes so far. WCS setup has really been a challenge to wrap my head around on the router. I can see how this will be a tremendous help with that.
 
OP
S

slodat

ALLIANCE MEMBER
Joined
Feb 6, 2010
Messages
3,679
Location
Central-ish, WA
That’s kind of you to say. There’s so much kicking my *** right now though!! 3d modeling is a steep learning curve. And, I haven’t started using Fusion for CAM yet. This is what’s next. Drawing a 3d part in Fusion, Fusion CAM, machine multiple setup part.
 

Finallygotit

ALLIANCE MEMBER
Joined
Jul 6, 2013
Messages
4,076
Location
Tucson, AZ
It will probably kick your *** for a little bit but once you get the hang of 3D modeling (you will love it) and the downstream ops, you are REALLY going to make some cool ****.


:beer:
 
OP
S

slodat

ALLIANCE MEMBER
Joined
Feb 6, 2010
Messages
3,679
Location
Central-ish, WA
I need the more advanced tool path stuff that Fusion/HSM Works offers. I just have to get there. Coming from Vectric Aspire, it’s a lot different. Especially when it comes to making changes.
 

HotWire

Well-known member
Joined
Mar 21, 2010
Messages
368
Location
Montana
I’m trying to learn how to make cool **** in the shop! ;)

I can’t deny I dig marrying new tech with traditional methods. As cool as digital fabrication can be, it only goes so far. WCS setup has really been a challenge to wrap my head around on the router. I can see how this will be a tremendous help with that.


I may have to pick your brain next year. My plan is to buy a Bridgeport or clone soon. Then upfit it to CNC.


Sent from my iPhone using Garage Journal
 
To avoid these ads, REGISTER NOW!
OP
S

slodat

ALLIANCE MEMBER
Joined
Feb 6, 2010
Messages
3,679
Location
Central-ish, WA
Merry Christmas, Slodat
I really enjoy watching your progress it is very interesting, love the mill project.
Wishes for a great 2020, Jim

Happy Holidays, Jim! I appreciate you checking out my shop and taking the time to comment. While the shop is a dream to work in, it can be a lonely place this time of year!

I may have to pick your brain next year. My plan is to buy a Bridgeport or clone soon. Then upfit it to CNC.

I'm happy to share what I've picked up along the way. My first reaction to retrofitting a Bridgeport is there are a lot better options that a typical J-head mill. Ideally, an old CNC machine that the control is either outdated, not functional or similar. If I sell my takeoff parts for 1/3 of what they typically go for, I'll have zero dollars into the machine before I do the new controls and spindle drive. These go for under two grand often. There's an identical machine to mine in Seattle area as of last week. Seller is asking $1k and he can't load it. I bet a deal could be had. It's a lot of weight to move. You want a forklift/telehandler at each end of the trip. Well worth the effort.
 
OP
S

slodat

ALLIANCE MEMBER
Joined
Feb 6, 2010
Messages
3,679
Location
Central-ish, WA
I’ve been taking care of little punch list kind of things for the past few days. It’s so nice to relax and enjoy the shop. Good recharge for the coming year for sure.

It’s no secret I’m all about automating things where it makes sense. One such thing is my cnc router. I’ve had several things I’ve wanted to do for a while. I had all the materials on hand and in general knew what I wanted to do. The probe setup yesterday is one such project.

Today I got the air blast installed and working on the router. M code to turn it on and off. Should be really handy with plastics and aluminum. Hose was ran when I had the motors apart.

0c6f452e38c2e2df17969663b5fc34a0.jpg

34dbf18100fe7b2b41870c934ff0b5a4.jpg

I have a lot of electric heat.. 23kw. I can’t have it all running when I have the router, vacuum table and dust collector running. That’s over 15 hp of motor running at once. This little guy, actuated by M codes, tells my home automation system (HomeSeer) to disable the heat while the router is running. It has to be outside the enclosure so the Z-Wave radio can work. This is the simple solution I came up with. It works well.

4e612587b60be42a53179e0f761faf13.jpg

Only router project left is I’d like to design a better dust shoe for the spindle. I’ll get to it at some point.

Happy Holidays!!
 

Attachments

  • 0c6f452e38c2e2df17969663b5fc34a0.jpg
    0c6f452e38c2e2df17969663b5fc34a0.jpg
    1.4 MB · Views: 0
  • 34dbf18100fe7b2b41870c934ff0b5a4.jpg
    34dbf18100fe7b2b41870c934ff0b5a4.jpg
    1.5 MB · Views: 0
  • 4e612587b60be42a53179e0f761faf13.jpg
    4e612587b60be42a53179e0f761faf13.jpg
    1.7 MB · Views: 1

BORING HOP YARD

Well-known member
Joined
Jan 13, 2007
Messages
1,098
Location
Boring Oregon
Merry Christmas Slodat, are you going to convert the mill to 2 or 3 axis CNC.
I would assume Z has been done on your type of mill before.
I'm looking forward to seeing your mill go through the Slodat treatment.
Greg
 
OP
S

slodat

ALLIANCE MEMBER
Joined
Feb 6, 2010
Messages
3,679
Location
Central-ish, WA
Happy Holidays, Greg! The mill was 3 axis cnc from the factory. I will be controlling all three from the Centroid AllIn1DC. This was one of the things that made me jump at the opportunity to buy this particular machine. Thanks for following along with my shop journey!
 

lilscorpion

Well-known member
Joined
Mar 15, 2010
Messages
3,599
Location
Colorado
Happy Holidays, Greg! The mill was 3 axis cnc from the factory. I will be controlling all three from the Centroid AllIn1DC. This was one of the things that made me jump at the opportunity to buy this particular machine. Thanks for following along with my shop journey!


Steven - Merry Christmas! I wish I could work out of your shop, you’re building my dream shop. You have such an impressive set of capabilities...man.

I’ve been looking at the modern day Centroid DIY system for a while now. I converted my manual knee mill to Centroid CNC about 15 years ago (I think) and it’s been a good error-free setup. I’m following along on your mill build. Gonna be sweet!

I use the centroid conversational programming almost exclusively because the old DXF import sucked. I know you’ve posted it somewhere in the past but can’t find it - What are you using for CAD on your router table? I wish I had a 2D art CAD I could post from...are you posting direct?

Another question about the AllIn1DC - I’ve had it on my list to build a bench top CNC press brake for some time now but for whatever reason, I’m apprehensive about building a CNC from scratch. The conversion I did on the mill was a kit that came ready for bolt-on which eliminated the thinking part. What’s the learning curve (figuring out what parts you need and how to get it all together) on a from scratch kit?

Also - really like the probe setup. It’s one of those features that makes difficult and time consuming tasks stupid easy. The notion you could cut a part on your router, find out a hole is too small, chuck it up anywhere on the table quick, find absolute center, and enlarge it to the correct dimension in less than a minute is a game changer.

Matt
 
OP
S

slodat

ALLIANCE MEMBER
Joined
Feb 6, 2010
Messages
3,679
Location
Central-ish, WA
Matt- I was hoping you’d stop by. I had a feeling some of this stuff would interest you. The shop is a dream for me, too. I get so lost working in the shop. It’s truly a joy and a privilege.

I use Vectric Aspire for 2d (2.5d is what I believe they actually classify it as) CAD. It does tool paths and the Centroid post processor works great. I run Dropbox on all of the shop computers. In Aspire I save the post processor output to a Dropbox folder. By the time I walk to the router control PC, it’s already on it. Load the file and I’m ready to cut. I will be able to use the same post for the mill as I do on the router. I don’t see me quitting using Aspire. A lot of parts are 2/2.5d and it’s fast and easy at this point. I’m over the hump of the learning curve. VCarve Pro is a lot less money and you wouldn’t notice the feature difference. And, I know once I’m proficient with Fusion 360, I’ll do more stuff In there. I do use Centroid’s Intercon conversational here and there.

For your press brake idea, I’d look Centroid Acorn. If it can do what you want. You’d need to sort out the gcode stuff. Acorn is $300. As far as the learning curve goes, it’s like everything else. It’s not hard and there are lots of people happy to help. Including me. What do you have for motors on your mill?

The probe is a huge game changer. Especially for parts where I want to engrave on the laser, then machine on the router. That’s the project for the next couple days. Sorting that out.

Merry Christmas, Matt and all!!
 
OP
S

slodat

ALLIANCE MEMBER
Joined
Feb 6, 2010
Messages
3,679
Location
Central-ish, WA
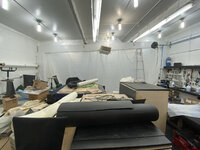
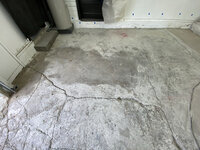
I'm off work for two weeks. I usually plan a big project for this time off. It's a great way to recharge. I like to choose something that's a lot of work, needs to be done and will feel great knowing it's behind me all year. The floor next to the roll up door in the upholstery bay is really, really rough. I didn't put the Lock-Tile down in that area because the floor wasn't flat enough to support it.

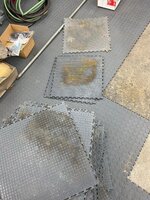
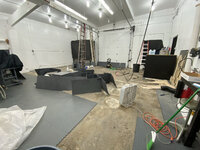
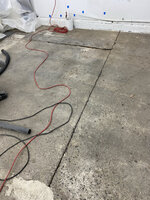
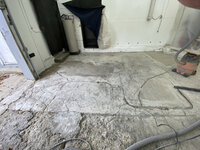
Apparently I hit my head, hard. Because I decided I'd knock out flattening that bit of concrete. I started by pulling up tile to clear the work area. This is some of what I found.

20d5f6433c99b2f32f3bb0958d6d229e.jpg

fdbcb90b07f5233705984e533e1e03b2.jpg

02ff63d6112fd842925df4b67431a6d3.jpg

5853f5282b854fe2a5148f9cd6f6236e.jpg

bde680e0703cae3dd2cf7271c50365a3.jpg

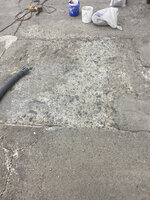
I did a 2' square moisture test where you tape a chunk of plastic sheet to the floor, sealing all of the edges. Remove it 24 hours later and look for moisture. It came up bone dry. I'm getting some moisture, but I don't think it's coming through the slab. Most likely through the cracks in the floor. Not much moisture, but enough for some mold and funk to grow in some of the tiles in the three years since I put the tile down. It's not consistently everywhere and the photos are of the worst spots.

I spent the entirety of yesterday researching, running to town for supplies, talking to a lot of knowledgeable people on the subject and in general putting together a game plan. I need to get this done and the shop back together in a week.. ish.

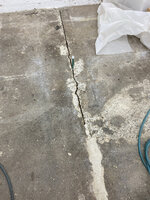
I deliberated on a lot of different solutions. Epoxy coating the floor is not an option. It would be a TON of work to get it in a condition the epoxy would look even half *** good. I bought some epoxy to seal the existing cracks.

This is $160 in epoxy and associated applicator.
b2b716a69948e73a4f3cd49898a06b36.jpg

The plan:
  • Thoroughly clean and dry the tiles.
  • Vee cut the cracks, fill the bottom with epoxy
  • Patch the rough concrete with RapidSet self leveler in the cracks and crevices
  • RapidSet Cementall to get to a flat surface in the areas I'm patching and filling.
  • Rent a proper concrete grinder and grind the entire surface - that half of the shop, with a 18 grit diamond
  • Clean thoroughly
  • Coat with DRYLOK Floor & Wall Masonry Waterproofer
  • Let that cure for a couple days with the heat on rather high
  • Lay the tiles back down

I considered a lot of options. There is such a tiny amount of moisture that I don't think the more expensive 2 part, 100% solids epoxy liquid vapor barrier products are necessary. They are about 4 times the cost of the Drylok and at least a week out.

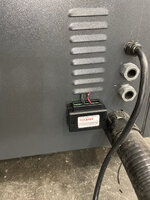
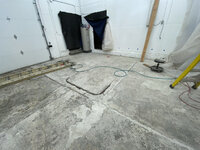
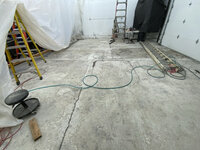
So.. turning the clean shop into a disaster area starts now. I'll empty that half of the bay, 550 sq ft of floor, drop a thick plastic barrier down the middle, mask off what I can't remove, and get to grinding while sucking rubber (full face respirator).

I'm sure this will be awesome when it's done. It's going to be a ton of work though.
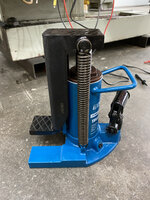
 

Attachments

  • b2b716a69948e73a4f3cd49898a06b36.jpg
    b2b716a69948e73a4f3cd49898a06b36.jpg
    1.9 MB · Views: 1
  • bde680e0703cae3dd2cf7271c50365a3.jpg
    bde680e0703cae3dd2cf7271c50365a3.jpg
    734.4 KB · Views: 1
  • 5853f5282b854fe2a5148f9cd6f6236e.jpg
    5853f5282b854fe2a5148f9cd6f6236e.jpg
    553.9 KB · Views: 1
  • 02ff63d6112fd842925df4b67431a6d3.jpg
    02ff63d6112fd842925df4b67431a6d3.jpg
    536.8 KB · Views: 1
  • fdbcb90b07f5233705984e533e1e03b2.jpg
    fdbcb90b07f5233705984e533e1e03b2.jpg
    582 KB · Views: 0
  • 20d5f6433c99b2f32f3bb0958d6d229e.jpg
    20d5f6433c99b2f32f3bb0958d6d229e.jpg
    412.3 KB · Views: 0
Last edited:
OP
S

slodat

ALLIANCE MEMBER
Joined
Feb 6, 2010
Messages
3,679
Location
Central-ish, WA
I like the plan. Are you grinding the concrete to level it out or just to get down to fresher concrete for the Drylok?


:beer:


Thank you for weighing in on the plan. Grinding is primarily to give the drylok an opportunity to work. Secondary to that, it will remove the 65+ years of dirt/dust/muck that’s ground into the surface of the concrete.

Currently hauling a trailer load of **** from the pallet rack down the street.

6666b10381f4bfab5f1d2d15d8642beb.jpg
 

Attachments

  • 6666b10381f4bfab5f1d2d15d8642beb.jpg
    6666b10381f4bfab5f1d2d15d8642beb.jpg
    1.8 MB · Views: 0
Last edited:
OP
S

slodat

ALLIANCE MEMBER
Joined
Feb 6, 2010
Messages
3,679
Location
Central-ish, WA
One of the flooring guys suggested Deep Seal instead of the Drylok. I ordered seven gallons from Home Depot. The product videos make it look like it will do the trick.

Plenty of work to get to this point. And, I haven’t really started. Should have it emptied quickly in the morning. Then put plastic up to create a dust containment.

771ea54599b4e1ff6df00c2e87ebb43d.jpg
 

Attachments

  • 771ea54599b4e1ff6df00c2e87ebb43d.jpg
    771ea54599b4e1ff6df00c2e87ebb43d.jpg
    1.4 MB · Views: 0
OP
S

slodat

ALLIANCE MEMBER
Joined
Feb 6, 2010
Messages
3,679
Location
Central-ish, WA
Long day. Got the rest of the tile up, cleaned, dried and stacked. Emptied the entire bay save for the pallet rack. Everything is masked off. Damn near an asbestos abatement enclosure. I’m wiped.

Beginning of the day:
3ce45b4aeeefc279ac51980421bb3590.jpg

Drying tile.
e3547809f534a2ee29f4cb7415077948.jpg

6a0621f8471e0a61e6b6c0fc4a21d959.jpg

Picked up some X14 mildew stain remover. It helped with cleaning the tile. Sprayed it on the concrete, too.
28e50b5845eb304ea3b0cd3c5e7be588.jpg

I’ve had the 20’ x 100’ roll of 6 mil plastic since I put the tile down, just for this project. Didn’t plan on it being the whole shop though. I found varying amounts of mold/mildew/yuck in many areas. Will be giving the other half of the bay the same treatment in the future.

I cut the plastic about 6’ long. Worked out well.
8500944da4b71505b347b9532634e838.jpg

Ready for the mess to begin tomorrow.
86977fcbfed433b2220e27210c66ec24.jpg

957c8f5550fef9e8132d73283589f6bc.jpg

00bd403c2517f44e605cbc0ee66e1b5a.jpg

d97a566df56fce334ed5a505a1e345a2.jpg
 

Attachments

  • 8500944da4b71505b347b9532634e838.jpg
    8500944da4b71505b347b9532634e838.jpg
    1.3 MB · Views: 0
  • 28e50b5845eb304ea3b0cd3c5e7be588.jpg
    28e50b5845eb304ea3b0cd3c5e7be588.jpg
    2.2 MB · Views: 0
  • 6a0621f8471e0a61e6b6c0fc4a21d959.jpg
    6a0621f8471e0a61e6b6c0fc4a21d959.jpg
    1.5 MB · Views: 0
  • e3547809f534a2ee29f4cb7415077948.jpg
    e3547809f534a2ee29f4cb7415077948.jpg
    1.8 MB · Views: 0
  • 3ce45b4aeeefc279ac51980421bb3590.jpg
    3ce45b4aeeefc279ac51980421bb3590.jpg
    1.4 MB · Views: 0
  • 86977fcbfed433b2220e27210c66ec24.jpg
    86977fcbfed433b2220e27210c66ec24.jpg
    1.3 MB · Views: 0
  • 957c8f5550fef9e8132d73283589f6bc.jpg
    957c8f5550fef9e8132d73283589f6bc.jpg
    1.3 MB · Views: 0
  • 00bd403c2517f44e605cbc0ee66e1b5a.jpg
    00bd403c2517f44e605cbc0ee66e1b5a.jpg
    1.3 MB · Views: 0
  • d97a566df56fce334ed5a505a1e345a2.jpg
    d97a566df56fce334ed5a505a1e345a2.jpg
    1.3 MB · Views: 0
OP
S

slodat

ALLIANCE MEMBER
Joined
Feb 6, 2010
Messages
3,679
Location
Central-ish, WA
This is going to be some back breaking work. There’s a complete top layer of ground in dirt. I’m using a knotted wire wheel in a grinder to expose clean concrete so I can put the self leveler down. This is about an hours work.

f63475ed0c0a0ad121bf255b2c069028.jpg

This is the area I need leveled out so I can put the tile down. Hoping to get it cleaned up and ready for self leveler in the next few hours. Picking up the grinder tomorrow and would be good to know what material I need to pick up.
 

Attachments

  • f63475ed0c0a0ad121bf255b2c069028.jpg
    f63475ed0c0a0ad121bf255b2c069028.jpg
    2.1 MB · Views: 0
OP
S

slodat

ALLIANCE MEMBER
Joined
Feb 6, 2010
Messages
3,679
Location
Central-ish, WA
Long day working the floor by hand. The low viscosity epoxy gets into the cracks and appears to be sealing them up well.

c75d293cf8b92fb96b17080c469411fc.jpg

2746ec7920388227b9997a31def0524c.jpg

983f6367926a76c6fe431361f4e8daf7.jpg

I wore a twisted knot wire wheel down to almost nothing in the 4.5” angle grinder. Picking up the concrete grinder and vacuum from the rental company tomorrow. Excited to see how that goes. Once the surface is cleaned up I’ll get all of the cracks with the epoxy and start with the self leveler over this area.

9bb6c2fdd43acbacba736507d172bf5a.jpg
 

Attachments

  • c75d293cf8b92fb96b17080c469411fc.jpg
    c75d293cf8b92fb96b17080c469411fc.jpg
    388 KB · Views: 0
  • 2746ec7920388227b9997a31def0524c.jpg
    2746ec7920388227b9997a31def0524c.jpg
    1.8 MB · Views: 0
  • 983f6367926a76c6fe431361f4e8daf7.jpg
    983f6367926a76c6fe431361f4e8daf7.jpg
    2 MB · Views: 0
  • 9bb6c2fdd43acbacba736507d172bf5a.jpg
    9bb6c2fdd43acbacba736507d172bf5a.jpg
    1.8 MB · Views: 0
OP
S

slodat

ALLIANCE MEMBER
Joined
Feb 6, 2010
Messages
3,679
Location
Central-ish, WA
Happy New Year!!

Grinding concrete is no joke. I am completely drained. Holy **** that’s a lot of hard work. The rough surface of my floor probably doubles the effort, even with the dual head grinder. It’s producing a crazy amount of dust. I’ve dumped 13 gallons of fine dust/dirt from my dust deputy equipped shop vac. It’s doing a surprisingly good job sucking up the dust off the floor.

First section when I started yesterday.
e8394b088a4e34354d2ee4f2bed69bc5.jpg

This was about four hours of the grinder kicking my ***.
660a04814e24688f26757febf586277d.jpg

About five hours into the other side.
3de4535ec0b9b06568bc950d4b7f14df.jpg

A good before after contrast.
f125b0707978e1f8dedf57245a5b1e96.jpg

That layer of dust is 1/2 - 3/4 thick.
fcd7d9dcafc3d443beaf15a978475a85.jpg

Going to go over the whole floor again now that the high spots are knocked down and it’s actually grinding and not just beating the **** out of me. In retrospect, I’m thinking I could have made due with the ****** floor. I’ve bought into the tiles and want to use them. I believe the sealer will be able to get into the concrete now and the tile will lay better. Lots of spots to fill in once this mess is cleaned up. Still considering ideas on the really bad section in front of the door.
 

Attachments

  • fcd7d9dcafc3d443beaf15a978475a85.jpg
    fcd7d9dcafc3d443beaf15a978475a85.jpg
    1.5 MB · Views: 0
  • f125b0707978e1f8dedf57245a5b1e96.jpg
    f125b0707978e1f8dedf57245a5b1e96.jpg
    1.7 MB · Views: 0
  • 660a04814e24688f26757febf586277d.jpg
    660a04814e24688f26757febf586277d.jpg
    1.5 MB · Views: 0
  • e8394b088a4e34354d2ee4f2bed69bc5.jpg
    e8394b088a4e34354d2ee4f2bed69bc5.jpg
    1.4 MB · Views: 0
  • 3de4535ec0b9b06568bc950d4b7f14df.jpg
    3de4535ec0b9b06568bc950d4b7f14df.jpg
    1.7 MB · Views: 0
OP
S

slodat

ALLIANCE MEMBER
Joined
Feb 6, 2010
Messages
3,679
Location
Central-ish, WA
I almost wonder if it would just be better to demo that section and pour new. :dunno:


Oh... it would be a LOT better.. alas, it is not at option at this time.

I’ve done all of the grinding I’m going to do this go round. Kept reminding myself the reason I’m grinding is so the sealer can absorb into the slab. That is back breaking work. I’m sure I’ll be sore for a solid week. Still a ton of handwork to do before I can seal up all of the cracks and apply the sealer. End of the day shots:

6e9c38e50d13b6ca453d75b87ee02647.jpg

10d40af94d46a8491b99d3236c2d11f9.jpg
 

Attachments

  • 6e9c38e50d13b6ca453d75b87ee02647.jpg
    6e9c38e50d13b6ca453d75b87ee02647.jpg
    1.5 MB · Views: 0
  • 10d40af94d46a8491b99d3236c2d11f9.jpg
    10d40af94d46a8491b99d3236c2d11f9.jpg
    1.5 MB · Views: 0
To avoid these ads, REGISTER NOW!
Top Bottom