To avoid these ads, REGISTER NOW!

Falcon's next shop - build thread

To avoid these ads, REGISTER NOW!
OP
F

Falcon67

Well-known member
Joined
Jun 11, 2009
Messages
18,371
Location
Merkel, TX
Yes, but I just have to stock one kind of wire and it's only $20 difference on a roll. No voltage drop, however LOL. House is the same way - when it was built in 2001, they didn't use any 14 in it anywhere. The 5 long plug runs and the compressor run is what chewed up the wire.
 

racingtadpole

Well-known member
Joined
Dec 3, 2011
Messages
2,029
Location
The far side of crazy.. but sometimes Australia
Ive just spent a couple of hours reading this whole thing. I really like your layout, Im looking forward to seeing it progress to the end, looking really good thus far. Also like the no stocking stuffer but still personable approach you take when writing the updates. Makes for easy reading.
Keep up the good work Chris.
 

chickenhauler

Well-known member
Joined
May 31, 2011
Messages
473
Location
Pennsylvania
Yes, but I just have to stock one kind of wire and it's only $20 difference on a roll. No voltage drop, however LOL. House is the same way - when it was built in 2001, they didn't use any 14 in it anywhere. The 5 long plug runs and the compressor run is what chewed up the wire.

:thumbup: My dad beat it into my head to run 12 for everything too. Voltage drop and heat were his biggest complaints against 14. Not to mention, it's just easier.
 
OP
F

Falcon67

Well-known member
Joined
Jun 11, 2009
Messages
18,371
Location
Merkel, TX
About time for another update! I had my final inspeection on Thursday and sailed right on with a "good to go". So that's it for official signoffs. On with the work. I'm pushing to get the work room set up as working space and get all the stuff out of the house garage. Slow progress. Spent Sunday working on the corner bench. Bought 22 2x4s, a sheet of 23/32 plywood sanded one side and some 1x2 trim. I also used some of the stored 2x6 lumber, saved from the next door house foundation pour. Then I cut it all up into little pieces ;)

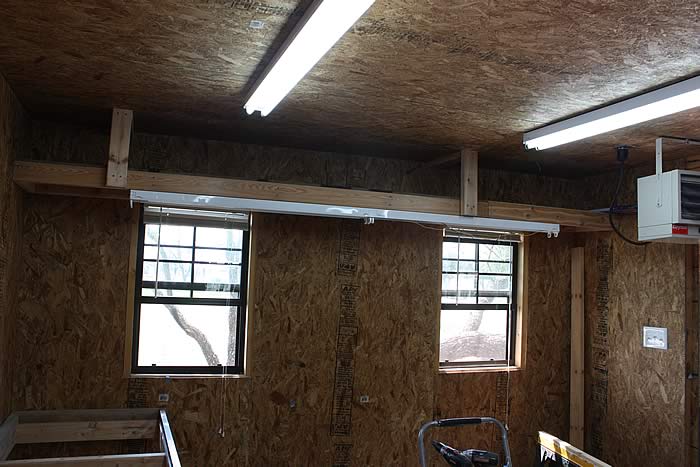
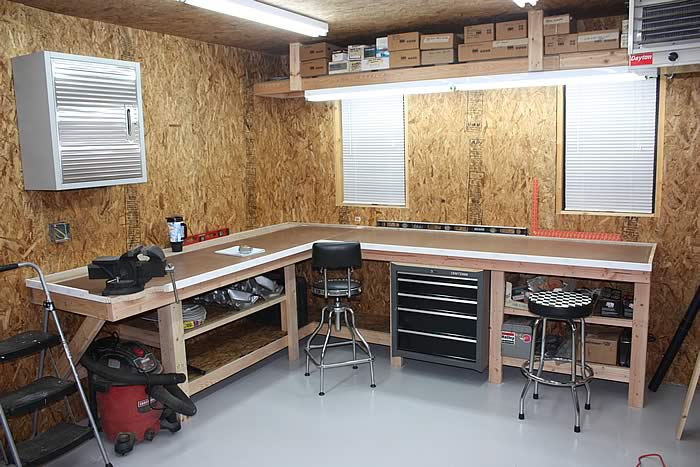
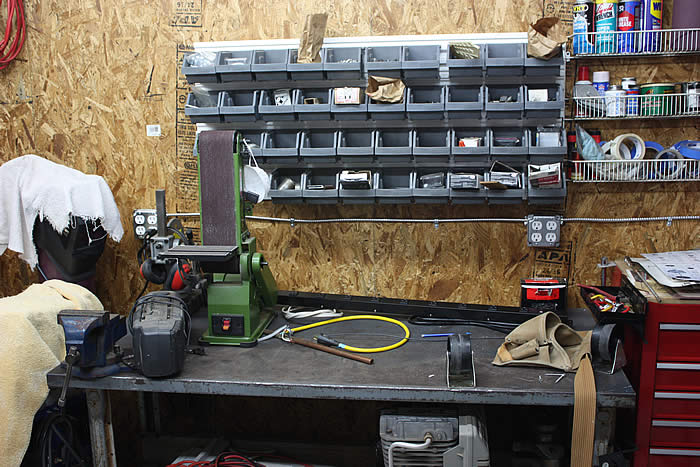
Built some overhead 16" deep storage. That also mounts the bench overhead light. I tested it by swinging my 213.5 lbs from the shelf. No problem there.
Bench2.jpg


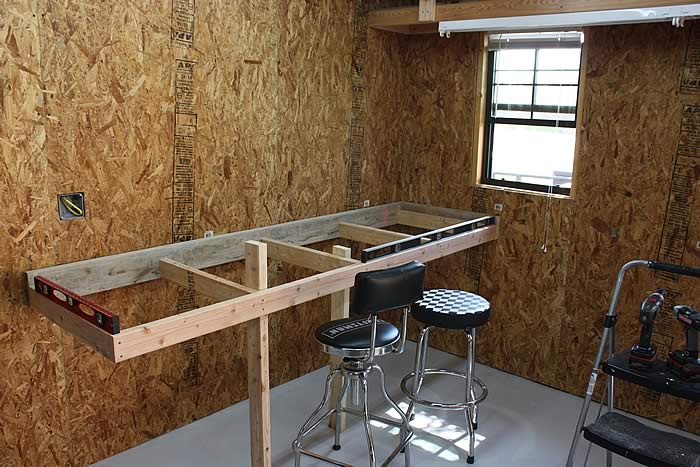
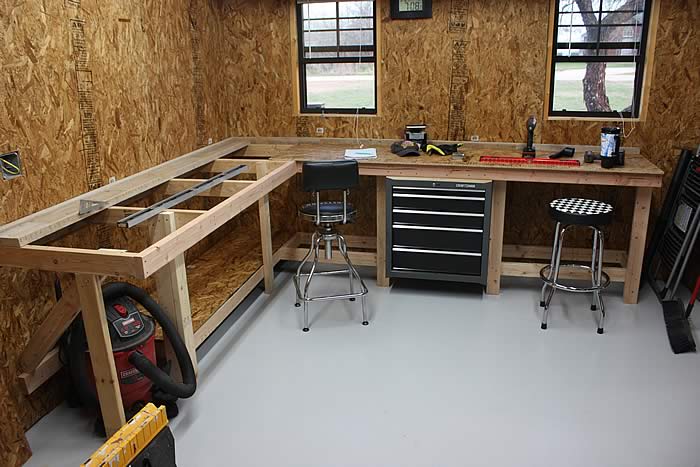
Built the easy frame first - this section is 8' x 29 1/2" deep. I'm using a 2x6 on the back side so I can just rip the plywood, OSB, etc right in half and use both pieces. I was going to shave 7/32 off the 2x6 to make it level with the top, but thought that might be a bit much of "make work" on the 10" table saw. So I just left it alone. I can always pull it and shave it down later if I feel the need. But a planer would be a safer way to do it for sure.
Bench1.jpg


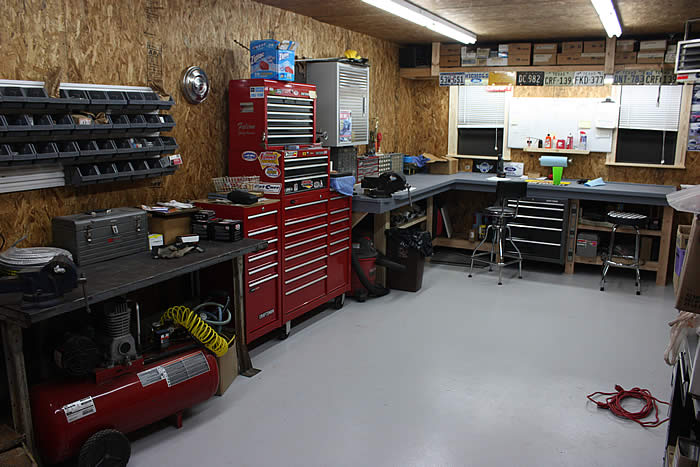
The next section is 119" x 24" deep. I made it a bit narrower so I could easily reach the windows. The top frames are lagged to the walls studs with 1/4 x 3" lag bolts. The top doesn't move or even wiggle.
Bench3.jpg


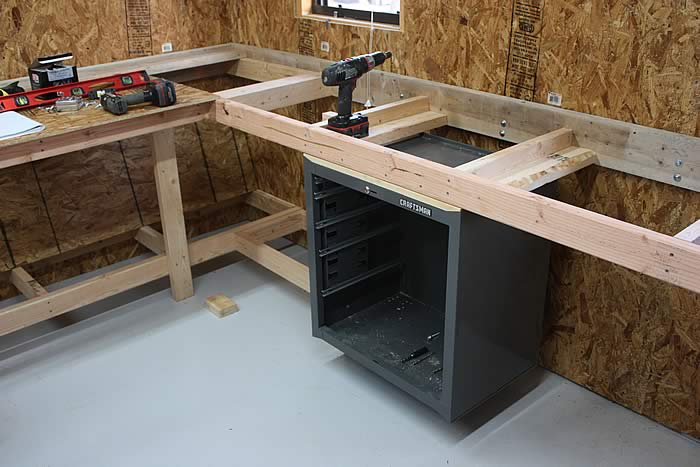
Mounted up the 5 drawer cabinet we found on sale at Sears late last year. It was about $120.
Bench4.jpg


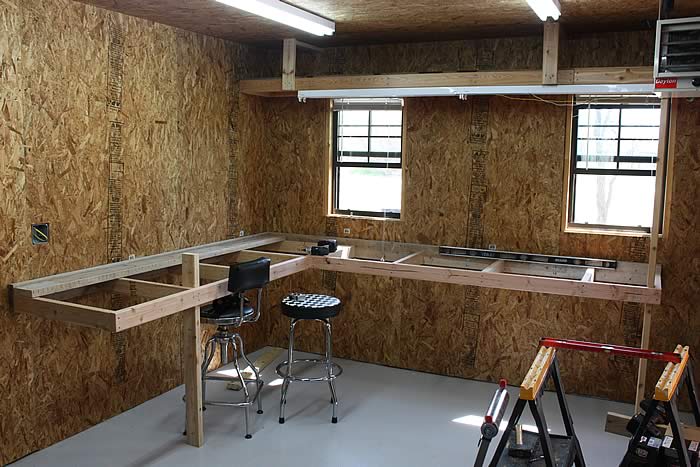
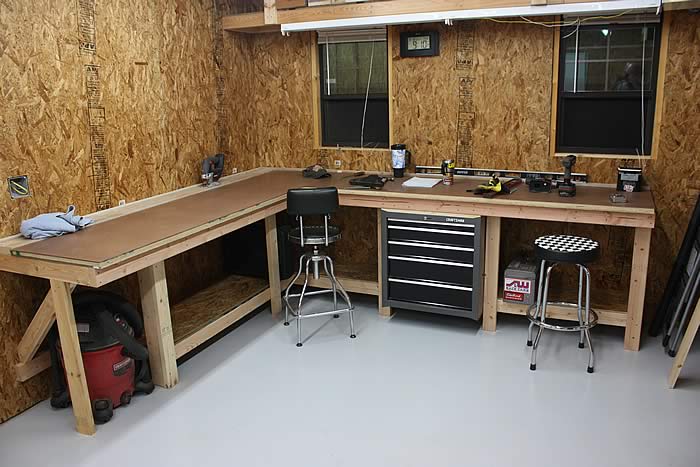
On the far left and far right, there will actually be two shelves with abotu 12" of space. The middle will have just the one for leg room and tall stuff, like air nailers or some such. The left side is 20' deep and the right side shelves are 16" deep.
Bench5.jpg


The top is 7/16" OSB, 23/32 ply and 1/8 hardboard. The overhang will end up around 2 1/4" of so with the trim. There will be a 1x2 trim around the front and side edges to hold the hardboard in place. Vice will sit on the far left corner. Still needs a little trimming up, but this is as far as I got before calling it a day. It sits comfortably, so I think I got it like I wanted it. Floor slopes a little to the windows, but the mean height to the bench top is 38". Feels good standing and it clears my legs when sitting.
Bench6.jpg


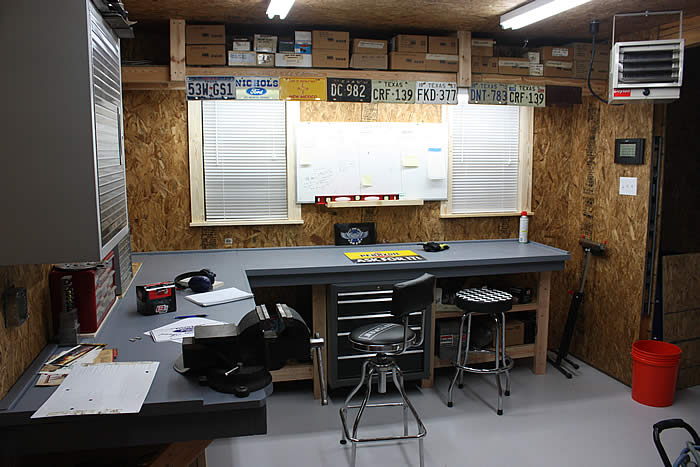
The left side wall will get three Seville wall cabinets. I have one - that was all that Sams had in stock this week. I'll use 23" linkable undercabinet lights. When my wifes sees that, I'll be putting some in the kitchen. Plugs will run along the back wall, spaced out however. Those will be surface mount metal boxes strung with MC cable.
 
Last edited:

onething

Well-known member
Joined
Jan 23, 2011
Messages
438
Location
TEXAS
Looking good! On the left end you have a vertical and diagonal support. Why? Just asking.
 
Last edited:
OP
F

Falcon67

Well-known member
Joined
Jun 11, 2009
Messages
18,371
Location
Merkel, TX
Looking good! On the left end you have a vertical and diagonal support. Why? Just asking.

The vice is going on that corner and I really don't like either brace. The vertical one is to keep the top level while I figure out if the angle is good enough. So we'll see. I need to go get a 4 or 5" lag bolt to secure that angle brace to the wall, then it'll work better. That under space is for vacuum parking and the angle brace lets it move out a little easier.
 
OP
F

Falcon67

Well-known member
Joined
Jun 11, 2009
Messages
18,371
Location
Merkel, TX
Edge banding is now on and I fixed the diagonal leg to my satisfaction. Found a 6" lag bolt and mounted it solid to the wall - no wiggle. I set the vice and trimmed the top to match the swing on the vice for vertical holding clearance. Pretty much ready for paint now. I mounted the cabinet at 20" off the surface - oops, that's way too high. Looked good on paper though. I'm going to lower that to 16".
Bench7.jpg


Vice/support detail
Bench8.jpg


The Seville wall cabinet is nice - a good buy for $70. Goes together quick too. It comes with two brackets for hanging that are heavy duty and full width. Since I have OSB walls and the supplied screws are about #14 in size, they can handle a heavy load easy and can be mounted anywhere.
 
Last edited:

Wingnut65

Well-known member
Joined
Apr 21, 2010
Messages
3,170
Location
Tampa Bay, FL
That vice cut-out is a great idea! That might end up on my bench as well.

Let us know how that front lip works out. It makes perfect sense, but I have a habit of clamping stuff right on the edge or overhanging the edge.
 
OP
F

Falcon67

Well-known member
Joined
Jun 11, 2009
Messages
18,371
Location
Merkel, TX
Thanks for the kind comments. On that particular vice, you have to sculpt the bench edge if you want to clamp anything vertical. It doesn't have enough "stick out" I guess you'd say. I just eyeballed the swing and cleared the area below. Bit of a compromise - it's positioned so that the left mount can use a long 3/8" lag bolt into the 2x4 and the other two use 3/8" bolts through the top. Have a "paint test" going on a scrap of hardboard, so I should get to put some paint on the top tonight. Can't find the package of smooth rollers, so yet another trip to Lowes at lunch. But there IS a Wendy's right across the parking lot.... :)
 

Jack Olsen

Super Moderator
Staff member
Joined
Mar 22, 2009
Messages
6,678
Location
Los Angeles
The lip all the way around is very smart. I planned on that for my most-recent bench, but got too lazy when it actually came time to execute. My thinking for the front side was to use a router to cut a little trench about 1/2" from the edge. But like I said, in the end I decided to just let all those little fasteners tumble to the floor. :)

With the diagonal, if you re-cut one to be a little longer and go to a point lower down on the wall you might get the best of both worlds.

This is a great build.
 
OP
F

Falcon67

Well-known member
Joined
Jun 11, 2009
Messages
18,371
Location
Merkel, TX
Thanks Jack! The diagonal is very sturdy - it misses a double 2x4 in the wall by only about 2". You can just see the seam between the OSB panels that is centered onver the 2x4s. I had to double up every other stud for mounting the siding. The anchor block on the wall is bolted to those 2x4s. I sat on the cantilevered corner and it didn't move a bit. The upper end is just deck screws, but I found a big stash of lag bolts so it'll get some there too. That little 19.2V impact driver makes quick work of the lag bolts.

Going to move my banker boxes of parts books and manuals (8 boxes) in and take an inventory. The parts books can go on a shelf in the back, but I need to spot a place to hack out some book shelves. I'm leaning toward using peg board in between the windows. I used that space to assemble the cabinet and joy - how nice it was to have a work area clear of both horizontal and vertical obstructions.

Don't think I'll need as much pegboard as I had, since most of what was on the wall will be in the drawer unit. The old bench wall - a little "busy":
ShopMess800.jpg
 
Last edited:
OP
F

Falcon67

Well-known member
Joined
Jun 11, 2009
Messages
18,371
Location
Merkel, TX
Nah, that's a huge Mesquite. BIG root system. Probably $1000 to take it out. It was cause for some careful foundation positioning but I like it there. It's on the south side so it shades the south wall and part of the roof from the sun. Worth keeping. I need to put a couple of trees on the west end before spring gets too far gone. The west end heat gain is something! Besides, to really kill a mesquite you need to take out just about all the root system or "water" what's left with diesel. Just cutting it down only makes it mad. It grows back with some serious thorns. A mesquite thorn will go through a thick tennis shoe sole like a hypo needle. Or through a tire, leather jacket - they's bad juju. Last summer when it was so dry that other trees were dying, mesquite shoots were cropping up everywhere, even from stumps cut off years ago.

>What bench ?? lol

Wait till the new one gets full!! I promise to keep the new one neat...for...a...few...weeks...maybe......
 
Last edited:

Motown 454

Well-known member
Joined
Sep 25, 2008
Messages
1,359
Nice job on the bench it came out great. How high did you build it ? Your doing a great job on this build. You have an awesome shop.
 
To avoid these ads, REGISTER NOW!

SiGmA_X

Well-known member
Joined
Aug 13, 2005
Messages
1,111
Location
Portland, OR
Hey Chris,

Love the progress and the build in general! Bench looks really good, the lip is a great idea. I hate parts walking away!

I wanted to comment on your compressor silencing methods and what I did. I have a 24x48, and at the entrance end (work end is the far end from the door, which is on one of the 24ft ends) I constructed a 12x12 storage room and inside that, constructed a box roughly 4x4 for my compressor. The room was insulated to help control temps and sound, and then the 4x4 box was double insulated. R13 batting was used. My Husky 80gal "5hp" compressor runs quietly in the room, you can feel it more than you can hear it. With music on quietly, you can't hear it at all really, just feel it through the slab.

People who don't know we had it on are realllly surprised when we whip out the air tools! And then more so when they don't notice it cycle, which was the goal!

Lookin forward to future updates!

Roman
 

Red Leader

Well-known member
Joined
May 15, 2011
Messages
2,688
Location
Denver, CO
Been a while since I've visited this thread, which is a while too long!

That bench is looking awesome and, as others have said, that edge work around the vise is genius. Nice goin' on that one!
 
OP
F

Falcon67

Well-known member
Joined
Jun 11, 2009
Messages
18,371
Location
Merkel, TX
How high did you build it ?
The median height is 37 1/2". The floor slopes a little towards the windows. I came back about 3' from the window wall and set a level line, then went from there. I can sit with my knees under the lip anywhere, so I got it where I wanted it good enough.

Nice. How did you secure the OSB to the studs?

Coarse thread 1 5/8" screws. I started with sheet rock screws but the heads tend to pop if they go in where the OSB is particularly hard, so I switched to deck screws.

Paints dry! That's "Elepant Gray" porch and floor paint from Lowes. Also trimmed out the windows just because.
Bench9.jpg


The bench light needed a shade, so I used available materials. I decided the "STD Board" should go between the windows. (STD - **** to do ;) )
Bench10.jpg


It's so pretty...then BAM! Shop world got smaller.
Inside8.jpg


Still have to decide where to put the reference materials. That's 9 banker boxes of manuals and parts books. I emptied one side of the house garage and actually got the truck in there with inches to spare. Really - 2" on the back bumper and 3 on the front - had to remove the trailer hitch ball. That threw the golf cart out of the house and into the shop. In 5 hours I went from bowling alley to tripping over stuff.

There's 4 machines left to move out of the garage. I still don't have any power run from the drops in the work room. I thought I'd just get most of the stuff in there, then I'd be pretty sure where I'd want plugs. I may do only a couple of double wall plugs over the bench and just mount a couple of power strips under the lip.
 
Last edited:
OP
F

Falcon67

Well-known member
Joined
Jun 11, 2009
Messages
18,371
Location
Merkel, TX
BTW, without pix of the truck in the garage, it never happened. :dunno:

Yer on...

Since moved things around so I can park it head in, fold up the driver's side mirror and squeeze by the shelf.
 

Attachments

  • TruckNose.jpg
    TruckNose.jpg
    39.4 KB · Views: 211
  • TruckTail.jpg
    TruckTail.jpg
    37.3 KB · Views: 277

onething

Well-known member
Joined
Jan 23, 2011
Messages
438
Location
TEXAS
I'd rent a storage building, IF I was you . . .

Lookin good - especially the lampshade. I may have to steal that one someday.
 
OP
F

Falcon67

Well-known member
Joined
Jun 11, 2009
Messages
18,371
Location
Merkel, TX
Not much new here - the work area is just about set up. Lots of shelf space put up. Also got part of the machinery up and running.

Inside9.jpg
Power good on the left, right side still waiting...and waiting... I stopped by HF and picked up a black power strip for front side of the 30" deep bench leg. I was missing a GFCI outlet and after turning the place upside down twice, I remembered it was haywired to a rafter for powering the two 4' lights in the big bay area. I can wire the bench as soon as I get up there and redo that light circuit hack.
Inside10.jpg

Got the other cabinet up with the bookshelf. Starting to look lived in. Grandson brought his minibike over for adjustment Friday morning. Tells his friends he has his own private "motorcycle shop".
Inside11.jpg

I used a bundle of R13 to insulate the west wall. There was a lot of heat coming through that in the afternoon. We've already been over 95F here. The inside surface of the Hardi runs 110~120F. It's HOT to the touch. After I put up the insulation, it was way better. At the same time that lower wall is hot, you can get up and put your hand on the reflective OSB covering the gable and it's cool to the touch. I'm now glad I used Techshield up there instead of plain OSB.
Inside12.jpg

Last circuit got wired in Saturday to the well pump. I had the three wire well pump wired wrong, then got run inside by a big rain storm. Sunday I wired it wrong again, re-checked colors, wired it right, still wouldn't start. Went all Fonzi on the motor controller and whacked it with a screwdriver, and the pump took off running.

Found this in the bottom of a box I was unpacking:
DrillLOL.jpg
 
Last edited:
OP
F

Falcon67

Well-known member
Joined
Jun 11, 2009
Messages
18,371
Location
Merkel, TX
Not a whole lot new to report. Got the power around the benches finally. I didn't get a pic, but I put one of the black HF power strips under the lip on the left had side of the bench. Lots of handy outlets available now. I used the MC cable to string the plugs so if I change my mind, it's an easy modification.

Inside14.jpg

Inside15.jpg


Mostly the last week or so we've just been sitting in the big door taking it easy. The build is going to have to slow way down. I had to go in for round with the Lithotripsy machine at the hospital. I had some kidney related (read - pain reading 12 on a 1-10 scale) on the left side the week before and the CAT scan showed three stones. One was 2 cm x 1 cm or so - huge. I also have a stent installed for the next three weeks. Not to put to fine a point on it, but until that comes out a trip to the outhouse is a minute or so of extreme pain and maybe 30 minutes of recovery. Drinking lots of water and having to just tough it out until the kidney is clear. The average cost for the treatment is more than the cost of the entire shop. Fortunately we have good insurance, but we're never sick so there is a big deductible to cover. Last thing I needed but hey, whadda gonna do. I may have to travel for training on a new system we're looking at for work, so better now than in the middle of some 3 hour plane flight.

Warm spring nights are good therapy, even if it's just sitting around.
Inside16.jpg
 
Last edited:

Motown 454

Well-known member
Joined
Sep 25, 2008
Messages
1,359
The garage looks great and well stocked. Nice job. Thats a nice picture, it looks inviting.
 
OP
F

Falcon67

Well-known member
Joined
Jun 11, 2009
Messages
18,371
Location
Merkel, TX
Oh - I did manage the first automitive related repair, in the shop, in the middle of all this. The the front wheels flew right off after the 19 month old played with it. JB Weld put 'er back in service.
Job1.jpg
 

colt340

Well-known member
Joined
Apr 26, 2008
Messages
85
Location
illinois
Garage looks great. Goodluck with those kidney stones. Health issues can really
put a damper on things.

al
 

onething

Well-known member
Joined
Jan 23, 2011
Messages
438
Location
TEXAS
Sorry about the stones, but sitting in the shop doing nothing is good. That's what I'm doing right now!
Get well soon.
 
To avoid these ads, REGISTER NOW!
Top Bottom