torqueman2002
Well-known member
BTW - I don't have too many tools; I need a bigger garage/shop!
Somebody please tell my family.")
Somebody please tell my family.


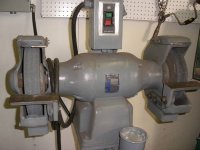
ALL: since i was posting anyway i thought i'd post this huge 12 inch Baldor i mentioned a few posts ago. is that too much machine for one of those belt sander attachments?
Ex: thanks and i thought that big Baldor might be a bit much. i think i have a 1/2 HP Baldor sitting on a shelf i might have to spiff up and put that belt sander you use on it
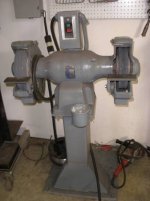
here's my 3/4 buffer and my 1/2 6 inch baldor grinders. i'm guessing the buffer might be the best option? i do have a commercial 1/2 HP block too. now i can wire up the commercial block to 220 if that might help, but not sure if it will and i don't think anybody we know has tried that yet. or has anybody?
An oven in the shop! Hmmmmm ....
Heat parts for painting, powder coating, heating interference parts-ring gears on a 1966 MGB flywheel, ... chicken pot pies, potatoes!


Brilliant!


I posted this question in another thread, but thought I'd be more likely to get an answer here. How do you guys pull the bearings? I'm trying to replace a 50-year-old set, and they do not want to come off.
If you're not trying to re-use the bearings, it's a lot easier. I just put a couple of layers of tape on the face of the jaws of my vise, opened the jaws to just a bit wider than the shaft, screwed on the nut to the end of the shaft and hit the end with an old wooden croquet mallet. The nut made sure that even if I didn't catch the rotor, it wouldn't fall to the floor.
Not very sophisticated, but effective. I'm sure that the pros on this board have smoother solutions.
What model Block grinder?I posted this question in another thread, but thought I'd be more likely to get an answer here. How do you guys pull the bearings? I'm trying to replace a 50-year-old set, and they do not want to come off.

Good point. Some may not know that's my weird sense of humor.I hope the cooking food in a paint curing oven was a joke: when the paint cures it out-gasses, when it out-gasses it condenses inside the oven. when you heat again it could out-gas and contaminate the food...

Since you posted a huge Baldor, I thought this might interest someone.ALL: since i was posting anyway i thought i'd post this huge 12 inch Baldor i mentioned a few posts ago. is that too much machine for one of those belt sander attachments?

If you're not trying to re-use the bearings, it's a lot easier. I just put a couple of layers of tape on the face of the jaws of my vise, opened the jaws to just a bit wider than the shaft, screwed on the nut to the end of the shaft and hit the end with an old wooden croquet mallet. The nut made sure that even if I didn't catch the rotor, it wouldn't fall to the floor.
Not very sophisticated, but effective. I'm sure that the pros on this board have smoother solutions.
What model Block grinder?
I ask because there are different methods.
Some have C-clips that may need to be removed prior to removing the bearings.
http://tinyurl.com/Go-Blue-Block-Grinder
Some have RH motor cover with start-capacitor start-up switch that needs to be removed prior to removing bearing from shaft.
http://tinyurl.com/CM-GJ-Lil-Brownie-115-7566
For the bearings that stay on the shaft, I have removed them with a small bearing splitter and puller.
http://tinyurl.com/Go-Blue-Block-Grinder
Protect the threads and shaft. Soak with your choice of penetrating oil (I use Kroil), let it sit. Be sure any rust or debris on the shaft that would hinder bearing removal is removed.
Be gentle and patient, the cast iron and aluminum housings can be fragile.
I don't know anyone selling parts, if something is damaged, you'll have a hard time repairing/replacing major parts.
Good luck and post up pictures of how you are doing.
We like pictures!


ALL: since i was posting anyway i thought i'd post this huge 12 inch Baldor i mentioned a few posts ago. is that too much machine for one of those belt sander attachments?


Here's a thread that might help, it shows the removal of bearings from the rotor shaft of a 1/3 HP m-397.19410.I'll give this a shot. Thanks.
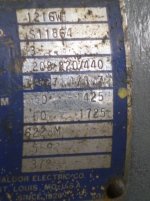
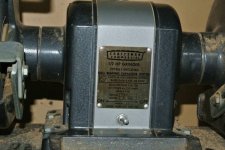
Thanks for the advice. The grinder is a 1/2 HP "Industrial Rated", ca. 1964. Model no. 397.19590. It has the bearings that stay on the shaft. I spent a few hours yesterday removing fifty years of grease, disassembling and inspecting.
Edit: You can see some slight damage to the RH threads on the stator shaft. It's been years since I've worked with bench grinders, and silly ol' me forgot one side had LH threads. That's what happened when I put vise grips over the threads, even with tripled-up rags underneath. Oops.
Thanks for finding a replacement.While taking a break from my first block grinder, I decided to check out my second new-to-me a grinder, a 1974 vintage 397.1949. Well, I guess it didn't like the cold Ohio weather, as when I fired it up (the second or third time since I purchased it) the plastic switch failed. I got it out of the grinder, and this is what I find:
I'm debating whether I want to spend the money to replace the switch or just try to make the original one serviceable with plastic epoxy.
I did find a switch that would fit the factory opening. NKK WR11AF. Should just pop right in, although a single-female to double-male spade adapter would be required as this switch only has two terminals.
http://www.zoro.com/i/G1925612/
SNIP
I'm debating whether I want to spend the money to replace the switch or just try to make the original one serviceable with plastic epoxy.
http://www.zoro.com/i/G1925612/
Outlaw: thanks for the heads up on using the oven for cooking which wasn't in my plans, but we wouldn't want it not said and have somebody see our thread and TM's funny post and getting sick or worse.
Just curious if it matters if its a gas or electric oven?
McB: nice job with the workmate. I really liked the grinder stand you made that fit under the bench you made, but of course you only have so much bench so i'm guessing not enough room to do that on the other side.

Are those jaw covers homemade, or store bought? If you bought them, please advise where---I want some of those.
Leadberry: i'm pretty sure you can just buy the switch or if you want to do a quick fix i'm guessing epoxy will work if the wire is still making a connection.
I also love your aluminum jaw covers and did they come with your vise or where did you buy them?
Leadberry: 2nd request to find out where you bought your vise's jaw covers. or did you make them? they are awesome. also good luck on your block restorations.
Here's a thread that might help, it shows the removal of bearings from the rotor shaft of a 1/3 HP m-397.19410.
http://www.garagejournal.com/forum/showpost.php?p=3905048&postcount=13
I've repaired threads with a small fine triangle file. Hope it works for you.
Nice grinder.
Thanks for finding a replacement.
I can see in your pics the green current eating goo, which will clean up.
I don't see, however; what needs to be epoxied. Did the button separate from the toggle?
i'd give the repair a shot. It costs nothing but time. I've had pretty good success repairing old electronics components, including several switches. If nothing else, it's good leaning experience, even if it fails.
McBSNIP.
Outlaw:SNIP i like the heat lamp idea. any side effects from using the family's oven to dry out a part or heat it up before painting?
SNIP

You are welcome.... Thanks for the link. I may have to give the file thing a try, or maybe clean them up with a die? ....


Spoke with the gentleman selling last week, but we could not coordinate til today. Of course we on the journal mention its existence over the weekend causing craigslist scheduling anxiety (thanks JCM).
Super clean, extra wheels, and even the manual. Great older guy who purchased it new in the 80's, but is slowing down in the woodworking hobby.
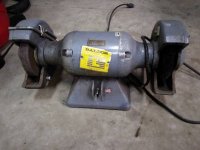
I have a 257.191401 1/2hp. No date stamp, but the wheel covers have a casting date stamp of 11/83. So, I assume it is a 1984 grinder. Pull off a wheel and see if you can find something like this:

[*]Replaced the bearings - the spin-down time did not improve, taking less than a minute before and after. A couple of causes come to mind. Originally I had an 8" wheel on on one side and for the second test I only had a 7". The 7" wheel wasn't dressed. The new bearings are non-contact sealed but they have more resistance than the old ones and I re-used the felt washers. I don't think that wind-down time is that important since I know that the bearings are good, and I wonder if the time will get better once the bearings are worn in a bit.
What you really want is smooth bearings. My 3/4hp with the 3 minute spin down (pre wire wheel) has a "click" in it that you can hear when it is slowing down. So, I have ordered a new set of shielded bearings. Since those will be packed with new grease, I expect my spin down times to drop some more. A smooth running machine is the goal of a rebuild.Spoke with the gentleman selling last week, but we could not coordinate til today. Of course we on the journal mention its existence over the weekend causing craigslist scheduling anxiety (thanks JCM).
Super clean, extra wheels, and even the manual. Great older guy who purchased it new in the 80's, but is slowing down in the woodworking hobby.

Well put JCM, I agree.
Over on OWWM site, there's a group that believe a long spin-down time can also indicate dry or no grease.