To avoid these ads, REGISTER NOW!

Maxjax Installs: Post Here

Scurrah

New member
Joined
Jan 26, 2024
Messages
3
Just installed my MaxJax last weekend. Got it through HomeDepot and got the Valentine’s Day deal. Set mine at 130” to the outer edges of the plates. Tested it with the BMW X5. I have to drive up on boards to get the lift arms under the Tesla. Love the ability to move the posts out of the way when I need the space or to move stuff around.
 

Attachments

  • IMG_5497.jpeg
    IMG_5497.jpeg
    822 KB · Views: 172
Last edited:
To avoid these ads, REGISTER NOW!

alanjd93

Member
Joined
Feb 16, 2024
Messages
12
Location
Michigan
Don't lift 7k lbs on a 6k lb rated lift.

I am going to make a big assumption and say they are the same. The assumption is that the M6K did so well on the ALI testing that they decided to change the rating to 7k lbs to appeal to more customers. Rating them for 7k lbs would mean they would have to pay again to get the lifts certified. I looked at these lifts many years ago and decided it wasn't for me as I wanted to lift 1/2 ton trucks with no problem.
When I heard they were making a 7k version, the Maxjax definitely interested me.

As mentioned, part numbers seem to be the same. So far, we have been unable to find anything different, besides a few stickers.
See attached for examples of some key parts.

With all that said. Don't ever use a lift past it's rated capacity. The sticker on your lift should indicate the capacity of your lift.
I understand what you're saying, I wouldn't advocate for anyone on here to do that either. I just think it's a little misleading to rebrand something as "Bigger" and "Badder" when it sure seems like the exact same thing. I get why the reps at Maxjax wouldn't be able to condone lifting over capacity on an M6K for liability reasons... just feels a little dirty that they would be so eager to try to sell someone the same exact product over again when the only difference is a sticker. How about a "retrofit kit" for people who have already purchased one? I'm sure it's better for the bottom line to sell a whole new unit, and I realize it's not free to get something re-certified. Personally I would be more than happy to pay for an overpriced decal kit to lift an extra 1,000 lbs though, would just be nice to have the option.
 

Rusty67

Well-known member
Joined
Jul 28, 2007
Messages
1,294
Location
LA, CA
Just installed my MaxJax last weekend. Got it through HomeDepot and got the Valentine’s Day deal. Set mine at 130” to the outer edges of the plates. Tested it with the BMW X5. I have to drive up on boards to get the lift arms under the Tesla. Love the ability to move the posts out of the way when I need the space or to move stuff around.

View attachment 2057315
Do you wheel the recliner under the car and kick the lever so you can lean back for oil changes in comfort and style?
 

Scurrah

New member
Joined
Jan 26, 2024
Messages
3
I’ve got a recently installed MaxJax. The hydraulic hoses that come with MaxJax now are 5/16 hoses with 3/8” NPT connectors. I’m looking to extend my hoses by coupling an additional 10 ft to the existing 15 ft hoses. I think I want to extend them with 3/8” hoses (not 5/16” hoses) with a 3/8” swivel connectors.

So, two questions.

First, is a total of 50ft of mixed hose sizes ok?

Second, are swivel connectors considered to be as reliable as non swivel?

Thanks!
IMG_5509.jpeg
 

realien

Well-known member
Joined
Apr 24, 2017
Messages
63
Location
Atlanta
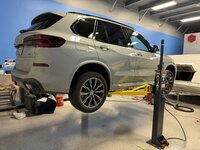
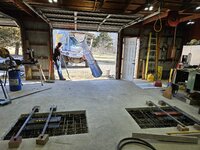
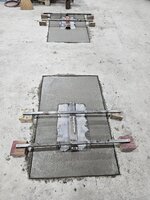
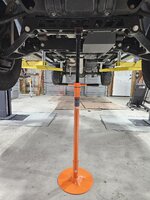
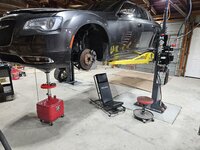
Moved my lift into the new shop. Had a couple of things I had to figure out

1) I needed to run the hydraulic house above the lift, but in the new shop, I have a large ceiling fan, so can't hang it from the ceiling

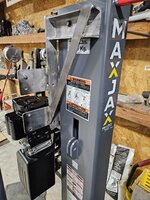
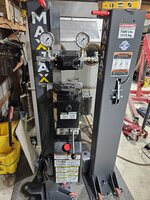
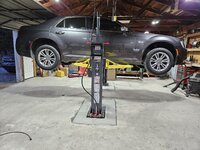
2) I wanted to mount the pump on one of the posts (it was on the wall in the old shop), but I don't want to drill new holes in the post.
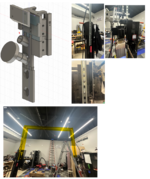
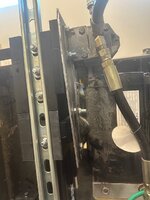
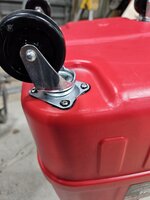
so I designed a mount in Fusion 360 that uses the existing holes in the posts (the handle and the bar that sits at the top to keep hands away from the jacks/pistons (or whatever you call the cylinders :)

Solution :

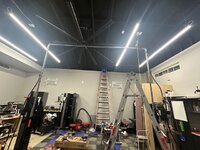
3) On one side, made mounts for uni strut so I can run about 10' high and across for the hose and I'll mount LED's on it too for additional lighting
4) on the other side, I created a cleat so I can drop the pump on
5) It's all supported by class 8 stainless hardware for extra strength

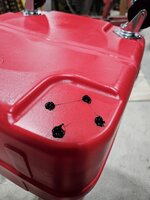
20 prototypes in PLA and final print in PETG with 4x 1 mm walls x 20% 1m infill and best of all no new holes in the lift, and 100% reversible..
I hung of the cleat and I'm 180 lbs so I figure it can handle the pump :)

I'm going to and a stubby c-clamp to the front of the pump side for "insurance" that will hold the cleat in place if the plastic fails.. but it looks great so far.

I'm working on some accessory parts now to hold the pad risers via a dovetail attachment.
 

Attachments

  • pump parts.png
    pump parts.png
    977 KB · Views: 127

Rusty67

Well-known member
Joined
Jul 28, 2007
Messages
1,294
Location
LA, CA
I don't think I could pull off something like that in tinkercad, its for children. Coincidentally a 3D modeling tool for children is just simple enough for me to be able to use it. Nice job building all that out. Can you post some of those pics individually? I'd like to take a closer look at what you have going on there.
 

realien

Well-known member
Joined
Apr 24, 2017
Messages
63
Location
Atlanta
I don't think I could pull off something like that in tinkercad, its for children. Coincidentally a 3D modeling tool for children is just simple enough for me to be able to use it. Nice job building all that out. Can you post some of those pics individually? I'd like to take a closer look at what you have going on there.
sure.. I probably need to take better pics.. I use fusion 360, did a bunch of the videos on youtube to learn it over the last few months..

the left post is just to mount the unistrut and potentially accessories like the pad risers

the right post supports unistrut and the pump on a cleat

left post with unistrut mount
IMG_3303.jpeg

right post with pump mounted on the cleat (and unistrut on the other side)
IMG_3304.jpeg

right post with unistrut

IMG_3305.jpeg

closeup of cleat and unistrut with pump mounted

IMG_3313.jpeg

cleat attached to the pump plate (that came with the silly cart thing)

cleat-on-pump-plate.png

this is the model broken out a bit..

pump-mount-model.png
 

Attachments

  • IMG_3302.jpeg
    IMG_3302.jpeg
    96.1 KB · Views: 55
  • IMG_3314.jpeg
    IMG_3314.jpeg
    83.7 KB · Views: 46
  • IMG_3315.jpeg
    IMG_3315.jpeg
    70.3 KB · Views: 54

MileHighRover

Well-known member
Joined
Mar 13, 2018
Messages
1,118
...I hung of the cleat and I'm 180 lbs so I figure it can handle the pump :)...
But the pump is 181 pounds so you're probably screwed. :lol_hitti


You're use of the Unistrut is pretty smart. Great solution. I don't have a fan so I had stainless hard lines made and ran them up, across the ceiling, and down. I had custom length hydraulic hoses made so I could ditch the factory, super stiff lines. I also mounted my power unit on the column. It's pretty clear you're way smarter than me. :bounce:
 
Last edited:

alan camby

Well-known member
Joined
Dec 3, 2011
Messages
1,566
Location
South of Indianapolis, Indiana
Looks like I am posting at the right time with the current topic of mounting the pump to the column. My concrete IS being poured on Monday so decides to tackle the mount tonight. Mine was designed in my head. I didn't add any holes, just used the 2 holes that were already in the top of the column. The newer Maxjax present an interesting problem compared to the old units. The older ones it was easy to hang the pump and valve off the back of the column. The newer units have the auto locking mechanism in the way.
Metal is 3" c-channel, 2"x3/8" flat bar, 4"x1/4" flat bar for the mounting plates, and 1-1/2"x3/16" triangulation brace.
I might add a rubber bumper to the column to absorb vivration. The mount is rock solid though. Will remove, prep, and paint next.
Enough typing. Here is what I have.
 

Attachments

  • 20240222_163837.jpg
    20240222_163837.jpg
    1.3 MB · Views: 45
  • 20240222_163852.jpg
    20240222_163852.jpg
    1.2 MB · Views: 46
  • 20240222_180017.jpg
    20240222_180017.jpg
    1 MB · Views: 42
  • 20240222_180036.jpg
    20240222_180036.jpg
    1.2 MB · Views: 55
  • 20240222_203035.jpg
    20240222_203035.jpg
    1.1 MB · Views: 58
  • 20240222_203055.jpg
    20240222_203055.jpg
    1.1 MB · Views: 62
  • 20240222_203113.jpg
    20240222_203113.jpg
    1 MB · Views: 67

realien

Well-known member
Joined
Apr 24, 2017
Messages
63
Location
Atlanta
But the pump is 181 pounds so you're probably screwed. :lol_hitti


You're use of the Unistrut is pretty smart. Great solution. I don't have a fan so I had stainless hard lines made and ran them up, across the ceiling, and down. I had custom length hydraulic hoses made so I could ditch the factory, super stiff lines. I also mounted my power unit on the column. It's pretty clear you're way smarter than me. :bounce:
Ha! If it works the way you’ve done it it’s perfect. I think I enjoy building things more than I like using the finished product ;-)
 

realien

Well-known member
Joined
Apr 24, 2017
Messages
63
Location
Atlanta
Looks like I am posting at the right time with the current topic of mounting the pump to the column. My concrete IS being poured on Monday so decides to tackle the mount tonight. Mine was designed in my head. I didn't add any holes, just used the 2 holes that were already in the top of the column. The newer Maxjax present an interesting problem compared to the old units. The older ones it was easy to hang the pump and valve off the back of the column. The newer units have the auto locking mechanism in the way.
Metal is 3" c-channel, 2"x3/8" flat bar, 4"x1/4" flat bar for the mounting plates, and 1-1/2"x3/16" triangulation brace.
I might add a rubber bumper to the column to absorb vivration. The mount is rock solid though. Will remove, prep, and paint next.
Enough typing. Here is what I have.
Mine has the auto locking, had to go on the side of the column.

What are those gauges ? Hydraulic pressure ?
 

alan camby

Well-known member
Joined
Dec 3, 2011
Messages
1,566
Location
South of Indianapolis, Indiana
Mine has the auto locking, had to go on the side of the column.

What are those gauges ? Hydraulic pressure ?
I noticed that your lift has the auto locks. The original maxjax had a bar that was used as a height lock. There have been several posts in the past of those units having the pump located on the back. I was just pointing out how the newer units required a unique approach to not hinder the operation of the auto lock.

They are gauges to measure the hydrualic pressure going to each column.
 

realien

Well-known member
Joined
Apr 24, 2017
Messages
63
Location
Atlanta
I noticed that your lift has the auto locks. The original maxjax had a bar that was used as a height lock. There have been several posts in the past of those units having the pump located on the back. I was just pointing out how the newer units required a unique approach to not hinder the operation of the auto lock.

They are gauges to measure the hydrualic pressure going to each column.
Do you have an adjustable flow valve too or is it just to monitor them ? I had to add a flow valve as one column was always faster than another but I do it by listening to when it hits the locks, the gauges looks like a worthy upgrade
 

alan camby

Well-known member
Joined
Dec 3, 2011
Messages
1,566
Location
South of Indianapolis, Indiana
Do you have an adjustable flow valve too or is it just to monitor them ? I had to add a flow valve as one column was always faster than another but I do it by listening to when it hits the locks, the gauges looks like a worthy upgrade
I am in the installation phase and haven't tested the lift yet.
My concrete footers get poured on Monday.
Have you tried bleeding the air?
 

realien

Well-known member
Joined
Apr 24, 2017
Messages
63
Location
Atlanta
I am in the installation phase and haven't tested the lift yet.
My concrete footers get poured on Monday.
Have you tried bleeding the air?
oh yes a million times, had this unit for nearly 8 years.. it had issues within about 3 years, I put the adjustable flow valve on in year 4 and its been fine, just sometimes tedious to adjust if I've moved it.. I had considered getting a new flow divider but they are not cheap and I'm not 100% convinced that's the issue..
 
Last edited:

MileHighRover

Well-known member
Joined
Mar 13, 2018
Messages
1,118
I have the M6 lift with auto locks. I mounted the pump on the backside of the column. It sits below the lock.

IMG-3757.jpg
 
Last edited:
To avoid these ads, REGISTER NOW!

alanjd93

Member
Joined
Feb 16, 2024
Messages
12
Location
Michigan
If anyone is interested in an upgrade for the flimsy stock arm lock release rings, Rotary FJ7985-1 is a much sturdier option. Tested one out off a lift from work and it fits perfect. The original ones wanted to pull apart when trying to release the arm locks, would probably be better suited as a key ring. Just ordered a set of 4 for $3.78 a piece.


alanjd93

Member
Joined
Feb 16, 2024
Messages
12
Location
Michigan
Also If you bought the older M6K early on, it's worth reading up on technical l service bulletins under the "downloads" tab on Maxjax's website. There have been a few updates since it's original release. When I bought mine in 2020 it came with TSBs 68 and 69 and updated fittings and hoses in the crate. Since then there have been four more TSBs released. The two most noteworthy are an updated safety weldment (TSB 73) which prevents the latch from hanging up, and and the addition of cylinder clamps (TSB 94) to prevent the lift cylinder from lowering past the top of the head in the case of a slow leak.
My original weldments had the hang-up issue after I first assembled it. I ended up having to debur them in a few areas with a grinder, otherwise they would intermittently not engage. It's scary when only one side of the vehicle goes down when you try to lower it on the locks. Do yourself a favor and call them up. When I called asking about them a few weeks back and they promptly sent me the updated parts at no cost. Haven't had any issues with my latches since, but the new parts will be going on regardless.
 

Rusty67

Well-known member
Joined
Jul 28, 2007
Messages
1,294
Location
LA, CA
I'd like to setup adjustable widths myself and I think I'm going to need to cut and repour part of my slab anyways as my current slab has a pit in it (previous owner) and I don't think the existing slab is thick enough anyways.
 

alan camby

Well-known member
Joined
Dec 3, 2011
Messages
1,566
Location
South of Indianapolis, Indiana
I am at day 9 on my concrete.
Got home from work a few hours early and put together my pump and flow divider valve mount. Everything worked out great. My $35 Amazon 4' hose was the perfect length to go from the left side down to the bottom of this column. I coupled the 2 maxjax hoses to run overhead.

I ended up using only one Maxjax fitting. The o-ring to JIC fitting that threads into the pump. Everything else is USA made hydraulic fittings. Hopefully I won't have any leaks when I get this running. The pressure gauges are $9.99 on Amazon. They have brass threads, so doubt they will leak at the NPT connection. The brass is thick with only a very small hole drilled in the center. Almost like they are using the little hole as a pressure snubber.
 

Attachments

  • 20240306_151510.jpg
    20240306_151510.jpg
    985.8 KB · Views: 66
  • 20240306_151517.jpg
    20240306_151517.jpg
    1.1 MB · Views: 57
  • 20240306_152341.jpg
    20240306_152341.jpg
    932.8 KB · Views: 57
  • 20240306_154623.jpg
    20240306_154623.jpg
    667.1 KB · Views: 61
  • 20240306_155107.jpg
    20240306_155107.jpg
    703.8 KB · Views: 65

alan camby

Well-known member
Joined
Dec 3, 2011
Messages
1,566
Location
South of Indianapolis, Indiana
I will try and get more pictures up in the coming days. I want to point out one item with poor quality control. I bought on of the Ranger brand (owned by Bendpak) underhoist drain pans with my lift. A few days ago I did my first oil change. The next day I went to the barn, I found that the oil pan reservoir had leaked at 3 of the 4 caster mounts.
Tonight I removed the casters, cleaned up the oil, and reinstalled with RTV. This unit ships with the casters installed. I am hoping the RTV will take care of the leak but I shouldn't have to do this on a brand new items. There are no cracks in the plastic, the oil just followed the path down the screw threads. I do believe the holes are, or at least should be, blind holes. Something was made wrong. Just a heads up to anyone that is adding this item to their Maxjax bundle.
If the RTV doesn't fix it, I will definitely be getting ahold of Maxjax.
 

Attachments

  • 20240404_155756.jpg
    20240404_155756.jpg
    1,013.3 KB · Views: 37
  • 20240404_155747.jpg
    20240404_155747.jpg
    617.8 KB · Views: 32
  • 20240404_160255.jpg
    20240404_160255.jpg
    683.2 KB · Views: 32
  • 20240404_160137.jpg
    20240404_160137.jpg
    779.4 KB · Views: 34
  • 20240404_155353.jpg
    20240404_155353.jpg
    669.9 KB · Views: 62

Rusty67

Well-known member
Joined
Jul 28, 2007
Messages
1,294
Location
LA, CA
I've not used mine yet. This makes me want to fill mine up with a gallon of water and see what happens.
 

MikeC55

Well-known member
Joined
Nov 1, 2020
Messages
418
Location
CT
Can you provide more detail on your embedded steel plates? How thick are they?, how are they anchored in the concrete? Is there something welded to the back of them that ties them into the concrete?
 

alan camby

Well-known member
Joined
Dec 3, 2011
Messages
1,566
Location
South of Indianapolis, Indiana
So far I have lifted a 2008 Ram 1500 regular cab long bed, 2017 Chrysler 300, and my 2000 1500 Silverado. I have my width at the 135" from back of mounting plate to back of mounting plate. I can't imagine going any narrower for the 3 vehicles I have lited. Getting out of the drivers door without hitting the columns is definitely a pain. Once the low Chrysler 300 is off the ground, the front doors can only be opened a few inches before the bottom of the door will hit the angle brace on the yellow lifting arms.
Both trucks have required the lifting arms to be extended all the way to reach the frame. Which is fine. I would think a vehicle with a narrow frame would require the columns to be moved. Something like a S10 or Ranger.

I have ordered 4 Vevor branded tall support stands. So far I only have received one. The quality is better than expected. I cutt about 16" out of the tube to make it work with the lower lift heights. Last picture shows the stand.

So far I am happy with the lift.
 

Attachments

  • 20240403_160201.jpg
    20240403_160201.jpg
    1 MB · Views: 58
  • 20240404_195538.jpg
    20240404_195538.jpg
    907.2 KB · Views: 61
  • 20240331_193944.jpg
    20240331_193944.jpg
    1 MB · Views: 54
  • 20240331_121406.jpg
    20240331_121406.jpg
    1.1 MB · Views: 57
  • 20240328_190205.jpg
    20240328_190205.jpg
    1.1 MB · Views: 61
  • 20240329_201723.jpg
    20240329_201723.jpg
    1.1 MB · Views: 62
  • 20240404_194443.jpg
    20240404_194443.jpg
    827 KB · Views: 61

gpeterson

Member
Joined
Mar 30, 2014
Messages
19
Why would anyone doubt the safety of a steel plate with the fasteners welded to it put into the concrete?

I'm also wondering why anyone would doubt the safety of expansion or epoxy anchors properly installed in concrete of sufficient thickness and strength. None of this is unique to MaxJax. Full height 2-post lifts are installed using the same methods.
 

NewShockerGuy

Well-known member
Joined
Oct 12, 2010
Messages
2,481
Location
Northern Virginia / DC
Do you have an adjustable flow valve too or is it just to monitor them ? I had to add a flow valve as one column was always faster than another but I do it by listening to when it hits the locks, the gauges looks like a worthy upgrade

What was the adjustable flow valve that you went with? I just got done rebuilding my original maxjax cylinders and noticed my far right side colum/cylinder lifts faster. Does your adjustable flow valve only work one way when lifting and then when you release it is full flow? Would love to see which one you used. I'm trying to decide which one/where to get it.

Thanks,
-Nigel
 

NewShockerGuy

Well-known member
Joined
Oct 12, 2010
Messages
2,481
Location
Northern Virginia / DC
I've had my maxjax now for 11-12 years, I think. It's been great 95% of the time. I just started getting some leaks a month or so back and decided with the help of Steve rebuild the cylinders. All went well!

While I had everything apart, I figured I'd drill another hole in the columns, so I'd have 5 total lifting points. I did two other holes years ago between the highest and lowest stock holes that maxjax did. And it proved to make the lift even more useful.

I wish I knew know where I would have done the holes because I could have actually spaced #4 hole down slightly and added another above it so I would have had 6 evenly spaced lifting points (it just bothers me now looking at it that everything isn't evenly spaced). But honestly, I hardly ever lift the car to the highest setting. I'm normally at either hole 1, 3 and sometimes 4.

One thing I never liked was the black resting blocks inside the columns, it was hard to see when they cleared the holes to put the safety pin in. I ended up spraying the exterior block sides red so now I can clearly see when the block has cleared the hole.

I still have to add my inline flower adjuster for the right column since it tends to lift faster. Other than that, I have a bunch of lift adapters for it, and might want to pick up the round lifting pads/plates. No issues with the square but sometimes they get in the way, where as the smaller round ones would be better.

maxjax1.jpg
maxjax2.jpg
maxjax3.jpg
maxjax4.jpg

Everything working after rebuilding both cylinders.
maxjax5.jpg

-Nigel
 
To avoid these ads, REGISTER NOW!
Top Bottom